Instructions
Page 4
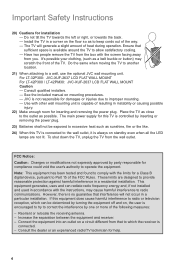
... with the screen facing away from the wall outlet. Consult qualified installers. - See the included manual on a circuit different from that sufficient space is available around the TV to operate the equipment. This equipment generates, uses and can be exposed to excessive heat such ... possible your clothing, (such as close to a wall, use the optional JVC wall mounting unit. For LT-32P300: JVC-XUF-2637 LCD FLAT WALL MOUNT For LT-42P300 / LT-42PM30: JVC-XUF-2637 LCD FLAT WALL MOUNT Caution - Place the TV as a belt buckle or button) may cause harmful interference to which can ...
... with the screen facing away from the wall outlet. Consult qualified installers. - See the included manual on a circuit different from that sufficient space is available around the TV to operate the equipment. This equipment generates, uses and can be exposed to excessive heat such ... possible your clothing, (such as close to a wall, use the optional JVC wall mounting unit. For LT-32P300: JVC-XUF-2637 LCD FLAT WALL MOUNT For LT-42P300 / LT-42PM30: JVC-XUF-2637 LCD FLAT WALL MOUNT Caution - Place the TV as a belt buckle or button) may cause harmful interference to which can ...
Instructions
Page 23
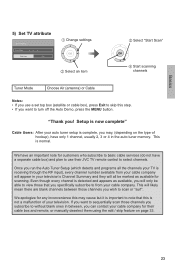
.... Basics 5) Set TV attribute Set TV Attribute Tuner Mode Air Start Scan Exit 1 Change settings OK 2 Select an item 3 Select "Start Scan" OK 4 Start scanning channels Tuner Mode Choose Air (antenna) or Cable Notes: • If you use their cable box and remote, or manually deselect them using the... edit / skip feature on page 33. 23 Once you want to select channels. We have an important note for their JVC TV remote control to turn off the Auto Demo, press the MENU button....
.... Basics 5) Set TV attribute Set TV Attribute Tuner Mode Air Start Scan Exit 1 Change settings OK 2 Select an item 3 Select "Start Scan" OK 4 Start scanning channels Tuner Mode Choose Air (antenna) or Cable Notes: • If you use their cable box and remote, or manually deselect them using the... edit / skip feature on page 33. 23 Once you want to select channels. We have an important note for their JVC TV remote control to turn off the Auto Demo, press the MENU button....
Instructions
Page 33
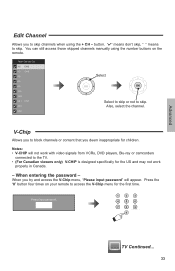
... channel. Notes: • V-CHIP will appear. When entering the password - You can still access those skipped channels manually using the + CH - Please input password: 1 2 3 4 5 6 7 8 9 RETURN + TUNE 0 TV TV Continued... 33 V-Chip Allows you to the TV. • (For Canadian viewers only) V-CHIP is designed specifically for the US and may not work with video...
... channel. Notes: • V-CHIP will appear. When entering the password - You can still access those skipped channels manually using the + CH - Please input password: 1 2 3 4 5 6 7 8 9 RETURN + TUNE 0 TV TV Continued... 33 V-Chip Allows you to the TV. • (For Canadian viewers only) V-CHIP is designed specifically for the US and may not work with video...
Instructions
Page 42
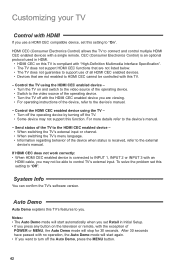
... CEC does not work correctly: • When HDMI CEC enabled device is received, refer to the external device's manual. For more details refer to the device's manual. - Customizing your TV Control with HDMI If you use of all HDMI CEC enabled devices. • Devices that are not enabled to HDMI... device you are viewing. • For operating instructions of the operating device. • Turn the TV off the Auto Demo, press the MENU button. 42 Control the TV using the TV - • Turn off the operating device by turning off the TV. • Some device may not be controlled with this...
... CEC does not work correctly: • When HDMI CEC enabled device is received, refer to the external device's manual. For more details refer to the device's manual. - Customizing your TV Control with HDMI If you use of all HDMI CEC enabled devices. • Devices that are not enabled to HDMI... device you are viewing. • For operating instructions of the operating device. • Turn the TV off the Auto Demo, press the MENU button. 42 Control the TV using the TV - • Turn off the operating device by turning off the TV. • Some device may not be controlled with this...
Instructions
Page 46
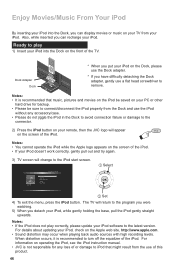
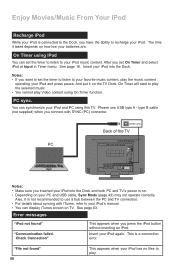
... audio sources with high recording levels. Ready to play correctly, please update your iPod doesn't work correctly, gently pull out and try again. 3) TV screen will appear iPod on the screen of or damage to iPod that music, pictures and movies on the iPod be saved on the screen...Set 4) To exit the menu, press the iPod button. For details about updating your iPod, check on operating the iPod, see the iPod instruction manual. • JVC is recommended to turn off the equalizer of the iPod. • If your iPod software to the iPod start screen. Also, while inserted you have...
... audio sources with high recording levels. Ready to play correctly, please update your iPod doesn't work correctly, gently pull out and try again. 3) TV screen will appear iPod on the screen of or damage to iPod that music, pictures and movies on the iPod be saved on the screen...Set 4) To exit the menu, press the iPod button. For details about updating your iPod, check on operating the iPod, see the iPod instruction manual. • JVC is recommended to turn off the equalizer of the iPod. • If your iPod software to the iPod start screen. Also, while inserted you have...
Instructions
Page 50
...it on how low your iPod and PC using this TV. Check Connection" This appears when you connect with iTunes, refer to your iPod's manual. • You can display iTunes screen on your... PC and USB cable, Sync Mode (page 43) may not operate correctly. Insert your iPod into the Dock and both PC and TV's power is on. • Depending on TV... iPod button without inserting an iPod. See page 63. Please use a hub between the PC and TV connection. • For details about syncing with SYNC (PC) connector. This is a connection error....
...it on how low your iPod and PC using this TV. Check Connection" This appears when you connect with iTunes, refer to your iPod's manual. • You can display iTunes screen on your... PC and USB cable, Sync Mode (page 43) may not operate correctly. Insert your iPod into the Dock and both PC and TV's power is on. • Depending on TV... iPod button without inserting an iPod. See page 63. Please use a hub between the PC and TV connection. • For details about syncing with SYNC (PC) connector. This is a connection error....
Instructions
Page 51
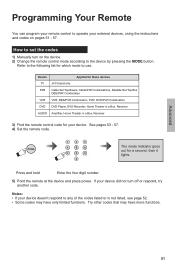
...TV The mode indicator goes out for which mode to the device by pressing the MODE button. Press and hold Enter the four digit number 5) Point the remote at the device and press power. Notes: • If your device did not turn on pages 51 - 57. How to set the codes 1) Manually... only limited functions. Advanced Programming Your Remote You can program your remote control to operate your device. Device Applied for these devices TV JVC brand only STB Cable Set Top Boxes, Cable/PVR Combinations, Satellite Set Top Box DBS/PVR Combination VCR VCR, DBS/PVR Combination...
...TV The mode indicator goes out for which mode to the device by pressing the MODE button. Press and hold Enter the four digit number 5) Point the remote at the device and press power. Notes: • If your device did not turn on pages 51 - 57. How to set the codes 1) Manually... only limited functions. Advanced Programming Your Remote You can program your remote control to operate your device. Device Applied for these devices TV JVC brand only STB Cable Set Top Boxes, Cable/PVR Combinations, Satellite Set Top Box DBS/PVR Combination VCR VCR, DBS/PVR Combination...
Instructions
Page 52
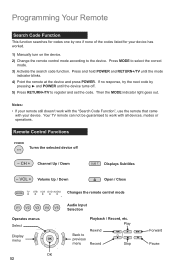
...Code Function", use the remote that came with all devices, modes or operations. Remote Control Functions POWER Turns the selected device off . 5) Press RETURN+/TV to register and set the code. Play Back to select the correct mode. 3) Activate the search code function. Then the MODE indicator light goes out...Subtitles - Programming Your Remote Search Code Function This function searches for codes one if none of the codes listed for your device has worked. 1) Manually turn on the device. 2) Change the remote control mode according to the device. VOL + Volume Up / Down Open / Close MODE...
...Code Function", use the remote that came with all devices, modes or operations. Remote Control Functions POWER Turns the selected device off . 5) Press RETURN+/TV to register and set the code. Play Back to select the correct mode. 3) Activate the search code function. Then the MODE indicator light goes out...Subtitles - Programming Your Remote Search Code Function This function searches for codes one if none of the codes listed for your device has worked. 1) Manually turn on the device. 2) Change the remote control mode according to the device. VOL + Volume Up / Down Open / Close MODE...
Instructions
Page 58
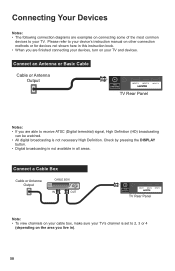
...book. • When you live in). 58 Connect an Antenna or Basic Cable Cable or Antenna Output 75 Ω (VHF/UHF) INPUT 1 INPUT 2 INPUT 3 TV Rear Panel Notes: • If you are finished connecting your devices, turn on the area you are able to receive ATSC (Digital terrestrial) signal, High... Definition (HD) broadcasting can be watched. • All digital broadcasting is set to your device's instruction manual on other connection methods or for devices not shown here in all areas. Please refer to 2, 3 or 4 (depending on your...
...book. • When you live in). 58 Connect an Antenna or Basic Cable Cable or Antenna Output 75 Ω (VHF/UHF) INPUT 1 INPUT 2 INPUT 3 TV Rear Panel Notes: • If you are finished connecting your devices, turn on the area you are able to receive ATSC (Digital terrestrial) signal, High... Definition (HD) broadcasting can be watched. • All digital broadcasting is set to your device's instruction manual on other connection methods or for devices not shown here in all areas. Please refer to 2, 3 or 4 (depending on your...

Instructions
Page 60
Connecting Your Devices Connect an Amplifier or Home Theater System TV Rear Panel (AUDIO OUT) Amplifier or Home Theater System Speaker Speaker Notes: • Refer to your amplifier's manual for more information. • This terminal can not output sound from your DIGITAL AUDIO OPTICAL OUT connection if ...the audio source is from the AUDIO OUT on the back of the TV otherwise. Connect an Amplifier using the DIGITAL AUDIO...
Connecting Your Devices Connect an Amplifier or Home Theater System TV Rear Panel (AUDIO OUT) Amplifier or Home Theater System Speaker Speaker Notes: • Refer to your amplifier's manual for more information. • This terminal can not output sound from your DIGITAL AUDIO OPTICAL OUT connection if ...the audio source is from the AUDIO OUT on the back of the TV otherwise. Connect an Amplifier using the DIGITAL AUDIO...
Instructions
Page 62
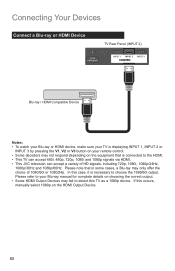
... including 720p, 1080i, 1080p/24Hz, 1080p/30Hz and 1080p/60Hz. If this TV as a 1080p device. Please note that is connected to the HDMI. • This TV can accept 480i, 480p, 720p, 1080i and 1080p signals via HDMI. • This JVC television can accept a variety of 1080/60i or 1080/24p. Please refer... / HDMI Compatible Device Notes: • To watch your Blu-ray or HDMI device, make sure your TV is displaying INPUT 1, INPUT 2 or INPUT 3 by pressing the V1, V2 or V3 button on your Blu-ray manual for complete details on choosing the correct output. • Some HDMI Output Devices may fail to...
... including 720p, 1080i, 1080p/24Hz, 1080p/30Hz and 1080p/60Hz. If this TV as a 1080p device. Please note that is connected to the HDMI. • This TV can accept 480i, 480p, 720p, 1080i and 1080p signals via HDMI. • This JVC television can accept a variety of 1080/60i or 1080/24p. Please refer... / HDMI Compatible Device Notes: • To watch your Blu-ray or HDMI device, make sure your TV is displaying INPUT 1, INPUT 2 or INPUT 3 by pressing the V1, V2 or V3 button on your Blu-ray manual for complete details on choosing the correct output. • Some HDMI Output Devices may fail to...
Instructions
Page 63
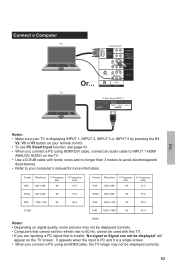
...remote control. • To use PC Smart Input function, see page 43. • When you connect a PC using an HDMI cable, the TV image may not be displayed" will appear on signal quality, some pictures may not be displayed correctly. 63 Format VGA Resolution 640 x 480 V. ... Ω (VHF/UHF) INPUT 1 INPUT 2 INPUT 3 Notes: • Make sure your TV is invalid, "No signal or Signal can not be displayed correctly. • Computers that cannot set the refresh rate to your computer's manual for more information. Frequency (kHz) 31.5 Format VGA Resolution 640 x 480 V. Or... Frequency ...
...remote control. • To use PC Smart Input function, see page 43. • When you connect a PC using an HDMI cable, the TV image may not be displayed" will appear on signal quality, some pictures may not be displayed correctly. 63 Format VGA Resolution 640 x 480 V. ... Ω (VHF/UHF) INPUT 1 INPUT 2 INPUT 3 Notes: • Make sure your TV is invalid, "No signal or Signal can not be displayed correctly. • Computers that cannot set the refresh rate to your computer's manual for more information. Frequency (kHz) 31.5 Format VGA Resolution 640 x 480 V. Or... Frequency ...


