
Instructions
Page 7
...Picture Settings 38 Adjust Picture Settings 38 Color Temperature 39 Digital Noise Clear 39 Natural Cinema 39 Reset 40 Sound Adjust 41 Sound Settings 41 Adjust Sound Settings 41 MTS (Multi-channel Sound 41 Reset 41 Clock Timers 42 Set Clock 42 On/Off Timer 43 Button Functions 44 Power 44 ...45 Input 45 Display 46 Sleep Timer 46 Sound 47 Video Status 47 TheaterPro D6500K 47 OK 47 Back 47 Aspect 48 Aspect Ratios 48 TV/CATV Slide Switch 49 VCR/DVD Slide Switch 49 VCR Buttons 49 DVD Buttons 49 Appendices 50 No Program 50 Troubleshooting 51 Warranty 52 Authorized...
...Picture Settings 38 Adjust Picture Settings 38 Color Temperature 39 Digital Noise Clear 39 Natural Cinema 39 Reset 40 Sound Adjust 41 Sound Settings 41 Adjust Sound Settings 41 MTS (Multi-channel Sound 41 Reset 41 Clock Timers 42 Set Clock 42 On/Off Timer 43 Button Functions 44 Power 44 ...45 Input 45 Display 46 Sleep Timer 46 Sound 47 Video Status 47 TheaterPro D6500K 47 OK 47 Back 47 Aspect 48 Aspect Ratios 48 TV/CATV Slide Switch 49 VCR/DVD Slide Switch 49 VCR Buttons 49 DVD Buttons 49 Appendices 50 No Program 50 Troubleshooting 51 Warranty 52 Authorized...

Instructions
Page 12
... rate of five channels per second. The Remote Control Before you change the batteries, try to install the batteries (included). When you can be reset. VOL + CH - The channels will zip by pressing the POWER button at the center of the remote control to control a VCR. The ...right and left buttons will scan forward and back through the channels using JVC's Hyperscan feature, press and hold CH+ or CH-. POWER TV CATV V V VCR DVD 12 To use the onscreen menus, press the MENU button. Insert two batteries (included) ...
... rate of five channels per second. The Remote Control Before you change the batteries, try to install the batteries (included). When you can be reset. VOL + CH - The channels will zip by pressing the POWER button at the center of the remote control to control a VCR. The ...right and left buttons will scan forward and back through the channels using JVC's Hyperscan feature, press and hold CH+ or CH-. POWER TV CATV V V VCR DVD 12 To use the onscreen menus, press the MENU button. Insert two batteries (included) ...

Instructions
Page 25
...03 Onscreen Menus INITIAL SETUP PREVIOUS LANGUAGE ENG. NOISE CLEAR NATURAL CINEMA LOW OFF AUTO Note: • When the Menu button on the TV side panel is pressed, the FRONT PANEL CONTROL menu between INITIAL SETUP 03 and PICTURE ADJUST will appear. CLOSED CAPTION AUTO SHUT OFF OFF... POWER INDICATOR ON OFF OFF NEXT PAGE SELECT OPERATE (1/3) MENU EXIT INITIAL SETUP 01 CLOCK / TIMERS PREVIOUS SET CLOCK ON / OFF TIMER RESET NEXT PAGE SELECT OPERATE (2/2) MENU EXIT PICTURE ADJUST 02 NEXT PAGE SELECT OPERATE MENU EXIT CLOCK/TIMERS SOUND ADJUST PREVIOUS BASS 00 TREBLE 00 ...
...03 Onscreen Menus INITIAL SETUP PREVIOUS LANGUAGE ENG. NOISE CLEAR NATURAL CINEMA LOW OFF AUTO Note: • When the Menu button on the TV side panel is pressed, the FRONT PANEL CONTROL menu between INITIAL SETUP 03 and PICTURE ADJUST will appear. CLOSED CAPTION AUTO SHUT OFF OFF... POWER INDICATOR ON OFF OFF NEXT PAGE SELECT OPERATE (1/3) MENU EXIT INITIAL SETUP 01 CLOCK / TIMERS PREVIOUS SET CLOCK ON / OFF TIMER RESET NEXT PAGE SELECT OPERATE (2/2) MENU EXIT PICTURE ADJUST 02 NEXT PAGE SELECT OPERATE MENU EXIT CLOCK/TIMERS SOUND ADJUST PREVIOUS BASS 00 TREBLE 00 ...
Instructions
Page 33
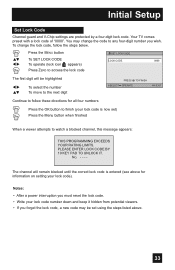
...) Press ZERO to watch a blocked channel, this message appears: THIS PROGRAMMING EXCEEDS YOUR RATING LIMITS. Notes: • After a power interruption you must reset the lock code. • Write your lock code is entered (see above . 33 You may change the lock code, follow these directions for information ...on setting your lock code). Your TV comes preset with a lock code of "0000". Initial Setup Set Lock Code Channel guard and V-Chip settings are protected by a four-digit lock...
...) Press ZERO to watch a blocked channel, this message appears: THIS PROGRAMMING EXCEEDS YOUR RATING LIMITS. Notes: • After a power interruption you must reset the lock code. • Write your lock code is entered (see above . 33 You may change the lock code, follow these directions for information ...on setting your lock code). Your TV comes preset with a lock code of "0000". Initial Setup Set Lock Code Channel guard and V-Chip settings are protected by a four-digit lock...

Instructions
Page 36
... MENU button when finished INITIAL SETUP PREVIOUS NOISE MUTING FRONT PANEL LOCK POSITION ADJUSTMENT POWER INDICATOR ON OFF OFF You can turn ON/OFF the TV, press the power button for more than 3 seconds. This feature will appear. Press the MENU button π† To POSITION ADJUSTMENT &#...8730;® To enter π†√® To adjust the position Press the MENU button to finish Notes: OPERATE OK RESET MENU EXIT • To reset the adjustment to the center, press the OK button. • When the arrow disappears, while you are adjusting the position, the...
... MENU button when finished INITIAL SETUP PREVIOUS NOISE MUTING FRONT PANEL LOCK POSITION ADJUSTMENT POWER INDICATOR ON OFF OFF You can turn ON/OFF the TV, press the power button for more than 3 seconds. This feature will appear. Press the MENU button π† To POSITION ADJUSTMENT &#...8730;® To enter π†√® To adjust the position Press the MENU button to finish Notes: OPERATE OK RESET MENU EXIT • To reset the adjustment to the center, press the OK button. • When the arrow disappears, while you are adjusting the position, the...
Instructions
Page 39
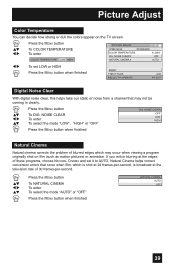
NOISE CLEAR To enter To select the mode "LOW", "HIGH" or "OFF" DIG. NOISE CLEAR NATURAL CINEMA LOW OFF AUTO RESET NEXT PAGE SELECT OPERATE (2/2) MENU EXIT Digital Noise Clear With digital noise clear, this helps take our static or noise from a channel that occur when ... MENU button when finished NATURAL CINEMA AUTO OFF 39 Natural Cinema helps correct conversion errors that may occur when viewing a program originally shot on the TV screen. π† √® √® Press the MENU button To COLOR TEMPERATURE To enter COLOR TEMPERATURE LOW HIGH To set it to AUTO...
NOISE CLEAR To enter To select the mode "LOW", "HIGH" or "OFF" DIG. NOISE CLEAR NATURAL CINEMA LOW OFF AUTO RESET NEXT PAGE SELECT OPERATE (2/2) MENU EXIT Digital Noise Clear With digital noise clear, this helps take our static or noise from a channel that occur when ... MENU button when finished NATURAL CINEMA AUTO OFF 39 Natural Cinema helps correct conversion errors that may occur when viewing a program originally shot on the TV screen. π† √® √® Press the MENU button To COLOR TEMPERATURE To enter COLOR TEMPERATURE LOW HIGH To set it to AUTO...

Instructions
Page 40
NOISE CLEAR NATURAL CINEMA LOW OFF AUTO RESET NEXT PAGE SELECT OPERATE (2/2) MENU EXIT 40 noise clear) at once to the default settings. π† √® Press the MENU button To RESET To enter The onscreen menu disappears for a moment, and then the settings are reset to the default setting for all picture adjustments (tint, color, picture, bright, detail, color temperature and dig. Press the MENU button when finished PICTURE ADJUST PREVIOUS STANDARD COLOR TEMPERATURE DIG. Picture Adjust Reset Reset resets all the picture adjustments.
NOISE CLEAR NATURAL CINEMA LOW OFF AUTO RESET NEXT PAGE SELECT OPERATE (2/2) MENU EXIT 40 noise clear) at once to the default settings. π† √® Press the MENU button To RESET To enter The onscreen menu disappears for a moment, and then the settings are reset to the default setting for all picture adjustments (tint, color, picture, bright, detail, color temperature and dig. Press the MENU button when finished PICTURE ADJUST PREVIOUS STANDARD COLOR TEMPERATURE DIG. Picture Adjust Reset Reset resets all the picture adjustments.
Instructions
Page 41
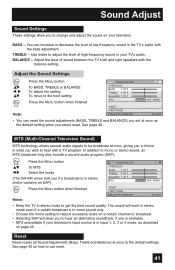
... Press the MENU button when finished Notes: SOUND ADJUST PREVIOUS BASS 00 TREBLE 00 BALANCE 00 MTS STEREO SAP MONO RESET NEXT PAGE SELECT OPERATE MENU EXIT • Keep the TV in stereo mode to mono or stereo sound, an MTS broadcast may also include a second audio program (SAP).... TREBLE and BALANCE) you set at once to adjust the level of high-frequency sound in the TV's audio with the balance setting. Adjust the level of low-frequency sound in your TV's audio. Reset Reset resets all Sound Adjustments (Bass, Treble and Balance) at once as described on page 45. BALANCE -...
... Press the MENU button when finished Notes: SOUND ADJUST PREVIOUS BASS 00 TREBLE 00 BALANCE 00 MTS STEREO SAP MONO RESET NEXT PAGE SELECT OPERATE MENU EXIT • Keep the TV in stereo mode to mono or stereo sound, an MTS broadcast may also include a second audio program (SAP).... TREBLE and BALANCE) you set at once to adjust the level of high-frequency sound in the TV's audio with the balance setting. Adjust the level of low-frequency sound in your TV's audio. Reset Reset resets all Sound Adjustments (Bass, Treble and Balance) at once as described on page 45. BALANCE -...
Instructions
Page 42
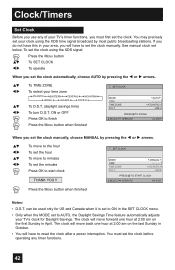
...SET CLOCK To operate When you do not have this in October. • You will have to reset the clock after a power interruption. The clock will move forward one hour at 2:00 am on the... You must first set the clock. Clock/Timers Set Clock Before you use any of your TV's timer functions, you must set the clock before operating any timer functions. 42 ATLANTIC ON ... D.S.T. SET CLOCK MODE TIME TIME ZONE D.S.T. AUTO -- : -- -- See manual clock set your TV's clock for Daylight Savings. ATLANTIC ON PRESS OK TO START CLOCK SELECT OPERATE MENU EXIT Press the MENU button ...
...SET CLOCK To operate When you do not have this in October. • You will have to reset the clock after a power interruption. The clock will move forward one hour at 2:00 am on the... You must first set the clock. Clock/Timers Set Clock Before you use any of your TV's timer functions, you must set the clock before operating any timer functions. 42 ATLANTIC ON ... D.S.T. SET CLOCK MODE TIME TIME ZONE D.S.T. AUTO -- : -- -- See manual clock set your TV's clock for Daylight Savings. ATLANTIC ON PRESS OK TO START CLOCK SELECT OPERATE MENU EXIT Press the MENU button ...
Instructions
Page 43
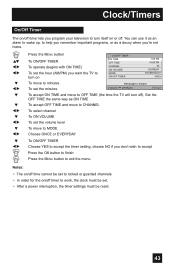
...MENU button To ON/OFF TIMER To operate (begins with ON TIME) To set the hour (AM/PM) you want the TV to turn on ON/OFF TIMER ON TIME OFF TIME CHANNEL ON VOLUME MODE ON/OFF TIMER 7:00 PM 10:00 PM ...03 CURRENT EVERYDAY NO To move to OFF TIME (the time the TV will turn itself on or off. You can use it as an alarm to wake up, to help you remember important... TIME and move to minutes To set . • After a power interruption, the timer settings must be reset. 43 Clock/Timers On/Off Timer The on/off timer lets you program your television to turn off).
...MENU button To ON/OFF TIMER To operate (begins with ON TIME) To set the hour (AM/PM) you want the TV to turn on ON/OFF TIMER ON TIME OFF TIME CHANNEL ON VOLUME MODE ON/OFF TIMER 7:00 PM 10:00 PM ...03 CURRENT EVERYDAY NO To move to OFF TIME (the time the TV will turn itself on or off. You can use it as an alarm to wake up, to help you remember important... TIME and move to minutes To set . • After a power interruption, the timer settings must be reset. 43 Clock/Timers On/Off Timer The on/off timer lets you program your television to turn off).
Instructions
Page 47
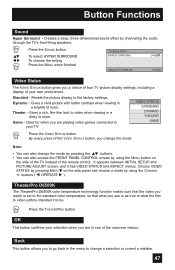
...Creates a deep, three-dimensional sound effect by using the MENU button on the side panel and choose a mode by channeling the audio through the TV's front-firing speakers. π† √® Press the SOUND button To select HYPER SURROUND To choose the setting Press the MENU when ... it to your own preferences. Note: • You can also change a selection or correct a mistake. 47 Resets the picture display to video when viewing in one of your TV. Gives a vivid picture with better contrast when viewing in the menu to video editors intended it has VIDEO STATUS and...
...Creates a deep, three-dimensional sound effect by using the MENU button on the side panel and choose a mode by channeling the audio through the TV's front-firing speakers. π† √® Press the SOUND button To select HYPER SURROUND To choose the setting Press the MENU when ... it to your own preferences. Note: • You can also change a selection or correct a mistake. 47 Resets the picture display to video when viewing in one of your TV. Gives a vivid picture with better contrast when viewing in the menu to video editors intended it has VIDEO STATUS and...

Instructions
Page 51
...; The Video Status mode may be damaged, disconnected or turned. There are lines across the picture • There could be interference from the TV. Adjust your antenna position. Unless crackling sounds the sound or picture become unplugged. • Perhaps the On/Off Timer is set improperly. Troubleshooting...settings are working and properly installed. • Make sure the remote has a clear sight path to see if the Sleep Timer was not reset. The clock is snowy (image noise) • Your antenna may be turned to feel static electricity if you brush or touch the screen....
...; The Video Status mode may be damaged, disconnected or turned. There are lines across the picture • There could be interference from the TV. Adjust your antenna position. Unless crackling sounds the sound or picture become unplugged. • Perhaps the On/Off Timer is set improperly. Troubleshooting...settings are working and properly installed. • Make sure the remote has a clear sight path to see if the Sleep Timer was not reset. The clock is snowy (image noise) • Your antenna may be turned to feel static electricity if you brush or touch the screen....


