Instruction Manual
Page 67
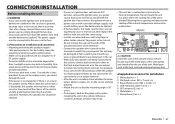
... a power source with a constant voltage supply, such as the heat sink and enclosure become hot. ❏❏Supplied accessories for installation 1 Wiring harness × 1 2 Flat head screws (M5 × 7 mm) × 6 3 Round head screws (M5 × 6 mm) × 6 4 USB extension cable (1.0 m) × 1 5 GPS antenna (3.5... lamps, blinkers, wipers, etc. CONNECTION/INSTALLATION Before installing the unit ◊ WARNING • If you connect the ignition wire (red) and the battery wire (yellow) to the car chassis (ground), you may cause a short circuit, that the mounting angle is 30° ...
... a power source with a constant voltage supply, such as the heat sink and enclosure become hot. ❏❏Supplied accessories for installation 1 Wiring harness × 1 2 Flat head screws (M5 × 7 mm) × 6 3 Round head screws (M5 × 6 mm) × 6 4 USB extension cable (1.0 m) × 1 5 GPS antenna (3.5... lamps, blinkers, wipers, etc. CONNECTION/INSTALLATION Before installing the unit ◊ WARNING • If you connect the ignition wire (red) and the battery wire (yellow) to the car chassis (ground), you may cause a short circuit, that the mounting angle is 30° ...

Instruction Manual
Page 68
...remove the key from the car 2 or 3 Car Bracket 2 or 3 • Select the appropriate type of the wiring harness. 4 Connect the wiring harness wires in the following order: ground, battery, ignition. 5 Connect the wiring harness connector to the unit. 6 Install the unit in your car. • Make sure that the unit is unstable, it... the unit using the mounting bracket removed from the ignition and disconnect the " battery. 2 Make the proper input and output wire connections for each unit. 3 Connect the speaker wires of screw for the mounting bracket: flat head (2) or round head (3). 68
...remove the key from the car 2 or 3 Car Bracket 2 or 3 • Select the appropriate type of the wiring harness. 4 Connect the wiring harness wires in the following order: ground, battery, ignition. 5 Connect the wiring harness connector to the unit. 6 Install the unit in your car. • Make sure that the unit is unstable, it... the unit using the mounting bracket removed from the ignition and disconnect the " battery. 2 Make the proper input and output wire connections for each unit. 3 Connect the speaker wires of screw for the mounting bracket: flat head (2) or round head (3). 68

Instruction Manual
Page 69
... cable come out from the tab. PRK SW Connect to the vehicle's parking brake detection switch harness. • For best safety, be sure to the vehicle's reverse lamp harness when using the optional power amplifier, connect to its power control terminal. ILLUMI REVERSE To car ... (right) Purple Purple with black stripe Ignition key switch Fuse box Battery (ACC) (BATT) To car chassis (GND) Red (Ignition wire) Yellow (Battery wire) Black (Ground wire) Connect the USB extension cable (4). (Page 70) Connect SiriusXM Connect Vehicle Tuner (commercially available). (Page 71) 15 A fuse Light ...
... cable come out from the tab. PRK SW Connect to the vehicle's parking brake detection switch harness. • For best safety, be sure to the vehicle's reverse lamp harness when using the optional power amplifier, connect to its power control terminal. ILLUMI REVERSE To car ... (right) Purple Purple with black stripe Ignition key switch Fuse box Battery (ACC) (BATT) To car chassis (GND) Red (Ignition wire) Yellow (Battery wire) Black (Ground wire) Connect the USB extension cable (4). (Page 70) Connect SiriusXM Connect Vehicle Tuner (commercially available). (Page 71) 15 A fuse Light ...


