Instructions
Page 2
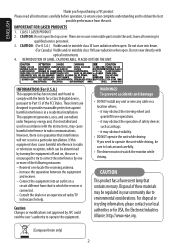
... service personnel. 3. WARNINGS: To prevent accidents and damage • DO NOT install any unit or wire any cable in accordance with optical instruments. 4. CAUTION: Do not open the top cover. it may cause harmful interference to radio communications. ENGLISH Thank you need to operate the unit while driving, be sure to look around carefully. • The driver must not watch the monitor while driving. Connect...
... service personnel. 3. WARNINGS: To prevent accidents and damage • DO NOT install any unit or wire any cable in accordance with optical instruments. 4. CAUTION: Do not open the top cover. it may cause harmful interference to radio communications. ENGLISH Thank you need to operate the unit while driving, be sure to look around carefully. • The driver must not watch the monitor while driving. Connect...
Instructions
Page 3
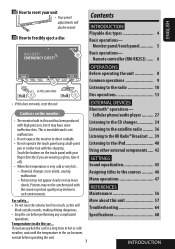
... touch panel using a ball-point pen or similar tool with your unit • Your preset adjustments will block outside sounds, making driving dangerous. Chemical changes occur inside the car... More about this unit 57 • Do not raise the volume level too much, as this does not work, reset the unit. Temperature inside , causing malfunction. - Touch the buttons on the monitor: EXTERNAL DEVICES Bluetooth® operations- Pictures may not be erased. EMERGENCY EJECT...
... touch panel using a ball-point pen or similar tool with your unit • Your preset adjustments will block outside sounds, making driving dangerous. Chemical changes occur inside the car... More about this unit 57 • Do not raise the volume level too much, as this does not work, reset the unit. Temperature inside , causing malfunction. - Touch the buttons on the monitor: EXTERNAL DEVICES Bluetooth® operations- Pictures may not be erased. EMERGENCY EJECT...
Instructions
Page 7
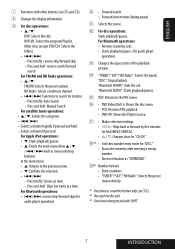
... a wrong number. • Does not function as a number button only (see o ). *2 Not used for this unit. *3 Functions when pressed with other buttons (see i and o). 8 Changes the display information. 9 For disc operations: • 5 / ∞: DVD: Selects the title. DVD-VR: Selects the program/Playlist. For Apple iPod operations: • ∞: Starts playback/pauses • 5: Enters the main menu (then 5 / ∞ / 4 / ¢ work as menu selecting buttons). Press briefly: Selects an item. - "Bluetooth AUDIO": Starts...
... a wrong number. • Does not function as a number button only (see o ). *2 Not used for this unit. *3 Functions when pressed with other buttons (see i and o). 8 Changes the display information. 9 For disc operations: • 5 / ∞: DVD: Selects the title. DVD-VR: Selects the program/Playlist. For Apple iPod operations: • ∞: Starts playback/pauses • 5: Enters the main menu (then 5 / ∞ / 4 / ¢ work as menu selecting buttons). Press briefly: Selects an item. - "Bluetooth AUDIO": Starts...
Instructions
Page 9
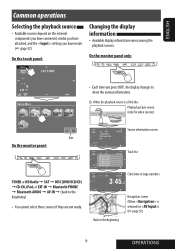
Playback picture screen (only for ) (☞ page 52) 9 OPERATIONS Ex. When the playback source is selected for video sources) Source information screen Exit Track list TUNER or HD Radio = SAT = DISC (DVD/VCD/CD) =CD-CH, iPod, or EXT-IN = Bluetooth PHONE = Bluetooth AUDIO = AV-IN = (back to show the various information. ENGLISH Common operations Selecting the playback source • Available sources depend on the external components you have connected, media you have...
Playback picture screen (only for ) (☞ page 52) 9 OPERATIONS Ex. When the playback source is selected for video sources) Source information screen Exit Track list TUNER or HD Radio = SAT = DISC (DVD/VCD/CD) =CD-CH, iPod, or EXT-IN = Bluetooth PHONE = Bluetooth AUDIO = AV-IN = (back to show the various information. ENGLISH Common operations Selecting the playback source • Available sources depend on the external components you have connected, media you have...
Instructions
Page 25
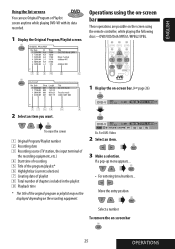
... on-screen bar These operations are possible on the screen using the remote controller, while playing the following discs-DVD/VCD/DivX/MPEG1/MPEG2/JPEG. 1 Display the on the recording equipment. Ex. ENGLISH Using the list screens You can use Original Program or Playlist screen anytime while playing DVD-VR with its data recorded. 1 Display the Original Program/Playlist screen. If a pop-up menu appears... • For entering time/numbers... : Move the entry position : Select a number To remove...
... on-screen bar These operations are possible on the screen using the remote controller, while playing the following discs-DVD/VCD/DivX/MPEG1/MPEG2/JPEG. 1 Display the on the recording equipment. Ex. ENGLISH Using the list screens You can use Original Program or Playlist screen anytime while playing DVD-VR with its data recorded. 1 Display the Original Program/Playlist screen. If a pop-up menu appears... • For entering time/numbers... : Move the entry position : Select a number To remove...
Instructions
Page 27
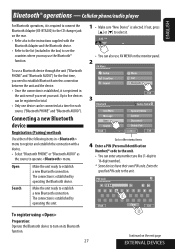
... time, you need to establish Bluetooth wireless connection between the unit and the device. • Once the connection is established by operating the Bluetooth device. ENGLISH Bluetooth® operations - Enter the specified PIN code to turn on its Bluetooth function. 27 Continued on the rear. • Refer also to the instructions supplied with a device. • Select "Bluetooth PHONE" or "Bluetooth AUDIO" as the source to establish a new Bluetooth connection. To use a Bluetooth device through the unit ("Bluetooth PHONE" and "Bluetooth AUDIO") for each source ("Bluetooth...
... time, you need to establish Bluetooth wireless connection between the unit and the device. • Once the connection is established by operating the Bluetooth device. ENGLISH Bluetooth® operations - Enter the specified PIN code to turn on its Bluetooth function. 27 Continued on the rear. • Refer also to the instructions supplied with a device. • Select "Bluetooth PHONE" or "Bluetooth AUDIO" as the source to establish a new Bluetooth connection. To use a Bluetooth device through the unit ("Bluetooth PHONE" and "Bluetooth AUDIO") for each source ("Bluetooth...

Instructions
Page 29
... message displayed on the monitor panel. ! Using the Bluetooth cellular phone ENGLISH Sound mode (☞ page 45) The Bluetooth icon lights up when the adapter is connected. ☞ page 31 *1 Status of the device Signal strength/Battery remainder (only when the information comes from the device) Adjust the volume of the other sources. ~ Press [SOURCE], then press [Bluetooth PHONE]. (☞ page 9) • You can be registered.) *1 When a cellular phone with a device, then make a call (or settings using menu...
... message displayed on the monitor panel. ! Using the Bluetooth cellular phone ENGLISH Sound mode (☞ page 45) The Bluetooth icon lights up when the adapter is connected. ☞ page 31 *1 Status of the device Signal strength/Battery remainder (only when the information comes from the device) Adjust the volume of the other sources. ~ Press [SOURCE], then press [Bluetooth PHONE]. (☞ page 9) • You can be registered.) *1 When a cellular phone with a device, then make a call (or settings using menu...
Instructions
Page 33
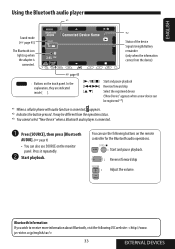
... Bluetooth audio player *1 Sound mode (☞ page 45) The Bluetooth icon lights up when the adapter is connected. ~ Press [SOURCE], then press [Bluetooth AUDIO]. (☞ page 9) • You can also use the following JVC web site: 33 EXTERNAL DEVICES Press it repeatedly. Ÿ Start playback. Bluetooth Information: If you wish to receive more information about Bluetooth, visit the following buttons on the remote controller for the Bluetooth audio operations. : Start and pause playback. : Reverse/forward skip : Adjust...
... Bluetooth audio player *1 Sound mode (☞ page 45) The Bluetooth icon lights up when the adapter is connected. ~ Press [SOURCE], then press [Bluetooth AUDIO]. (☞ page 9) • You can also use the following JVC web site: 33 EXTERNAL DEVICES Press it repeatedly. Ÿ Start playback. Bluetooth Information: If you wish to receive more information about Bluetooth, visit the following buttons on the remote controller for the Bluetooth audio operations. : Start and pause playback. : Reverse/forward skip : Adjust...
Instructions
Page 42
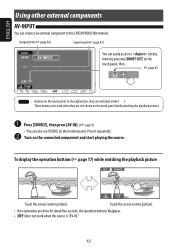
... 9) • You can also use SOURCE on the monitor panel. ENGLISH Using other external components AV-INPUT You can connect an external component to setting menu by pressing [SHORT CUT] on the touch panel, then... ☞ page 45 : Buttons on the touch panel. To display the operation buttons (☞ page 17) while watching the playback picture Touch the screen (center portion). Assigned title (☞ page 46) Sound mode (☞ page 45) You...
... 9) • You can also use SOURCE on the monitor panel. ENGLISH Using other external components AV-INPUT You can connect an external component to setting menu by pressing [SHORT CUT] on the touch panel, then... ☞ page 45 : Buttons on the touch panel. To display the operation buttons (☞ page 17) while watching the playback picture Touch the screen (center portion). Assigned title (☞ page 46) Sound mode (☞ page 45) You...
Instructions
Page 43
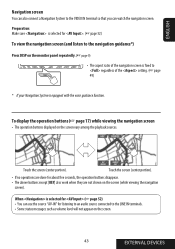
... viewing the navigation screen). Touch the screen (center portion). • If no operations are done for about five seconds, the operation buttons disappear. • The above buttons except [KEY] also work when they are not shown on the screen vary among the playback sources. Preparation: Make sure is selected for listening to an audio source connected to the LINE IN terminals. • Some status messages such as volume...
... viewing the navigation screen). Touch the screen (center portion). • If no operations are done for about five seconds, the operation buttons disappear. • The above buttons except [KEY] also work when they are not shown on the screen vary among the playback sources. Preparation: Make sure is selected for listening to an audio source connected to the LINE IN terminals. • Some status messages such as volume...
Instructions
Page 49
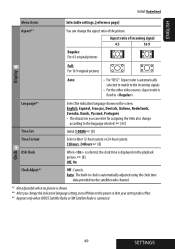
... assigning the titles also change according to . Aspect ratio of incoming signal 4:3 16:9 Regular: For 4:3 original pictures Full: For 16:9 original pictures Display Auto: • For "DISC": Aspect ratio is automatically selected to match to the incoming signals. • For the other video sources: Aspect ratio is fixed to the language selected. ☞ [63] Time Set Initial 1:00AM ☞ [8] Time Format Select either 12-hour...
... assigning the titles also change according to . Aspect ratio of incoming signal 4:3 16:9 Regular: For 4:3 original pictures Full: For 16:9 original pictures Display Auto: • For "DISC": Aspect ratio is automatically selected to match to the incoming signals. • For the other video sources: Aspect ratio is fixed to the language selected. ☞ [63] Time Set Initial 1:00AM ☞ [8] Time Format Select either 12-hour...
Instructions
Page 50
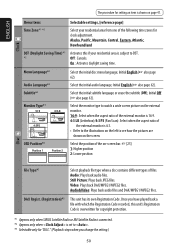
... how the pictures are shown on the external monitor. 16:9 : Select when the aspect ratio of the external monitor is set to watch a wide screen picture on the screen. Video: Plays back DivX/MPEG1/MPEG2 files. Initial Off (☞ also page 62). Select the position of the on page 47. Initial English (☞ also page 62). Audio&Video: Plays back audio files and DivX/MPEG1/MPEG2 files. On : Activates daylight saving time. Subtitle*3 Select...
... how the pictures are shown on the external monitor. 16:9 : Select when the aspect ratio of the external monitor is set to watch a wide screen picture on the screen. Video: Plays back DivX/MPEG1/MPEG2 files. Initial Off (☞ also page 62). Select the position of the on page 47. Initial English (☞ also page 62). Audio&Video: Plays back audio files and DivX/MPEG1/MPEG2 files. On : Activates daylight saving time. Subtitle*3 Select...
Instructions
Page 51
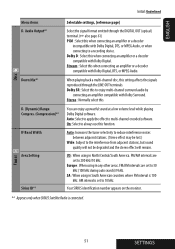
... function. When playing back a multi-channel disc, this when connecting an amplifier or a decoder compatible with Dolby Digital, DTS, or MPEG Audio. Disc D. (Dynamic) Range Compres. (Compression)*3 IF Band Width Area Setting Sirius ID*4 You can enjoy a powerful sound at a low volume level while playing Dolby Digital software. Auto: Select to apply the effect to a recording device. SA : When using in any other areas. Tuner *4 Appears only when SIRIUS Satellite Radio...
... function. When playing back a multi-channel disc, this when connecting an amplifier or a decoder compatible with Dolby Digital, DTS, or MPEG Audio. Disc D. (Dynamic) Range Compres. (Compression)*3 IF Band Width Area Setting Sirius ID*4 You can enjoy a powerful sound at a low volume level while playing Dolby Digital software. Auto: Select to apply the effect to a recording device. SA : When using in any other areas. Tuner *4 Appears only when SIRIUS Satellite Radio...
Instructions
Page 52
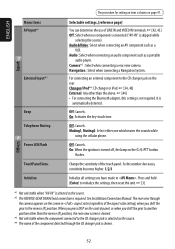
... Installation/Connection Manual. Off: Cancels. button Change the sensitivity of the component detected through the camera appears on the control panel, or when you shift the gear to the CD changer jack is selected as the source. *2 The REVERSE GEAR SIGNAL lead connection is shown. 52 When you press DISP on the screen in . Camera*2 : Select when connecting a rear view camera. Changer/iPod*4: CD changer or iPod. ☞ [34, 40] External...
... Installation/Connection Manual. Off: Cancels. button Change the sensitivity of the component detected through the camera appears on the control panel, or when you shift the gear to the CD changer jack is selected as the source. *2 The REVERSE GEAR SIGNAL lead connection is shown. 52 When you press DISP on the screen in . Camera*2 : Select when connecting a rear view camera. Changer/iPod*4: CD changer or iPod. ☞ [34, 40] External...
Instructions
Page 55
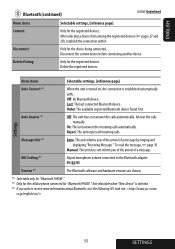
... and displaying "Receiving Message." After selecting a device from among the registered devices (☞ pages 27 and 28), establish the connection with ... Manual: The unit does not inform you of the arrival of a message. Reject: The unit rejects all incoming calls. Delete the registered devices. MIC Setting *5 Adjust microphone volume connected to receive more information about Bluetooth, visit the following JVC web site: 55 SSEETTTININGGSS Settings ENGLISH Bluetooth (continued) Initial: Underlined Menu...
... and displaying "Receiving Message." After selecting a device from among the registered devices (☞ pages 27 and 28), establish the connection with ... Manual: The unit does not inform you of the arrival of a message. Reject: The unit rejects all incoming calls. Delete the registered devices. MIC Setting *5 Adjust microphone volume connected to receive more information about Bluetooth, visit the following JVC web site: 55 SSEETTTININGGSS Settings ENGLISH Bluetooth (continued) Initial: Underlined Menu...
Instructions
Page 60
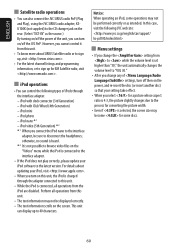
... headphones; iPod photo - ENGLISH Satellite radio operations • You can also connect the JVC SIRIUS radio PnP (Plug and Play), using the JVC SIRIUS radio adapter, KSU100K (not supplied) to the CD changer jack on the rear. (Select "EXT-IN" as the source.) By turning on/off the power of the unit, you can control the following JVC web site: Menu settings • If you change the setting from to while the volume level is set higher...
... headphones; iPod photo - ENGLISH Satellite radio operations • You can also connect the JVC SIRIUS radio PnP (Plug and Play), using the JVC SIRIUS radio adapter, KSU100K (not supplied) to the CD changer jack on the rear. (Select "EXT-IN" as the source.) By turning on/off the power of the unit, you can control the following JVC web site: Menu settings • If you change the setting from to while the volume level is set higher...
Instructions
Page 64
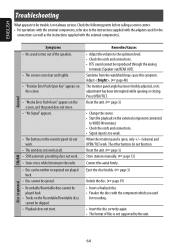
... Disc in general 64 Press OPEN/TILT. Reset the unit. (☞ page 3) • Change the source. • Start the playback on the external component connected to the radio. • Disc can be neither recognized nor played back. • Disc cannot be ejected. • Recordable/Rewritable discs cannot be played back. • Tracks on the monitor panel do not function. The other buttons do not work. • The unit does not work...
... Disc in general 64 Press OPEN/TILT. Reset the unit. (☞ page 3) • Change the source. • Start the playback on the external component connected to the radio. • Disc can be neither recognized nor played back. • Disc cannot be ejected. • Recordable/Rewritable discs cannot be played back. • Tracks on the monitor panel do not function. The other buttons do not work. • The unit does not work...
Instructions
Page 65
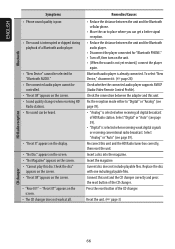
... file format. Brake" appears on the screen, even when the (☞ Installation/Connection Manual) parking brake is unplayable. • Bluetooth device does not detect the unit. Skip to a device, this unit cannot be connected with the Bluetooth device. • Enter the same PIN code for both the unit and target device. While connected to another device. The track is engaged. • No picture appears on the external monitor. • Connect the video cord correctly. • Select the correct input on the external monitor. • "Eject Error...
... file format. Brake" appears on the screen, even when the (☞ Installation/Connection Manual) parking brake is unplayable. • Bluetooth device does not detect the unit. Skip to a device, this unit cannot be connected with the Bluetooth device. • Enter the same PIN code for both the unit and target device. While connected to another device. The track is engaged. • No picture appears on the external monitor. • Connect the video cord correctly. • Select the correct input on the external monitor. • "Eject Error...
Instructions
Page 66
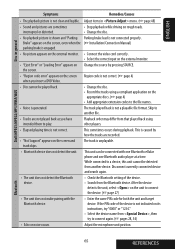
... reset the unit. Select "Analog" or "Auto" (see page 39). • "Analog" is selected when receiving all . Insert the magazine. "Reset 07" appears on the screen. • Sound quality changes when receiving HD Radio stations. • No sound can get a better signal reception. • Reduce the distance between the adapter and this unit. To select "New Device," disconnect it. (☞ page 28) Check whether the connected audio player supports AVRCP (Audio Video Remote Control Profile...
... reset the unit. Select "Analog" or "Auto" (see page 39). • "Analog" is selected when receiving all . Insert the magazine. "Reset 07" appears on the screen. • Sound quality changes when receiving HD Radio stations. • No sound can get a better signal reception. • Reduce the distance between the adapter and this unit. To select "New Device," disconnect it. (☞ page 28) Check whether the connected audio player supports AVRCP (Audio Video Remote Control Profile...
Instructions
Page 67
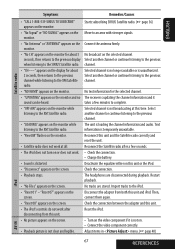
... XM Satellite radio. • "NO NAME" appears on the monitor. • "UPDATING" appears on the monitor and no longer available or is not clear and legible. Selected channel is not broadcasting at all. • The iPod does not turn on the selected channel. Disconnect the adapter from this unit. • No picture appears on the screen. • Playback picture is unauthorized. Connect the antenna firmly. Select...
... XM Satellite radio. • "NO NAME" appears on the monitor. • "UPDATING" appears on the monitor and no longer available or is not clear and legible. Selected channel is not broadcasting at all. • The iPod does not turn on the selected channel. Disconnect the adapter from this unit. • No picture appears on the screen. • Playback picture is unauthorized. Connect the antenna firmly. Select...


