
Instructions
Page 3
...operation, to ensure your own sound adjustments ........ 14 OTHER MAIN FUNCTIONS 15 Setting the clock 15 Canceling Advanced SCM - SCM LINK .... 15 Selecting the level display 16 Detaching ... 20 How to a preset station 8 CD OPERATIONS 9 Playing a CD 9 Locating a track or a particular portion on a CD 10 Selecting CD playback modes 10 Prohibiting CD ejection 11 SOUND ADJUSTMENTS 12 Adjusting the ...use the MODE button If you have parked the car for purchasing a JVC product. Please read all instructions carefully before performing any number button until the temperature in the ...
...operation, to ensure your own sound adjustments ........ 14 OTHER MAIN FUNCTIONS 15 Setting the clock 15 Canceling Advanced SCM - SCM LINK .... 15 Selecting the level display 16 Detaching ... 20 How to a preset station 8 CD OPERATIONS 9 Playing a CD 9 Locating a track or a particular portion on a CD 10 Selecting CD playback modes 10 Prohibiting CD ejection 11 SOUND ADJUSTMENTS 12 Adjusting the ...use the MODE button If you have parked the car for purchasing a JVC product. Please read all instructions carefully before performing any number button until the temperature in the ...
Instructions
Page 5
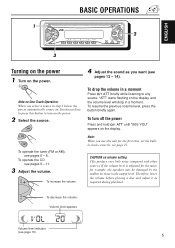
... 8. To drop the volume in a moment Press briefly while listening to turn off the power Press and hold until "SEE YOU" appears on volume setting CDs produce very little noise compared with other sources. "ATT" starts flashing on the power. If the volume level is adjusted for the tuner, for the... first time, set the builtin clock correctly, see page 15. ENGLISH BASIC OPERATIONS 1 FM CD SSM 2 AM MO RPT RND MODE SCM 3 Turning on the power 1 Turn on the display, and the volume level ...
... 8. To drop the volume in a moment Press briefly while listening to turn off the power Press and hold until "SEE YOU" appears on volume setting CDs produce very little noise compared with other sources. "ATT" starts flashing on the power. If the volume level is adjusted for the tuner, for the... first time, set the builtin clock correctly, see page 15. ENGLISH BASIC OPERATIONS 1 FM CD SSM 2 AM MO RPT RND MODE SCM 3 Turning on the power 1 Turn on the display, and the volume level ...
Instructions
Page 15
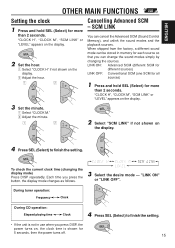
...in memory for each source so that you can change the sound modes simply by changing the sources. During tuner operation: Frequency Clock During CD operation: Elapsed playing time Clock 4 Press SEL (Select) to finish the setting. LINK ON: Advanced SCM (different SCM for different sources) LINK OFF:...in use when you press the button, the display mode changes as follows. 3 Select the desire mode - ENGLISH OTHER MAIN FUNCTIONS Setting the clock 1 Press and hold SEL (Select) for more than 2 seconds. When shipped from the factory, a different sound mode can cancel the Advanced ...
...in memory for each source so that you can change the sound modes simply by changing the sources. During tuner operation: Frequency Clock During CD operation: Elapsed playing time Clock 4 Press SEL (Select) to finish the setting. LINK ON: Advanced SCM (different SCM for different sources) LINK OFF:...in use when you press the button, the display mode changes as follows. 3 Select the desire mode - ENGLISH OTHER MAIN FUNCTIONS Setting the clock 1 Press and hold SEL (Select) for more than 2 seconds. When shipped from the factory, a different sound mode can cancel the Advanced ...

Instructions
Page 16
"VOL 1", "VOL 2" or "OFF". 4 Press SEL (Select) to your preference. VOL 2 : Alternates "VOL 1" setting and illumination display. ENGLISH Selecting the level display You can select the level display according to finish the setting. 2 Select "LEVEL" if not shown on the display. 3 Select the desired mode - "CLOCK H", "CLOCK M", "SCM LINK" or "LEVEL" appears on the display. 16 When shipped from the factory, "VOL 2" is selected. VOL 1 : Shows the volume level indicator. OFF : Erases the volume level indicator. 1 Press and hold SEL for more than 2 seconds.
"VOL 1", "VOL 2" or "OFF". 4 Press SEL (Select) to your preference. VOL 2 : Alternates "VOL 1" setting and illumination display. ENGLISH Selecting the level display You can select the level display according to finish the setting. 2 Select "LEVEL" if not shown on the display. 3 Select the desired mode - "CLOCK H", "CLOCK M", "SCM LINK" or "LEVEL" appears on the display. 16 When shipped from the factory, "VOL 2" is selected. VOL 1 : Shows the volume level indicator. OFF : Erases the volume level indicator. 1 Press and hold SEL for more than 2 seconds.
Instructions
Page 19
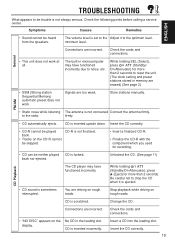
... is set to reset the unit. (The clock setting and preset stations stored in microcomputer may have functioned incorrectly due to noise, etc. Insert the CD correctly. 19 Connections are incorrect. to the optimum level. Unlocked the CD. (See page 11) CD Playback The CD player may have functioned incorrectly. General • This unit does not...
... is set to reset the unit. (The clock setting and preset stations stored in microcomputer may have functioned incorrectly due to noise, etc. Insert the CD correctly. 19 Connections are incorrect. to the optimum level. Unlocked the CD. (See page 11) CD Playback The CD player may have functioned incorrectly. General • This unit does not...


