Instructions
Page 2
... du Canada. NO USER SERVICEABLE PARTS INSIDE. The power can radiate radio frequency energy and, if not installed and used in particular, specifies that interference will not occur in a residential installation. Déconnectez la fiche d'alimentation secteur pour mettre l'appareil complètement hors tension (le témoin STANDBY est éteint). REFER SERVICING TO QUALIFIED SERVICE PERSONNEL. For U.S.A. Operation is easily accessible...
... du Canada. NO USER SERVICEABLE PARTS INSIDE. The power can radiate radio frequency energy and, if not installed and used in particular, specifies that interference will not occur in a residential installation. Déconnectez la fiche d'alimentation secteur pour mettre l'appareil complètement hors tension (le témoin STANDBY est éteint). REFER SERVICING TO QUALIFIED SERVICE PERSONNEL. For U.S.A. Operation is easily accessible...
Instructions
Page 4
... number inside the System in the following carefully: • Make sure there is only possible using the buttons and controls on the plug, not the AC power cord. If they have a doubt about This System" and "Troubleshooting," but not in this operation is good ventilation around the unit. Power sources • When unplugging the System from a cold to a warm place Should this manual...
... number inside the System in the following carefully: • Make sure there is only possible using the buttons and controls on the plug, not the AC power cord. If they have a doubt about This System" and "Troubleshooting," but not in this operation is good ventilation around the unit. Power sources • When unplugging the System from a cold to a warm place Should this manual...
Instructions
Page 5
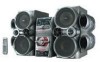
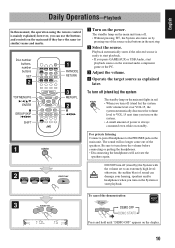
... the Remote Control 4 Step 3: Hook Up 5 Display Indication 8 Daily Operations-Playback 10 Listening to the Radio 11 Playing Back a Disc 12 Playing Back from the PC 14 Playing Back from Other External Equipment.......... 15 Daily Operations-Sound and Other Adjustments 16 Adjusting the Volume 16 Reinforcing the Bass Sound 16 Making the Center Channel Sound Clear -Clear Voice 17 Selecting the Sound Modes 17 Selecting 3D Phonic Mode 17 Presetting Automatic DVD VIDEO Sound Increase Level 17 Changing the Picture Tone 18 Turning On or...
... the Remote Control 4 Step 3: Hook Up 5 Display Indication 8 Daily Operations-Playback 10 Listening to the Radio 11 Playing Back a Disc 12 Playing Back from the PC 14 Playing Back from Other External Equipment.......... 15 Daily Operations-Sound and Other Adjustments 16 Adjusting the Volume 16 Reinforcing the Bass Sound 16 Making the Center Channel Sound Clear -Clear Voice 17 Selecting the Sound Modes 17 Selecting 3D Phonic Mode 17 Presetting Automatic DVD VIDEO Sound Increase Level 17 Changing the Picture Tone 18 Turning On or...
Instructions
Page 6
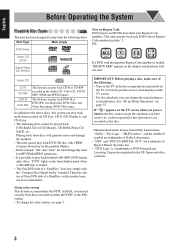
... can play back only DVDs whose Region Code numbers include "1." IMPORTANT: Before playing a disc, make sure of the following... • Turn on the TV and select an appropriate input mode on the TV to view the pictures or on-screen displays on the front display panel when a +R/+RW disc is a trademark of DVD Format/Logo Licensing Corporation registerd in either the NTSC or the PAL system. • To change the initial setting to...
... can play back only DVDs whose Region Code numbers include "1." IMPORTANT: Before playing a disc, make sure of the following... • Turn on the TV and select an appropriate input mode on the TV to view the pictures or on-screen displays on the front display panel when a +R/+RW disc is a trademark of DVD Format/Logo Licensing Corporation registerd in either the NTSC or the PAL system. • To change the initial setting to...
Instructions
Page 10
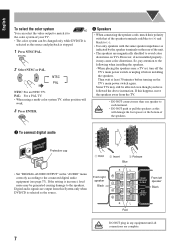
... the speakers near a TV set, turn off the TV's main power switch or unplug it before turning on the TV's main power switch again. To connect digital audio Protective cap 1 Hold 2 Insert 3 Release Blue • Set "DIGITAL AUDIO OUTPUT" in any equipment until all connections are complete. 7 Digital audio signals are magnetically shielded to the connected digital audio equipment (see page 37). If the setting is incorrect, loud noise may be changed only while DVD/CD is selected...
... the speakers near a TV set, turn off the TV's main power switch or unplug it before turning on the TV's main power switch again. To connect digital audio Protective cap 1 Hold 2 Insert 3 Release Blue • Set "DIGITAL AUDIO OUTPUT" in any equipment until all connections are complete. 7 Digital audio signals are magnetically shielded to the connected digital audio equipment (see page 37). If the setting is incorrect, loud noise may be changed only while DVD/CD is selected...
Instructions
Page 11
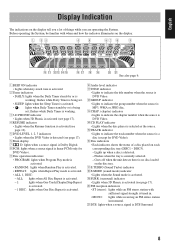
... activated (see page 17). 6 Main display 7 D: lights when a source signal is Dolby Digital. 8 PCM: lights when a source signal is linear PCM (only for DVD Video). t TRACK indicator • Lights to indicate the title number when the source is currently selected. - Lights up when a disc is a disc (except for DVD Video). 9 Disc operation indicators • PROGRAM: lights when Program Play mode is activated. • RANDOM: lights when Random Play is activated. • REPEAT: lights when Repeat Play mode is working ; flashes while Daily Timer is activated. •...
... activated (see page 17). 6 Main display 7 D: lights when a source signal is Dolby Digital. 8 PCM: lights when a source signal is linear PCM (only for DVD Video). t TRACK indicator • Lights to indicate the title number when the source is currently selected. - Lights up when a disc is a disc (except for DVD Video). 9 Disc operation indicators • PROGRAM: lights when Program Play mode is activated. • RANDOM: lights when Random Play is activated. • REPEAT: lights when Repeat Play mode is working ; flashes while Daily Timer is activated. •...
Instructions
Page 12
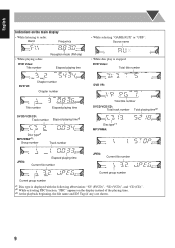
... display • While listening to radio: Band Frequency • While selecting "GAME/AUX" or "USB": Source name • While playing a disc: DVD Video: Title number Reception mode (FM only) Elapsed playing time • While disc play is stopped: DVD Video: Total title number DVD VR: Chapter number Chapter number Title number Elapsed playing time SVCD/VCD/CD: Track number Elapsed playing time*2 Disc type*1 MP3/WMA*3: Group number Track number DVD VR: Total title number SVCD/VCD/CD: Total track number Total playing...
... display • While listening to radio: Band Frequency • While selecting "GAME/AUX" or "USB": Source name • While playing a disc: DVD Video: Title number Reception mode (FM only) Elapsed playing time • While disc play is stopped: DVD Video: Total title number DVD VR: Chapter number Chapter number Title number Elapsed playing time SVCD/VCD/CD: Track number Elapsed playing time*2 Disc type*1 MP3/WMA*3: Group number Track number DVD VR: Total title number SVCD/VCD/CD: Total track number Total playing...
Instructions
Page 13
.../AUX or USB Audio, start playback. however, you can damage your hearing, speakers and/or headphones when you turn down the volume before 1 connecting or putting the headphones. • Disconnecting the headphones will no longer come out of power is always consumed even while on the main unit. Disc number buttons, number buttons SET 2 TOP MENU/PG 3/2/5/∞ ENTER 7 GROUP SKIP 4/¢ SHIFT 1 FM MODE RETURN 3 MENU...
.../AUX or USB Audio, start playback. however, you can damage your hearing, speakers and/or headphones when you turn down the volume before 1 connecting or putting the headphones. • Disconnecting the headphones will no longer come out of power is always consumed even while on the main unit. Disc number buttons, number buttons SET 2 TOP MENU/PG 3/2/5/∞ ENTER 7 GROUP SKIP 4/¢ SHIFT 1 FM MODE RETURN 3 MENU...

Instructions
Page 14
... indicator lights on the main unit. FM AM 2 Select a preset number for the station you store. control on the display. Increases the frequency. 3 Store the station. To select preset number 30, press h10, 3, then 0. • You can preset 30 FM and 15 AM stations. 1 Tune in to a station While FM or AM is lost-monaural reception mode. To stop searching manually, press either button. To select preset number 10, press10. Examples: To select preset number...
... indicator lights on the main unit. FM AM 2 Select a preset number for the station you store. control on the display. Increases the frequency. 3 Store the station. To select preset number 30, press h10, 3, then 0. • You can preset 30 FM and 15 AM stations. 1 Tune in to a station While FM or AM is lost-monaural reception mode. To stop searching manually, press either button. To select preset number 10, press10. Examples: To select preset number...
Instructions
Page 17
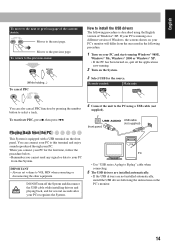
...'s monitor. 14 Remote control: Main unit: You can connect your PC. Moves to B plug" cable when connecting. 5 The USB drivers are installed automatically. • If the USB drivers are not installed automatically, install the USB drivers following procedure is described using a USB cable (not supplied). When you cannot send any signal or data to your PC from the ones used in the following procedure. 1 Turn on the front panel. If your PC...
...'s monitor. 14 Remote control: Main unit: You can connect your PC. Moves to B plug" cable when connecting. 5 The USB drivers are installed automatically. • If the USB drivers are not installed automatically, install the USB drivers following procedure is described using a USB cable (not supplied). When you cannot send any signal or data to your PC from the ones used in the following procedure. 1 Turn on the front panel. If your PC...

Instructions
Page 18
.../AUX jack are installed. For enjoying powerful game sound with low sound level. • The video signals from Other External Equipment IMPORTANT • Turn the power off to all components before connections. • Always set volume to VOL MIN when connecting or disconnecting the other external equipment for the genre or scene of Microsoft corporation. To connect game console (front panel) Red White Yellow Game console To connect audio equipment (front panel) Red White Audio...
.../AUX jack are installed. For enjoying powerful game sound with low sound level. • The video signals from Other External Equipment IMPORTANT • Turn the power off to all components before connections. • Always set volume to VOL MIN when connecting or disconnecting the other external equipment for the genre or scene of Microsoft corporation. To connect game console (front panel) Red White Yellow Game console To connect audio equipment (front panel) Red White Audio...

Instructions
Page 19
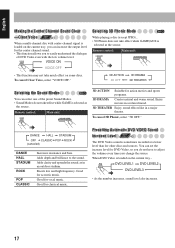
... SURROUND MODE SOUND MODE 3/2/5/∞, ENTER BEEP 4/¢ SHIFT DVD LEVEL Main unit SLEEP DISPLAY SOUND TURBO SUBWOOFER LEVEL +/- VFP Reinforcing the Bass Sound INFO To adjust the subwoofer level gradually You can enjoy powerful sound by using Sound Turbo. To enjoy powerful sound You can select the subwoofer level from level 0 (minimum) to level 2 (maximum). Remote control: Main unit: TURBO ON TURBO OFF • When the Sound Turbo is set to TURBO ON, the S.TURBO indicator lights up and the subwoofer level...
... SURROUND MODE SOUND MODE 3/2/5/∞, ENTER BEEP 4/¢ SHIFT DVD LEVEL Main unit SLEEP DISPLAY SOUND TURBO SUBWOOFER LEVEL +/- VFP Reinforcing the Bass Sound INFO To adjust the subwoofer level gradually You can enjoy powerful sound by using Sound Turbo. To enjoy powerful sound You can select the subwoofer level from level 0 (minimum) to level 2 (maximum). Remote control: Main unit: TURBO ON TURBO OFF • When the Sound Turbo is set to TURBO ON, the S.TURBO indicator lights up and the subwoofer level...
Instructions
Page 20
... POP CLASSIC Increases resonance and bass. Presetting Automatic DVD VIDEO Sound Increase Level Remote ONLY The DVD Video sound is loaded on the current tray... English Making the Center Channel Sound Clear -Clear Voice Remote ONLY When a multi-channel disc with the low volume level. To cancel Clear Voice, select "VOICE OFF." 3D ACTION 3D OFF 3D DRAMA 3D THEATER Selecting the Sound Modes INFO You can select one of DVD Video even with center-channel signal is sometimes recorded at a lower...
... POP CLASSIC Increases resonance and bass. Presetting Automatic DVD VIDEO Sound Increase Level Remote ONLY The DVD Video sound is loaded on the current tray... English Making the Center Channel Sound Clear -Clear Voice Remote ONLY When a multi-channel disc with the low volume level. To cancel Clear Voice, select "VOICE OFF." 3D ACTION 3D OFF 3D DRAMA 3D THEATER Selecting the Sound Modes INFO You can select one of DVD Video even with center-channel signal is sometimes recorded at a lower...

Instructions
Page 39
... screen while operating this System. USE ENTER TO CONFIRM TO EXIT, PRESS [SET UP]. You can select the monitor type of your TV is 4:3 (conventional TV). SUBTITLE Some discs have multiple audio languages. USE ENTER TO CONFIRM TO EXIT, PRESS [SET UP]. ZU (see "Language Code List" on the screen. To remove the Set up Menu PICTURE MONITOR TYPE PICTURE SOURCE SCREEN SAVER FILE TYPE 4:3 LB AUTO ON AUDIO 7 LANGUAGE Set...
... screen while operating this System. USE ENTER TO CONFIRM TO EXIT, PRESS [SET UP]. You can select the monitor type of your TV is 4:3 (conventional TV). SUBTITLE Some discs have multiple audio languages. USE ENTER TO CONFIRM TO EXIT, PRESS [SET UP]. ZU (see "Language Code List" on the screen. To remove the Set up Menu PICTURE MONITOR TYPE PICTURE SOURCE SCREEN SAVER FILE TYPE 4:3 LB AUTO ON AUDIO 7 LANGUAGE Set...

Instructions
Page 40
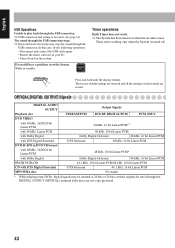
... "OPTICAL DIGITAL OUTPUT Signals" on a disc, you can activate or deactivate screen saver while operating the built-in Dolby Digital decoder. DOLBY To connect an amplifier with a built-in disc player. AUDIO DIGITAL AUDIO OUTPUT DOWN MIX D. DOWN MIX When playing a multi-channel DVD, the System converts the signals into 2 channels. English PICTURE SOURCE You can adjust the sound settings of the following : AUTO: Normally select this correctly according to a linear PCM digital equipment such as an MD recorder. When playing back a disc containing both audio...
... "OPTICAL DIGITAL OUTPUT Signals" on a disc, you can activate or deactivate screen saver while operating the built-in Dolby Digital decoder. DOLBY To connect an amplifier with a built-in disc player. AUDIO DIGITAL AUDIO OUTPUT DOWN MIX D. DOWN MIX When playing a multi-channel DVD, the System converts the signals into 2 channels. English PICTURE SOURCE You can adjust the sound settings of the following : AUTO: Normally select this correctly according to a linear PCM digital equipment such as an MD recorder. When playing back a disc containing both audio...

Instructions
Page 43
..., preset the stations again. Turning Off the Power Automatically: • If you unplug the AC power cord or if a power failure occurs, the preset stations will be different from the PC: • Check if your game machine connected to the optical digital output signals through the DIGITAL OUTPUT (OPTICAL) terminal. Playing Back a Disc: • On some DVD, SVCD, or VCD discs, the actual operations may be skipped. When making a disc, use reverse slow motion, Program Play, and...
..., preset the stations again. Turning Off the Power Automatically: • If you unplug the AC power cord or if a power failure occurs, the preset stations will be different from the PC: • Check if your game machine connected to the optical digital output signals through the DIGITAL OUTPUT (OPTICAL) terminal. Playing Back a Disc: • On some DVD, SVCD, or VCD discs, the actual operations may be skipped. When making a disc, use reverse slow motion, Program Play, and...

Instructions
Page 44
... 4:3 letter box with some DVD discs. OTHERS Set up Menu-ON SCREEN GUIDE: • The set up Menu-DOWN MIX: • This setting is not effective when DTS multi-channel software is not available. - This System can play mode). For details about DVD-VR format and play list, refer to the manual of the play only baseline JPEG files*. On-Screen Disc Operations (see pages 23 to 25) Programming the Playing Order-Program Play: • While programming steps...
... 4:3 letter box with some DVD discs. OTHERS Set up Menu-ON SCREEN GUIDE: • The set up Menu-DOWN MIX: • This setting is not effective when DTS multi-channel software is not available. - This System can play mode). For details about DVD-VR format and play list, refer to the manual of the play only baseline JPEG files*. On-Screen Disc Operations (see pages 23 to 25) Programming the Playing Order-Program Play: • While programming steps...
Instructions
Page 45
...: Adjustments or settings are connected. No picture appears on the TV screen, the picture is blurred, or the picture is divided into two parts. ] The System is a time limit. No subtitle appears on the writing application. Handling discs • Remove the disc from its case by the "FILE TYPE" setting (see page 37). ] You have selected the initial subtitle language. ] Some DVDs are programmed to operate...
...: Adjustments or settings are connected. No picture appears on the TV screen, the picture is blurred, or the picture is divided into two parts. ] The System is a time limit. No subtitle appears on the writing application. Handling discs • Remove the disc from its case by the "FILE TYPE" setting (see page 37). ] You have selected the initial subtitle language. ] Some DVDs are programmed to operate...
Instructions
Page 46
... kHz, 16 bit Linear PCM with Dolby Digital Dolby Digital bitstream 48 kHz, 16 bit Linear PCM with DTS Digital Surround DTS bitstream 44.1 kHz, 16 bit Linear PCM MP3/WMA disc No output * While playing some DVDs, digital signals may stop the sound through the USB connection. English USB Operations: Unable to play back through the USB connection. ] USB connection and setting is turned off and on -time comes. While in DVD-VR format with 48 kHz, 16...
... kHz, 16 bit Linear PCM with Dolby Digital Dolby Digital bitstream 48 kHz, 16 bit Linear PCM with DTS Digital Surround DTS bitstream 44.1 kHz, 16 bit Linear PCM MP3/WMA disc No output * While playing some DVDs, digital signals may stop the sound through the USB connection. English USB Operations: Unable to play back through the USB connection. ] USB connection and setting is turned off and on -time comes. While in DVD-VR format with 48 kHz, 16...

Instructions
Page 49
...; (subwoofers) Tuner section FM tuning range: AM tuning range: 87.5 MHz - 108.0 MHz 530 kHz - 1 710 kHz Disc player section Playable disc: DVD Video CD/VCD/SVCD CD-R/CD-RW (recorded in Audio CD/ Video CD/Super Video CD/MP3/WMA/ JPEG format) DVD-R/DVD-RW (recorded in DVD-Video or DVD-VR format) +R/+RW (recorded in . English Specifications Amplifier section-CA-HXD77 Output Power: SUBWOOFERS: 180 W per channel, min. with power saving off-Normal mode) 1 W (on standby...
...; (subwoofers) Tuner section FM tuning range: AM tuning range: 87.5 MHz - 108.0 MHz 530 kHz - 1 710 kHz Disc player section Playable disc: DVD Video CD/VCD/SVCD CD-R/CD-RW (recorded in Audio CD/ Video CD/Super Video CD/MP3/WMA/ JPEG format) DVD-R/DVD-RW (recorded in DVD-Video or DVD-VR format) +R/+RW (recorded in . English Specifications Amplifier section-CA-HXD77 Output Power: SUBWOOFERS: 180 W per channel, min. with power saving off-Normal mode) 1 W (on standby...


