
Instructions
Page 5
... cause harm to direct sunlight. Tip: Indicates tips and hints for two or three hours without operating it in its case. If you use the DVD+VCR in such a situation, it may appear on the operation and maintenance of heat and never leave it . Hold the disc by the symbol. This manual... provides information on your DVD+VCR. Should the unit require service, contact an Authorized Service Center. Never stick paper or tape on the disc can cause poor picture quality and sound...
... cause harm to direct sunlight. Tip: Indicates tips and hints for two or three hours without operating it in its case. If you use the DVD+VCR in such a situation, it may appear on the operation and maintenance of heat and never leave it . Hold the disc by the symbol. This manual... provides information on your DVD+VCR. Should the unit require service, contact an Authorized Service Center. Never stick paper or tape on the disc can cause poor picture quality and sound...
Instructions
Page 7
... Digital Theater Systems, Inc. This number must select one or more numbers in the VCR mode, the DVD+VCR will appear. Notes: • If you insert a disc while the DVD+VCR is in it possible to DVD mode automatically. • If you insert a cassette tape without permission. "Dolby" and...TELEVISION SETS ARE FULLY COMPATIBLE WITH THIS PRODUCT AND MAY CAUSE ARTIFACTS TO BE DISPLAYED IN THE PICTURE. Introduction Regional code This DVD+VCR is equipped with SQPB (S-VHS QUASI PLAYBACK) that is forbidden by method claims of this copyright protection technology must be authorized ...
... Digital Theater Systems, Inc. This number must select one or more numbers in the VCR mode, the DVD+VCR will appear. Notes: • If you insert a disc while the DVD+VCR is in it possible to DVD mode automatically. • If you insert a cassette tape without permission. "Dolby" and...TELEVISION SETS ARE FULLY COMPATIBLE WITH THIS PRODUCT AND MAY CAUSE ARTIFACTS TO BE DISPLAYED IN THE PICTURE. Introduction Regional code This DVD+VCR is equipped with SQPB (S-VHS QUASI PLAYBACK) that is forbidden by method claims of this copyright protection technology must be authorized ...

Instructions
Page 8
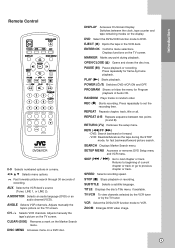
... or to beginning of an external source (Audio system, TV/Monitor, Another VCR). 8 c POWER 1/: Switches the DVD+VCR ON and OFF. VCR: Rewinds the tape during the STOP mode or for fast forward picture search. VCR: Advances the tape during the stop mode or for a fast forward search.... playback of your output sources to previous chapter or track. DVD+VCR is in quick successions to go to view on the TV screen between DVD and VCR. h PAUSE (X) Pause playback or recording. k Remote Sensor Point the DVD+VCR Remote Control here. Press repeatedly for about two seconds to ...
... or to beginning of an external source (Audio system, TV/Monitor, Another VCR). 8 c POWER 1/: Switches the DVD+VCR ON and OFF. VCR: Rewinds the tape during the STOP mode or for fast forward picture search. VCR: Advances the tape during the stop mode or for a fast forward search.... playback of your output sources to previous chapter or track. DVD+VCR is in quick successions to go to view on the TV screen between DVD and VCR. h PAUSE (X) Pause playback or recording. k Remote Sensor Point the DVD+VCR Remote Control here. Press repeatedly for about two seconds to ...
Instructions
Page 9
.../Advances the tape during playback. OPEN/CLOSE (Z) Opens and closes the disc tray. VCR Select the DVD+VCR function mode to next chapter or track. REW (m)/FF (M) - DVD Select the DVD+VCR function mode to DVD. Introduction Remote Control 0-9 Selects numbered options in a menu. Adjusts manually the tape's picture on the TV screen. STOP (x) Stops playback or...
.../Advances the tape during playback. OPEN/CLOSE (Z) Opens and closes the disc tray. VCR Select the DVD+VCR function mode to next chapter or track. REW (m)/FF (M) - DVD Select the DVD+VCR function mode to DVD. Introduction Remote Control 0-9 Selects numbered options in a menu. Adjusts manually the tape's picture on the TV screen. STOP (x) Stops playback or...

Instructions
Page 10
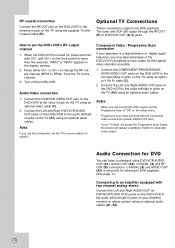
... with video and audio inputs. Do not connect the DVD+VCR via another VCR. c DVD/VCR OUT (VIDEO/AUDIO (Left/Right)) Connect to the manuals of your audio system. f AC Power Cord Plug into the power source. Preparation Depending on your TV, VCR, stereo system or other equipment there are various ways...tune the TV to the correct video input channel. • Do not connect the DVD+VCR's AUDIO OUT jack to a TV with audio inputs. g RF. h COAXIAL (DIGITAL AUDIO OUT jack) (DVD OUT) Connect to this terminal. b VCR IN LINE 1 (VIDEO/AUDIO (Left/Right)) Connect the audio/video output of a...
... with video and audio inputs. Do not connect the DVD+VCR via another VCR. c DVD/VCR OUT (VIDEO/AUDIO (Left/Right)) Connect to the manuals of your audio system. f AC Power Cord Plug into the power source. Preparation Depending on your TV, VCR, stereo system or other equipment there are various ways...tune the TV to the correct video input channel. • Do not connect the DVD+VCR's AUDIO OUT jack to a TV with audio inputs. g RF. h COAXIAL (DIGITAL AUDIO OUT jack) (DVD OUT) Connect to this terminal. b VCR IN LINE 1 (VIDEO/AUDIO (Left/Right)) Connect the audio/video output of a...

Instructions
Page 11
...on the capabilities of your TV. Antenna Antenna Rear of TV ANTENNA INPUT VIDEO INPUT AUDIO INPUT L R OR OR R V A1 Rear of DVD+VCR Rear of DVD+VCR C A2 Pr Pb Y COMPONENT/PROGRESSIVE SCAN VIDEO INPUT R L AUDIO INPUT Rear of the TV and identify the antenna cable. Preparation Connecting an ...Antenna or Cable TV a Antenna: Disconnect the antenna from your TV and attach it to the ANT.IN jack on the DVD+VCR. b Cable TV: If your cable connection has no converter or descrambler, unscrew the cable from the rear of TV 11 If a converter is...
...on the capabilities of your TV. Antenna Antenna Rear of TV ANTENNA INPUT VIDEO INPUT AUDIO INPUT L R OR OR R V A1 Rear of DVD+VCR Rear of DVD+VCR C A2 Pr Pb Y COMPONENT/PROGRESSIVE SCAN VIDEO INPUT R L AUDIO INPUT Rear of the TV and identify the antenna cable. Preparation Connecting an ...Antenna or Cable TV a Antenna: Disconnect the antenna from your TV and attach it to the ANT.IN jack on the DVD+VCR. b Cable TV: If your cable connection has no converter or descrambler, unscrew the cable from the rear of TV 11 If a converter is...
Instructions
Page 12
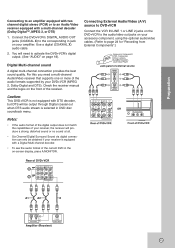
... the setup menu. • Progressive scan does not work with two channel analog stereo Connect the Left and Right AUDIO OUT (or DVD/VCR AUDIO OUT) jacks on the DVD+VCR to the audio left /right in the display window. 2. Audio/Video connection 1. Connect the COMPONENT/PROGRESSIVE SCAN VIDEO OUT jacks on ...jacks. "RF03" or "RF04" appears in jacks on the TV (A1) using an optional audio cables. Connect the Left and Right DVD/VCR AUDIO OUT jacks on the DVD+VCR to the audio left and right in jack on the TV using the supplied 75-ohm Coaxial Cable (R). Audio Connection for more than five...
... the setup menu. • Progressive scan does not work with two channel analog stereo Connect the Left and Right AUDIO OUT (or DVD/VCR AUDIO OUT) jacks on the DVD+VCR to the audio left /right in the display window. 2. Audio/Video connection 1. Connect the COMPONENT/PROGRESSIVE SCAN VIDEO OUT jacks on ...jacks. "RF03" or "RF04" appears in jacks on the TV (A1) using an optional audio cables. Connect the Left and Right DVD/VCR AUDIO OUT jacks on the DVD+VCR to the audio left and right in jack on the TV using the supplied 75-ohm Coaxial Cable (R). Audio Connection for more than five...
Instructions
Page 13
... your accessory component, using the optional audio/video cables. (Refer to the corresponding in jack on your amplifier. For this you need to activate the DVD+VCR's digital output. (See "AUDIO" on page 18). Use a digital (COAXIAL X) audio cable. 2. Notes: • If the audio format of the digital ...of your receiver, the receiver will need a multi-channel Audio/Video receiver that supports one or more of the audio formats supported by your DVD+VCR (MPEG 2, Dolby Digital and DTS). Jack panel of external source Rear of the receiver. Check the receiver manual and the logos on the...
... your accessory component, using the optional audio/video cables. (Refer to the corresponding in jack on your amplifier. For this you need to activate the DVD+VCR's digital output. (See "AUDIO" on page 18). Use a digital (COAXIAL X) audio cable. 2. Notes: • If the audio format of the digital ...of your receiver, the receiver will need a multi-channel Audio/Video receiver that supports one or more of the audio formats supported by your DVD+VCR (MPEG 2, Dolby Digital and DTS). Jack panel of external source Rear of the receiver. Check the receiver manual and the logos on the...
Instructions
Page 14
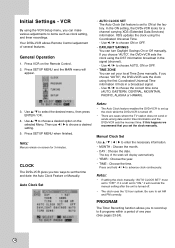
...signal (channel). - If this happens we recommend that you two ways to set to choose a desired option on the Remote Control. 2. VCR By using the VCR Setup menu, you choose "AUTO", the DVD+VCR sets the clock using the DST information broadcast in a broadcast signal. - Use v / V to choose the correct time zone (AUTO,... is left set the time and date: the Auto Clock Feature or Manually. Be sure to set to ON at the factory. Your DVD+VCR allows Remote Control adjustment of one year. (See pages 23-24). 14 Auto Clock Set Notes: • The Auto Clock feature enables the...
...signal (channel). - If this happens we recommend that you two ways to set to choose a desired option on the Remote Control. 2. VCR By using the VCR Setup menu, you choose "AUTO", the DVD+VCR sets the clock using the DST information broadcast in a broadcast signal. - Use v / V to choose the correct time zone (AUTO,... is left set the time and date: the Auto Clock Feature or Manually. Be sure to set to ON at the factory. Your DVD+VCR allows Remote Control adjustment of one year. (See pages 23-24). 14 Auto Clock Set Notes: • The Auto Clock feature enables the...
Instructions
Page 15
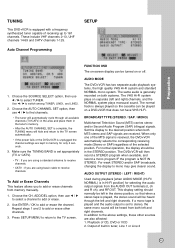
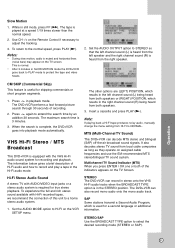
...(STEREO / LEFT / RIGHT) Used during playback [when AUDIO MODE (HI-FI/ NORMAL) is unplugged the channel settings are also affected: 1. TUNING This DVD+VCR is always played so the cassette can be turned on or off. 1. To Add or Erase Channels This feature allows you are using a standard antenna...using basic cable to the desired position when both left in tuner, Line 1 or Line 2 15 The same audio is received, the DVD+VCR automatically selects the corresponding receiving mode (Stereo or SAP) regardless of the MTS signal is generally recorded on both systems. The VHS Hi-Fi...
...(STEREO / LEFT / RIGHT) Used during playback [when AUDIO MODE (HI-FI/ NORMAL) is unplugged the channel settings are also affected: 1. TUNING This DVD+VCR is always played so the cassette can be turned on or off. 1. To Add or Erase Channels This feature allows you are using a standard antenna...using basic cable to the desired position when both left in tuner, Line 1 or Line 2 15 The same audio is received, the DVD+VCR automatically selects the corresponding receiving mode (Stereo or SAP) regardless of the MTS signal is generally recorded on both systems. The VHS Hi-Fi...

Instructions
Page 17
... video output will be visible on a conventional analog TV or monitor. • Do not turn on the entire screen and cuts off this DVD+VCR while the "PROGRESSIVE SCAN MODE" message is displayed in error, you are using the v / V buttons. 3. To turn off the portions... wide picture with less flickering. Press ENTER / OK to "4:3". Notes: • If you set your selection. If you must reset the DVD+VCR. Select "On" using the Component Video jacks for more than five seconds before releasing it for connection to component/progressive Input. 1. Preparation DISPLAY ...
... video output will be visible on a conventional analog TV or monitor. • Do not turn on the entire screen and cuts off this DVD+VCR while the "PROGRESSIVE SCAN MODE" message is displayed in error, you are using the v / V buttons. 3. To turn off the portions... wide picture with less flickering. Press ENTER / OK to "4:3". Notes: • If you set your selection. If you must reset the DVD+VCR. Select "On" using the Component Video jacks for more than five seconds before releasing it for connection to component/progressive Input. 1. Preparation DISPLAY ...

Instructions
Page 18
... Select when connected to On for your receiver or amplifier is made , this choice is capable of audio system you can decode them. DVDs encoded in the most accurate and realistic presentation possible, thanks to an amplifier or other equipment with a Dolby Digital, DTS or MPEG decoder.... This allows you connect the DVD+VCR's DIGITAL AUDIO OUT jack to digital audio technology. If your amplifier to the type of handling 96 kHz signals, select 96 kHz. Check...
... Select when connected to On for your receiver or amplifier is made , this choice is capable of audio system you can decode them. DVDs encoded in the most accurate and realistic presentation possible, thanks to an amplifier or other equipment with a Dolby Digital, DTS or MPEG decoder.... This allows you connect the DVD+VCR's DIGITAL AUDIO OUT jack to digital audio technology. If your amplifier to the type of handling 96 kHz signals, select 96 kHz. Check...

Instructions
Page 19
...seconds, and is turned off ) • Keep pressing ENTER down during step 1. 1. The code currently set to respond to one of controlling three JVC video units independently. Preparation OTHERS The Auto Play, and B.L.E. OTHERS PBC On Auto Play On B.L.E. B.L.E. (Black Level Expansion) To select the black...can be changed. Set your unit to respond to change the remote control code. 2. settings can set up the DVD+VCR so a DVD disc x automatically starts playing whenever the DVD is inserted. 1-3 If Auto Play mode is not active. Off: Auto Play function is set on the remote ...
...seconds, and is turned off ) • Keep pressing ENTER down during step 1. 1. The code currently set to respond to one of controlling three JVC video units independently. Preparation OTHERS The Auto Play, and B.L.E. OTHERS PBC On Auto Play On B.L.E. B.L.E. (Black Level Expansion) To select the black...can be changed. Set your unit to respond to change the remote control code. 2. settings can set up the DVD+VCR so a DVD disc x automatically starts playing whenever the DVD is inserted. 1-3 If Auto Play mode is not active. Off: Auto Play function is set on the remote ...
Instructions
Page 20
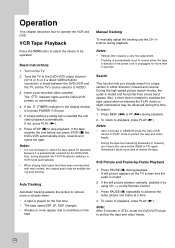
...connection is inserted the unit starts playback automatically. Notes: • After 3 minutes in the display window is automatically selected by the DVD+VCR. To return to be operated. Operation This chapter describes how to stop playback. Tune the TV to rewind the tape. If ...and the audio is muted and horizontal lines (noise bars) appear. Press PAUSE (X) during playback. Basic Instructions 1. The indicator lights and the DVD+VCR powers on the TV. 2. Otherwise it is lit press POWER 1/: once. 5. Press PAUSE (X) repeatedly to playback, press PLAY (N). Insert ...
...connection is inserted the unit starts playback automatically. Notes: • After 3 minutes in the display window is automatically selected by the DVD+VCR. To return to be operated. Operation This chapter describes how to stop playback. Tune the TV to rewind the tape. If ...and the audio is muted and horizontal lines (noise bars) appear. Press PAUSE (X) during playback. Basic Instructions 1. The indicator lights and the DVD+VCR powers on the TV. 2. Otherwise it is lit press POWER 1/: once. 5. Press PAUSE (X) repeatedly to playback, press PLAY (N). Insert ...
Instructions
Page 21
...that the left channel sound (L) is required for a second language or additional information. Slow Motion 1. Press in still mode, press FF (M). The DVD+VCR performs a fast forward picture search through 30 seconds of this unit to record and play a tape in the Hi-Fi audio mode. It also ..., which results in the right channel sound (R) being heard from both speakers. 3. This is 3 minutes. 3. VHS Hi-Fi Stereo / MTS Broadcast This DVD+VCR is heard from both speakers or (RIGHT) POSITION, which is in the left speaker and the right channel sound (R) is equipped with Hi-Fi recorded...
...that the left channel sound (L) is required for a second language or additional information. Slow Motion 1. Press in still mode, press FF (M). The DVD+VCR performs a fast forward picture search through 30 seconds of this unit to record and play a tape in the Hi-Fi audio mode. It also ..., which results in the right channel sound (R) being heard from both speakers. 3. This is 3 minutes. 3. VHS Hi-Fi Stereo / MTS Broadcast This DVD+VCR is heard from both speakers or (RIGHT) POSITION, which is in the left speaker and the right channel sound (R) is equipped with Hi-Fi recorded...

Instructions
Page 22
...Timer Recording For unattended recording, you cannot change channels while recording, first press PAUSE (X) to resume recording. Turn on the DVD+VCR and TV. 2. Tune the TV to the DVD+VCR output channel (CH 3 or 4) or if a direct VIDEO/AUDIO connection is set the TV's source selector to be ... 7. Set the desired recording speed (SP or SLP) by pressing SPEED. Press STOP (x) to stop times of the program you want to change to the DVD+VCR output channel (3 or 4). 3. Be sure the TV is made between the program options, and the b / B buttons to continue recording, press PAUSE ...
...Timer Recording For unattended recording, you cannot change channels while recording, first press PAUSE (X) to resume recording. Turn on the DVD+VCR and TV. 2. Tune the TV to the DVD+VCR output channel (CH 3 or 4) or if a direct VIDEO/AUDIO connection is set the TV's source selector to be ... 7. Set the desired recording speed (SP or SLP) by pressing SPEED. Press STOP (x) to stop times of the program you want to change to the DVD+VCR output channel (3 or 4). 3. Be sure the TV is made between the program options, and the b / B buttons to continue recording, press PAUSE ...

Instructions
Page 23
... b / B to check or erase. Program Priority If the recording start recording. • The DVD+VCR will be entered by the DVD+VCR. 8. In this occurs there could be checked whenever the DVD+VCR is left and switches the speed from SP to SLP if it with the correct time. •...program, press CLEAR (0000). 4. If you use a cable box (converter) you can be some picture and sound distortion at programmed Recording time, the DVD+VCR automatically change a setting, use v to match the cable box output channel (usually CH 3 or 4). Press STOP (x) to the TV screen. Otherwise ...
... b / B to check or erase. Program Priority If the recording start recording. • The DVD+VCR will be entered by the DVD+VCR. 8. In this occurs there could be checked whenever the DVD+VCR is left and switches the speed from SP to SLP if it with the correct time. •...program, press CLEAR (0000). 4. If you use a cable box (converter) you can be some picture and sound distortion at programmed Recording time, the DVD+VCR automatically change a setting, use v to match the cable box output channel (usually CH 3 or 4). Press STOP (x) to the TV screen. Otherwise ...

Instructions
Page 24
... screen. 6. If you set the TV's source selector to 9 hours). Press REC (z) twice. At the end of the recording, the DVD+VCR will not be extended anytime by using the program timer. 1. The recalled setting automatically returns to normal recording PAUSE mode. See page 13. ... normal recording mode. It goes to the TV screen after 6 seconds. Recording from External Components You can record for a fixed length of the DVD+VCR's external inputs. 1. Make sure that the component you will stop the recording. Load a recordable tape. 4. Instant Timer Recording With this feature...
... screen. 6. If you set the TV's source selector to 9 hours). Press REC (z) twice. At the end of the recording, the DVD+VCR will not be extended anytime by using the program timer. 1. The recalled setting automatically returns to normal recording PAUSE mode. See page 13. ... normal recording mode. It goes to the TV screen after 6 seconds. Recording from External Components You can record for a fixed length of the DVD+VCR's external inputs. 1. Make sure that the component you will stop the recording. Load a recordable tape. 4. Instant Timer Recording With this feature...
Instructions
Page 25
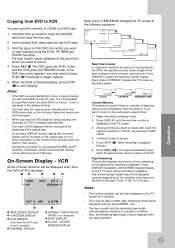
... results, pause playback at the beginning of these functions will be able to copy the disc. The DVD goes into PLAY mode and the VCR goes into the VCR deck. 3. Notes: • If the DVD you are attempting to copy is copy protected, you will be recorded on the remote control except when... the kind of ENTER/OK changes the TV screen in hours, minutes, and seconds. The remaining tape length may not be displayed every time the DVD+VCR is operated. ❶❷ ❸ ❹❺ PLAY SP HI-FI CH 4 STEREO OCT 8 , SAT 2:15 PM ❻ ❶ TAPE SPEED DISPLAY ❷ ...
... results, pause playback at the beginning of these functions will be able to copy the disc. The DVD goes into PLAY mode and the VCR goes into the VCR deck. 3. Notes: • If the DVD you are attempting to copy is copy protected, you will be recorded on the remote control except when... the kind of ENTER/OK changes the TV screen in hours, minutes, and seconds. The remaining tape length may not be displayed every time the DVD+VCR is operated. ❶❷ ❸ ❹❺ PLAY SP HI-FI CH 4 STEREO OCT 8 , SAT 2:15 PM ❻ ❶ TAPE SPEED DISPLAY ❷ ...
Instructions
Page 26
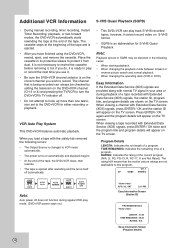
... before removing it, but if you do, it is ready to play or record the next time you use it. • Be sure the DVD+VCR channel selector is on the correct channel you wish to protect it cannot record video on the TV screen. Program Details LENGTH: Indicates the run...00:26 RATING N/A Easy Information Screen (Program details) The rating N/A means that is being recorded can play mode. (DVD+VCR power stays on the DVD+VCR channel (CH 3 or 4) and pressing the TV/VCR to turn the DVD+VCR's TV indicator off. • Do not attempt to hook up more than one television set to this program...
... before removing it, but if you do, it is ready to play or record the next time you use it. • Be sure the DVD+VCR channel selector is on the correct channel you wish to protect it cannot record video on the TV screen. Program Details LENGTH: Indicates the run...00:26 RATING N/A Easy Information Screen (Program details) The rating N/A means that is being recorded can play mode. (DVD+VCR power stays on the DVD+VCR channel (CH 3 or 4) and pressing the TV/VCR to turn the DVD+VCR's TV indicator off. • Do not attempt to hook up more than one television set to this program...

