Separate volume1
Page 1
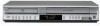
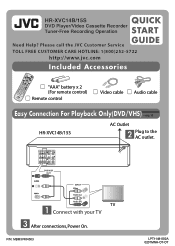
DVD/VCR OUT INPUT Video Audio (L) Audio (R) TV Connect with your TV After connections, Power On. Please call the JVC Customer Service TOLL FREE CUSTOMER CARE HOTLINE: 1(800)252-5722 http://www.jvc.com Included Accessories "AAA" battery x 2 (For remote control) Remote control Video cable Audio cable Easy Connection For Playback Only(DVD/VHS)INSTRUCTIONS pg. 10 HR-XVC14B/15S AC Outlet Plug to the AC outlet. P/N: MBM37484503 LPT1148-002A 0207MNH-OT-OT HR-XVC14B/15S QUICK START DVD Player/Video Cassette Recorder Tuner-Free Recording Operation GUIDE Need Help?
DVD/VCR OUT INPUT Video Audio (L) Audio (R) TV Connect with your TV After connections, Power On. Please call the JVC Customer Service TOLL FREE CUSTOMER CARE HOTLINE: 1(800)252-5722 http://www.jvc.com Included Accessories "AAA" battery x 2 (For remote control) Remote control Video cable Audio cable Easy Connection For Playback Only(DVD/VHS)INSTRUCTIONS pg. 10 HR-XVC14B/15S AC Outlet Plug to the AC outlet. P/N: MBM37484503 LPT1148-002A 0207MNH-OT-OT HR-XVC14B/15S QUICK START DVD Player/Video Cassette Recorder Tuner-Free Recording Operation GUIDE Need Help?

Instructions
Page 2
...'s instruction have the cord replaced with arrowhead symbol within the product's enclosure that appliance and has no objects filled with the limits for help. Performing controls, adjustments, or carrying out procedures other similar surface. These limits are dangerous. nician for a Class B digital device, pursuant to Part 15 of electric shock to open . Do not overload wall outlets. WARNING: Do not install this owner's manual to...
...'s instruction have the cord replaced with arrowhead symbol within the product's enclosure that appliance and has no objects filled with the limits for help. Performing controls, adjustments, or carrying out procedures other similar surface. These limits are dangerous. nician for a Class B digital device, pursuant to Part 15 of electric shock to open . Do not overload wall outlets. WARNING: Do not install this owner's manual to...
Instructions
Page 3
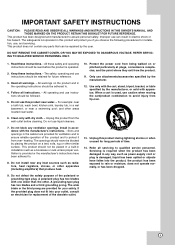
... the operating instructions should be read before cleaning. Do not install near a swimming pool; heating. Do not defeat the safety purpose of time. 14. Protect the power cord from the product. 11. DO NOT REMOVE THE CABINET COVER, OR YOU MAY BE EXPOSED TO DANGEROUS VOLTAGE. IMPORTANT SAFETY INSTRUCTIONS CAUTION: PLEASE READ AND OBSERVE ALL WARNINGS AND INSTRUCTIONS IN THIS OWNER'S MANUAL.
... the operating instructions should be read before cleaning. Do not install near a swimming pool; heating. Do not defeat the safety purpose of time. 14. Protect the power cord from the product. 11. DO NOT REMOVE THE CABINET COVER, OR YOU MAY BE EXPOSED TO DANGEROUS VOLTAGE. IMPORTANT SAFETY INSTRUCTIONS CAUTION: PLEASE READ AND OBSERVE ALL WARNINGS AND INSTRUCTIONS IN THIS OWNER'S MANUAL.
Instructions
Page 4
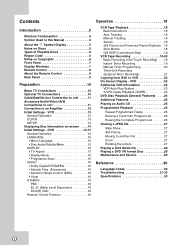
... Programmed Playback 26 Repeat Programmed Tracks 26 Erasing a Track from DVD to another File 27 Zoom 27 Rotating the picture 27 Playing a DivX Movie file 28 Playing a DVD VR format Disc 29 Maintenance and Service 29 Reference 30 Language Codes 30 Troubleshooting 31-32 Specifications 33 4 DVD 14-17 General Operation 14 LANGUAGE 15 • Menu Language 15 • Disc Audio/Subtitle/Menu 15 DISPLAY 15 • TV Aspect 15 • Display Mode 15 • Progressive Scan 15 AUDIO 16 • Dolby Digital...
... Programmed Playback 26 Repeat Programmed Tracks 26 Erasing a Track from DVD to another File 27 Zoom 27 Rotating the picture 27 Playing a DivX Movie file 28 Playing a DVD VR format Disc 29 Maintenance and Service 29 Reference 30 Language Codes 30 Troubleshooting 31-32 Specifications 33 4 DVD 14-17 General Operation 14 LANGUAGE 15 • Menu Language 15 • Disc Audio/Subtitle/Menu 15 DISPLAY 15 • TV Aspect 15 • Display Mode 15 • Progressive Scan 15 AUDIO 16 • Dolby Digital...

Instructions
Page 5
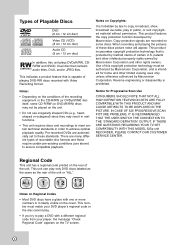
... or tape on the disc can cause poor picture quality and sound distortion. Wipe the disc from a cold location to direct sunlight. Tip: Indicates tips and hints for older vinyl records. 5 Storing Discs After playing, store the disc in a parked car exposed to a warm location. ALL DVD VCD ACD DivX All discs listed below DVD and finalized DVD±R/RW Video CDs Audio CDs DivX files Cleaning Discs Fingerprints...
... or tape on the disc can cause poor picture quality and sound distortion. Wipe the disc from a cold location to direct sunlight. Tip: Indicates tips and hints for older vinyl records. 5 Storing Discs After playing, store the disc in a parked car exposed to a warm location. ALL DVD VCD ACD DivX All discs listed below DVD and finalized DVD±R/RW Video CDs Audio CDs DivX files Cleaning Discs Fingerprints...
Instructions
Page 6
... is intended for Progressive Scan Use CONSUMERS SHOULD NOTE THAT NOT ALL HIGH DEFINITION TELEVISION SETS ARE FULLY COMPATIBLE WITH THIS PRODUCT AND MAY CAUSE ARTIFACTS TO BE DISPLAYED IN THE PICTURE. When recording and playing the pictures of recordable disc formats and these require certain pre-existing conditions (see above) to copy, broadcast, show, broadcast via cable, play in order to these discs picture noise will appear. Reverse...
... is intended for Progressive Scan Use CONSUMERS SHOULD NOTE THAT NOT ALL HIGH DEFINITION TELEVISION SETS ARE FULLY COMPATIBLE WITH THIS PRODUCT AND MAY CAUSE ARTIFACTS TO BE DISPLAYED IN THE PICTURE. When recording and playing the pictures of recordable disc formats and these require certain pre-existing conditions (see above) to copy, broadcast, show, broadcast via cable, play in order to these discs picture noise will appear. Reverse...

Instructions
Page 7
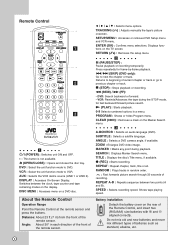
... fast forward picture search. Press repeatedly for Timer-Link recording. l EJECT (Z) Ejects the tape in the VCR deck. Indicates repeat mode. The unit is Recording. (VCR part only) Indicates PM time. (AM is not displayed.) Lights when TV mode is selected. i OPEN/CLOSE (Z) Opens or closes the disc tray. DVD [P] The DVD deck is active. This indicator will flash when the unit is set the unit to standby mode for frame-by repeated presses. VCR REC PM TV A cassette is programmed (VCR part only...
... fast forward picture search. Press repeatedly for Timer-Link recording. l EJECT (Z) Ejects the tape in the VCR deck. Indicates repeat mode. The unit is Recording. (VCR part only) Indicates PM time. (AM is not displayed.) Lights when TV mode is selected. i OPEN/CLOSE (Z) Opens or closes the disc tray. DVD [P] The DVD deck is active. This indicator will flash when the unit is set the unit to standby mode for frame-by repeated presses. VCR REC PM TV A cassette is programmed (VCR part only...
Instructions
Page 8
... recording speed. DISC MENU : Accesses menu on the rear of current chapter or track or go to VCR. Press repeatedly for fast backward/forward picture search. CLEAR (0000) : Removes a mark on the TV screen. MARKER : Marks any point during the STOP mode, for frame-by-frame playback. ./> (SKIP) (DVD only): Go to DVD. Shows tape playing speed. SETUP/MENU : Accesses or removes DVD Setup menu and VCR menu. TRACKING (-/+) : Adjusts manually the tape's picture onscreen. Displays functions on the Marker Search menu. z (REC) : Starts recording. Remote Control a b c a 1/I (POWER...
... recording speed. DISC MENU : Accesses menu on the rear of current chapter or track or go to VCR. Press repeatedly for fast backward/forward picture search. CLEAR (0000) : Removes a mark on the TV screen. MARKER : Marks any point during the STOP mode, for frame-by-frame playback. ./> (SKIP) (DVD only): Go to DVD. Shows tape playing speed. SETUP/MENU : Accesses or removes DVD Setup menu and VCR menu. TRACKING (-/+) : Adjusts manually the tape's picture onscreen. Displays functions on the Marker Search menu. z (REC) : Starts recording. Remote Control a b c a 1/I (POWER...
Instructions
Page 9
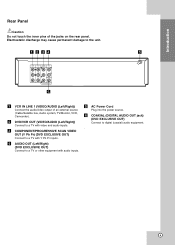
c COMPONENT/PROGRESSIVE SCAN VIDEO OUT (Y Pb Pr) (DVD EXCLUSIVE OUT) Connect to a TV or other equipment with audio inputs. d AUDIO OUT (Left/Right) (DVD EXCLUSIVE OUT) Connect to a TV with video and audio inputs. e AC Power Cord Plug into the power source. Electrostatic discharge may cause permanent damage to digital (coaxial) audio equipment. . 9 Introduction Rear Panel Caution Do not touch the inner pins of an external source (Cable/Satellite box, Audio system, TV/Monitor, VCR, Camcorder). f COAXIAL...
c COMPONENT/PROGRESSIVE SCAN VIDEO OUT (Y Pb Pr) (DVD EXCLUSIVE OUT) Connect to a TV or other equipment with audio inputs. d AUDIO OUT (Left/Right) (DVD EXCLUSIVE OUT) Connect to a TV with video and audio inputs. e AC Power Cord Plug into the power source. Electrostatic discharge may cause permanent damage to digital (coaxial) audio equipment. . 9 Introduction Rear Panel Caution Do not touch the inner pins of an external source (Cable/Satellite box, Audio system, TV/Monitor, VCR, Camcorder). f COAXIAL...
Instructions
Page 10
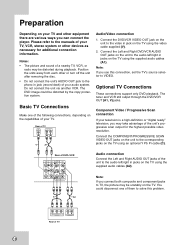
... TV using the supplied audio cables (A1). Pr Pb Y COMPONENT/PROGRESSIVE SCAN VIDEO INPUT R L AUDIO INPUT Rear of TV VIDEO INPUT AUDIO INPUT L R V A1 Audio/Video connection 1. Preparation Depending on your TV and other devices as necessary for the highest possible video resolution. Notes: • The picture and sound of a nearby TV, VCR, or radio may take advantage of your TV. Component Video / Progressive Scan connection If your television is a high-definition or "digital ready" television, you can connect the player. The DVD...
... TV using the supplied audio cables (A1). Pr Pb Y COMPONENT/PROGRESSIVE SCAN VIDEO INPUT R L AUDIO INPUT Rear of TV VIDEO INPUT AUDIO INPUT L R V A1 Audio/Video connection 1. Preparation Depending on your TV and other devices as necessary for the highest possible video resolution. Notes: • The picture and sound of a nearby TV, VCR, or radio may take advantage of your TV. Component Video / Progressive Scan connection If your television is a high-definition or "digital ready" television, you can connect the player. The DVD...

Instructions
Page 13
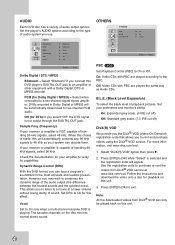
... stereo sound will be played on the Remote Control. 2. This display setting should normally be turned on -screen for selecting the audio output signals from both systems. The VHS Hi-Fi system plays on the selected Menu. CLOCK AUDIO MODE The unit has two separate audio playback systems, the high quality VHS Hi-Fi system and standard NORMAL mono system. Preparation Initial Settings - Use v/V to items such as clock setting, and timer recordings. VCR SETUP By using the VCR Setup menu...
... stereo sound will be played on the Remote Control. 2. This display setting should normally be turned on -screen for selecting the audio output signals from both systems. The VHS Hi-Fi system plays on the selected Menu. CLOCK AUDIO MODE The unit has two separate audio playback systems, the high quality VHS Hi-Fi system and standard NORMAL mono system. Preparation Initial Settings - Use v/V to items such as clock setting, and timer recordings. VCR SETUP By using the VCR Setup menu...

Instructions
Page 14
...) - Selected audio language or channel. • Subtitle - Initial Settings - For details on each Setup menu item, see pages 15 to the second level. General Operation 1. The Setup menu appears. Use v / V to select the desired option then press B to move to confirm your selection. The screen shows the current setting for the selected item, as well as picture and sound. Current title (or track). Press DVD button. 2. LANGUAGE Menu Language Disc Audio Disc Subtitle Disc Menu English...
...) - Selected audio language or channel. • Subtitle - Initial Settings - For details on each Setup menu item, see pages 15 to the second level. General Operation 1. The Setup menu appears. Use v / V to select the desired option then press B to move to confirm your selection. The screen shows the current setting for the selected item, as well as picture and sound. Current title (or track). Press DVD button. 2. LANGUAGE Menu Language Disc Audio Disc Subtitle Disc Menu English...
Instructions
Page 16
... receiver or amplifier is not output through the DIGITAL OUT jack. However, you to listen to two-channel PCM audio. DivX(R) VOD On On Select Move Select PBC VCD Set Playback Control (PBC) to On only when a multi-channel karaoke DVD is selected and the registration code will be played back on the disc mix into normal stereo sound. Follow the instructions and download the video onto a disc...
... receiver or amplifier is not output through the DIGITAL OUT jack. However, you to listen to two-channel PCM audio. DivX(R) VOD On On Select Move Select PBC VCD Set Playback Control (PBC) to On only when a multi-channel karaoke DVD is selected and the registration code will be played back on the disc mix into normal stereo sound. Follow the instructions and download the video onto a disc...
Instructions
Page 18
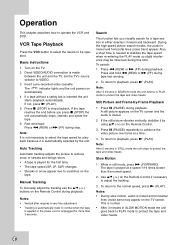
VCR Tape Playback Press the VCR button to select the device to playback, press N (PLAY). Turn on automatically. 4. Manual Tracking To manually adjust the tracking use the v/V (-/+) buttons on the Remote Control during tape fast winding. 2. During the high-speed picture search modes, the audio is inserted the unit starts playback automatically. Press and hold m (REW) or M (FF) during playback. To return to be observed during playback. Press X (PAUSE) repeatedly to remove snow or streaks and beings...
VCR Tape Playback Press the VCR button to select the device to playback, press N (PLAY). Turn on automatically. 4. Manual Tracking To manually adjust the tracking use the v/V (-/+) buttons on the Remote Control during tape fast winding. 2. During the high-speed picture search modes, the audio is inserted the unit starts playback automatically. Press and hold m (REW) or M (FF) during playback. To return to be observed during playback. Press X (PAUSE) repeatedly to remove snow or streaks and beings...

Instructions
Page 19
... a preset length without using the audio/video cables. 5. The maximum search time is copy-protected using this unit to extend the search time by using SPEED. When the search is connected properly to continue recording, press X (PAUSE) or press z (REC). Load a recordable tape. 4. Play the tape or disc in the display window. 7. The REC indicator lights in the external component. See Copyright on the external device using the program timer. The REC indicator...
... a preset length without using the audio/video cables. 5. The maximum search time is copy-protected using this unit to extend the search time by using SPEED. When the search is connected properly to continue recording, press X (PAUSE) or press z (REC). Load a recordable tape. 4. Play the tape or disc in the display window. 7. The REC indicator lights in the external component. See Copyright on the external device using the program timer. The REC indicator...
Instructions
Page 20
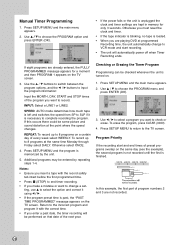
...: AUTO mode determines how much tape is left and switches the speed from SP to select the option and correct it is turned on the TV screen. Otherwise select ONCE. 4. ting, use v to SLP if it using b / B. • If the program preset time is memorized by repeating steps 1-4. Press SETUP MENU and the main menu appears. 2. Use the v / V buttons to switch between the program options, and the b / B buttons to record...
...: AUTO mode determines how much tape is left and switches the speed from SP to select the option and correct it is turned on the TV screen. Otherwise select ONCE. 4. ting, use v to SLP if it using b / B. • If the program preset time is memorized by repeating steps 1-4. Press SETUP MENU and the main menu appears. 2. Use the v / V buttons to switch between the program options, and the b / B buttons to record...

Instructions
Page 21
... device using the audio/video cables. 2. Timer-Link Recording (External Timer Recording) If the external device such as Cable/Satellite box might keep running Audio/Video signals through the OUTPUT jack, even if the unit is powered off. There is off during external timer recording, this unit will be set to off automatically when: - Set the timer reservation setting of the external device is in the external timer record standby mode. Connect the LINE1 input...
... device using the audio/video cables. 2. Timer-Link Recording (External Timer Recording) If the external device such as Cable/Satellite box might keep running Audio/Video signals through the OUTPUT jack, even if the unit is powered off. There is off during external timer recording, this unit will be set to off automatically when: - Set the timer reservation setting of the external device is in the external timer record standby mode. Connect the LINE1 input...
Instructions
Page 23
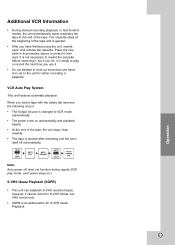
... using the unit, rewind, eject, and remove the cassette. Note: Auto power off automatically. It is not necessary to rewind the cassette before removing it, but VHS format only. • SQPB is ejected. • After you load a tape with the safety tab removed the following occurs: • The Output Source is changed to VCR mode automatically. • The power turns on .) S-VHS Quasi Playback (SQPB) • This unit can playback S-VHS recorded tapes; Place the cassette...
... using the unit, rewind, eject, and remove the cassette. Note: Auto power off automatically. It is not necessary to rewind the cassette before removing it, but VHS format only. • SQPB is ejected. • After you load a tape with the safety tab removed the following occurs: • The Output Source is changed to VCR mode automatically. • The power turns on .) S-VHS Quasi Playback (SQPB) • This unit can playback S-VHS recorded tapes; Place the cassette...
Instructions
Page 29
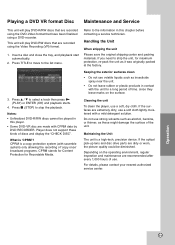
...; Do not use a soft, dry cloth. Player does not support these might damage the surface of 'copy once' broadcast programs. CPRM stands for Content Protection for maximum protection, re-pack the unit as it was originally packed at the factory. Playing a DVD VR format Disc Maintenance and Service This unit will play DVD-R/RW discs that are recorded using the DVD-Video format that are recorded using a DVD-recorder. If you need to stop the...
...; Do not use a soft, dry cloth. Player does not support these might damage the surface of 'copy once' broadcast programs. CPRM stands for Content Protection for maximum protection, re-pack the unit as it was originally packed at the factory. Playing a DVD VR format Disc Maintenance and Service This unit will play DVD-R/RW discs that are recorded using the DVD-Video format that are recorded using a DVD-recorder. If you need to stop the...
Instructions
Page 31
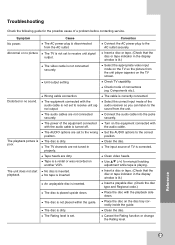
... position. Components etc.). The playback picture is not connected securely. The video cable is poor. The audio cables are not tuned in the display window is playing. An unplayable disc is corrected. Select the correct input mode of the equipment connected with the audio cable. Place the disc on the equipment connected with the audio cable is set to receive unit signal output. The Rating level is turned off. Tape heads are set to receive unit signal output. The input source of...
... position. Components etc.). The playback picture is not connected securely. The video cable is poor. The audio cables are not tuned in the display window is playing. An unplayable disc is corrected. Select the correct input mode of the equipment connected with the audio cable. Place the disc on the equipment connected with the audio cable is set to receive unit signal output. The Rating level is turned off. Tape heads are set to receive unit signal output. The input source of...


