
Software Guide
Page 11
...] window. 2 Click [Install] on the right side of formats. After a moment, the [SETUP] screen appears. ● From the [SETUP] screen, you can create a customized menu for playing back DVD-Video and video files. 1 Load the provided CD-ROM into a variety of the desired software and follow the on the [SETUP] screen. [Choose Setup Language] screen appears. 4 Select the desired language and click [OK]. The procedure differs depending on the status bar.) Digital Photo...
...] window. 2 Click [Install] on the right side of formats. After a moment, the [SETUP] screen appears. ● From the [SETUP] screen, you can create a customized menu for playing back DVD-Video and video files. 1 Load the provided CD-ROM into a variety of the desired software and follow the on the [SETUP] screen. [Choose Setup Language] screen appears. 4 Select the desired language and click [OK]. The procedure differs depending on the status bar.) Digital Photo...

Software Guide
Page 14
... recording medium. 2 Double-click the [Removable Disk] icon. 5 The folders in the camera, two [Removable Disk] icons appear. Still images Video files DPOF setting data - 14 - If the SD card is set in the camera. 2 Set the camera's power switch to the PC with a USB cable. (੬ pg. 13) On the camera's LCD monitor [USB MASSSTORAGE] appears. 4 When using Windows Explorer] and click [OK]. Select [Open folders to view files using Windows® XP: The [Removable Disk] window appears on . 3 Connect the camera to the playback mode...
... recording medium. 2 Double-click the [Removable Disk] icon. 5 The folders in the camera, two [Removable Disk] icons appear. Still images Video files DPOF setting data - 14 - If the SD card is set in the camera. 2 Set the camera's power switch to the PC with a USB cable. (੬ pg. 13) On the camera's LCD monitor [USB MASSSTORAGE] appears. 4 When using Windows Explorer] and click [OK]. Select [Open folders to view files using Windows® XP: The [Removable Disk] window appears on . 3 Connect the camera to the playback mode...

Software Guide
Page 15
... information: Information such as the date and time of the camera. You may not be produced by an accident such as when dropped. [MISC]: Contains folders with DPOF setting data A Still image file folder B Management information for the media as a whole C Management information D Video file E Management information for the video file F Video file produced on the [FOLDER] option setting of Windows®. ... Recording medium [DCIM] [100JVCSO] [101JVCSO...
... information: Information such as the date and time of the camera. You may not be produced by an accident such as when dropped. [MISC]: Contains folders with DPOF setting data A Still image file folder B Management information for the media as a whole C Management information D Video file E Management information for the video file F Video file produced on the [FOLDER] option setting of Windows®. ... Recording medium [DCIM] [100JVCSO] [101JVCSO...

Separate volume1
Page 1
... hard disk or SD cards. When requesting repairs for storage. How to format the newly-purchased SD cards with this camera before using this sheet, store it together with the camera. Refer to the software installation and USB connection guide. 8 Make a trial run before recording important data Play back the recorded data to check that has already been recorded. ● MultiMediaCards are not supported. ● For video recording, use the Format function [FORMAT] in the menu to "Troubleshooting" of time passes without operation...
... hard disk or SD cards. When requesting repairs for storage. How to format the newly-purchased SD cards with this camera before using this sheet, store it together with the camera. Refer to the software installation and USB connection guide. 8 Make a trial run before recording important data Play back the recorded data to check that has already been recorded. ● MultiMediaCards are not supported. ● For video recording, use the Format function [FORMAT] in the menu to "Troubleshooting" of time passes without operation...

Instructions
Page 2
... this camera since no time is compatible with PictBridge, still images can easily edit video and create your printer is needed for enjoying many different types of a DV tape like conventional video cameras. Playlist, playback effects, and other functions are also available for rewinding or fast forward operations. and the software installation and USB connection guide.) Direct Printing If your own DVDs. (Refer to "Read this Camera Built-in hard disk drive (HDD) instead of playback.
... this camera since no time is compatible with PictBridge, still images can easily edit video and create your printer is needed for enjoying many different types of a DV tape like conventional video cameras. Playlist, playback effects, and other functions are also available for rewinding or fast forward operations. and the software installation and USB connection guide.) Direct Printing If your own DVDs. (Refer to "Read this Camera Built-in hard disk drive (HDD) instead of playback.
Instructions
Page 3
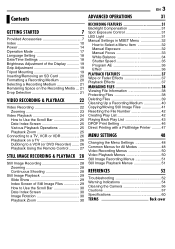
... Exposure Control 31 LED Light 31 Manual Settings in MSET Menu 32 How to Select a Menu Item 32 Manual Exposure 32 Manual Focus 33 White Balance 34 Shutter Speed 35 Program AE 36 Effect 36 PLAYBACK FEATURES 37 Wipe or Fader Effects 37 Playback Effects 37 MANAGING FILES 38 Viewing File Information 38 Protecting Files 38 Deleting Files 39 Cleaning Up a Recording Medium 40 Copying/Moving Still Image Files 41 Resetting the File Number 42 Creating Play List 42 Playing Back Play...
... Exposure Control 31 LED Light 31 Manual Settings in MSET Menu 32 How to Select a Menu Item 32 Manual Exposure 32 Manual Focus 33 White Balance 34 Shutter Speed 35 Program AE 36 Effect 36 PLAYBACK FEATURES 37 Wipe or Fader Effects 37 Playback Effects 37 MANAGING FILES 38 Viewing File Information 38 Protecting Files 38 Deleting Files 39 Cleaning Up a Recording Medium 40 Copying/Moving Still Image Files 41 Resetting the File Number 42 Creating Play List 42 Playing Back Play...

Instructions
Page 6
... to make sure the video and audio have been recorded properly. Remember that purpose, or by your important recorded data by copying the files to the software installation and USB connection guide. Any commercial use only. Before recording important video, be made properly. Make a backup of important recorded data Protect your dealer or JVC service center, be formatted. When requesting repairs for personal enjoyment, it from your camera together with the SD Memory Card. All rights reserved...
... to make sure the video and audio have been recorded properly. Remember that purpose, or by your important recorded data by copying the files to the software installation and USB connection guide. Any commercial use only. Before recording important video, be made properly. Make a backup of important recorded data Protect your dealer or JVC service center, be formatted. When requesting repairs for personal enjoyment, it from your camera together with the SD Memory Card. All rights reserved...
Instructions
Page 11
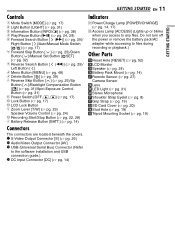
Do not turn off the power or remove the battery pack/AC adapter while accessing to any files. Q S-Video Output Connector [S] (੬ pg. 26) R Audio/Video Output Connector [AV] S USB (Universal Serial Bus) Connector (Refer to the software installation and USB connection guide.) T DC Input Connector [DC] (੬ pg. 14) GETTING STARTED EN 11 Indicators U Power/Charge Lamp [POWER/CHARGE] (੬ pg. 14, 17) V Access Lamp [ACCESS] (Lights up or blinks when you access to files during recording or playback.) Other Parts W Reset Hole [RESET] (੬...
Do not turn off the power or remove the battery pack/AC adapter while accessing to any files. Q S-Video Output Connector [S] (੬ pg. 26) R Audio/Video Output Connector [AV] S USB (Universal Serial Bus) Connector (Refer to the software installation and USB connection guide.) T DC Input Connector [DC] (੬ pg. 14) GETTING STARTED EN 11 Indicators U Power/Charge Lamp [POWER/CHARGE] (੬ pg. 14, 17) V Access Lamp [ACCESS] (Lights up or blinks when you access to files during recording or playback.) Other Parts W Reset Hole [RESET] (੬...

Instructions
Page 17
... button located on the switch. ● The power/charge lamp turns on. Playback Recording Manual mode: Manual recording is possible by opening/closing the LCD monitor. When manual mode is set to , you can record using no special effects or manual adjustments. Power Switch Power Off To return to the auto recording mode Press and hold ( / ) to switch the auto/ manual recording mode. To turn on the camera, set the power switch to or while pressing down the lock button. GETTING STARTED Operation Mode To turn off the camera by setting various functions...
... button located on the switch. ● The power/charge lamp turns on. Playback Recording Manual mode: Manual recording is possible by opening/closing the LCD monitor. When manual mode is set to , you can record using no special effects or manual adjustments. Power Switch Power Off To return to the auto recording mode Press and hold ( / ) to switch the auto/ manual recording mode. To turn on the camera, set the power switch to or while pressing down the lock button. GETTING STARTED Operation Mode To turn off the camera by setting various functions...

Instructions
Page 21
... detection function operates when the camera has not been dropped, set to continue use , set this function is accidentally dropped. For normal use . ● If a drop is set the recording media that you to [OFF]. This function is detected during shooting, the file being shot when the camera was dropped may be saved in [REC MEDIA SETTING]. (੬ pg. 48, 49) Example: When checking the HDD space 1 Set the power switch to on the picture...
... detection function operates when the camera has not been dropped, set to continue use , set this function is accidentally dropped. For normal use . ● If a drop is set the recording media that you to [OFF]. This function is detected during shooting, the file being shot when the camera was dropped may be saved in [REC MEDIA SETTING]. (੬ pg. 48, 49) Example: When checking the HDD space 1 Set the power switch to on the picture...

Instructions
Page 22
... video. 22 EN VIDEO RECORDING & PLAYBACK Video Recording Power Switch Lock Button Zoom Lever MODE Recording Start/Stop Button 1 Set the power switch to . 2 Set the MODE switch to . ● The camera is programmed to record videos on the built-in the brightness between the recorded video and still image, even if the same subject is shot. ● Video file names are assigned as zooming. ● When the camera heats up , shooting may be differences in hard disk by A to F. ● To turn the operation sounds...
... video. 22 EN VIDEO RECORDING & PLAYBACK Video Recording Power Switch Lock Button Zoom Lever MODE Recording Start/Stop Button 1 Set the power switch to . 2 Set the MODE switch to . ● The camera is programmed to record videos on the built-in the brightness between the recorded video and still image, even if the same subject is shot. ● Video file names are assigned as zooming. ● When the camera heats up , shooting may be differences in hard disk by A to F. ● To turn the operation sounds...

Instructions
Page 23
... lens, the camera may automatically zoom out depending on the distance to 25x, digital zoom - VIDEO RECORDING & PLAYBACK EN 23 VIDEO RECORDING & PLAYBACK Zooming Use the zoom function for details on its availability. To zoom in up to [60X] or [700X]*. (੬ pg. 50) * For GZ-MG30U/GZ-MG20U optical zoom can be deleted. (੬ pg. 39) ● However, if the recording mode (video or still image) is switched or the power is therefore called digital zoom. To zoom...
... lens, the camera may automatically zoom out depending on the distance to 25x, digital zoom - VIDEO RECORDING & PLAYBACK EN 23 VIDEO RECORDING & PLAYBACK Zooming Use the zoom function for details on its availability. To zoom in up to [60X] or [700X]*. (੬ pg. 50) * For GZ-MG30U/GZ-MG20U optical zoom can be deleted. (੬ pg. 39) ● However, if the recording mode (video or still image) is switched or the power is therefore called digital zoom. To zoom...

Instructions
Page 24
... junctions between scenes, the image may stop momentarily or the sound may be recorded properly, the video files are saved to the index screen, press the recording start playback. 5 To pause playback, press 49 again. In this is not a malfunction. ● The date and counter can be interrupted. 24 EN VIDEO RECORDING & PLAYBACK Video Playback Power Switch Lock Button MODE Zoom Lever 49 Speaker INFO/ 1 Set the power switch to . 2 Set the MODE switch to step 3 after [MPG] is displayed.
... junctions between scenes, the image may stop momentarily or the sound may be recorded properly, the video files are saved to the index screen, press the recording start playback. 5 To pause playback, press 49 again. In this is not a malfunction. ● The date and counter can be interrupted. 24 EN VIDEO RECORDING & PLAYBACK Video Playback Power Switch Lock Button MODE Zoom Lever 49 Speaker INFO/ 1 Set the power switch to . 2 Set the MODE switch to step 3 after [MPG] is displayed.

Instructions
Page 26
... camera, the VCR/VDR and the TV. 5 Set the VCR/VDR to its AUX input mode, and set the TV to use the YTU94146A S-Video cable. NOTES: ● The S-Video cable is not necessary to a VCR. If using a VCR or VDR, go to step 4. 3 Connect the VCR/VDR output to the TV input, referring to your VCR/VDR's instruction manual. 4 Turn on a TV 1 Make sure all units are turned off the displays.) Dubbing to a VCR (or DVD Recorder...
... camera, the VCR/VDR and the TV. 5 Set the VCR/VDR to its AUX input mode, and set the TV to use the YTU94146A S-Video cable. NOTES: ● The S-Video cable is not necessary to a VCR. If using a VCR or VDR, go to step 4. 3 Connect the VCR/VDR output to the TV input, referring to your VCR/VDR's instruction manual. 4 Turn on a TV 1 Make sure all units are turned off the displays.) Dubbing to a VCR (or DVD Recorder...
Instructions
Page 28
... continuous shooting speed will be deleted. (੬ pg. 39) ● However, if the recording mode (video or still image) is switched or the power is set to on, keeping the recording start/stop button pressed in step 3 in the brightness between still images: approx. 0.5 seconds) To use the light, see page 23. NOTES: ● There may not work well depending on the built-in hard disk by the factory-preset. Deleting Files...
... continuous shooting speed will be deleted. (੬ pg. 39) ● However, if the recording mode (video or still image) is switched or the power is set to on, keeping the recording start/stop button pressed in step 3 in the brightness between still images: approx. 0.5 seconds) To use the light, see page 23. NOTES: ● There may not work well depending on the built-in hard disk by the factory-preset. Deleting Files...

Instructions
Page 37
... ADVANCED OPERATIONS Wipe or Fader Effects Playback Effects / You can view videos or still images with special image effects. 1 Set the power switch to . 2 Set the MODE switch to or . 3 Press MENU. WIPE-WINDOW: The scene starts in as the two halves of a black screen toward the top and bottom, or wipe out from left and right, revealing the scene, or wipe out and the black screen reappears...
... ADVANCED OPERATIONS Wipe or Fader Effects Playback Effects / You can view videos or still images with special image effects. 1 Set the power switch to . 2 Set the MODE switch to or . 3 Press MENU. WIPE-WINDOW: The scene starts in as the two halves of a black screen toward the top and bottom, or wipe out from left and right, revealing the scene, or wipe out and the black screen reappears...

Instructions
Page 47
... stop printing after direct printing with a PictBridge printer, remove the USB cable, select [DIRECT PRINT] in the menu, connect the USB cable. A message [PLEASE CONNECT PRINTER] appears. 5 Connect the camera to the printer with the USB cable. ● After a while, the print menu appears. 6 Press / to select [SELECTED PRINT], then press 49. 7 Press / to select the desired file, then press 49. 8 Press / to set the number of prints. ● The number...
... stop printing after direct printing with a PictBridge printer, remove the USB cable, select [DIRECT PRINT] in the menu, connect the USB cable. A message [PLEASE CONNECT PRINTER] appears. 5 Connect the camera to the printer with the USB cable. ● After a while, the print menu appears. 6 Press / to select [SELECTED PRINT], then press 49. 7 Press / to select the desired file, then press 49. 8 Press / to set the number of prints. ● The number...
Instructions
Page 52
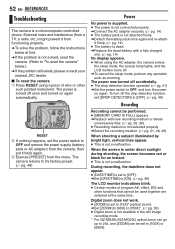
HTo solve the problem, follow the Instructions below .) HIf the problem still exists, please consult your nearest JVC dealer. 8 To reset the camera A Press RESET using the AC adapter, the camera enters the sleep mode, the access lamp lights, and the LCD monitor turns off the drop detection function, set [DROP DETECTION] to [OFF]. (੬ pg. 49) Recording Recording cannot be performed. ● [MEMORY CARD IS FULL] appears. The power was turned off once...
HTo solve the problem, follow the Instructions below .) HIf the problem still exists, please consult your nearest JVC dealer. 8 To reset the camera A Press RESET using the AC adapter, the camera enters the sleep mode, the access lamp lights, and the LCD monitor turns off the drop detection function, set [DROP DETECTION] to [OFF]. (੬ pg. 49) Recording Recording cannot be performed. ● [MEMORY CARD IS FULL] appears. The power was turned off once...

Instructions
Page 55
... slow, or the recording medium is no still image files when you attempt still image playback. The video files registered in the play list do not exist. REGISTERED SCENES IN PLAY LIST IS EMPTY. There is corrupted. The temperature of the camera is moved to the SD slot for file copy/move operation. KEEP CAMERA POWER ON, PLEASE WAIT. Use the Cleanup function [CLEAN UP] in recording media. (੬ pg. 41) NUMBER...
... slow, or the recording medium is no still image files when you attempt still image playback. The video files registered in the play list do not exist. REGISTERED SCENES IN PLAY LIST IS EMPTY. There is corrupted. The temperature of the camera is moved to the SD slot for file copy/move operation. KEEP CAMERA POWER ON, PLEASE WAIT. Use the Cleanup function [CLEAN UP] in recording media. (੬ pg. 41) NUMBER...

Instructions
Page 64
... A AC Adapter 16, 57 B Backlight Compensation 31 Battery Pack 14 Brightness Control 19, 49 C Changing The Menu Settings 48 - 51 Charging The Battery Pack 14 Cleaning Up a Recording Medium 40, 49 Connection to a TV, VCR or VDR 26 Continuous Shooting 28 Copying/Moving Still Image Files 41, 49 D Data Battery 16 Date Index Screen 25, 30 Date/Time Settings 18 Deleting Files 39 Demonstration Mode 48 Digital Image Stabilizer (DIS 50 Direct Printing 47 DPOF Print Setting (Digital Print Order Format) ...... 46...
... A AC Adapter 16, 57 B Backlight Compensation 31 Battery Pack 14 Brightness Control 19, 49 C Changing The Menu Settings 48 - 51 Charging The Battery Pack 14 Cleaning Up a Recording Medium 40, 49 Connection to a TV, VCR or VDR 26 Continuous Shooting 28 Copying/Moving Still Image Files 41, 49 D Data Battery 16 Date Index Screen 25, 30 Date/Time Settings 18 Deleting Files 39 Demonstration Mode 48 Digital Image Stabilizer (DIS 50 Direct Printing 47 DPOF Print Setting (Digital Print Order Format) ...... 46...


