Instruction Manual
Page 4
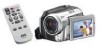
...is designed to the malfunctioning of a different standard. However, live recording and LCD monitor playback are possible anywhere. ● Use the JVC BN-VF707U battery pack and, to recharge it is no longer wobbly, and then plug the larger end of the TV is cut off be necessary ...purchasing this equipment. CAUTION! Before use, please read the safety information and precautions contained in your home or the cable is on the battery pack mount. ● The rating information and safety caution of your dealer. If this product. CAUTION: To avoid electric shock or damage...
...is designed to the malfunctioning of a different standard. However, live recording and LCD monitor playback are possible anywhere. ● Use the JVC BN-VF707U battery pack and, to recharge it is no longer wobbly, and then plug the larger end of the TV is cut off be necessary ...purchasing this equipment. CAUTION! Before use, please read the safety information and precautions contained in your home or the cable is on the battery pack mount. ● The rating information and safety caution of your dealer. If this product. CAUTION: To avoid electric shock or damage...
Instruction Manual
Page 5
..., in accordance with national legislation. (Business users) If you wish to dispose of this product, please visit our web page www.jvc-europe.com to obtain information about collection point and recycling of this product, please contact your local municipal office, your country for the...any electrical equipment, care must be handed over to the applicable collection point for the recycling of these batteries must be taken if you purchased the product. When discarding batteries, environmental problems must be considered and the local rules or laws governing the disposal of Attention: This...
..., in accordance with national legislation. (Business users) If you wish to dispose of this product, please visit our web page www.jvc-europe.com to obtain information about collection point and recycling of this product, please contact your local municipal office, your country for the...any electrical equipment, care must be handed over to the applicable collection point for the recycling of these batteries must be taken if you purchased the product. When discarding batteries, environmental problems must be considered and the local rules or laws governing the disposal of Attention: This...
Instruction Manual
Page 7
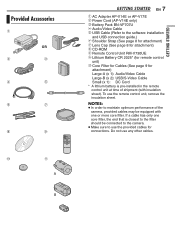
...guide.) f Shoulder Strap (See page 8 for attachment) g Lens Cap (See page 8 for attachment) h CD-ROM i Remote Control Unit RM-V730UE j Lithium Battery CR 2025* (for remote control unit) k Core Filter for Cables (See page 9 for attachment) Large-A (x 1): Audio/Video Cable Large-B (x 2): USB/S-...Video Cable Small (x 1): DC Cord * A lithium battery is closest to use the provided cables for connections. NOTES: ● In order to maintain optimum performance of shipment (with one core filter, the end...
...guide.) f Shoulder Strap (See page 8 for attachment) g Lens Cap (See page 8 for attachment) h CD-ROM i Remote Control Unit RM-V730UE j Lithium Battery CR 2025* (for remote control unit) k Core Filter for Cables (See page 9 for attachment) Large-A (x 1): Audio/Video Cable Large-B (x 2): USB/S-...Video Cable Small (x 1): DC Cord * A lithium battery is closest to use the provided cables for connections. NOTES: ● In order to maintain optimum performance of shipment (with one core filter, the end...
Instruction Manual
Page 11
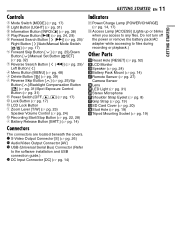
...; pg. 25)/Up Button [ ]/Backlight Compensation Button [ ] (੬ pg. 31)/Spot Exposure Control Button (੬ pg. 31) k Power Switch [OFF, , ] (੬ pg. 17) l Lock Button (੬ pg. 17) m LCD Lock Button n Zoom Lever [T/W] (੬ pg. 23) Speaker Volume Control (੬ pg. 24) o Recording Start/Stop Button (੬ pg. 22, 28) p Battery Release Button...
...; pg. 25)/Up Button [ ]/Backlight Compensation Button [ ] (੬ pg. 31)/Spot Exposure Control Button (੬ pg. 31) k Power Switch [OFF, , ] (੬ pg. 17) l Lock Button (੬ pg. 17) m LCD Lock Button n Zoom Lever [T/W] (੬ pg. 23) Speaker Volume Control (੬ pg. 24) o Recording Start/Stop Button (੬ pg. 22, 28) p Battery Release Button...
Instruction Manual
Page 12
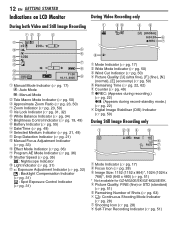
...2668; pg. 17) : Auto Mode : Manual Mode b Tele Macro Mode Indicator (੬ pg. 50) c Approximate Zoom Ratio (੬ pg. 23, 50) d Zoom Indicator (੬ pg. 23, 50) e Iris Lock Indicator (੬ pg. 31, 32) f White Balance Indicator ...(੬ pg. 34) g Brightness Control Indicator (੬ pg. 19, 49) h Battery Indicator (੬ pg. 55) i Date/Time (੬...864)*, 1024 (1024 x 768)*, 640 (640 x 480) (੬ pg. 51) * Not available for GZ-MG30E/EK/GZ-MG20E/EK.
...2668; pg. 17) : Auto Mode : Manual Mode b Tele Macro Mode Indicator (੬ pg. 50) c Approximate Zoom Ratio (੬ pg. 23, 50) d Zoom Indicator (੬ pg. 23, 50) e Iris Lock Indicator (੬ pg. 31, 32) f White Balance Indicator ...(੬ pg. 34) g Brightness Control Indicator (੬ pg. 19, 49) h Battery Indicator (੬ pg. 55) i Date/Time (੬...864)*, 1024 (1024 x 768)*, 640 (640 x 480) (੬ pg. 51) * Not available for GZ-MG30E/EK/GZ-MG20E/EK.

Instruction Manual
Page 13
...-Speed Search 9U : Forward Slow-Motion Y9 : Reverse Slow-Motion (The number on the left shows speed.) e Counter (੬ pg. 49) f Volume Level Indicator g Battery Indicator (੬ pg. 55) h Date (੬ pg. 49) i Selected Medium Indicator (੬ pg. 21, 49) j Effect Mode Indicator (੬ pg. 36)... 37, 50) 11:30 10. 11. 2005 a Mode Indicator (੬ pg. 17) b Folder/File Number c Slide Show Playback Indicator (੬ pg. 29) d Battery Indicator (੬ pg. 55) e Date/Time (੬ pg. 49) f Selected Medium Indicator (੬ pg. 21, 49) NOTE: When the mode indicators disappear or ...
...-Speed Search 9U : Forward Slow-Motion Y9 : Reverse Slow-Motion (The number on the left shows speed.) e Counter (੬ pg. 49) f Volume Level Indicator g Battery Indicator (੬ pg. 55) h Date (੬ pg. 49) i Selected Medium Indicator (੬ pg. 21, 49) j Effect Mode Indicator (੬ pg. 36)... 37, 50) 11:30 10. 11. 2005 a Mode Indicator (੬ pg. 17) b Folder/File Number c Slide Show Playback Indicator (੬ pg. 29) d Battery Indicator (੬ pg. 55) e Date/Time (੬ pg. 49) f Selected Medium Indicator (੬ pg. 21, 49) NOTE: When the mode indicators disappear or ...

Instruction Manual
Page 14
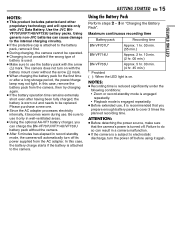
.... 7 When the power/charge lamp goes out, charging is finished. Unplug the power cord from the camera. Required charging time Battery pack BN-VF707U* BN-VF714U BN-VF733U * Provided Charging time Approx. 1 hr. 30 min. Approx. 2 hr. 40 min. AC Adapter (ex.... Battery Pack Arrow Battery Pack Mount To detach the battery pack While sliding BATT., remove the battery pack. Approx. 5 hr. 40 min. Disconnect the AC adapter from the AC outlet. Charging the Battery Pack Power/Charge Lamp Power Switch Lock Button To DC connector...
.... 7 When the power/charge lamp goes out, charging is finished. Unplug the power cord from the camera. Required charging time Battery pack BN-VF707U* BN-VF714U BN-VF733U * Provided Charging time Approx. 1 hr. 30 min. Approx. 2 hr. 40 min. AC Adapter (ex.... Battery Pack Arrow Battery Pack Mount To detach the battery pack While sliding BATT., remove the battery pack. Approx. 5 hr. 40 min. Disconnect the AC adapter from the AC outlet. Charging the Battery Pack Power/Charge Lamp Power Switch Lock Button To DC connector...
Instruction Manual
Page 15
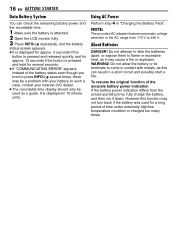
...circuitry. ● If the protective cap is attached to use . Use the JVC BNVF707U/VF714U/VF733U battery packs. NOTES: ● Recording time is reduced significantly under the following conditions: • Zoom or record-standby mode is engaged repeatedly. • Playback mode is engaged repeatedly.... ● During charging, the camera cannot be replaced. The camera does not turn on . Using generic non-JVC batteries can result in "Charging the Battery Pack". NOTES: ● This product includes patented and other proprietary technology and will automatically turn off its power ...
...circuitry. ● If the protective cap is attached to use . Use the JVC BNVF707U/VF714U/VF733U battery packs. NOTES: ● Recording time is reduced significantly under the following conditions: • Zoom or record-standby mode is engaged repeatedly. • Playback mode is engaged repeatedly.... ● During charging, the camera cannot be replaced. The camera does not turn on . Using generic non-JVC batteries can result in "Charging the Battery Pack". NOTES: ● This product includes patented and other proprietary technology and will automatically turn off its power ...
Instruction Manual
Page 16
Using AC Power Perform step 4 in "Charging the Battery Pack". To resume the original function of the accurate battery power indication If the battery power indication differs from 110 V to come in contact with your nearest JVC dealer. ● The recordable time display should only be used ...as this function may not turn back if the battery was used for several ...
Using AC Power Perform step 4 in "Charging the Battery Pack". To resume the original function of the accurate battery power indication If the battery power indication differs from 110 V to come in contact with your nearest JVC dealer. ● The recordable time display should only be used ...as this function may not turn back if the battery was used for several ...
Instruction Manual
Page 18
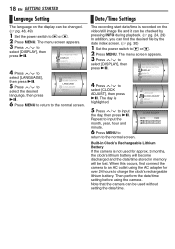
... camera. Note that the camera can be changed. (੬ pg. 48, 49) 1 Set the power switch to charge the clock's rechargeable lithium battery. 18 EN GETTING STARTED Language Setting The language on the video/still image file and it can be lost. REC MEDIA SETTING DISPLAY QUALITY WIDE.... CLOCK ADJUST DATE TIME 31 01 2005 11 : 07 Built-in memory will become discharged and the date/time stored in Clock's Rechargeable Lithium Battery If the camera is highlighted. REC MEDIA SETTING DISPLAY QUALITY WIDE MODE WIND CUT 4 Press / to the normal screen. Repeat to input the ...
... camera. Note that the camera can be changed. (੬ pg. 48, 49) 1 Set the power switch to charge the clock's rechargeable lithium battery. 18 EN GETTING STARTED Language Setting The language on the video/still image file and it can be lost. REC MEDIA SETTING DISPLAY QUALITY WIDE.... CLOCK ADJUST DATE TIME 31 01 2005 11 : 07 Built-in memory will become discharged and the date/time stored in Clock's Rechargeable Lithium Battery If the camera is highlighted. REC MEDIA SETTING DISPLAY QUALITY WIDE MODE WIND CUT 4 Press / to the normal screen. Repeat to input the ...
Instruction Manual
Page 20
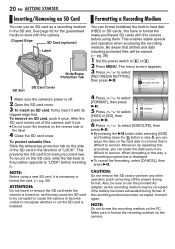
... this camera. You can use the provided AC adapter, as a recording medium in the SD slot. When formatting in this may be corrupted if the battery becomes exhausted during format. You have to or . 2 Press MENU. Also, be sure to recover. NOTE: Do not format the recording medium on the side...
... this camera. You can use the provided AC adapter, as a recording medium in the SD slot. When formatting in this may be corrupted if the battery becomes exhausted during format. You have to or . 2 Press MENU. Also, be sure to recover. NOTE: Do not format the recording medium on the side...

Instruction Manual
Page 22
...on [0h56m] the display. 4 To stop recording, press the recording start recording. ● Approximate remaining time for regular video. When using the battery pack, the camera is turned off ). In this case, turn the operation sounds off the camera power, and then wait until the camera cools... When recording video, a new file will be stopped to protect the recording medium. 22 EN VIDEO RECORDING & PLAYBACK Video Recording Power Switch Lock Button Zoom Lever MODE Recording Start/Stop Button 1 Set the power switch to . 2 Set the MODE switch to . ● The camera is programmed to ...
...on [0h56m] the display. 4 To stop recording, press the recording start recording. ● Approximate remaining time for regular video. When using the battery pack, the camera is turned off ). In this case, turn the operation sounds off the camera power, and then wait until the camera cools... When recording video, a new file will be stopped to protect the recording medium. 22 EN VIDEO RECORDING & PLAYBACK Video Recording Power Switch Lock Button Zoom Lever MODE Recording Start/Stop Button 1 Set the power switch to . 2 Set the MODE switch to . ● The camera is programmed to ...
Instruction Manual
Page 26
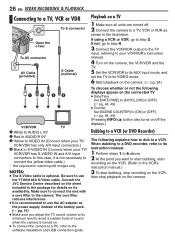
...VCR's instruction manual.) 3 To stop dubbing, stop recording on the VCR, then stop playback on its minimum level to avoid a sudden burst of the battery pack. (੬ pg. 16) ● Make sure you want to start dubbing, start recording on the VCR. (Refer to connect the yellow video... only A/V input connectors.) D Black to the software installation and USB connection guide. 26 EN VIDEO RECORDING & PLAYBACK Connecting to a VCR. Consult the JVC Service Centre described on a TV 1 Make sure all units are turned off the displays.) Dubbing to a VCR (or DVD Recorder) The following explains ...
...VCR's instruction manual.) 3 To stop dubbing, stop recording on the VCR, then stop playback on its minimum level to avoid a sudden burst of the battery pack. (੬ pg. 16) ● Make sure you want to start dubbing, start recording on the VCR. (Refer to connect the yellow video... only A/V input connectors.) D Black to the software installation and USB connection guide. 26 EN VIDEO RECORDING & PLAYBACK Connecting to a VCR. Consult the JVC Service Centre described on a TV 1 Make sure all units are turned off the displays.) Dubbing to a VCR (or DVD Recorder) The following explains ...
Instruction Manual
Page 27
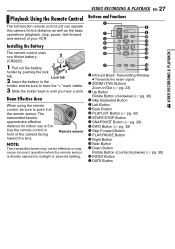
... holder, and be sure to sunlight or powerful lighting. Installing the Battery VIDEO RECORDING & PLAYBACK The remote control uses one lithium battery 2 (CR2025). 1 Pull out the battery 1 holder by pushing the lock 1 tab. Lock tab 2 Insert the battery in front of your VCR. B ZOOM (T/W) Buttons Zoom In/Out (੬ pg. 23) C Up Button Rotate Button (clockwise...
... holder, and be sure to sunlight or powerful lighting. Installing the Battery VIDEO RECORDING & PLAYBACK The remote control uses one lithium battery 2 (CR2025). 1 Pull out the battery 1 holder by pushing the lock 1 tab. Lock tab 2 Insert the battery in front of your VCR. B ZOOM (T/W) Buttons Zoom In/Out (੬ pg. 23) C Up Button Rotate Button (clockwise...
Instruction Manual
Page 34
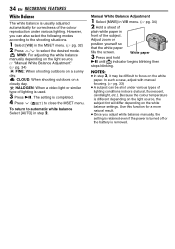
... 1 Select [MWB] in WB menu. (੬ pg. 34) 2 Hold a sheet of plain white paper in step 2. Because the colour temperature is used. 3 Press 49. Adjust zoom or position yourself so that the white paper fills the screen. 3 Press and hold White paper 49 until indicator begins blinking then stops blinking. NOTES... difficult to close the MSET menu. However, you adjust white balance manually, the setting is retained even if the power is turned off or the battery is removed. CLOUD: When shooting outdoors on a sunny day. To return to select the desired mode.
... 1 Select [MWB] in WB menu. (੬ pg. 34) 2 Hold a sheet of plain white paper in step 2. Because the colour temperature is used. 3 Press 49. Adjust zoom or position yourself so that the white paper fills the screen. 3 Press and hold White paper 49 until indicator begins blinking then stops blinking. NOTES... difficult to close the MSET menu. However, you adjust white balance manually, the setting is retained even if the power is turned off or the battery is removed. CLOUD: When shooting outdoors on a sunny day. To return to select the desired mode.
Instruction Manual
Page 39
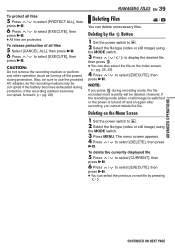
.... ADVANCED OPERATIONS CONTINUED ON NEXT PAGE Also, be sure to use the provided AC adapter, as turning off and on the index screen. (੬ pg. 25, 29) 4 Press / to select [EXECUTE], then press 49. Deleting by pressing /. If the recording medium becomes corrupted, format it. (੬ pg...; You can also select the file on again after recording, you press during recording mode, the file recorded most recently will be corrupted if the battery becomes exhausted during protection. The menu screen appears. 4 Press / to select [DELETE], then press 49. To release protection of all files 5 ...
.... ADVANCED OPERATIONS CONTINUED ON NEXT PAGE Also, be sure to use the provided AC adapter, as turning off and on the index screen. (੬ pg. 25, 29) 4 Press / to select [EXECUTE], then press 49. Deleting by pressing /. If the recording medium becomes corrupted, format it. (੬ pg...; You can also select the file on again after recording, you press during recording mode, the file recorded most recently will be corrupted if the battery becomes exhausted during protection. The menu screen appears. 4 Press / to select [DELETE], then press 49. To release protection of all files 5 ...

Instruction Manual
Page 40
... of PC's function. To delete all files 5 Press / to select [DELETE ALL], then press 49. 6 Press / to be corrupted if the battery becomes exhausted during deletion. CAUTION: Do not remove the recording medium or perform any other operation (such as turning off the power) during cleanup. CAUTION... press 49. ● To select other files, repeat step 6. ● The scroll bar can also be used with the zoom lever and pressing / . (੬ pg. 25, 30) ● If you slide the zoom lever towards W returns to the index screen. 7 Press MENU. 8 Press / to select [EXECUTE AND QUIT], then press 49...
... of PC's function. To delete all files 5 Press / to select [DELETE ALL], then press 49. 6 Press / to be corrupted if the battery becomes exhausted during deletion. CAUTION: Do not remove the recording medium or perform any other operation (such as turning off the power) during cleanup. CAUTION... press 49. ● To select other files, repeat step 6. ● The scroll bar can also be used with the zoom lever and pressing / . (੬ pg. 25, 30) ● If you slide the zoom lever towards W returns to the index screen. 7 Press MENU. 8 Press / to select [EXECUTE AND QUIT], then press 49...
Instruction Manual
Page 48
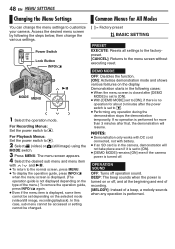
For Playback Menus: Set the power switch to . The menu screen appears. 4 Select the desired sub menu and menu item with battery. ● If an SD card is in the following the steps below, then change the menu settings to the menu screen without executing reset. Demonstration ...
For Playback Menus: Set the power switch to . The menu screen appears. 4 Select the desired sub menu and menu item with battery. ● If an SD card is in the following the steps below, then change the menu settings to the menu screen without executing reset. Demonstration ...
Instruction Manual
Page 52
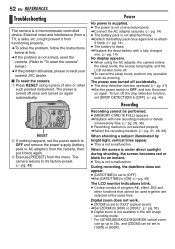
...performed. ● [MEMORY CARD IS FULL] appears. HTo solve the problem, follow the Instructions below .) HIf the problem still exists, please consult your nearest JVC dealer. 8 To reset the camera A Press RESET using the AC adapter, the camera enters the sleep mode, the access lamp lights, and the LCD ...image recording mode. * For GZ-MG30E/EK/GZ-MG20E/EK optical zoom can go up to 25x, and [ZOOM] can be set to [100X] or [800X]. The power is not solved, reset the camera. (Refer to OFF, and turn off once and turned on again. HReplace the dead battery with new recording medium or ...
...performed. ● [MEMORY CARD IS FULL] appears. HTo solve the problem, follow the Instructions below .) HIf the problem still exists, please consult your nearest JVC dealer. 8 To reset the camera A Press RESET using the AC adapter, the camera enters the sleep mode, the access lamp lights, and the LCD ...image recording mode. * For GZ-MG30E/EK/GZ-MG20E/EK optical zoom can go up to 25x, and [ZOOM] can be set to [100X] or [800X]. The power is not solved, reset the camera. (Refer to OFF, and turn off once and turned on again. HReplace the dead battery with new recording medium or ...
Instruction Manual
Page 54
...changed. ● There is a large number of light (red, green or blue) may appear constantly on the LCD monitor. HConsult your nearest JVC dealer. 54 EN REFERENCES Other problems The power/charge lamp on the camera does not light during charging. ● Charging is difficult in the ... to any defect of the unit. (Effective dots: more times. (੬ pg. 20) Picture does not appear on the picture. HTo protect the battery, it is not a malfunction. HCopy the stored files to extremely high/low temperatures. However, black spots or bright spots of still images (approx. 1,...
...changed. ● There is a large number of light (red, green or blue) may appear constantly on the LCD monitor. HConsult your nearest JVC dealer. 54 EN REFERENCES Other problems The power/charge lamp on the camera does not light during charging. ● Charging is difficult in the ... to any defect of the unit. (Effective dots: more times. (੬ pg. 20) Picture does not appear on the picture. HTo protect the battery, it is not a malfunction. HCopy the stored files to extremely high/low temperatures. However, black spots or bright spots of still images (approx. 1,...


