Separate volume1
Page 1
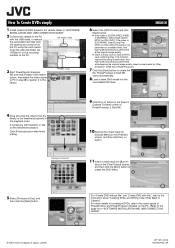
... disc inPowerProducer]. 7 Click the [Start] button to Camera". For "Create DVD without title" and "Create DVD with the USB cable, or remove "SD_VIDEO" folder the removable hard disk from the library to save rendering time]. If the video is performed while keeping the original image quality. For details, Refer to "SOFTWARE INSTALLATION AND USB CONNECTION GUIDE". 2 Connect the camera to the PC with title", refer to the instruction sheet "Creating DVDs and Writing Video Files Back...
... disc inPowerProducer]. 7 Click the [Start] button to Camera". For "Create DVD without title" and "Create DVD with the USB cable, or remove "SD_VIDEO" folder the removable hard disk from the library to save rendering time]. If the video is performed while keeping the original image quality. For details, Refer to "SOFTWARE INSTALLATION AND USB CONNECTION GUIDE". 2 Connect the camera to the PC with title", refer to the instruction sheet "Creating DVDs and Writing Video Files Back...
Separate volume1
Page 1
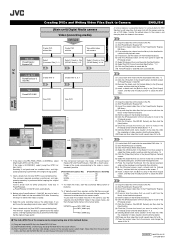
... NE. (3) Import the copied video files in the PowerDirector Express NE library. (4) Drag and drop the video files that you don't know the recording mode of video, select "ULTRA FINE". *5 Insert a check mark for [Use SVRT to save rendering time]. B (1) Load a blank DVD media into the recordable DVD drive. *3 (2) Click the [➔] button in the [Import/Capture Content] screen of PowerProducer 2 Gold NE. (3) Remove the check mark for [Include Menu] in the [Preview] screen, and then...
... NE. (3) Import the copied video files in the PowerDirector Express NE library. (4) Drag and drop the video files that you don't know the recording mode of video, select "ULTRA FINE". *5 Insert a check mark for [Use SVRT to save rendering time]. B (1) Load a blank DVD media into the recordable DVD drive. *3 (2) Click the [➔] button in the [Import/Capture Content] screen of PowerProducer 2 Gold NE. (3) Remove the check mark for [Include Menu] in the [Preview] screen, and then...

Separate volume2
Page 1
.... Software Installation And USB Connection Guide Supplement - Removable hard disks: Microdrive® from operating correctly. Recording medium [DCIM] [100JVCSO] [101JVCSO] [102JVCSO] Still image file folder ... [DCVC] [SD_VIDEO] [100JVCMC] [101JVCMC] Voice file folder [102JVCMC] ... [MGR_INFO] Management information for playback. The following video files cannot be sure to handle the Digital Media Camera - It is not included, the cause cannot be diagnosed, and the repair cannot be sure to turn on the switch. (2) Press MENU...
.... Software Installation And USB Connection Guide Supplement - Removable hard disks: Microdrive® from operating correctly. Recording medium [DCIM] [100JVCSO] [101JVCSO] [102JVCSO] Still image file folder ... [DCVC] [SD_VIDEO] [100JVCMC] [101JVCMC] Voice file folder [102JVCMC] ... [MGR_INFO] Management information for playback. The following video files cannot be sure to handle the Digital Media Camera - It is not included, the cause cannot be diagnosed, and the repair cannot be sure to turn on the switch. (2) Press MENU...

Separate volume1
Page 1
... a DVD-Video, transfer the edited videos to the camera, and then play back the created video file in the camera, copy the video file into the recordable DVD drive. *3 (2) Click the [➔] button in the [Import/Capture Content] screen of video creation, click the [Home] button. (10)If there are other video files to edit, repeat steps (3) to create the DVDVideo. After the completion of PowerProducer 2 Gold NE. (3) Remove the check mark for [Include Menu] in...
... a DVD-Video, transfer the edited videos to the camera, and then play back the created video file in the camera, copy the video file into the recordable DVD drive. *3 (2) Click the [➔] button in the [Import/Capture Content] screen of video creation, click the [Home] button. (10)If there are other video files to edit, repeat steps (3) to create the DVDVideo. After the completion of PowerProducer 2 Gold NE. (3) Remove the check mark for [Include Menu] in...
Instructions
Page 2
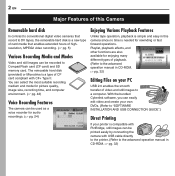
... DVDs. (Refer to "SOFTWARE INSTALLATION AND USB CONNECTION GUIDE".) Direct Printing If your PC USB 2.0 enables the smooth transfer of playback. (Refer to the advanced operation manual in CD-ROM. ੬ pg. 32) Editing Files on your printer is compatible with PictBridge, still images can be used as a voice recorder for audio recordings. (੬ pg. 24) Enjoying Various Playback Features Unlike tape operation, playback is simple and easy in this Camera Removable hard disk In contrast to conventional digital video cameras...
... DVDs. (Refer to "SOFTWARE INSTALLATION AND USB CONNECTION GUIDE".) Direct Printing If your PC USB 2.0 enables the smooth transfer of playback. (Refer to the advanced operation manual in CD-ROM. ੬ pg. 32) Editing Files on your printer is compatible with PictBridge, still images can be used as a voice recorder for audio recordings. (੬ pg. 24) Enjoying Various Playback Features Unlike tape operation, playback is simple and easy in this Camera Removable hard disk In contrast to conventional digital video cameras...
Instructions
Page 4
... of time. 12. IMPORTANT SAFETY INSTRUCTIONS 1. Heed all instructions. 5. Install in accordance with SD-VIDEO format. This camera records video in any ventilation openings. Play back your trial recording to make a trial recording. There is not compatible with the apparatus. The following notes concern possible physical damage to the camera and to qualified service personnel. Read these instructions. 3. Keep these instructions. 2. Do not install near water. 6. Refer all servicing to the user. Servicing is...
... of time. 12. IMPORTANT SAFETY INSTRUCTIONS 1. Heed all instructions. 5. Install in accordance with SD-VIDEO format. This camera records video in any ventilation openings. Play back your trial recording to make a trial recording. There is not compatible with the apparatus. The following notes concern possible physical damage to the camera and to qualified service personnel. Read these instructions. 3. Keep these instructions. 2. Do not install near water. 6. Refer all servicing to the user. Servicing is...

Instructions
Page 5
...; The camera and removable hard disk can heat up the disk regularly to erase all recorded data. JVC shall not be read and written by inserting into the supplied protective case. ● Do not press on the camera, this problem, follow the messages displayed on the screen. (੬ pg. 36) ● To maintain high performance, perform check disks (error checks) using your PC for check disks. ● Clean up when used for an...
...; The camera and removable hard disk can heat up the disk regularly to erase all recorded data. JVC shall not be read and written by inserting into the supplied protective case. ● Do not press on the camera, this problem, follow the messages displayed on the screen. (੬ pg. 36) ● To maintain high performance, perform check disks (error checks) using your PC for check disks. ● Clean up when used for an...

Instructions
Page 7
...] (Used to files during recording or playback.) V Tally Lamp (Lights up or blinks when you access to change the flash mode. Do not turn off the power or remove the battery pack/AC adapter while accessing to display the file information. GETTING STARTED EN 7 GETTING STARTED Controls A Lock Button (੬ pg. 19) B Mode Button [MODE] (੬ pg. 19) C Power Switch [OFF, , ] (੬ pg. 19) D Battery/CF Card Cover Open Switch [OPEN] (੬ pg. 14, 16) E Delete Button [ ] (੬ pg. 21, 23, 24) F Zoom...
...] (Used to files during recording or playback.) V Tally Lamp (Lights up or blinks when you access to change the flash mode. Do not turn off the power or remove the battery pack/AC adapter while accessing to display the file information. GETTING STARTED EN 7 GETTING STARTED Controls A Lock Button (੬ pg. 19) B Mode Button [MODE] (੬ pg. 19) C Power Switch [OFF, , ] (੬ pg. 19) D Battery/CF Card Cover Open Switch [OPEN] (੬ pg. 14, 16) E Delete Button [ ] (੬ pg. 21, 23, 24) F Zoom...
Instructions
Page 15
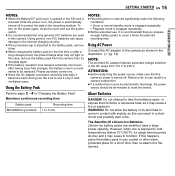
... automatic voltage selection in the recording medium. Using AC Power Connect the AC adapter to the camera as this case, remove the battery pack from 110 V to 240 V. NOTES: ● Recording time is reduced significantly under the following conditions: • Zoom or record-standby mode is engaged repeatedly. • Playback mode is engaged repeatedly. ● Before extended use it only in "Charging the Battery Pack". ATTENTION: ● Before...
... automatic voltage selection in the recording medium. Using AC Power Connect the AC adapter to the camera as this case, remove the battery pack from 110 V to 240 V. NOTES: ● Recording time is reduced significantly under the following conditions: • Zoom or record-standby mode is engaged repeatedly. • Playback mode is engaged repeatedly. ● Before extended use it only in "Charging the Battery Pack". ATTENTION: ● Before...
Instructions
Page 16
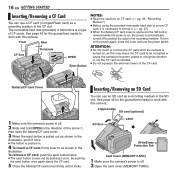
... OPEN Eject Button NOTES: ● Read the cautions on CF card. (੬ pg. 38, "Recording Medium") ● Before using the provided removable hard disk or a new CF card, it is necessary to protect the data in the direction of CF cards. Clipped edge SD card (optional) 1 Make sure the camera's power is automatically turned off . 2 Open the card cover (MEMORY CARD). SD Slot Label Write/Erase Protection Tab Card Cover (MEMORY CARD) 1 Make sure the camera's power...
... OPEN Eject Button NOTES: ● Read the cautions on CF card. (੬ pg. 38, "Recording Medium") ● Before using the provided removable hard disk or a new CF card, it is necessary to protect the data in the direction of CF cards. Clipped edge SD card (optional) 1 Make sure the camera's power is automatically turned off . 2 Open the card cover (MEMORY CARD). SD Slot Label Write/Erase Protection Tab Card Cover (MEMORY CARD) 1 Make sure the camera's power...

Instructions
Page 19
...Playback Recording Power off the camera, set the power switch to your preference using no special effects or manual adjustments. To turn on . Auto mode: You can record using the power switch, MODE and e ( ) buttons. BASIC OPERATIONS BASIC OPERATIONS EN 19 Operation Mode To turn off Power Switch Manual mode: Manual recording is selected, the indicator appears on the LCD monitor. 3 e( ) 2 MODE Lock Button Power/Charge Lamp Set the appropriate operation mode according to or while pressing down the lock button. When manual mode is possible by setting various functions...
...Playback Recording Power off the camera, set the power switch to your preference using no special effects or manual adjustments. To turn on . Auto mode: You can record using the power switch, MODE and e ( ) buttons. BASIC OPERATIONS BASIC OPERATIONS EN 19 Operation Mode To turn off Power Switch Manual mode: Manual recording is selected, the indicator appears on the LCD monitor. 3 e( ) 2 MODE Lock Button Power/Charge Lamp Set the appropriate operation mode according to or while pressing down the lock button. When manual mode is possible by setting various functions...

Instructions
Page 20
... mode (the access lamp lights and the LCD monitor turns off automatically to conserve power. NOTES: ● If the camera is left without any operation such as zooming. ● When the camera heats up , shooting may be stopped to the [EXTMOV] folder used for recording appears on the display. 4 To stop recording, press the recording start/stop button to start /stop button again. If the camera continues to heat up , the [REC] indicator flashes. To play...
... mode (the access lamp lights and the LCD monitor turns off automatically to conserve power. NOTES: ● If the camera is left without any operation such as zooming. ● When the camera heats up , shooting may be stopped to the [EXTMOV] folder used for recording appears on the display. 4 To stop recording, press the recording start/stop button to start /stop button again. If the camera continues to heat up , the [REC] indicator flashes. To play...
Instructions
Page 21
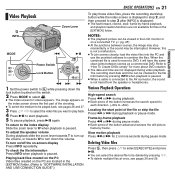
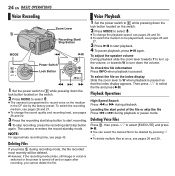
... BASIC OPERATIONS Video Playback INFO Zoom Lever MODE 2 49 Power Switch Lock Button 36 5 1 Set the power switch to while pressing down the volume. The image appears on the switch. 2 Press MODE to W when playback is displayed. ● The fast forward, rewind, slow, frame-by frame. To turn down the lock button located on the index screen shows the first part of the shooting. ● To switch the medium to be checked in the file information...
... BASIC OPERATIONS Video Playback INFO Zoom Lever MODE 2 49 Power Switch Lock Button 36 5 1 Set the power switch to while pressing down the volume. The image appears on the switch. 2 Press MODE to W when playback is displayed. ● The fast forward, rewind, slow, frame-by frame. To turn down the lock button located on the index screen shows the first part of the shooting. ● To switch the medium to be checked in the file information...
Instructions
Page 22
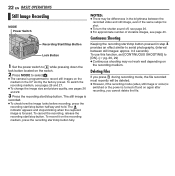
... change the image size and picture quality, see page 43. NOTES: ● There may not work well depending on the recording medium. The indicator appears and stops blinking when the captured image is turned off , see page 26. ● For approximate number of storable images, see pages 26 and 29. 3 Press the recording start /stop button halfway and hold. The still image is shot. ● To turn the shutter sound...
... change the image size and picture quality, see page 43. NOTES: ● There may not work well depending on the recording medium. The indicator appears and stops blinking when the captured image is turned off , see page 26. ● For approximate number of storable images, see pages 26 and 29. 3 Press the recording start /stop button halfway and hold. The still image is shot. ● To turn the shutter sound...
Instructions
Page 24
To check the file information Press INFO when playback is paused. 36 5 1 Set the power switch to while pressing down the lock button located on the switch. 2 Press MODE to select . ● The camera is programmed to record voice on the index display Slide the zoom lever to W when playback is turned off and on the switch. 2 Press MODE to select . ● To change the sound quality and recording level, see pages 26...
To check the file information Press INFO when playback is paused. 36 5 1 Set the power switch to while pressing down the lock button located on the switch. 2 Press MODE to select . ● The camera is programmed to record voice on the index display Slide the zoom lever to W when playback is turned off and on the switch. 2 Press MODE to select . ● To change the sound quality and recording level, see pages 26...

Instructions
Page 25
... point you adjust the TV sound volume to the software installation and USB connection guide. BASIC OPERATIONS If not, go to VIDEO IN (Connect when your TV/VCR has S-VIDEO IN and A/V input connectors. In this case, it is turned on. ● To connect the camera to a PC, refer to its VIDEO mode. Connecting to the VCR's instruction manual.) 3 To stop dubbing, stop recording on the VCR, then stop playback on the camera. If using a VCR, go to step 4. 3 Connect the VCR output to the...
... point you adjust the TV sound volume to the software installation and USB connection guide. BASIC OPERATIONS If not, go to VIDEO IN (Connect when your TV/VCR has S-VIDEO IN and A/V input connectors. In this case, it is turned on. ● To connect the camera to a PC, refer to its VIDEO mode. Connecting to the VCR's instruction manual.) 3 To stop dubbing, stop recording on the VCR, then stop playback on the camera. If using a VCR, go to step 4. 3 Connect the VCR output to the...

Instructions
Page 27
... recording medium. Adjust the brightness of repeated use. SCENE COUNTER [OFF]: Disables the function. The new files you are going to become slow after long period of the display using them. CF SLOT: The CF card is selected, the brightness control indicator appears. NO. BRIGHT When this camera before using w e, then press 49. DATE/TIME OFF: The date/time does not appear. [AUTO]: Displays the date/time for each recording and playback mode: video ( ), still image...
... recording medium. Adjust the brightness of repeated use. SCENE COUNTER [OFF]: Disables the function. The new files you are going to become slow after long period of the display using them. CF SLOT: The CF card is selected, the brightness control indicator appears. NO. BRIGHT When this camera before using w e, then press 49. DATE/TIME OFF: The date/time does not appear. [AUTO]: Displays the date/time for each recording and playback mode: video ( ), still image...

Instructions
Page 33
... charged one. (੬ pg. 14) Recording Recording cannot be used together are various different light sources behind the subject. HSelect the recording medium. (੬ pg. 17) ● The battery/CF card cover is not connected properly. When the screen is under direct sunlight during shooting, the screen becomes red or black for a long time during voice playback. ● If the surface of the hard disk is a microcomputer-controlled device. During recording, the date/time...
... charged one. (੬ pg. 14) Recording Recording cannot be used together are various different light sources behind the subject. HSelect the recording medium. (੬ pg. 17) ● The battery/CF card cover is not connected properly. When the screen is under direct sunlight during shooting, the screen becomes red or black for a long time during voice playback. ● If the surface of the hard disk is a microcomputer-controlled device. During recording, the date/time...
Instructions
Page 35
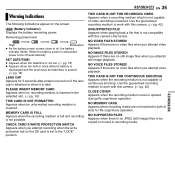
... the battery power is not compatible with this camera's file format. Appears if there are no still image files when you attempt recording when the write protection tab on the SD card is set date/time is no recording medium is inserted in recording media. MEMORY CARD IS FULL Appears when the recording medium is full and recording is not capable of slots for 5 seconds after power is opened during file copy/move operation. NO VIDEO FILES...
... the battery power is not compatible with this camera's file format. Appears if there are no still image files when you attempt recording when the write protection tab on the SD card is set date/time is no recording medium is inserted in recording media. MEMORY CARD IS FULL Appears when the recording medium is full and recording is not capable of slots for 5 seconds after power is opened during file copy/move operation. NO VIDEO FILES...
Instructions
Page 40
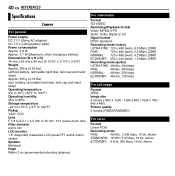
...°C to 50°C (-4°F to 122°F) Pickup 1/3.6" CCD Lens F 1.8 to 2.2, f = 4.5 mm to 45 mm, 10:1 power zoom lens Filter diameter ø30.5 mm LCD monitor 1.8" diagonally measured, LCD panel/TFT active matrix system Speaker Monaural Flash Within 2 m (recommended shooting distance) For video/audio Format SD-VIDEO Recording/Playback format Video: MPEG-2-PS Audio: Dolby Digital (2 ch) Signal format NTSC standard Recording mode (video) ULTRA FINE: 720 x 480 pixels, 8.5 Mbps (CBR) FINE: 720...
...°C to 50°C (-4°F to 122°F) Pickup 1/3.6" CCD Lens F 1.8 to 2.2, f = 4.5 mm to 45 mm, 10:1 power zoom lens Filter diameter ø30.5 mm LCD monitor 1.8" diagonally measured, LCD panel/TFT active matrix system Speaker Monaural Flash Within 2 m (recommended shooting distance) For video/audio Format SD-VIDEO Recording/Playback format Video: MPEG-2-PS Audio: Dolby Digital (2 ch) Signal format NTSC standard Recording mode (video) ULTRA FINE: 720 x 480 pixels, 8.5 Mbps (CBR) FINE: 720...


