
Instruction Manual
Page 9
... Power 30 Using a Battery Pack 31 Power Status Display 32 Turning On/Off the Power 33 Initial Settings 34 Displays on the LCD Monitor and Viewfinder .. 36 Display Screen 36 Status Screen 37 USB Mode Screen 38 Remote Edit Mode Screen 38 Warning Display 38 Adjusting the LCD Monitor and Viewfinder ...... 38 Adjusting the LCD Monitor 39 Adjusting the Viewfinder 40 Adjusting the Monitor Speaker 40 Adjusting Back Focus 41 Assignment of Functions to User Buttons ........ 42 Tally Lamp 42 SD Card...
... Power 30 Using a Battery Pack 31 Power Status Display 32 Turning On/Off the Power 33 Initial Settings 34 Displays on the LCD Monitor and Viewfinder .. 36 Display Screen 36 Status Screen 37 USB Mode Screen 38 Remote Edit Mode Screen 38 Warning Display 38 Adjusting the LCD Monitor and Viewfinder ...... 38 Adjusting the LCD Monitor 39 Adjusting the Viewfinder 40 Adjusting the Monitor Speaker 40 Adjusting Back Focus 41 Assignment of Functions to User Buttons ........ 42 Tally Lamp 42 SD Card...

Instruction Manual
Page 10
...Menu 143 Display/Status Screen Display Screen in Camera Mode 145 Display Screen in Media Mode 151 Status Screen 153 Camera Features Marker and Safety Zone Displays 154 Smoothening the Skin Color (Skin Detail Function 155 Color Bar Output 155 Adjusting Color Matrix 156 Configuring Setup Files 157 Saving Setup Files 157 Loading a Setup File 158 Deleting Setup Files 159 Connecting External Devices Managing/Editing Clips on a PC 160 Connecting External Monitor 161 Connecting a Earphone 163 Connecting Wired Remote Control 164 Connecting a Remote Control Unit 164 Functions Operable...
...Menu 143 Display/Status Screen Display Screen in Camera Mode 145 Display Screen in Media Mode 151 Status Screen 153 Camera Features Marker and Safety Zone Displays 154 Smoothening the Skin Color (Skin Detail Function 155 Color Bar Output 155 Adjusting Color Matrix 156 Configuring Setup Files 157 Saving Setup Files 157 Loading a Setup File 158 Deleting Setup Files 159 Connecting External Devices Managing/Editing Clips on a PC 160 Connecting External Monitor 161 Connecting a Earphone 163 Connecting Wired Remote Control 164 Connecting a Remote Control Unit 164 Functions Operable...

Instruction Manual
Page 13
... quick switching according to be recorded as digital output. In addition to two mic inputs, you to copy recorded clips to Windows or Macintosh computers and for checking the video images. (For MP4 file format) The disc provided with [JVC ProHD Clip Manager] and other application software as well as their user guides. * For details, refer to gradually slow motion effects. Equipped with a USB host function, you can upload recorded files stored in GPS This camera recorder is also supported. Image...
... quick switching according to be recorded as digital output. In addition to two mic inputs, you to copy recorded clips to Windows or Macintosh computers and for checking the video images. (For MP4 file format) The disc provided with [JVC ProHD Clip Manager] and other application software as well as their user guides. * For details, refer to gradually slow motion effects. Equipped with a USB host function, you can upload recorded files stored in GPS This camera recorder is also supported. Image...

Instruction Manual
Page 16
... video data and setup files, will be deleted. Do not remove the SD card during access either using the camera recorder, only the file administration information is not completely erased from this camera recorder. o We are deleted using this manual. Introduction SDHC/SDXC Cards o SDHC/SDXC card is referred to as recording, playback, or formatting). o Use an SD card (4 GB to 128 GB) with Class 6 or higher performance, formatted using a PC. Do not use it to operate correctly. 0 SD cards...
... video data and setup files, will be deleted. Do not remove the SD card during access either using the camera recorder, only the file administration information is not completely erased from this camera recorder. o We are deleted using this manual. Introduction SDHC/SDXC Cards o SDHC/SDXC card is referred to as recording, playback, or formatting). o Use an SD card (4 GB to 128 GB) with Class 6 or higher performance, formatted using a PC. Do not use it to operate correctly. 0 SD cards...

Instruction Manual
Page 19
... files are output on the viewfinder and LCD monitor. Select [Change] and press the Set button to switch to USB mode. (A P160 [Managing/Editing Clips on a PC] ) 0 In USB mode, the camera recorder is recognized by the connected PC as a peripheral drive. (USB mass storage class only) Disable the connection on the PC and remove the USB cable from an External Device A B] ) Memo : 0 Playback of SD card is not possible in Camera mode when the power is turned on. 0 Camera images...
... files are output on the viewfinder and LCD monitor. Select [Change] and press the Set button to switch to USB mode. (A P160 [Managing/Editing Clips on a PC] ) 0 In USB mode, the camera recorder is recognized by the connected PC as a peripheral drive. (USB mass storage class only) Disable the connection on the PC and remove the USB cable from an External Device A B] ) Memo : 0 Playback of SD card is not possible in Camera mode when the power is turned on. 0 Camera images...

Instruction Manual
Page 20
... screen display (when the menu screen is not displayed). This switch operates only with the supplied lens. F You can also use it as a user button by assigning a specific feature in Menu Screen] ) Center Set button (R) : Confirms menu items and setting values Cross-Shaped Button : Selects menu (JKHI) items and setting values 0 During Camera mode [5/J][K/6][7/H/ : You can also use ZEBRA][8/I [FULL AUTO ON/OFF] Full Auto Switch (A P57 [Adjusting the Brightness Automatically] ) (A P65 [Automatic White Balance Mode (FAW: Fulltime Auto White balance)] ) 20 Names of Functions...
... screen display (when the menu screen is not displayed). This switch operates only with the supplied lens. F You can also use it as a user button by assigning a specific feature in Menu Screen] ) Center Set button (R) : Confirms menu items and setting values Cross-Shaped Button : Selects menu (JKHI) items and setting values 0 During Camera mode [5/J][K/6][7/H/ : You can also use ZEBRA][8/I [FULL AUTO ON/OFF] Full Auto Switch (A P57 [Adjusting the Brightness Automatically] ) (A P65 [Automatic White Balance Mode (FAW: Fulltime Auto White balance)] ) 20 Names of Functions...

Instruction Manual
Page 26
... Functions to User Buttons] ) L Zoom Lever at the Grip] ) M [IRIS A/M] Iris Mode Switch Switches the mode of Parts Select "A" to set to auto iris, and "M" to set to "A". G [F.f] Back Focus Button and Indicator Lamp (A P41 [Adjusting Back Focus] ) H [ZOOM SERVO/MANUAL] Zoom Operation Servo/Manual Switch Set to "SERVO" in the menu setting to this unit 0 When using a separately sold separately). F (A P54 [Setting to Auto Focus Temporarily (Push Auto Focus)] ) You can be installed. 0 Installable filter types: φ72mmP0.75 Memo : 0 Remove the lens hood when installing...
... Functions to User Buttons] ) L Zoom Lever at the Grip] ) M [IRIS A/M] Iris Mode Switch Switches the mode of Parts Select "A" to set to auto iris, and "M" to set to "A". G [F.f] Back Focus Button and Indicator Lamp (A P41 [Adjusting Back Focus] ) H [ZOOM SERVO/MANUAL] Zoom Operation Servo/Manual Switch Set to "SERVO" in the menu setting to this unit 0 When using a separately sold separately). F (A P54 [Setting to Auto Focus Temporarily (Push Auto Focus)] ) You can be installed. 0 Installable filter types: φ72mmP0.75 Memo : 0 Remove the lens hood when installing...

Instruction Manual
Page 31
... date/time and time code data are not inserted straight, the battery will not be reset. Remove the battery if you are connected, or when the LCD monitor is frequently used , accessories are not using the built-in battery always gets charged. Release Lever Battery .. When this happens, set the [POWER ON/OFF] switch to "ON" to display the [Initial Setting] screen, then set the [POWER ON/OFF] switch to the [instruction manual] of the recommended batteries. Battery Continuous Recording Time...
... date/time and time code data are not inserted straight, the battery will not be reset. Remove the battery if you are connected, or when the LCD monitor is frequently used , accessories are not using the built-in battery always gets charged. Release Lever Battery .. When this happens, set the [POWER ON/OFF] switch to "ON" to display the [Initial Setting] screen, then set the [POWER ON/OFF] switch to the [instruction manual] of the recommended batteries. Battery Continuous Recording Time...

Instruction Manual
Page 33
... transfer the files on the SD card. A B (A P18 [Operation Modes] ) Power Status Display 33 However, you can check the most recently recorded video clip using the clip review feature. (A P83 [Viewing Recorded Videos Immediately (Clip Review)] ) Media Mode This mode allows you continue to use the camera recorder while the power warning is not possible in the Camera mode. Select [Change] and press the Set button to switch to USB mode. 0 In USB mode, the camera recorder is connected to a USB cable, the message "Change to USB Mode?" Memo : 0 If you to play...
... transfer the files on the SD card. A B (A P18 [Operation Modes] ) Power Status Display 33 However, you can check the most recently recorded video clip using the clip review feature. (A P83 [Viewing Recorded Videos Immediately (Clip Review)] ) Media Mode This mode allows you continue to use the camera recorder while the power warning is not possible in the Camera mode. Select [Change] and press the Set button to switch to USB mode. 0 In USB mode, the camera recorder is connected to a USB cable, the message "Change to USB Mode?" Memo : 0 If you to play...

Instruction Manual
Page 70
... CH-1/CH-2 AUTO/MANUAL] selection switch on SD cards in the automatic adjustment mode, the limiter operates at -6dBFS. 0 If [CH1 Limiter]/[CH2 Limiter] B [Threshold Level] is set to a value other than "Off", the limiter operates according to the value set. (A P128 [CH1 Limiter/CH2 Limiter] ) 0 When [Main Menu] B [Camera Function] B [FULL AUTO] B [Audio] is set to adjust the level. Adjusting Audio Recording Level 0 You can adjust the level manually during the recording, recording standby, and stop modes. (A P128 [CH1...
... CH-1/CH-2 AUTO/MANUAL] selection switch on SD cards in the automatic adjustment mode, the limiter operates at -6dBFS. 0 If [CH1 Limiter]/[CH2 Limiter] B [Threshold Level] is set to a value other than "Off", the limiter operates according to the value set. (A P128 [CH1 Limiter/CH2 Limiter] ) 0 When [Main Menu] B [Camera Function] B [FULL AUTO] B [Audio] is set to adjust the level. Adjusting Audio Recording Level 0 You can adjust the level manually during the recording, recording standby, and stop modes. (A P128 [CH1...
Instruction Manual
Page 75
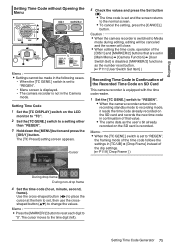
... set and the screen returns to change the values. Memo : 0 Press the [MARKER/2] button to reset each digit to the time digit (left). Setting Time Code 1 Set the [TC DISPLAY] switch on the SD card and records the new time code in [Main Menu] B [Camera Function] B [User Switch Set] is disabled. [MARKER/2] functions as the user's bit already recorded on the SD card is set , then use the crossshaped button (JK) to the normal screen. 0 To cancel the setting, press the [CANCEL] button. Setting Time Code without Opening the Menu...
... set and the screen returns to change the values. Memo : 0 Press the [MARKER/2] button to reset each digit to the time digit (left). Setting Time Code 1 Set the [TC DISPLAY] switch on the SD card and records the new time code in [Main Menu] B [Camera Function] B [User Switch Set] is disabled. [MARKER/2] functions as the user's bit already recorded on the SD card is set , then use the crossshaped button (JK) to the normal screen. 0 To cancel the setting, press the [CANCEL] button. Setting Time Code without Opening the Menu...

Instruction Manual
Page 83
... [AUTO FOCUS/11] button. (A P42 [Assignment of Functions to User Buttons] ) 2 Press the button assigned with the "Clip Review" function during standby ("STBY" is displayed). It will take some time to "STBY" (recording standby) mode. To operate Clip Review, use the [CANCEL] button to set to "STBYC" (white text) first. (A P89 [Clip Continuous Rec] ) 0 Clip Review is unavailable when the camera recorder is played back. 0 Only video clips in recording state. 0 Clip Review is unavailable when operating View Remote via...
... [AUTO FOCUS/11] button. (A P42 [Assignment of Functions to User Buttons] ) 2 Press the button assigned with the "Clip Review" function during standby ("STBY" is displayed). It will take some time to "STBY" (recording standby) mode. To operate Clip Review, use the [CANCEL] button to set to "STBYC" (white text) first. (A P89 [Clip Continuous Rec] ) 0 Clip Review is unavailable when the camera recorder is played back. 0 Only video clips in recording state. 0 Clip Review is unavailable when operating View Remote via...
Instruction Manual
Page 128
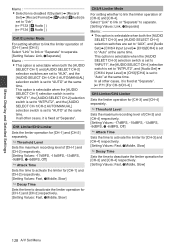
... [Audio Set] B [CH3/4 Input Level] B [CH3]/[CH4] is set to "2ch". (A P133 [ W Audio ] ) (A P134 [ Y Audio ] ) CH1/2 Limiter Mode For setting whether to link the limiter operation of [CH-1] and [CH-2]. CH1 Limiter/CH2 Limiter Sets the limiter operation for [CH-1] and [CH-2] separately. 9 Threshold Level Sets the maximum recording level of [CH-3] and [CH-4]. Menu Display and Detailed Settings Memo : 0 Selection is disabled if [System] B [Record Set] B [Record Format] B [WAudio]/[YAudio] is set to "Auto" at...
... [Audio Set] B [CH3/4 Input Level] B [CH3]/[CH4] is set to "2ch". (A P133 [ W Audio ] ) (A P134 [ Y Audio ] ) CH1/2 Limiter Mode For setting whether to link the limiter operation of [CH-1] and [CH-2]. CH1 Limiter/CH2 Limiter Sets the limiter operation for [CH-1] and [CH-2] separately. 9 Threshold Level Sets the maximum recording level of [CH-3] and [CH-4]. Menu Display and Detailed Settings Memo : 0 Selection is disabled if [System] B [Record Set] B [Record Format] B [WAudio]/[YAudio] is set to "Auto" at...

Instruction Manual
Page 170
... is displayed. 1 Set the camera recorder to the Camera mode. (A P18 [Operation Modes] ) 2 Set [Genlock Input] to "60p", "60i", "30p", or "24p", 59.94 Hz synchronizing signals (vertical synchronization) are input. 50 Hz/60 Hz synchronizing signals are used SD synchronizing : Supports SMPTE259M signal HD synchronizing : Supports SMPTE292M signal HD/SD SDI IN External Synchronizing Signal SDI Signal Generator Connecting External Devices . 170 Inputting External Synchronizing Signals (Genlock) o Synchronizing signal used...
... is displayed. 1 Set the camera recorder to the Camera mode. (A P18 [Operation Modes] ) 2 Set [Genlock Input] to "60p", "60i", "30p", or "24p", 59.94 Hz synchronizing signals (vertical synchronization) are input. 50 Hz/60 Hz synchronizing signals are used SD synchronizing : Supports SMPTE259M signal HD synchronizing : Supports SMPTE292M signal HD/SD SDI IN External Synchronizing Signal SDI Signal Generator Connecting External Devices . 170 Inputting External Synchronizing Signals (Genlock) o Synchronizing signal used...

Instruction Manual
Page 171
...- Connecting External Devices Inputting External Synchronizing Signals (Genlock) 171 Color flash may be synchronized on this camera recorder. 1 Set the camera recorder to the Camera mode. (A P18 [Operation Modes] ) 2 Set [Genlock Input] to reasons such as no signal input while genlock is in operation, "Sync Unlocked" is displayed. 0 If there is genlock signal input but the signal format is not supported, "Invalid Sync" is complete, the display disappears and recording can be made while recording or playback is...
...- Connecting External Devices Inputting External Synchronizing Signals (Genlock) 171 Color flash may be synchronized on this camera recorder. 1 Set the camera recorder to the Camera mode. (A P18 [Operation Modes] ) 2 Set [Genlock Input] to reasons such as no signal input while genlock is in operation, "Sync Unlocked" is displayed. 0 If there is genlock signal input but the signal format is not supported, "Invalid Sync" is complete, the display disappears and recording can be made while recording or playback is...
Instruction Manual
Page 177
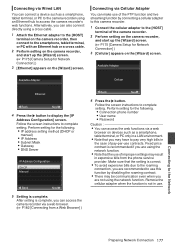
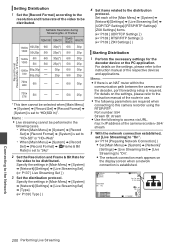
...] screen. Fixed price contract is complete. Remove the cellular adapter when the function is correct. 0 To avoid expensive bills due to the roaming connection, you are recommended to use . Ethernet Back Next 4 Press the I button. Connecting via Wired LAN You can access the camera recorder via a web browser on the camera recorder, and start up the [Wizard] screen. (A P175 [Camera Setup for the following . 0 Connection phone number 0 User name 0 Password Caution...
...] screen. Fixed price contract is complete. Remove the cellular adapter when the function is correct. 0 To avoid expensive bills due to the roaming connection, you are recommended to use . Ethernet Back Next 4 Press the I button. Connecting via Wired LAN You can access the camera recorder via a web browser on the camera recorder, and start up the [Wizard] screen. (A P175 [Camera Setup for the following . 0 Connection phone number 0 User name 0 Password Caution...
Instruction Manual
Page 200
...] B [Record Set] B [Record Format] B [System] is set to "HD+SD" or "HD+Web" 0 When [Main Menu] B [System] B [Record Set] B [Record Format] B [WFrame & Bit Rate] is set to this camera recorder using the RTSP/RTP. For details on the settings, please refer to the instruction manual of the video to be selected when [Main Menu] B [System] B [Record Set] B [Record Format] B [System] is set [Live Streaming] to "On". (A P174 [Preparing Network Connection] ) 0 Set [Main Menu] B [System] B [Network]/ [Settings] B [Live Streaming Set...
...] B [Record Set] B [Record Format] B [System] is set to "HD+SD" or "HD+Web" 0 When [Main Menu] B [System] B [Record Set] B [Record Format] B [WFrame & Bit Rate] is set to this camera recorder using the RTSP/RTP. For details on the settings, please refer to the instruction manual of the video to be selected when [Main Menu] B [System] B [Record Set] B [Record Format] B [System] is set [Live Streaming] to "On". (A P174 [Preparing Network Connection] ) 0 Set [Main Menu] B [System] B [Network]/ [Settings] B [Live Streaming Set...

Instruction Manual
Page 202
... card. (A P43 [SD Card] ) Lost Media Info * (*: A, B) 0 Card is set. Others 202 Error Messages and Actions your nearest service center. Usage time of the SD card the SD card, or insert a recordable is removed while recording Restore the card using this occurs, turn it from functioning properly. Fan Stop Detected Please Turn P.Off Fan Maintenance Required The fan stopped running. Memo : 0 You can check the usage time of the fan in progress. Rec Inhibited [REC] button...
... card. (A P43 [SD Card] ) Lost Media Info * (*: A, B) 0 Card is set. Others 202 Error Messages and Actions your nearest service center. Usage time of the SD card the SD card, or insert a recordable is removed while recording Restore the card using this occurs, turn it from functioning properly. Fan Stop Detected Please Turn P.Off Fan Maintenance Required The fan stopped running. Memo : 0 You can check the usage time of the fan in progress. Rec Inhibited [REC] button...
Instruction Manual
Page 203
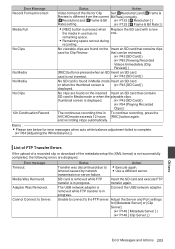
... Rate ] ) 0 [REC] button is in Media mode Insert an SD card. Insert the SD card and execute FTP transfer again. Cannot Connect to the FTP server. Adjust the Server and Port settings for Clip Review. and recording stops automatically. Error message Timeout. Media Was Removed. Status Action Transfer was discontinued due to complete. (A P64 [Adjusting the White Balance] ) List of FTP Transfer Errors If the upload of a recorded clip or download of the file for error messages when auto white balance adjustment failed...
... Rate ] ) 0 [REC] button is in Media mode Insert an SD card. Insert the SD card and execute FTP transfer again. Cannot Connect to the FTP server. Adjust the Server and Port settings for Clip Review. and recording stops automatically. Error message Timeout. Media Was Removed. Status Action Transfer was discontinued due to complete. (A P64 [Adjusting the White Balance] ) List of FTP Transfer Errors If the upload of a recorded clip or download of the file for error messages when auto white balance adjustment failed...
Instruction Manual
Page 208
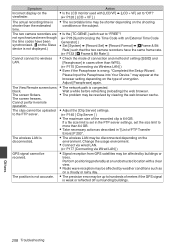
... 208 Troubleshooting Please Input the Passphrase into Your Device." Cannot perform remote operation. Wait a while before refreshing (reloading) the web browser. 0 The problem may be disconnected depending on the shooting conditions or the subject. If a file size limit is not displayed.) (A P78 [Synchronizing the Time Code with a clear view. 0 Radio wave reception may be uploaded 0 Adjust the [Clip Server] settings. viewfinder. (A P120 [ LCD + VF ] ) The actual recording time is...
... 208 Troubleshooting Please Input the Passphrase into Your Device." Cannot perform remote operation. Wait a while before refreshing (reloading) the web browser. 0 The problem may be disconnected depending on the shooting conditions or the subject. If a file size limit is not displayed.) (A P78 [Synchronizing the Time Code with a clear view. 0 Radio wave reception may be uploaded 0 Adjust the [Clip Server] settings. viewfinder. (A P120 [ LCD + VF ] ) The actual recording time is...


