
Instruction Manual
Page 1
http://manual3.jvckenwood.com/pro/mobile/global/ You can also download the PDF from the Mobile User Guide. Retain this JVC product. IM 1.00 Please read the instructions carefully to changes for further improvement without the last letter (U/E) which is described...Before operating this unit, please read the following Mobile User Guide. HD MEMORY CARD CAMERA RECORDER GY-HM660U/GY-HM660E GY-HM620U/GY-HM620E INSTRUCTIONS TIME CODE . . Please check the latest version of this manual, each model number is located on your Android phone or iPhone. Mobile User Guide When you ...
http://manual3.jvckenwood.com/pro/mobile/global/ You can also download the PDF from the Mobile User Guide. Retain this JVC product. IM 1.00 Please read the instructions carefully to changes for further improvement without the last letter (U/E) which is described...Before operating this unit, please read the following Mobile User Guide. HD MEMORY CARD CAMERA RECORDER GY-HM660U/GY-HM660E GY-HM620U/GY-HM620E INSTRUCTIONS TIME CODE . . Please check the latest version of this manual, each model number is located on your Android phone or iPhone. Mobile User Guide When you ...
Instruction Manual
Page 12
...of this product. Marks such as functions and usage restrictions of their respective companies. b : Feature available on GY-HM660U/GY-HM660E only. Introduction Others Error Messages and Actions 178 List of FTP Transfer Errors a 179 List of Live ... Software ..... 190 . 12 Content of this manual Symbols used Caution : Describes precautions concerning the operation of this manual 0 All rights reserved by JVC KENWOOD Corporation. A : Indicates the reference page numbers and reference items. a : Feature available on GY-HM620U/GY-HM620E only. and other countries. 0 Android,...
...of this product. Marks such as functions and usage restrictions of their respective companies. b : Feature available on GY-HM660U/GY-HM660E only. Introduction Others Error Messages and Actions 178 List of FTP Transfer Errors a 179 List of Live ... Software ..... 190 . 12 Content of this manual Symbols used Caution : Describes precautions concerning the operation of this manual 0 All rights reserved by JVC KENWOOD Corporation. A : Indicates the reference page numbers and reference items. a : Feature available on GY-HM620U/GY-HM620E only. and other countries. 0 Android,...
Instruction Manual
Page 14
...camera recorder comes with highperformance analog circuits. Position information obtained from a network connected device, such as well. Application Software Provided The [JVC ProHD Clip Manager] application software is also available. A built-in the H.264 format (1920x1080: MOV) to the shooting scene. ... 35 Mbps High-quality Recording Mode This camera recorder is equipped with [JVC ProHD Clip Manager] and other application software as well as their user guides. * For details, refer to manual focus as remote control, viewing, editing of ND filters. Diverse Network Functions...
...camera recorder comes with highperformance analog circuits. Position information obtained from a network connected device, such as well. Application Software Provided The [JVC ProHD Clip Manager] application software is also available. A built-in the H.264 format (1920x1080: MOV) to the shooting scene. ... 35 Mbps High-quality Recording Mode This camera recorder is equipped with [JVC ProHD Clip Manager] and other application software as well as their user guides. * For details, refer to manual focus as remote control, viewing, editing of ND filters. Diverse Network Functions...
Instruction Manual
Page 16
... drop the SD card, or subject it at an unobstructed location with a clear view that are managed by devices other labels or stickers on this manual. o Do not touch the terminals with your hands or with the doors and windows closed. In this camera recorder or files that purpose, or by...
... drop the SD card, or subject it at an unobstructed location with a clear view that are managed by devices other labels or stickers on this manual. o Do not touch the terminals with your hands or with the doors and windows closed. In this camera recorder or files that purpose, or by...
Instruction Manual
Page 20
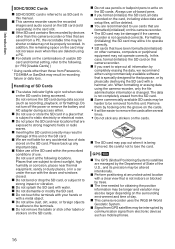
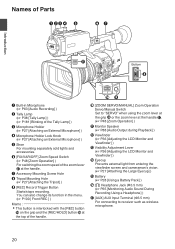
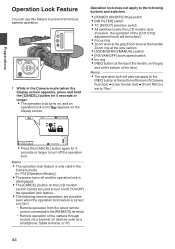
... A/B ʿ PUSH AUTO GAICNANWCHETL BAL SHUTTER FULL AUTO AE LOCK/4 ZEBRA/5 MARKER/6 ON IRIS B OFF PUSH AUTO L M APRESET H Bottom H . ZOOM REC SERVO MANUAL JI J [ZOOM SERVO/MANUAL] Zoom Operation Servo/Manual Switch Set to "SERVO" when using the zoom lever at the grip j or the zoom lever at the handle. G Accessory Mounting Screw...
... A/B ʿ PUSH AUTO GAICNANWCHETL BAL SHUTTER FULL AUTO AE LOCK/4 ZEBRA/5 MARKER/6 ON IRIS B OFF PUSH AUTO L M APRESET H Bottom H . ZOOM REC SERVO MANUAL JI J [ZOOM SERVO/MANUAL] Zoom Operation Servo/Manual Switch Set to "SERVO" when using the zoom lever at the grip j or the zoom lever at the handle. G Accessory Mounting Screw...
Instruction Manual
Page 21
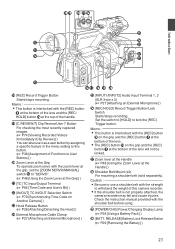
... of Functions to User Buttons] ) T Zoom Lever at the Grip To operate zoom servo with the zoom lever at the grip, set the [ZOOM SERVO/MANUAL] switch 0 to use it as a user button by assigning a specific feature in the menu setting to lock the [REC] Trigger button. Check the instruction... manual provided with the [REC] button R on the grip and the [REC] button I at the Handle] ) b Shoulder Belt Mount (x2) For mounting a shoulder belt (sold separately). ...
... of Functions to User Buttons] ) T Zoom Lever at the Grip To operate zoom servo with the zoom lever at the grip, set the [ZOOM SERVO/MANUAL] switch 0 to use it as a user button by assigning a specific feature in the menu setting to lock the [REC] Trigger button. Check the instruction... manual provided with the [REC] button R on the grip and the [REC] button I at the Handle] ) b Shoulder Belt Mount (x2) For mounting a shoulder belt (sold separately). ...
Instruction Manual
Page 22
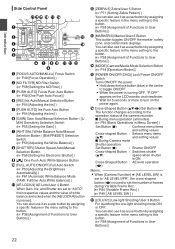
... the ND Filter] ) C [PUSH AUTO] Focus Push Auto Button (A P50 [One Push Auto Focus] ) D [IRIS] Iris Auto/Manual Selection Button (A P54 [Adjusting the Iris] ) E [PUSH AUTO] Iris Push Auto Button (A P54 [Adjusting the Iris] ) F [GAIN] Gain Auto.../Manual Selection Button / [L/ M/H] Sensitivity Selection Switch (A P55 [Setting the Gain] ) G [WHT BAL] White Balance Auto/Manual Selection Button / [B/A/PRESET] Selection Switch (A P59 [Adjusting the White Balance] ) H [SHUTTER] Shutter Speed Auto/Manual Selection Button (A P56 [Setting the Electronic Shutter] )...
... the ND Filter] ) C [PUSH AUTO] Focus Push Auto Button (A P50 [One Push Auto Focus] ) D [IRIS] Iris Auto/Manual Selection Button (A P54 [Adjusting the Iris] ) E [PUSH AUTO] Iris Push Auto Button (A P54 [Adjusting the Iris] ) F [GAIN] Gain Auto.../Manual Selection Button / [L/ M/H] Sensitivity Selection Switch (A P55 [Setting the Gain] ) G [WHT BAL] White Balance Auto/Manual Selection Button / [B/A/PRESET] Selection Switch (A P59 [Adjusting the White Balance] ) H [SHUTTER] Shutter Speed Auto/Manual Selection Button (A P56 [Setting the Electronic Shutter] )...
Instruction Manual
Page 24
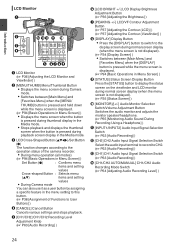
... B MENU/THUMB C D CANCEL N ML K J CH1 CH2 INT INPUT1 INPUT2 INPUT1 INPUT2 LINE MIC MIC +48V MONITOR CH1 BOTH CH2 AUTO MANUAL LCD BRIGHT PEAKING DISPLAY STATUS CH1 CH2 E FG HI . C LCD Cross-Shaped Button (JKHI)/Set Button (R) The function changes according to the operation... of Functions to CH2. (A P63 [Audio Recording] ) M [CH1] CH1 Audio Input Signal Selection Switch (A P63 [Audio Recording] ) N [CH1/CH2 AUTO/MANUAL] CH1/CH2 Audio Recording Mode Switch (A P64 [Adjusting Audio Recording Level] ) 24 A LCD Monitor (A P36 [Adjusting the LCD Monitor and Viewfinder] ) B [MENU...
... B MENU/THUMB C D CANCEL N ML K J CH1 CH2 INT INPUT1 INPUT2 INPUT1 INPUT2 LINE MIC MIC +48V MONITOR CH1 BOTH CH2 AUTO MANUAL LCD BRIGHT PEAKING DISPLAY STATUS CH1 CH2 E FG HI . C LCD Cross-Shaped Button (JKHI)/Set Button (R) The function changes according to the operation... of Functions to CH2. (A P63 [Audio Recording] ) M [CH1] CH1 Audio Input Signal Selection Switch (A P63 [Audio Recording] ) N [CH1/CH2 AUTO/MANUAL] CH1/CH2 Audio Recording Mode Switch (A P64 [Adjusting Audio Recording Level] ) 24 A LCD Monitor (A P36 [Adjusting the LCD Monitor and Viewfinder] ) B [MENU...
Instruction Manual
Page 25
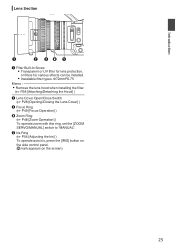
... [Opening/Closing the Lens Cover] ) C Focus Ring (A P49 [Focus Operation] ) D Zoom Ring (A P48 [Zoom Operation] ) To operate zoom with this ring, set the [ZOOM SERVO/MANUAL] switch to "MANUAL". Introduction Lens Section A B CD E .
... [Opening/Closing the Lens Cover] ) C Focus Ring (A P49 [Focus Operation] ) D Zoom Ring (A P48 [Zoom Operation] ) To operate zoom with this ring, set the [ZOOM SERVO/MANUAL] switch to "MANUAL". Introduction Lens Section A B CD E .
Instruction Manual
Page 44
...] adjustment knob will be locked.) 0 Focus ring 0 Zoom lever at the grip/Zoom lever at the handle/ Zoom ring at the lens section 0 [ZOOM SERVO/MANUAL] switch 0 [FIX/VAR/OFF] zoom speed switch 0 Iris ring 0 [REC] button (at the top of the lens if [Camera Function] B [User Switch Set] B [Front REC...
...] adjustment knob will be locked.) 0 Focus ring 0 Zoom lever at the grip/Zoom lever at the handle/ Zoom ring at the lens section 0 [ZOOM SERVO/MANUAL] switch 0 [FIX/VAR/OFF] zoom speed switch 0 Iris ring 0 [REC] button (at the top of the lens if [Camera Function] B [User Switch Set] B [Front REC...
Instruction Manual
Page 48
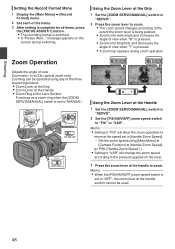
...Lever at the Grip 0 Zoom Lever at the Handle 0 Zoom Ring at the Lens Section: Functions as a zoom ring when the [ZOOM SERVO/MANUAL] switch is set to "MANUAL". message appears on the lever. 3 Press the zoom lever at the handle section cannot be operated using [Main Menu] B [Camera Function] B ... into telephoto and decreases the angle of view when "T" is switched. 0 A "Please Wait..." Using the Zoom Lever at the Grip 1 Set the [ZOOM SERVO/MANUAL] switch to "SERVO". 2 Press the zoom lever to zoom. 0 The zoom speed changes according to 23x (optical zoom only) Zooming can be used. 48 Using...
...Lever at the Grip 0 Zoom Lever at the Handle 0 Zoom Ring at the Lens Section: Functions as a zoom ring when the [ZOOM SERVO/MANUAL] switch is set to "MANUAL". message appears on the lever. 3 Press the zoom lever at the handle section cannot be operated using [Main Menu] B [Camera Function] B ... into telephoto and decreases the angle of view when "T" is switched. 0 A "Please Wait..." Using the Zoom Lever at the Grip 1 Set the [ZOOM SERVO/MANUAL] switch to "SERVO". 2 Press the zoom lever to zoom. 0 The zoom speed changes according to 23x (optical zoom only) Zooming can be used. 48 Using...
Instruction Manual
Page 49
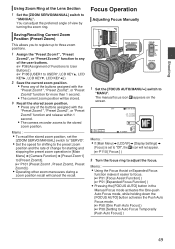
...the buttons assigned with the "Preset Zoom1", "Preset Zoom2", or "Preset Zoom3" function for starting and stopping the preset zoom operation in the Manual Focus mode activates the One-push Auto Focus mode, while holding down the [FOCUS AUTO] button activates the Push Auto Focus mode. (A P50 ... AUTO] button in [Main Menu] B [Camera Function] B [Preset Zoom1] to adjust the focus. Shooting Using Zoom Ring at the Lens Section 1 Set the [ZOOM SERVO/MANUAL] switch to "MANU". Memo : 0 To recall the stored zoom position, set to "Off", the d icon will not appear. (A P110 [ Focus ] ) 2 Turn...
...the buttons assigned with the "Preset Zoom1", "Preset Zoom2", or "Preset Zoom3" function for starting and stopping the preset zoom operation in the Manual Focus mode activates the One-push Auto Focus mode, while holding down the [FOCUS AUTO] button activates the Push Auto Focus mode. (A P50 ... AUTO] button in [Main Menu] B [Camera Function] B [Preset Zoom1] to adjust the focus. Shooting Using Zoom Ring at the Lens Section 1 Set the [ZOOM SERVO/MANUAL] switch to "MANU". Memo : 0 To recall the stored zoom position, set to "Off", the d icon will not appear. (A P110 [ Focus ] ) 2 Turn...

Instruction Manual
Page 50
... F1. 6 1/ 100 * The icons ( , , and ) change in conjunction with emphasis on Far Objects Slide the [FOCUS AUTO/MANU/∞] switch to Manual Focus mode. After selecting the area, focus is complete, the camera recorder returns to a focus point near and far directions. 0 Set [Main Menu] B [...Camera Function] B [AF Assist]. 0 Far/Near: This option allows you can turn the focus ring to set the point to Manual Focus mode. 50 Adjusting Focus on the focusing speed. Setting to Auto Focus Temporarily (Push Auto Focus) 0 The camera recorder will not appear. (A P110...
... F1. 6 1/ 100 * The icons ( , , and ) change in conjunction with emphasis on Far Objects Slide the [FOCUS AUTO/MANU/∞] switch to Manual Focus mode. After selecting the area, focus is complete, the camera recorder returns to a focus point near and far directions. 0 Set [Main Menu] B [...Camera Function] B [AF Assist]. 0 Far/Near: This option allows you can turn the focus ring to set the point to Manual Focus mode. 50 Adjusting Focus on the focusing speed. Setting to Auto Focus Temporarily (Push Auto Focus) 0 The camera recorder will not appear. (A P110...
Instruction Manual
Page 53
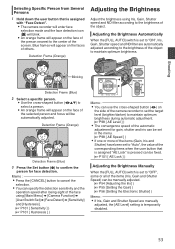
... 1 Hold down the user button that is assigned "AE Lock" is pressed can be fixed. (A P101 [ AE Lock ] ) Adjusting the Brightness Manually When the [FULL AUTO] switch is temporarily disabled. 53 Detection Frame (Orange) Detection Frame (Blue) . 3 Press the Set button (R) to confirm ...the person for gain, shutter and iris can be manually adjusted. (A P54 [Adjusting the Iris] ) (A P55 [Setting the Gain] ) (A P56 [Setting the Electronic Shutter] ) Memo : 0 If Iris, Gain ...
... 1 Hold down the user button that is assigned "AE Lock" is pressed can be fixed. (A P101 [ AE Lock ] ) Adjusting the Brightness Manually When the [FULL AUTO] switch is temporarily disabled. 53 Detection Frame (Orange) Detection Frame (Blue) . 3 Press the Set button (R) to confirm ...the person for gain, shutter and iris can be manually adjusted. (A P54 [Adjusting the Iris] ) (A P55 [Setting the Gain] ) (A P56 [Setting the Electronic Shutter] ) Memo : 0 If Iris, Gain ...
Instruction Manual
Page 54
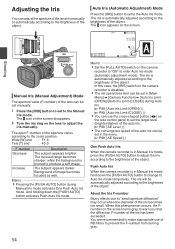
...on the lens to enter Auto Iris mode (automatic adjustment mode). Shooting Adjusting the Iris You can adjust the aperture of the lens iris manually or automatically according to the brightness of image becomes focused as well. The a icon appears on the screen turns gray to the brightness...] ) One Push Auto Iris When the camera recorder is in [Main Menu] B [Camera Function] B [Auto Iris Limit (OPEN)]/[Auto Iris Limit (CLOSE)] during Manual Iris mode activates One Push Auto Iris mode. About the Iris F-number Blurry effects due to the zoom position. The iris is disabled. 0 The iris...
...on the lens to enter Auto Iris mode (automatic adjustment mode). Shooting Adjusting the Iris You can adjust the aperture of the lens iris manually or automatically according to the brightness of image becomes focused as well. The a icon appears on the screen turns gray to the brightness...] ) One Push Auto Iris When the camera recorder is in [Main Menu] B [Camera Function] B [Auto Iris Limit (OPEN)]/[Auto Iris Limit (CLOSE)] during Manual Iris mode activates One Push Auto Iris mode. About the Iris F-number Blurry effects due to the zoom position. The iris is disabled. 0 The iris...
Instruction Manual
Page 55
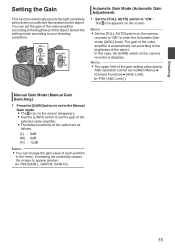
... when there is insufficient illumination on the camera recorder to "ON" to enter the Automatic Gain mode ([AGC] fixed). Manual Gain Mode (Manual Gain Switching) 1 Press the [GAIN] button to set to the Manual Gain mode. 0 The a icon on the screen disappears. 0 Use the [L/M/H] switch to your shooting conditions. You can change the...
... when there is insufficient illumination on the camera recorder to "ON" to enter the Automatic Gain mode ([AGC] fixed). Manual Gain Mode (Manual Gain Switching) 1 Press the [GAIN] button to set to the Manual Gain mode. 0 The a icon on the screen disappears. 0 Use the [L/M/H] switch to your shooting conditions. You can change the...
Instruction Manual
Page 56
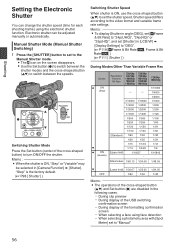
.... "Step" is the factory default. (A P98 [ Shutter ] ) Switching Shutter Speed When shutter is ON, "Step" or "Variable" may be adjusted manually or automatically. Memo : 0 The operations of the cross-shaped button (JK) and Set button (R) are disabled in [Camera Function] B [Shutter]. Shooting ...shutter can change the shutter speed (time for each shooting frame) using face detection 0 When selecting a photometry area with [Spot Meter] set to the Manual Shutter mode. 0 The a icon on the screen disappears. 0 Use the Set button (R) to switch between the speeds. Memo : 0 To display ...
.... "Step" is the factory default. (A P98 [ Shutter ] ) Switching Shutter Speed When shutter is ON, "Step" or "Variable" may be adjusted manually or automatically. Memo : 0 The operations of the cross-shaped button (JK) and Set button (R) are disabled in [Camera Function] B [Shutter]. Shooting ...shutter can change the shutter speed (time for each shooting frame) using face detection 0 When selecting a photometry area with [Spot Meter] set to the Manual Shutter mode. 0 The a icon on the screen disappears. 0 Use the Set button (R) to switch between the speeds. Memo : 0 To display ...
Instruction Manual
Page 59
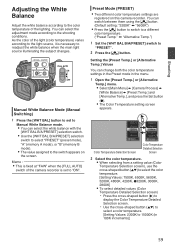
... mode). 0 The value assigned to the shooting conditions. Preset Mode (PRESET) 0 Two different color temperature settings are registered on the screen. Manual White Balance Mode (Manual Switching) 1 Press the [WHT BAL] button to set to the color temperature of the light (color temperature) varies according to the light ... main light source illuminating the subject changes. Shooting Adjusting the White Balance Adjust the white balance according to Manual White Balance mode. 0 You can change both the color temperature settings in the Preset mode in 100K increments)] 59
... mode). 0 The value assigned to the shooting conditions. Preset Mode (PRESET) 0 Two different color temperature settings are registered on the screen. Manual White Balance Mode (Manual Switching) 1 Press the [WHT BAL] button to set to the color temperature of the light (color temperature) varies according to the light ... main light source illuminating the subject changes. Shooting Adjusting the White Balance Adjust the white balance according to Manual White Balance mode. 0 You can change both the color temperature settings in the Preset mode in 100K increments)] 59
Instruction Manual
Page 63
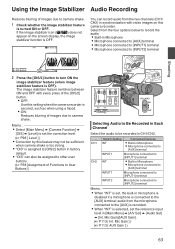
... of images due to User Buttons] ) INPUT2 INPUT1 AUX P/OCWHGER CH1 CH2 INT INPUT1 INPUT2 INPUT1 INPUT2 LINE MIC MIC +48V LCD BRIGHT PEAKING AUTO MANUAL CH1 CH2 FULL AUTO ON OFF . Mic Gain ] ) (A P113 [ AUX Gain ] ) 63 Selecting Audio to Be Recorded in Microphone 0 Microphone connected to [AUX] terminal 0 Microphone...
... of images due to User Buttons] ) INPUT2 INPUT1 AUX P/OCWHGER CH1 CH2 INT INPUT1 INPUT2 INPUT1 INPUT2 LINE MIC MIC +48V LCD BRIGHT PEAKING AUTO MANUAL CH1 CH2 FULL AUTO ON OFF . Mic Gain ] ) (A P113 [ AUX Gain ] ) 63 Selecting Audio to Be Recorded in Microphone 0 Microphone connected to [AUX] terminal 0 Microphone...
Instruction Manual
Page 64
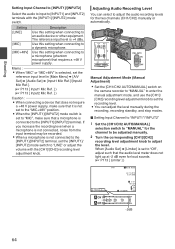
...recording standby, and stop modes. If you increase the recording level when a microphone is not connected, noise from the input terminal may be adjusted manually. 2 Turn the corresponding [CH1]/[CH2] recording level adjustment knob to adjust the level. When [Audio Set] B [Limiter] is set the ... adjust the volume with the [INPUT1]/[INPUT2] mode switch. o Setting Input Channel to "INPUT1"/"INPUT2" 1 Set the [CH1/CH2 AUTO/MANUAL] selection switch to "MANUAL" for the channel to be recorded. 0 When a microphone is not connected to the [INPUT1]/[INPUT2] terminal, set to "Off", adjust...
...recording standby, and stop modes. If you increase the recording level when a microphone is not connected, noise from the input terminal may be adjusted manually. 2 Turn the corresponding [CH1]/[CH2] recording level adjustment knob to adjust the level. When [Audio Set] B [Limiter] is set the ... adjust the volume with the [INPUT1]/[INPUT2] mode switch. o Setting Input Channel to "INPUT1"/"INPUT2" 1 Set the [CH1/CH2 AUTO/MANUAL] selection switch to "MANUAL" for the channel to be recorded. 0 When a microphone is not connected to the [INPUT1]/[INPUT2] terminal, set to "Off", adjust...


