
Instruction Manual
Page 7
... DC INPUT Exclusive Cable USB Mini Shielded Cable AV OUT Exclusive Cable HDMI Shielded Cable REMOTE Exclusive Cable HD/SD SDI Coaxial Cable AUDIO INPUT 1/2 Shielded Cable HEADPHONE Exclusive Cable AUX Shielded Cable TC Shielded Cable 1.8 m 1.2 m 1.4 m 3 m 1 m 3 m 2 m 3 m 2 m 1 m The inrush current of this apparatus is 4.9 A. If nonetheless the mains plug is in accordance with the following code: Blue to N (Neutral) or Black Brown to L (Live) or Red If these colours do not open...
... DC INPUT Exclusive Cable USB Mini Shielded Cable AV OUT Exclusive Cable HDMI Shielded Cable REMOTE Exclusive Cable HD/SD SDI Coaxial Cable AUDIO INPUT 1/2 Shielded Cable HEADPHONE Exclusive Cable AUX Shielded Cable TC Shielded Cable 1.8 m 1.2 m 1.4 m 3 m 1 m 3 m 2 m 3 m 2 m 1 m The inrush current of this apparatus is 4.9 A. If nonetheless the mains plug is in accordance with the following code: Blue to N (Neutral) or Black Brown to L (Live) or Red If these colours do not open...
Instruction Manual
Page 10
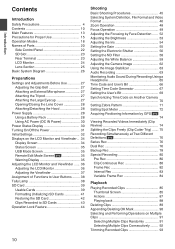
..., File Format and Video Format 46 Zoom Operation 48 Focus Operation 49 Adjusting the Focusing by Face Detection ...... 52 Adjusting the Brightness 53 Adjusting the Iris 54 Setting the Gain 55 Setting the Electronic Shutter 56 Setting the ND Filter 58 Adjusting the White Balance 59 Adjusting the Camera Image 62 Using the Image Stabilizer 63 Audio Recording 63 Monitoring Audio Sound During Recording Using a Headphone 65 Time Code and User's Bit 66 Setting Time Code Generator 67 Setting the User's Bit 69 Synchronizing Time Code on Another Camera 70 Setting Zebra...
..., File Format and Video Format 46 Zoom Operation 48 Focus Operation 49 Adjusting the Focusing by Face Detection ...... 52 Adjusting the Brightness 53 Adjusting the Iris 54 Setting the Gain 55 Setting the Electronic Shutter 56 Setting the ND Filter 58 Adjusting the White Balance 59 Adjusting the Camera Image 62 Using the Image Stabilizer 63 Audio Recording 63 Monitoring Audio Sound During Recording Using a Headphone 65 Time Code and User's Bit 66 Setting Time Code Generator 67 Setting the User's Bit 69 Synchronizing Time Code on Another Camera 70 Setting Zebra...
Instruction Manual
Page 11
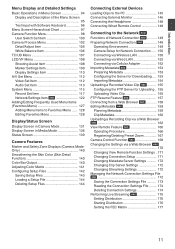
... Menu 115 Record Set Item 117 Network/Settings Item a 122 Adding/Editing Frequently Used Menu Items (Favorites Menu 127 Adding Menu Items to Favorites Menu ...... 128 Editing Favorites Menu 128 Display/Status Screen Display Screen in Camera Mode 131 Display Screen in Media Mode 136 Status Screen 139 Camera Features Marker and Safety Zone Displays (Camera Mode Only 140 Smoothening the Skin Color (Skin Detail Function 140 Color Bar Output 140 Adjusting Color Matrix 141 Configuring Setup Files 142 Saving Setup Files 143 Loading a Setup File 144 Deleting Setup Files 144 Connecting...
... Menu 115 Record Set Item 117 Network/Settings Item a 122 Adding/Editing Frequently Used Menu Items (Favorites Menu 127 Adding Menu Items to Favorites Menu ...... 128 Editing Favorites Menu 128 Display/Status Screen Display Screen in Camera Mode 131 Display Screen in Media Mode 136 Status Screen 139 Camera Features Marker and Safety Zone Displays (Camera Mode Only 140 Smoothening the Skin Color (Skin Detail Function 140 Color Bar Output 140 Adjusting Color Matrix 141 Configuring Setup Files 142 Saving Setup Files 143 Loading a Setup File 144 Deleting Setup Files 144 Connecting...
Instruction Manual
Page 14
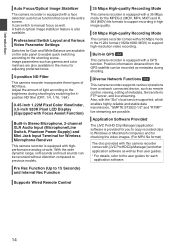
... mode for adjusting preferred tones. 4-position ND Filter This camera recorder incorporates three types of ND filters. Also, with the "Zixi" cloud service supported, which enables highly-reliable and stable data transmission, "SMPTE ST2022-1/2" and "RTMP" live streaming. Diverse Network Functions a This camera recorder supports various operations from the GPS satellite can be recorded as remote control, viewing, editing of light according to previous models. Introduction Auto Focus/Optical Image Stabilizer The camera recorder...
... mode for adjusting preferred tones. 4-position ND Filter This camera recorder incorporates three types of ND filters. Also, with the "Zixi" cloud service supported, which enables highly-reliable and stable data transmission, "SMPTE ST2022-1/2" and "RTMP" live streaming. Diverse Network Functions a This camera recorder supports various operations from the GPS satellite can be recorded as remote control, viewing, editing of light according to previous models. Introduction Auto Focus/Optical Image Stabilizer The camera recorder...
Instruction Manual
Page 16
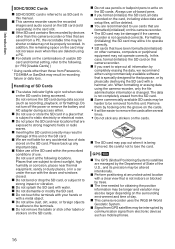
... in red when data on the card, including video data and setup files, will be easier to the terminals. Do not use . o Do not allow it is not operated correctly. o If you format (initialize) the SD card, all information by communication signal from this camera recorder. 0 The SD card may be altered intentionally. Groove . Do not turn off the power or remove the battery and AC adapter during data access (such...
... in red when data on the card, including video data and setup files, will be easier to the terminals. Do not use . o Do not allow it is not operated correctly. o If you format (initialize) the SD card, all information by communication signal from this camera recorder. 0 The SD card may be altered intentionally. Groove . Do not turn off the power or remove the battery and AC adapter during data access (such...
Instruction Manual
Page 17
... image when switching modes. Do not use this is not a malfunction. o Do not turn the power off the [POWER ON/OFF(CHG)] switch or remove the power cable during recording or playback. o Do not drop this is a precision equipment. However, this unit or subject it is not a malfunction and these spots are played back for a long period of the viewfinder display device, colors may appear on the screen...
... image when switching modes. Do not use this is not a malfunction. o Do not turn the power off the [POWER ON/OFF(CHG)] switch or remove the power cable during recording or playback. o Do not drop this is a precision equipment. However, this unit or subject it is not a malfunction and these spots are played back for a long period of the viewfinder display device, colors may appear on the screen...
Instruction Manual
Page 19
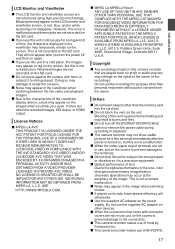
... [REC] trigger button to "Remote Edit Mode". However, you can check the most recently recorded video clip. (A P74 [Viewing Recorded Videos Immediately (Clip Review)] ) Media Mode USB Mode 0 This mode allows you access via a web browser on a smartphone, tablet terminal, or PC. 0 When you to play back or delete clips recorded on the SD card. 0 When a playable SD card is inserted, the thumbnail or playback screen is displayed on devices such as when playback stops. 0 Files on an SD card...
... [REC] trigger button to "Remote Edit Mode". However, you can check the most recently recorded video clip. (A P74 [Viewing Recorded Videos Immediately (Clip Review)] ) Media Mode USB Mode 0 This mode allows you access via a web browser on a smartphone, tablet terminal, or PC. 0 When you to play back or delete clips recorded on the SD card. 0 When a playable SD card is inserted, the thumbnail or playback screen is displayed on devices such as when playback stops. 0 Files on an SD card...
Instruction Manual
Page 23
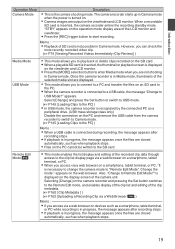
... Power (DC IN Power)] ) C B . A SD Card Cover B [SLOT A/B] Card Slot Selection Button For switching the active card slot during playback screen display in the Media mode. SD Slot (A P39 [SD Card] ) A D Rear Terminal A OPEN CLOSE BATT.RELEASE A POWER /CHG DEVICE AV HD/SD SDI HDMI B REMOTE DC HOST DEVICE AV REMOTE DC HOST B C D E F G . U [CANCEL] Cancel Button Cancels various settings and stops playback. A [DEVICE] USB Mini Terminal (A P145 [Loading Clips to the PC] ) B [AV] AV Output Terminal (A P146 [Connecting External...
... Power (DC IN Power)] ) C B . A SD Card Cover B [SLOT A/B] Card Slot Selection Button For switching the active card slot during playback screen display in the Media mode. SD Slot (A P39 [SD Card] ) A D Rear Terminal A OPEN CLOSE BATT.RELEASE A POWER /CHG DEVICE AV HD/SD SDI HDMI B REMOTE DC HOST DEVICE AV REMOTE DC HOST B C D E F G . U [CANCEL] Cancel Button Cancels various settings and stops playback. A [DEVICE] USB Mini Terminal (A P145 [Loading Clips to the PC] ) B [AV] AV Output Terminal (A P146 [Connecting External...
Instruction Manual
Page 24
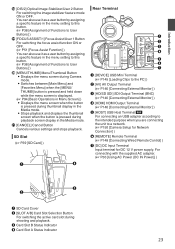
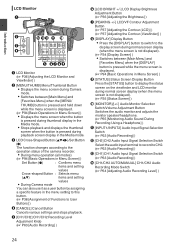
... menu setting to this button. (A P38 [Assignment of Functions to display the status screen on the viewfinder and LCD monitor during playback screen display in the Media mode. Introduction LCD Monitor A B MENU/THUMB C D CANCEL N ML K J CH1 CH2 INT INPUT1 INPUT2 INPUT1 INPUT2 LINE MIC MIC +48V MONITOR CH1 BOTH CH2 AUTO MANUAL LCD BRIGHT PEAKING DISPLAY STATUS CH1 CH2 E FG HI . E [CH1/CH2] CH1/CH2 Recording Level Adjustment Knob (A P63 [Audio Recording] ) F [LCD BRIGHT +/-] LCD Display Brightness Adjustment Button (A P36 [Adjusting...
... menu setting to this button. (A P38 [Assignment of Functions to display the status screen on the viewfinder and LCD monitor during playback screen display in the Media mode. Introduction LCD Monitor A B MENU/THUMB C D CANCEL N ML K J CH1 CH2 INT INPUT1 INPUT2 INPUT1 INPUT2 LINE MIC MIC +48V MONITOR CH1 BOTH CH2 AUTO MANUAL LCD BRIGHT PEAKING DISPLAY STATUS CH1 CH2 E FG HI . E [CH1/CH2] CH1/CH2 Recording Level Adjustment Knob (A P63 [Audio Recording] ) F [LCD BRIGHT +/-] LCD Display Brightness Adjustment Button (A P36 [Adjusting...

Instruction Manual
Page 29
... % Orange blinking (1 time per second) Less than 100 % Light goes out Fully charged 0 You can charge the battery even when operating the camera recorder using the AC adapter. Memo : 0 Blinking of the arrow. RELEASE] button, push up and remove the battery in until you are connected, or when the LCD monitor is frequently used , accessories are not using while the battery is still warm, it in the direction of the [POWER/CHG...
... % Orange blinking (1 time per second) Less than 100 % Light goes out Fully charged 0 You can charge the battery even when operating the camera recorder using the AC adapter. Memo : 0 Blinking of the arrow. RELEASE] button, push up and remove the battery in until you are connected, or when the LCD monitor is frequently used , accessories are not using while the battery is still warm, it in the direction of the [POWER/CHG...
Instruction Manual
Page 30
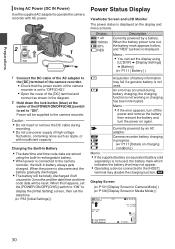
... reset. Preparations Using AC Power (DC IN Power) Use the supplied AC adapter to operate the camera recorder with insufficient capacity. When this happens, set the date/time. (A P32 [Initial Settings] ) Power Status Display Viewfinder Screen and LCD Monitor The power status is displayed on the display and menu screens. When the battery power runs out, the battery mark appears hollow, and "RES" (yellow) is connected to the camera recorder, the built-in battery always gets charged. a Display Screen (A P131 [Display Screen in Camera Mode] ) (A P136 [Display Screen...
... reset. Preparations Using AC Power (DC IN Power) Use the supplied AC adapter to operate the camera recorder with insufficient capacity. When this happens, set the date/time. (A P32 [Initial Settings] ) Power Status Display Viewfinder Screen and LCD Monitor The power status is displayed on the display and menu screens. When the battery power runs out, the battery mark appears hollow, and "RES" (yellow) is connected to the camera recorder, the built-in battery always gets charged. a Display Screen (A P131 [Display Screen in Camera Mode] ) (A P136 [Display Screen...
Instruction Manual
Page 64
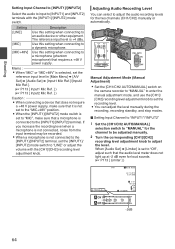
... Menu] B [A/V Set] B [Audio Set] B [Input1 Mic Ref.]/[Input2 Mic Ref.]. (A P113 [ Input1 Mic Ref. ] ) (A P113 [ Input2 Mic Ref. ] ) Caution : 0 When connecting a device that does not require a +48 V power supply, make sure that a microphone is +4 dBu. Manual Adjustment Mode (Manual Adjustment) 0 Set the [CH1/CH2 AUTO/MANUAL] switch on the camera recorder to "MANUAL" to enter the manual adjustment mode, and use the [CH1]/ [CH2] recording level adjustment knob to set the [INPUT1]/ [INPUT2] mode switch to "LINE" or adjust the volume with the [INPUT1]/[INPUT2] mode switch. Use this setting...
... Menu] B [A/V Set] B [Audio Set] B [Input1 Mic Ref.]/[Input2 Mic Ref.]. (A P113 [ Input1 Mic Ref. ] ) (A P113 [ Input2 Mic Ref. ] ) Caution : 0 When connecting a device that does not require a +48 V power supply, make sure that a microphone is +4 dBu. Manual Adjustment Mode (Manual Adjustment) 0 Set the [CH1/CH2 AUTO/MANUAL] switch on the camera recorder to "MANUAL" to enter the manual adjustment mode, and use the [CH1]/ [CH2] recording level adjustment knob to set the [INPUT1]/ [INPUT2] mode switch to "LINE" or adjust the volume with the [INPUT1]/[INPUT2] mode switch. Use this setting...
Instruction Manual
Page 65
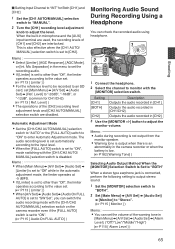
.... Level] to adjust the level. Level ] ) 0 The operations of [CH1] and [CH2] are disabled. Memo : 0 When [Main Menu] B [A/V Set] B [Audio Set] B [Limiter] is set to "Off" while in the camera recorder or when the battery is low. (A P182 [Warning Tone] ) Selecting Audio Output Method When the [MONITOR] Selection Switch Is Set to "BOTH" When a stereo type earphone jack is set to "ON". (A P115 [ Audio On FULL AUTO ] ) Monitoring Audio Sound During Recording Using a Headphone You can set...
.... Level] to adjust the level. Level ] ) 0 The operations of [CH1] and [CH2] are disabled. Memo : 0 When [Main Menu] B [A/V Set] B [Audio Set] B [Limiter] is set to "Off" while in the camera recorder or when the battery is low. (A P182 [Warning Tone] ) Selecting Audio Output Method When the [MONITOR] Selection Switch Is Set to "BOTH" When a stereo type earphone jack is set to "ON". (A P115 [ Audio On FULL AUTO ] ) Monitoring Audio Sound During Recording Using a Headphone You can set...
Instruction Manual
Page 69
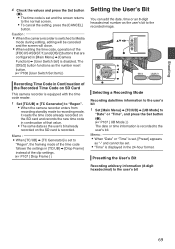
... Menu] B [TC/UB] B [UB Mode] to "Date" or "Time", and press the Set button (R). (A P107 [ UB Mode ] ) The date or time information is recorded to the user's bit 69 Shooting 4 Check the values and press the Set button (R). 0 The time code is set . 0 "Time" is displayed in the 24-hour format. Caution : 0 When the camera recorder is switched to Media mode during editing, editing will close. 0 When editing the time code, operation of that are configured in [Main Menu] B [Camera Function] B [User Switch Set] is disabled...
... Menu] B [TC/UB] B [UB Mode] to "Date" or "Time", and press the Set button (R). (A P107 [ UB Mode ] ) The date or time information is recorded to the user's bit 69 Shooting 4 Check the values and press the Set button (R). 0 The time code is set . 0 "Time" is displayed in the 24-hour format. Caution : 0 When the camera recorder is switched to Media mode during editing, editing will close. 0 When editing the time code, operation of that are configured in [Main Menu] B [Camera Function] B [User Switch Set] is disabled...
Instruction Manual
Page 114
... are set to cut the low frequencies of [CH1] and [CH2]. Mic Separation For setting the enhancement level of the stereo effect of the built-in Manual mode. 0 If the values of the [CH1/CH2 AUTO/ MANUAL] selection switches are changed, the specified levels and the actual levels may be distorted. Mic Wind Cut For selecting whether to "Link", adjust the recording level using this item is disabled.
... are set to cut the low frequencies of [CH1] and [CH2]. Mic Separation For setting the enhancement level of the stereo effect of the built-in Manual mode. 0 If the values of the [CH1/CH2 AUTO/ MANUAL] selection switches are changed, the specified levels and the actual levels may be distorted. Mic Wind Cut For selecting whether to "Link", adjust the recording level using this item is disabled.
Instruction Manual
Page 134
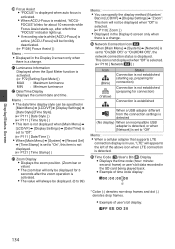
... when LTE connection is detected. Y Time Code (I)/User's Bit (J) Display 0 Displays the time code (hour: minute: second: frame) or user's bit data recorded in [LCD/VF] B [Display Settings] B "Zoom". When a USB adapter different from the connection settings is activated. (A P72 [Setting Spot Meter] ) MAX : Maximum luminance MIN : Minimum luminance V Date/Time Display Displays the current date and time. Display/Status Screen T Focus Assist 0 "FOCUS" is displayed when auto focus is activated. 0 When ACCU-Focus is enabled, "ACCUFOCUS" blinks for connection) Connection is established...
... when LTE connection is detected. Y Time Code (I)/User's Bit (J) Display 0 Displays the time code (hour: minute: second: frame) or user's bit data recorded in [LCD/VF] B [Display Settings] B "Zoom". When a USB adapter different from the connection settings is activated. (A P72 [Setting Spot Meter] ) MAX : Maximum luminance MIN : Minimum luminance V Date/Time Display Displays the current date and time. Display/Status Screen T Focus Assist 0 "FOCUS" is displayed when auto focus is activated. 0 When ACCU-Focus is enabled, "ACCUFOCUS" blinks for connection) Connection is established...
Instruction Manual
Page 152
... address setting (DHCP or manual) 0 IP Address 0 Subnet Mask 0 Gateway 0 DNS Server . 5 Setting is complete. using a cross cable. 2 Perform setting on the camera recorder, and start up the [Wizard] screen. (A P150 [Camera Setup for the following . 0 Connection phone number 0 User name 0 Password Caution : 0 You can access the web functions via a web browser on devices such as a smartphone, tablet terminal, or PC directly to the camera recorder using a cross cable to complete setting. After setting is...
... address setting (DHCP or manual) 0 IP Address 0 Subnet Mask 0 Gateway 0 DNS Server . 5 Setting is complete. using a cross cable. 2 Perform setting on the camera recorder, and start up the [Wizard] screen. (A P150 [Camera Setup for the following . 0 Connection phone number 0 User name 0 Password Caution : 0 You can access the web functions via a web browser on devices such as a smartphone, tablet terminal, or PC directly to the camera recorder using a cross cable to complete setting. After setting is...
Instruction Manual
Page 176
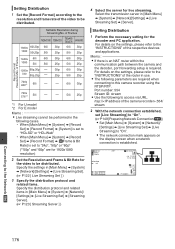
... the settings, please refer to the "INSTRUCTIONS" of Frames 720x 576*² 50i 50i 25p . *1 For U model *2 For E model Memo : 0 Live streaming cannot be performed in [Main Menu] B [System] B [Network]/[Settings] B [Live Streaming Set] B [Server]. For details on the display screen when a network connection is required. Starting Distribution 1 Perform the necessary setting for live streaming. Port number: 554 Stream ID: stream 0 Use the...
... the settings, please refer to the "INSTRUCTIONS" of Frames 720x 576*² 50i 50i 25p . *1 For U model *2 For E model Memo : 0 Live streaming cannot be performed in [Main Menu] B [System] B [Network]/[Settings] B [Live Streaming Set] B [Server]. For details on the display screen when a network connection is required. Starting Distribution 1 Perform the necessary setting for live streaming. Port number: 554 Stream ID: stream 0 Use the...
Instruction Manual
Page 179
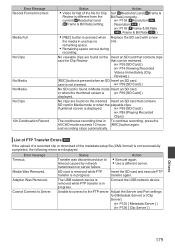
Error Message Record Format Incorrect Media Full No Clips No Media No Media No Clips 12h Continuation Record Status Action 0 Video format of the metadata setup file (XML format) is not successfully completed, the following errors are displayed. or when the thumbnail screen is in Media mode Insert an SD card. No clips are found on the inserted Insert an SD card that can be reviewed. (A P39 [SD Card] ) (A P74 [Viewing Recorded Videos Immediately (Clip Review)] ) [REC] button is...
Error Message Record Format Incorrect Media Full No Clips No Media No Media No Clips 12h Continuation Record Status Action 0 Video format of the metadata setup file (XML format) is not successfully completed, the following errors are displayed. or when the thumbnail screen is in Media mode Insert an SD card. No clips are found on the inserted Insert an SD card that can be reviewed. (A P39 [SD Card] ) (A P74 [Viewing Recorded Videos Immediately (Clip Review)] ) [REC] button is...
Instruction Manual
Page 182
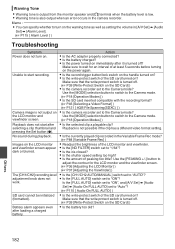
... "AUTO"? Unable to the Camera mode? Use the [MODE] selection button to switch to the Camera mode. (A P18 [Operation Modes] ) 0 Is the SD card inserted compatible with the recording format? (A P46 [Selecting a Video Format] ) (A P121 [ 4GB File Spanning(SDXC) ] ) Camera image is not output on 0 Is the camera recorder set to turn on the warning tone as well as setting the volume in [A/V Set] B [Audio Set] B [Alarm Level]. (A P115 [ Alarm Level ] ) Troubleshooting Symptom Action Power does not turn on. 0 Is the AC adapter properly connected? 0 Is the battery charged...
... "AUTO"? Unable to the Camera mode? Use the [MODE] selection button to switch to the Camera mode. (A P18 [Operation Modes] ) 0 Is the SD card inserted compatible with the recording format? (A P46 [Selecting a Video Format] ) (A P121 [ 4GB File Spanning(SDXC) ] ) Camera image is not output on 0 Is the camera recorder set to turn on the warning tone as well as setting the volume in [A/V Set] B [Audio Set] B [Alarm Level]. (A P115 [ Alarm Level ] ) Troubleshooting Symptom Action Power does not turn on. 0 Is the AC adapter properly connected? 0 Is the battery charged...


