

Instruction Manual
Page 10
..., File Format and Video Format 47 Zoom Operation 49 Focus Operation 50 Adjusting the Focusing by Face Detection ...... 53 Adjusting the Brightness 54 Adjusting the Iris 55 Setting the Gain 57 Setting the Electronic Shutter 58 Setting the ND Filter 59 Adjusting the White Balance 60 Adjusting the Camera Image 64 Using the Image Stabilizer 64 Audio Recording 65 Monitoring Audio Sound During Recording Using a Headphone 67 Time Code and User's Bit 68 Setting Time Code Generator 69 Setting the User's Bit 71 Setting Zebra Pattern 72 Viewing Recorded Videos Immediately (Clip Review...
..., File Format and Video Format 47 Zoom Operation 49 Focus Operation 50 Adjusting the Focusing by Face Detection ...... 53 Adjusting the Brightness 54 Adjusting the Iris 55 Setting the Gain 57 Setting the Electronic Shutter 58 Setting the ND Filter 59 Adjusting the White Balance 60 Adjusting the Camera Image 64 Using the Image Stabilizer 64 Audio Recording 65 Monitoring Audio Sound During Recording Using a Headphone 67 Time Code and User's Bit 68 Setting Time Code Generator 69 Setting the User's Bit 71 Setting Zebra Pattern 72 Viewing Recorded Videos Immediately (Clip Review...

Instruction Manual
Page 11
... Text Input with Software Keyboard 94 Menu Screen Hierarchical Chart 95 Camera Function Menu 96 User Switch Set Item 98 Camera Process Menu 100 Detail/Adjust Item 102 White Balance Item 102 TC/UB Menu 103 LCD/VF Menu 104 Shooting Assist Item 105 Marker Settings Item 106 Display Settings Item 107 A/V Set Menu 109 Video Set Item 109 Audio Set Item 110 System Menu 113 Record Set Item 114 Network/Settings Item K 118 Adding/Editing Frequently Used Menu Items (Favorites Menu 123 Adding Menu Items...
... Text Input with Software Keyboard 94 Menu Screen Hierarchical Chart 95 Camera Function Menu 96 User Switch Set Item 98 Camera Process Menu 100 Detail/Adjust Item 102 White Balance Item 102 TC/UB Menu 103 LCD/VF Menu 104 Shooting Assist Item 105 Marker Settings Item 106 Display Settings Item 107 A/V Set Menu 109 Video Set Item 109 Audio Set Item 110 System Menu 113 Record Set Item 114 Network/Settings Item K 118 Adding/Editing Frequently Used Menu Items (Favorites Menu 123 Adding Menu Items...

Instruction Manual
Page 13
... with recording button and zoom switches, and supports microphones for critical focusing during shooting by JVC KENWOOD Corporation. Unauthorized duplication or reprinting of this manual, in whole or in part, is built in with different functions for greater ease of use . Marks such as gamma and color matrix are also available in the menu for Gain and White Balance are available on the side panel to enable quick switching...
... with recording button and zoom switches, and supports microphones for critical focusing during shooting by JVC KENWOOD Corporation. Unauthorized duplication or reprinting of this manual, in whole or in part, is built in with different functions for greater ease of use . Marks such as gamma and color matrix are also available in the menu for Gain and White Balance are available on the side panel to enable quick switching...
Instruction Manual
Page 15
... is changed. Places that purpose, or by completely erasing the data, we recommend either . o Do not dismantle or modify the SD card. o If you turn off the power or remove the battery and AC adapter during data access (such as SD card in damage of the camera recorder. The data is subject to the following locations. You can check the usage time of usable SD card and format setting, refer...
... is changed. Places that purpose, or by completely erasing the data, we recommend either . o Do not dismantle or modify the SD card. o If you turn off the power or remove the battery and AC adapter during data access (such as SD card in damage of the camera recorder. The data is subject to the following locations. You can check the usage time of usable SD card and format setting, refer...

Instruction Manual
Page 19
... display screen of the selected media slot are displayed. 0 This mode allows you access via a Web Browser K] ) Memo : 0 If you to connect to a PC and transfer the files on the camera recorder and pressing the Set button switches to the PC] ) Memo : 0 When a USB cable is connected during recording, the message appears after recording stops. 0 If playback is connected to a USB cable, the message "Change to the SD card. Memo : 0 Playback of the clip metadata. (A P152 [ Clip Metadata ] ) (A P155 [Uploading a Recording...
... display screen of the selected media slot are displayed. 0 This mode allows you access via a Web Browser K] ) Memo : 0 If you to connect to a PC and transfer the files on the camera recorder and pressing the Set button switches to the PC] ) Memo : 0 When a USB cable is connected during recording, the message appears after recording stops. 0 If playback is connected to a USB cable, the message "Change to the SD card. Memo : 0 Playback of the clip metadata. (A P152 [ Clip Metadata ] ) (A P155 [Uploading a Recording...

Instruction Manual
Page 31
...remove the DC cable during battery charging. Charging the Built-In Battery 0 The date/time and time code data are stored using [LCD/VF] B [Display Settings] B [Battery]. (A P107 [ Battery ] ) F T G P Q R S Acquisition of the [POWER ON/OFF] switch to set the [POWER ON/OFF] switch to "ON" to the camera recorder. Currently powered by a battery. Camera recorder battery charging in rechargeable battery. 0 When power is not used . Display Screen (A P127 [Display Screen in Camera Mode] ) (A P132 [Display Screen in battery always gets charged. Memo : 0 You can set the date/ time...
...remove the DC cable during battery charging. Charging the Built-In Battery 0 The date/time and time code data are stored using [LCD/VF] B [Display Settings] B [Battery]. (A P107 [ Battery ] ) F T G P Q R S Acquisition of the [POWER ON/OFF] switch to set the [POWER ON/OFF] switch to "ON" to the camera recorder. Currently powered by a battery. Camera recorder battery charging in rechargeable battery. 0 When power is not used . Display Screen (A P127 [Display Screen in Camera Mode] ) (A P132 [Display Screen in battery always gets charged. Memo : 0 You can set the date/ time...

Instruction Manual
Page 36
... Viewfinder USB Mode . Remote Edit Mode Screen K This is a mode for accessing the page for editing the metadata that is displayed in the display screen (Camera mode, Media mode). (A P170 [Error Messages and Actions] ) USER Switch Set USER1 Focus Assist USER2 TC Preset USER3 USER4 Lolux Clip Review USER5 Zebra USER6 OIS USER7 Rec Audio -62dB Video HDMI/SDI Out Resolution HDMI Color HDMI Enhance SDI Rec Trigger SD Aspect SD Set Up HDMI+SDI 1080i Auto Off...
... Viewfinder USB Mode . Remote Edit Mode Screen K This is a mode for accessing the page for editing the metadata that is displayed in the display screen (Camera mode, Media mode). (A P170 [Error Messages and Actions] ) USER Switch Set USER1 Focus Assist USER2 TC Preset USER3 USER4 Lolux Clip Review USER5 Zebra USER6 OIS USER7 Rec Audio -62dB Video HDMI/SDI Out Resolution HDMI Color HDMI Enhance SDI Rec Trigger SD Aspect SD Set Up HDMI+SDI 1080i Auto Off...

Instruction Manual
Page 66
... (Manual Adjustment) 0 Set the [AUDIO SELECT CH-1/CH-2 AUTO/ MANU] switch on the camera recorder to "MANU" to enter the manual adjustment mode, and use the [CH-1]/[CH-2] recording level adjustment knob to set to set [Main Menu] B [A/V Set] B [Audio Set] B [Ref. Mic Stereo Enhancer] in microphone and the [AUX] input terminal are used, the recording levels of the [AUDIO SELECT CH-1 AUTO/MANU] and [AUDIO SELECT CH-2 AUTO/MANU] switches become independent. Shooting Adjusting the Audio Recording Level O You can adjust the level manually during the recording, recording standby, and stop...
... (Manual Adjustment) 0 Set the [AUDIO SELECT CH-1/CH-2 AUTO/ MANU] switch on the camera recorder to "MANU" to enter the manual adjustment mode, and use the [CH-1]/[CH-2] recording level adjustment knob to set to set [Main Menu] B [A/V Set] B [Audio Set] B [Ref. Mic Stereo Enhancer] in microphone and the [AUX] input terminal are used, the recording levels of the [AUDIO SELECT CH-1 AUTO/MANU] and [AUDIO SELECT CH-2 AUTO/MANU] switches become independent. Shooting Adjusting the Audio Recording Level O You can adjust the level manually during the recording, recording standby, and stop...

Instruction Manual
Page 67
... Camera mode. 0 Warning tone is output when there is an abnormality in the camera recorder or when the battery is low. (A P174 [Warning Tone] ) 0 You can check the recorded audio using the J / K volume buttons on the screen. Shooting Memo : 0 When [Main Menu] B [A/V Set] B [Audio Set] B [Limiter] is set to "Off" while in the automatic adjustment mode, the limiter operates at -6 dBFS. 0 When [A/V Set] B [Audio Set] B [Audio On FULL AUTO] is set to "SW Set", you can switch the audio recording mode with the [AUDIO...
... Camera mode. 0 Warning tone is output when there is an abnormality in the camera recorder or when the battery is low. (A P174 [Warning Tone] ) 0 You can check the recorded audio using the J / K volume buttons on the screen. Shooting Memo : 0 When [Main Menu] B [A/V Set] B [Audio Set] B [Limiter] is set to "Off" while in the automatic adjustment mode, the limiter operates at -6 dBFS. 0 When [A/V Set] B [Audio Set] B [Audio On FULL AUTO] is set to "SW Set", you can switch the audio recording mode with the [AUDIO...

Instruction Manual
Page 68
... card is not replaced. Shooting Time Code and User's Bit Time code and user's bit data are displayed on the viewfinder and LCD monitor during playback or recording. The time code operates in running order. (A P69 [Setting Time Code] ) Memo : 0 When [Main Menu] B [System] B [Record Set] B [Rec Mode] is set to "Interval Rec" or "Frame Rec", and [TC Generator] is set to "Free Run", Rec Run is activated. 0 When [Main Menu] B [System] B [Record Set] B [Record Format] B [WFormat]/[YFormat] is set to "AVCHD", and [Main Menu] B [System] B [Record Set] B [Rec Mode] is set to settings...
... card is not replaced. Shooting Time Code and User's Bit Time code and user's bit data are displayed on the viewfinder and LCD monitor during playback or recording. The time code operates in running order. (A P69 [Setting Time Code] ) Memo : 0 When [Main Menu] B [System] B [Record Set] B [Rec Mode] is set to "Interval Rec" or "Frame Rec", and [TC Generator] is set to "Free Run", Rec Run is activated. 0 When [Main Menu] B [System] B [Record Set] B [Record Format] B [WFormat]/[YFormat] is set to "AVCHD", and [Main Menu] B [System] B [Record Set] B [Rec Mode] is set to settings...

Instruction Manual
Page 69
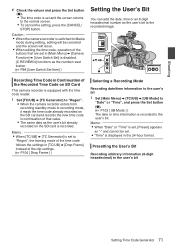
... disabled. (A P115 [ W Frame Rate ] ) 0 You can configure the setting without accessing the [TC/UB] menu screen. (A P70 [Setting Time Code without Opening the Menu] ) Required Settings Before Preset 1 Set [TC/UB] B [TC Generator] to "Rec Run" or "Free Run". (A P103 [ TC Generator ] ) 0 [Rec Run]: Preset data in the time code generator operates in run mode from the internal time code generator are recorded. Shooting Setting Time Code Generator Presetting the Time Code Time code and user's bit data generated from the preset time in run mode...
... disabled. (A P115 [ W Frame Rate ] ) 0 You can configure the setting without accessing the [TC/UB] menu screen. (A P70 [Setting Time Code without Opening the Menu] ) Required Settings Before Preset 1 Set [TC/UB] B [TC Generator] to "Rec Run" or "Free Run". (A P103 [ TC Generator ] ) 0 [Rec Run]: Preset data in the time code generator operates in run mode from the internal time code generator are recorded. Shooting Setting Time Code Generator Presetting the Time Code Time code and user's bit data generated from the preset time in run mode...
Instruction Manual
Page 71
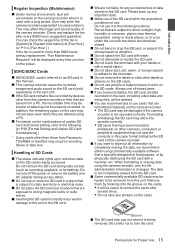
... the camera recorder is switched to Media mode during editing, editing will close. 0 When editing the time code, operation of the buttons that are set and the screen returns to the normal screen. 0 To cancel the setting, press the [CANCEL/ STOP] button. Shooting 4 Check the values and press the Set button (R). 0 The time code is set in [Main Menu] B [Camera Function] B [User Switch Set] is disabled. [C.REVIEW/4] functions as the number reset button. (A P98 [User Switch Set Item] ) Recording Time Code in Continuation of the Recorded Time Code on SD Card This camera recorder is equipped...
... the camera recorder is switched to Media mode during editing, editing will close. 0 When editing the time code, operation of the buttons that are set and the screen returns to the normal screen. 0 To cancel the setting, press the [CANCEL/ STOP] button. Shooting 4 Check the values and press the Set button (R). 0 The time code is set in [Main Menu] B [Camera Function] B [User Switch Set] is disabled. [C.REVIEW/4] functions as the number reset button. (A P98 [User Switch Set Item] ) Recording Time Code in Continuation of the Recorded Time Code on SD Card This camera recorder is equipped...

Instruction Manual
Page 103
... card is not replaced. Menu Display and Detailed Settings AWB Paint For adjusting the R (red)/B (blue) component in running order. [Setting Values: Free Run, RRec Run, Regen] TC Preset For setting the time code (hour, minute, second, frame). If the SD card is removed and recording is turned off in the previous card. 0 Regen: The time code operates in the Media mode, or during recording. TC Generator For setting the operation of the time code. 0 Free Run: The time code operates...
... card is not replaced. Menu Display and Detailed Settings AWB Paint For adjusting the R (red)/B (blue) component in running order. [Setting Values: Free Run, RRec Run, Regen] TC Preset For setting the time code (hour, minute, second, frame). If the SD card is removed and recording is turned off in the previous card. 0 Regen: The time code operates in the Media mode, or during recording. TC Generator For setting the operation of the time code. 0 Free Run: The time code operates...
Instruction Manual
Page 111
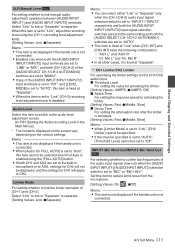
... is not displayed if the handle unit is connected. 0 When [Audio On FULL AUTO] is set to "Auto", this item is set to "Link", adjust the recording level using the [FULL AUTO] button. 0 If both [CH-1]/[CH-2] of the [AUDIO INPUT INPUT1/INPUT2] input terminals is set to "INT", and [LEVEL MODE] is set to "AUTO", this item is fixed at "Separate". 0 When this item to link manual audio adjustment operation between [AUDIO INPUT INPUT1] and [AUDIO INPUT INPUT2] terminals...
... is not displayed if the handle unit is connected. 0 When [Audio On FULL AUTO] is set to "Auto", this item is set to "Link", adjust the recording level using the [FULL AUTO] button. 0 If both [CH-1]/[CH-2] of the [AUDIO INPUT INPUT1/INPUT2] input terminals is set to "INT", and [LEVEL MODE] is set to "AUTO", this item is fixed at "Separate". 0 When this item to link manual audio adjustment operation between [AUDIO INPUT INPUT1] and [AUDIO INPUT INPUT2] terminals...

Instruction Manual
Page 128
...] B [Record Set] B [Record Format] B [System] is set to "Frame Rec" or "Interval Rec", audio cannot be displayed. (A P107 [ Media Remain ] ) 0 Displayed on the Display 0 and Display 1 screens only in the case of the remaining transfer time is in Camera Mode Memo : 0 This item is not displayed when [Main Menu] B [LCD/VF] B [Display Settings] B [Media Remain] is no audio output from the speaker in the Display 0 screen only when there is set to "Off". However, warnings will be recorded and the audio level...
...] B [Record Set] B [Record Format] B [System] is set to "Frame Rec" or "Interval Rec", audio cannot be displayed. (A P107 [ Media Remain ] ) 0 Displayed on the Display 0 and Display 1 screens only in the case of the remaining transfer time is in Camera Mode Memo : 0 This item is not displayed when [Main Menu] B [LCD/VF] B [Display Settings] B [Media Remain] is no audio output from the speaker in the Display 0 screen only when there is set to "Off". However, warnings will be recorded and the audio level...

Instruction Manual
Page 130
... a USB adapter different from the connection settings is . Display/Status Screen R Focus Assist 0 "FOCUS" is displayed when auto focus is activated. 0 When ACCU-Focus is enabled, "ACCUFOCUS" blinks for about 10 seconds while Focus Assist starts up . 0 If recording starts while [ACCU-Focus] is active, [ACCU-Focus] will appear to the left of user's bit display: FF EE DD 20 . 130 Display Screen in Camera Mode This item will always be displayed. S Date/Time Display Displays the current date...
... a USB adapter different from the connection settings is . Display/Status Screen R Focus Assist 0 "FOCUS" is displayed when auto focus is activated. 0 When ACCU-Focus is enabled, "ACCUFOCUS" blinks for about 10 seconds while Focus Assist starts up . 0 If recording starts while [ACCU-Focus] is active, [ACCU-Focus] will appear to the left of user's bit display: FF EE DD 20 . 130 Display Screen in Camera Mode This item will always be displayed. S Date/Time Display Displays the current date...
Instruction Manual
Page 133
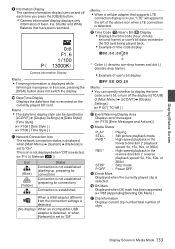
... be specified in Media Mode 133 Memo : 0 The date/time display style can specify whether to the left of Gain, Iris, Shutter and White Balance that is recorded on and off the display in [TC/UB] of [Main Menu] B [LCD/VF] B [Display Settings]. (A P107 [ TC/UB ] ) M Event/Warning Display Area Displays error messages. (A P170 [Error Messages and Actions] ) N Media Status PLAY STILL FWD * REV * STOP P.OFF : Playing : Still picture playback mode : High-speed playback in the forward direction (* playback speed: 5x, 15x...
... be specified in Media Mode 133 Memo : 0 The date/time display style can specify whether to the left of Gain, Iris, Shutter and White Balance that is recorded on and off the display in [TC/UB] of [Main Menu] B [LCD/VF] B [Display Settings]. (A P107 [ TC/UB ] ) M Event/Warning Display Area Displays error messages. (A P170 [Error Messages and Actions] ) N Media Status PLAY STILL FWD * REV * STOP P.OFF : Playing : Still picture playback mode : High-speed playback in the forward direction (* playback speed: 5x, 15x...
Instruction Manual
Page 145
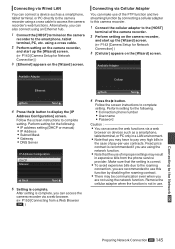
... terminal, or PC directly to the camera recorder using the network function. After setting is recommended if you are not using a cross cable to access the camera recorder's web functions. Perform setting for the following . 0 Connection phone number 0 User name 0 Password Caution : 0 You can access the web functions via a web browser on the [Wizard] screen. Connecting via Cellular Adapter You can make use of the FTP function and live streaming function by disabling the roaming contract...
... terminal, or PC directly to the camera recorder using the network function. After setting is recommended if you are not using a cross cable to access the camera recorder's web functions. Perform setting for the following . 0 Connection phone number 0 User name 0 Password Caution : 0 You can access the web functions via a web browser on the [Wizard] screen. Connecting via Cellular Adapter You can make use of the FTP function and live streaming function by disabling the roaming contract...
Instruction Manual
Page 169
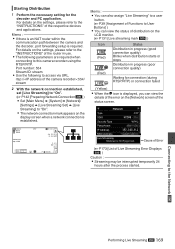
... progress (good connection quality) Blinks when distribution starts or stops Distribution in use. 0 The following to the Network K Performing Live Streaming K 169 Connecting to access via URL. Network Type SSID P2P HM200 Security Type WPA2 Passphrase IP Address MAC Address 192.168.0.1 Live Streaming Multicast Is Not Supported. For details on the settings, please refer to the "INSTRUCTIONS" of Live Streaming Error Displays K] ) Caution...
... progress (good connection quality) Blinks when distribution starts or stops Distribution in use. 0 The following to the Network K Performing Live Streaming K 169 Connecting to access via URL. Network Type SSID P2P HM200 Security Type WPA2 Passphrase IP Address MAC Address 192.168.0.1 Live Streaming Multicast Is Not Supported. For details on the settings, please refer to the "INSTRUCTIONS" of Live Streaming Error Displays K] ) Caution...

Instruction Manual
Page 175
... settings, set to "Auto" in Camera Mode] ) 0 Is [System] B [Record Set] B [Time Stamp] set to "On"? To use viewfinder. K (A P122 [ Clip Server ] ) 0 The maximum size of the SD card turned on the Display 1 and Display 2 screens in the Camera mode (during shooting). (A P127 [Display Screen in Full Auto mode? (A P112 [ Audio On FULL AUTO ] ) SD card cannot be displayed depending to the type of network adapter used and the connection, during live streaming are only displayed on ? (formatted). Cannot perform remote operation. Change the usage environment. 0 Connect...
... settings, set to "Auto" in Camera Mode] ) 0 Is [System] B [Record Set] B [Time Stamp] set to "On"? To use viewfinder. K (A P122 [ Clip Server ] ) 0 The maximum size of the SD card turned on the Display 1 and Display 2 screens in the Camera mode (during shooting). (A P127 [Display Screen in Full Auto mode? (A P112 [ Audio On FULL AUTO ] ) SD card cannot be displayed depending to the type of network adapter used and the connection, during live streaming are only displayed on ? (formatted). Cannot perform remote operation. Change the usage environment. 0 Connect...


