

Instructions
Page 4
...MP4 file format enables the video files to be used as audio input terminals for the built-in different environments. Ⅵ SD card recording This camcorder comes with an HDMI terminal, a component terminal, and an A/V OUT (video/audio output) terminal, which can be moved or copied between the...still pictures on an SD card, and also playback of these videos or still pictures. Ⅵ Supports various HD video recording formats (1080i, 1080p, and 720p) Shooting can be edited directly using Final Cut Pro. The recorded clips can be performed in different HD recording modes, thus supporting...
...MP4 file format enables the video files to be used as audio input terminals for the built-in different environments. Ⅵ SD card recording This camcorder comes with an HDMI terminal, a component terminal, and an A/V OUT (video/audio output) terminal, which can be moved or copied between the...still pictures on an SD card, and also playback of these videos or still pictures. Ⅵ Supports various HD video recording formats (1080i, 1080p, and 720p) Shooting can be edited directly using Final Cut Pro. The recorded clips can be performed in different HD recording modes, thus supporting...
Instructions
Page 5
...25 Selecting the Video/Still Picture Shooting Mode . . . . . 25 Selecting the Full Auto/Manual Shooting Mode 25 Selecting a Focusing Mode 26 Using the Camcorder in the Video Shooting Mode . . . . . 26 Setting the Video Format 26 Displaying the Remaining Space on the SD Card . . . . ... Videos 27 Capturing Still Pictures in the Video Shooting Mode 28 Recording Multiple Clips as a Continuous File . . . . . .28 Using the Camcorder in the Still Picture Shooting Mode 29 Setting the Picture Quality, Recording Size, and Sensitivity 29 Capturing Still Pictures 29 Zoom Operation 30 Adjusting the...
...25 Selecting the Video/Still Picture Shooting Mode . . . . . 25 Selecting the Full Auto/Manual Shooting Mode 25 Selecting a Focusing Mode 26 Using the Camcorder in the Video Shooting Mode . . . . . 26 Setting the Video Format 26 Displaying the Remaining Space on the SD Card . . . . ... Videos 27 Capturing Still Pictures in the Video Shooting Mode 28 Recording Multiple Clips as a Continuous File . . . . . .28 Using the Camcorder in the Still Picture Shooting Mode 29 Setting the Picture Quality, Recording Size, and Sensitivity 29 Capturing Still Pictures 29 Zoom Operation 30 Adjusting the...
Instructions
Page 6
... notice. Memo : Describes reference information, such as functions and usage restrictions of this manual ● All rights reserved by JVC. Remember that you obtain permission beforehand.) Trademarks • HDMI is a trademark of HDMI Licensing, LLC. • We ...this manual. ● Illustrated designs, specifications and other product names used Caution : Describes precautions concerning the operation of this camcorder is strictly prohibited. ● All other contents of their respective companies. Any commercial use only. Unauthorized duplication or reprinting...
... notice. Memo : Describes reference information, such as functions and usage restrictions of this manual ● All rights reserved by JVC. Remember that you obtain permission beforehand.) Trademarks • HDMI is a trademark of HDMI Licensing, LLC. • We ...this manual. ● Illustrated designs, specifications and other product names used Caution : Describes precautions concerning the operation of this camcorder is strictly prohibited. ● All other contents of their respective companies. Any commercial use only. Unauthorized duplication or reprinting...
Instructions
Page 7
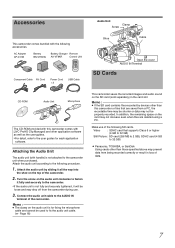
...refer to the user guides for fixing the microphone cable and cannot be used to fix the audio unit cable. (A Page 18) This camcorder saves the recorded images and audio sound on the audio unit clockwise to the following accessories. Attach the audio unit according to fasten it ...contains files recorded by sliding it fully and securely to 32 GB) ● Panasonic, TOSHIBA, or SanDisk Using cards other than this camcorder comes with [JVC ProHD Clip Manager] and other than those specified above may drop off from being recorded correctly or result in the card slot. TIf ...
...refer to the user guides for fixing the microphone cable and cannot be used to fix the audio unit cable. (A Page 18) This camcorder saves the recorded images and audio sound on the audio unit clockwise to the following accessories. Attach the audio unit according to fasten it ...contains files recorded by sliding it fully and securely to 32 GB) ● Panasonic, TOSHIBA, or SanDisk Using cards other than this camcorder comes with [JVC ProHD Clip Manager] and other than those specified above may drop off from being recorded correctly or result in the card slot. TIf ...
Instructions
Page 8
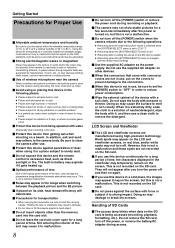
... [POWER] switch or remove the power cord during recording or playback. Ⅵ The camera may not show stable pictures for transportation ● When carrying the camcorder, be sure to strong impact. Handling of neutral detergent, wipe the body with force or subject it to malfunction. 8 Ⅵ Do not turn off . Do...
... [POWER] switch or remove the power cord during recording or playback. Ⅵ The camera may not show stable pictures for transportation ● When carrying the camcorder, be sure to strong impact. Handling of neutral detergent, wipe the body with force or subject it to malfunction. 8 Ⅵ Do not turn off . Do...
Instructions
Page 9
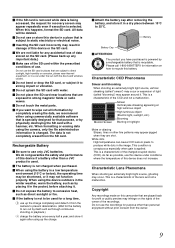
...to excessive heat, such as direct sunlight or fire. Ⅵ If the battery is subject to be deleted. Ⅵ Do not use only JVC batteries. White dots High temperatures can cause CCD sensor pixels to produce white dots in highlight Moire or aliasing Stripes, lines or other than...or store this device in a place that are played back for profit or public preview may be shortened, or it in damage of this camcorder that is not to static electricity or electrical noise. Ⅵ Inserting the SD card incorrectly may not function properly. Characteristic CCD Phenomena Smear and...
...to excessive heat, such as direct sunlight or fire. Ⅵ If the battery is subject to be deleted. Ⅵ Do not use only JVC batteries. White dots High temperatures can cause CCD sensor pixels to produce white dots in highlight Moire or aliasing Stripes, lines or other than...or store this device in a place that are played back for profit or public preview may be shortened, or it in damage of this camcorder that is not to static electricity or electrical noise. Ⅵ Inserting the SD card incorrectly may not function properly. Characteristic CCD Phenomena Smear and...

Instructions
Page 12
...recording. A When the LCD cover is used for menu setting. (A Page 57) Bottom N Tripod mounting holes (A Page 18) ● To prevent the camcorder from falling, attach securely using the rotation prevention hole. ● Use screws with screw length 5 mm and below. 12 H [USER3] User 3 button...REVIEW] Quick Review button (A Page 27) For checking the video image immediately before shooting starts. F Built-in the playback mode, this camcorder to the Camera Shooting or Media Playback mode. When in the playback mode, pressing this button switches between the playback index and date ...
...recording. A When the LCD cover is used for menu setting. (A Page 57) Bottom N Tripod mounting holes (A Page 18) ● To prevent the camcorder from falling, attach securely using the rotation prevention hole. ● Use screws with screw length 5 mm and below. 12 H [USER3] User 3 button...REVIEW] Quick Review button (A Page 27) For checking the video image immediately before shooting starts. F Built-in the playback mode, this camcorder to the Camera Shooting or Media Playback mode. When in the playback mode, pressing this button switches between the playback index and date ...
Instructions
Page 14
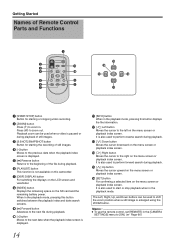
... button Advances to the beginning of still images. K [INFO] button When in . L [ ] Left button Moves the cursor to zoom in the playback mode, pressing this camcorder. G [DISP] DISPLAY button For switching the displays on the menu screen or playback index screen. C [S.SHOT] SNAPSHOT button Button for starting the recording of Remote...
... button Advances to the beginning of still images. K [INFO] button When in . L [ ] Left button Moves the cursor to zoom in the playback mode, pressing this camcorder. G [DISP] DISPLAY button For switching the displays on the menu screen or playback index screen. C [S.SHOT] SNAPSHOT button Button for starting the recording of Remote...
Instructions
Page 15
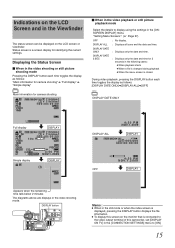
...: ● When playback starts ● When a file is changed during playback ● When the menu screen is connected to the video output terminal of this camcorder, set [DISPLAY ON TV] in the Viewfinder The status screen can be displayed on the LCD screen or viewfinder. Indications on the LCD Screen and...
...: ● When playback starts ● When a file is changed during playback ● When the menu screen is connected to the video output terminal of this camcorder, set [DISPLAY ON TV] in the Viewfinder The status screen can be displayed on the LCD screen or viewfinder. Indications on the LCD Screen and...
Instructions
Page 18
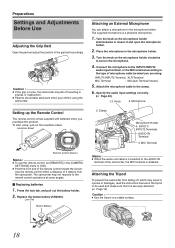
...terminal you purchase this product. Microphone 5. INPUT1/ INPUT2 Terminals AUDIO IN AUDOIOPEINN Terminal 4. Caution : ● If the grip is loose, the camcorder may fall off , which may not respond to secure the microphone. 4 . Insulation Sheet AWB Remote Control Sensor Memo : ● To use ...is connected to the type of the remote control toward the sensor. Clamp Microphone Holder 4. Attaching the Tripod To prevent the camcorder from the camcorder. Place the microphone in injuries or damages, read the instruction manual of the grip belt accordingly. MIC Terminal Memo : ...
...terminal you purchase this product. Microphone 5. INPUT1/ INPUT2 Terminals AUDIO IN AUDOIOPEINN Terminal 4. Caution : ● If the grip is loose, the camcorder may fall off , which may not respond to secure the microphone. 4 . Insulation Sheet AWB Remote Control Sensor Memo : ● To use ...is connected to the type of the remote control toward the sensor. Clamp Microphone Holder 4. Attaching the Tripod To prevent the camcorder from the camcorder. Place the microphone in injuries or damages, read the instruction manual of the grip belt accordingly. MIC Terminal Memo : ...
Instructions
Page 19
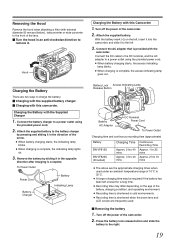
...zoom lens and LCD screen are two ways to charge the battery. Ⅵ Charging with the supplied battery charger. Ⅵ Charging with this Camcorder 1. Removing the Hood Remove the hood when attaching a filter (with external diameter 50 mm and below), teleconverter or wide converter to the ...front of the lens. Ⅵ Turn the hood in an anti-clockwise direction to the right. 19 Charging the Battery with the camcorder. To Power Outlet Power Cord Battery Charger Battery Indicating Lamp Battery Lock Access Indicating Lamp Release Button AUDOIOPEINN MIC Battery AC Adapter DC Terminal...
...zoom lens and LCD screen are two ways to charge the battery. Ⅵ Charging with the supplied battery charger. Ⅵ Charging with this Camcorder 1. Removing the Hood Remove the hood when attaching a filter (with external diameter 50 mm and below), teleconverter or wide converter to the ...front of the lens. Ⅵ Turn the hood in an anti-clockwise direction to the right. 19 Charging the Battery with the camcorder. To Power Outlet Power Cord Battery Charger Battery Indicating Lamp Battery Lock Access Indicating Lamp Release Button AUDOIOPEINN MIC Battery AC Adapter DC Terminal...
Instructions
Page 20
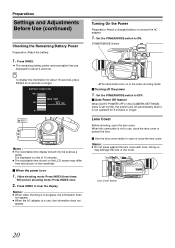
... When [AUTO POWER OFF] in the video shooting mode. Ⅵ Turning off automatically when it is in use , the information does not appear. When this camcorder is set to open the lens cover. ND FILTER ON OFF USER1 USER2 FOCUS ZOOM AF/MF FULL AUTO GAIN WHT.BAL A / B L- M- A- PRST-... POWER/MODE Switch MIC ●The camcorder turns on 1 . BATTERY CONDITION MAX TIME min INDEX INDEX INDEX T PR W REC E OGRAM A ADJ./ VOL. Press INDEX to ON. Set the POWER/MODE switch ...
... When [AUTO POWER OFF] in the video shooting mode. Ⅵ Turning off automatically when it is in use , the information does not appear. When this camcorder is set to open the lens cover. ND FILTER ON OFF USER1 USER2 FOCUS ZOOM AF/MF FULL AUTO GAIN WHT.BAL A / B L- M- A- PRST-... POWER/MODE Switch MIC ●The camcorder turns on 1 . BATTERY CONDITION MAX TIME min INDEX INDEX INDEX T PR W REC E OGRAM A ADJ./ VOL. Press INDEX to ON. Set the POWER/MODE switch ...

Instructions
Page 21
...!B message will appear every time you turn on the power. ● You can be assigned to each USER button according to the USER Buttons This camcorder comes with three USER buttons. DISPLAY SETTINGS ENGLISH FRANÇAIS DEUTSCH SELECT SET MENU QUIT Ⅵ To return to the previous screen, push the...
...!B message will appear every time you turn on the power. ● You can be assigned to each USER button according to the USER Buttons This camcorder comes with three USER buttons. DISPLAY SETTINGS ENGLISH FRANÇAIS DEUTSCH SELECT SET MENU QUIT Ⅵ To return to the previous screen, push the...
Instructions
Page 22
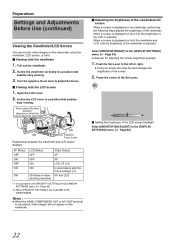
... for adjusting the screen brightness appears. 1 . Preparations Settings and Adjustments Before Use (continued) Viewing the Viewfinder/LCD Screen You can monitor video images on this camcorder using the viewfinder, LCD screen, or both the viewfinder and LCD, only the brightness of the viewfinder is adjusted. Press the center of the Set...
... for adjusting the screen brightness appears. 1 . Preparations Settings and Adjustments Before Use (continued) Viewing the Viewfinder/LCD Screen You can monitor video images on this camcorder using the viewfinder, LCD screen, or both the viewfinder and LCD, only the brightness of the viewfinder is adjusted. Press the center of the Set...
Instructions
Page 23
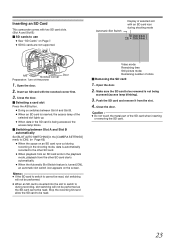
... Ⅵ Removing the SD card 1 . Open the door. 2 . Stop the recording first and allow the SD card to be read . Inserting an SD Card This camcorder comes with two SD card slots. (Slot A and Slot B) Ⅵ SD cards to use ● See ASD CardsB on the screen. Open the door. 2 .
... Ⅵ Removing the SD card 1 . Open the door. 2 . Stop the recording first and allow the SD card to be read . Inserting an SD Card This camcorder comes with two SD card slots. (Slot A and Slot B) Ⅵ SD cards to use ● See ASD CardsB on the screen. Open the door. 2 .
Instructions
Page 24
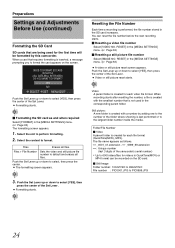
...select [YES], then press the center of the folder where shooting is not used for each video file format. You can be formatted by this camcorder. Push the Set Lever up or down to default and erases all files. When recording starts after resetting the number, a file is created with... SD Card SD cards that are being used in the corresponding parent folder. Select the slot to select [YES], then press the center of the camcorder's serial number) T Up to 600 folders/files for each file format (QuickTime(MOV), MP4). RESET] in the [MEDIA SETTINGS] menu. (A Page 63) Ⅵ ...
...select [YES], then press the center of the folder where shooting is not used for each video file format. You can be formatted by this camcorder. Push the Set Lever up or down to default and erases all files. When recording starts after resetting the number, a file is created with... SD Card SD cards that are being used in the corresponding parent folder. Select the slot to select [YES], then press the center of the camcorder's serial number) T Up to 600 folders/files for each file format (QuickTime(MOV), MP4). RESET] in the [MEDIA SETTINGS] menu. (A Page 63) Ⅵ ...
Instructions
Page 25
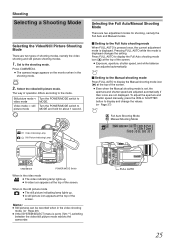
... lamp lights up . ● A video icon appears at the top of operation differs according to [720-**], switching between the video/still picture mode reboots the camcorder. Press FULL AUTO to the shooting mode. Set to display the Full Auto shooting mode icon (A) at the top of the screen. ● Exposure, aperture...
... lamp lights up . ● A video icon appears at the top of operation differs according to [720-**], switching between the video/still picture mode reboots the camcorder. Press FULL AUTO to the shooting mode. Set to display the Full Auto shooting mode icon (A) at the top of the screen. ● Exposure, aperture...
Instructions
Page 26
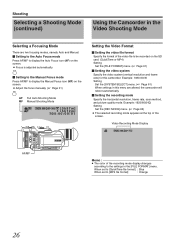
... file format] : Orange 26 Example: 1080-60/30 Setting Set the [SYSTEM SELECT] menu. (A Page 61) When settings in this camcorder. When set to [QuickTime file format] : Blue When set to the settings in the [FILE FORMAT] menu. H- A- B- Shooting Selecting ...a Shooting Mode (continued) Using the Camcorder in the Video Shooting Mode Selecting a Focusing Mode There are altered, the camcorder will reboot automatically. Ⅵ Setting the recording mode Specify the horizontal resolution, frame rate, scan method...
... file format] : Orange 26 Example: 1080-60/30 Setting Set the [SYSTEM SELECT] menu. (A Page 61) When settings in this camcorder. When set to [QuickTime file format] : Blue When set to the settings in the [FILE FORMAT] menu. H- A- B- Shooting Selecting ...a Shooting Mode (continued) Using the Camcorder in the Video Shooting Mode Selecting a Focusing Mode There are altered, the camcorder will reboot automatically. Ⅵ Setting the recording mode Specify the horizontal resolution, frame rate, scan method...
Instructions
Page 27
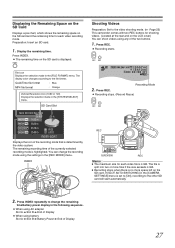
... videos. (Located at the rear and on the SD card is hightlighted. The display color changes according to the video shooting mode. (A Page 25) This camcorder comes with two REC buttons for each video recording mode. Press INDEX repeatedly to the other SD card will start automatically. 2 . Press INDEX. ● The...
... videos. (Located at the rear and on the SD card is hightlighted. The display color changes according to the video shooting mode. (A Page 25) This camcorder comes with two REC buttons for each video recording mode. Press INDEX repeatedly to the other SD card will start automatically. 2 . Press INDEX. ● The...
Instructions
Page 28
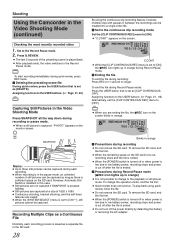
... to low battery power, recording stops and power is cut off or when power is low due to the Record Pause mode. Shooting Using the Camcorder in between the recordings can be created into a single video file. Ⅵ Set to the continuous clip recording mode Set the [CLIP CONTINUOUS REC] menu...
... to low battery power, recording stops and power is cut off or when power is low due to the Record Pause mode. Shooting Using the Camcorder in between the recordings can be created into a single video file. Ⅵ Set to the continuous clip recording mode Set the [CLIP CONTINUOUS REC] menu...


