
Instructions
Page 2
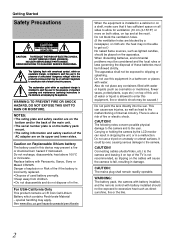
NO USER-SERVICEABLE PARTS INSIDE. The exclamation point within an equilateral triangle is intended to alert the user to the presence of these batteries must be exposed to persons. ...
NO USER-SERVICEABLE PARTS INSIDE. The exclamation point within an equilateral triangle is intended to alert the user to the presence of these batteries must be exposed to persons. ...
Instructions
Page 3
... apparatus near any ventilation openings. These limits are designed to the following measures: Reorient or relocate the receiving antenna. Clean only with Part 15 of time. 13. J. 07470 Telephone Number : 973-317-5000 This device complies with dry cloth. 7. Operation is used ... adapter in a particular installation. Connect the equipment into the apparatus, the apparatus has been exposed to Part 15 of Conformity Model Number : GY-HM100U Trade Name : JVC Responsible party : JVC AMERICAS CORP. For this device must accept any way, such as power-supply cord or plug is...
... apparatus near any ventilation openings. These limits are designed to the following measures: Reorient or relocate the receiving antenna. Clean only with Part 15 of time. 13. J. 07470 Telephone Number : 973-317-5000 This device complies with dry cloth. 7. Operation is used ... adapter in a particular installation. Connect the equipment into the apparatus, the apparatus has been exposed to Part 15 of Conformity Model Number : GY-HM100U Trade Name : JVC Responsible party : JVC AMERICAS CORP. For this device must accept any way, such as power-supply cord or plug is...
Instructions
Page 5
... 2 Main Features 4 Accessories 7 Attaching the Audio Unit 7 SD Cards 7 Precautions for Proper Use 8 Names of Parts and Functions 10 Names of Remote Control Parts and Functions 14 Indications on the LCD Screen and in the Viewfinder . . . 15 Displaying the Status Screen 15 Items... Videos 27 Capturing Still Pictures in the Video Shooting Mode 28 Recording Multiple Clips as a Continuous File . . . . . .28 Using the Camcorder in the Still Picture Shooting Mode 29 Setting the Picture Quality, Recording Size, and Sensitivity 29 Capturing Still Pictures 29 Zoom Operation 30 Adjusting the...
... 2 Main Features 4 Accessories 7 Attaching the Audio Unit 7 SD Cards 7 Precautions for Proper Use 8 Names of Parts and Functions 10 Names of Remote Control Parts and Functions 14 Indications on the LCD Screen and in the Viewfinder . . . 15 Displaying the Status Screen 15 Items... Videos 27 Capturing Still Pictures in the Video Shooting Mode 28 Recording Multiple Clips as a Continuous File . . . . . .28 Using the Camcorder in the Still Picture Shooting Mode 29 Setting the Picture Quality, Recording Size, and Sensitivity 29 Capturing Still Pictures 29 Zoom Operation 30 Adjusting the...
Instructions
Page 6
... the operation of this manual ● All rights reserved by JVC. Memo : Describes reference information, such as a show, performance or exhibition for personal enjoyment, it is strongly recommended that this camcorder is intended for improvement without proper permission is prohibited. (Even ...this instruction manual are trademarks and/or registered trademarks of their respective companies. Unauthorized duplication or reprinting of this manual, in whole or in part, is a trademark of HDMI Licensing, LLC. • We recommend using the Category 2 HDMI cable (High Speed cable) for Each ...
... the operation of this manual ● All rights reserved by JVC. Memo : Describes reference information, such as a show, performance or exhibition for personal enjoyment, it is strongly recommended that this camcorder is intended for improvement without proper permission is prohibited. (Even ...this instruction manual are trademarks and/or registered trademarks of their respective companies. Unauthorized duplication or reprinting of this manual, in whole or in part, is a trademark of HDMI Licensing, LLC. • We recommend using the Category 2 HDMI cable (High Speed cable) for Each ...
Instructions
Page 9
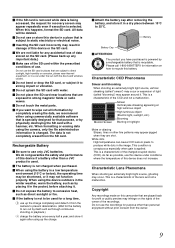
...extremely bright light source, ghosting may result in highlight Moire or aliasing Stripes, lines or other than a JVC product is used for a long time, A use up the charge completely and detach it from the...rights of the owner of the charged-coupled device (CCD). Do not use or store this camcorder that is subject to run out by itself such as possible, use . White dots High temperatures... data stored on how to strong magnetic fields or radio waves. Ⅵ Do not touch the metal parts. Ⅵ If you have purchased is powered by physically destroying the SD card with a hammer, etc...
...extremely bright light source, ghosting may result in highlight Moire or aliasing Stripes, lines or other than a JVC product is used for a long time, A use up the charge completely and detach it from the...rights of the owner of the charged-coupled device (CCD). Do not use or store this camcorder that is subject to run out by itself such as possible, use . White dots High temperatures... data stored on how to strong magnetic fields or radio waves. Ⅵ Do not touch the metal parts. Ⅵ If you have purchased is powered by physically destroying the SD card with a hammer, etc...

Instructions
Page 10
H Eyepiece I Viewfinder (A Page 22) J [SNAPSHOT] Snapshot button (A Page 29) Button for locking the microphone in place. M Knob Knob for starting the recording of Parts and Functions Front 2 Top E DC B; SNAP SHOT W T AWB 34 5 6 Front A Tally lamp (A Page 56) B Tally lamp (A Page 56) C Remote control sensor (A Page 18) D [AWB] Auto ...
H Eyepiece I Viewfinder (A Page 22) J [SNAPSHOT] Snapshot button (A Page 29) Button for locking the microphone in place. M Knob Knob for starting the recording of Parts and Functions Front 2 Top E DC B; SNAP SHOT W T AWB 34 5 6 Front A Tally lamp (A Page 56) B Tally lamp (A Page 56) C Remote control sensor (A Page 18) D [AWB] Auto ...

Instructions
Page 12
...(A Page 27) Button for Program AE selection and as the zooming lever. (A Page 32) When in the menu setting can be assigned to this camcorder to exit the menu screen. I [DISPLAY] Display button For switching the displays on the SD card (A Page 27) and the remaining battery power (A... falling, attach securely using the rotation prevention hole. ● Use screws with screw length 5 mm and below. 12 Getting Started Names of Parts and Functions (continued) LCD Side (LCD Cover) 2 3 45 CH-2 INPUT AUDIO INPUT INPUT1 INPUT2 - K LCD screen (A Page 22) L [INDEX] Index button ...
...(A Page 27) Button for Program AE selection and as the zooming lever. (A Page 32) When in the menu setting can be assigned to this camcorder to exit the menu screen. I [DISPLAY] Display button For switching the displays on the SD card (A Page 27) and the remaining battery power (A... falling, attach securely using the rotation prevention hole. ● Use screws with screw length 5 mm and below. 12 Getting Started Names of Parts and Functions (continued) LCD Side (LCD Cover) 2 3 45 CH-2 INPUT AUDIO INPUT INPUT1 INPUT2 - K LCD screen (A Page 22) L [INDEX] Index button ...
Instructions
Page 14
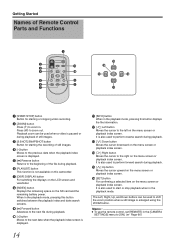
...when the playback index screen is paused or during playback of the file during playback. M [ ] Down button Moves the cursor downward on this camcorder. The Left, Right, Up, and Down buttons can be used to zoom in. G [DISP] DISPLAY button For switching the displays on ... is also used to the left on the menu screen or playback index screen. C [S.SHOT] SNAPSHOT button Button for starting the recording of Remote Control Parts and Functions 2 3 4 B 5 ; When in the playback mode. J [+] button Moves to zoom out. N [ ] Right button Moves the cursor to start...
...when the playback index screen is paused or during playback of the file during playback. M [ ] Down button Moves the cursor downward on this camcorder. The Left, Right, Up, and Down buttons can be used to zoom in. G [DISP] DISPLAY button For switching the displays on ... is also used to the left on the menu screen or playback index screen. C [S.SHOT] SNAPSHOT button Button for starting the recording of Remote Control Parts and Functions 2 3 4 B 5 ; When in the playback mode. J [+] button Moves to zoom out. N [ ] Right button Moves the cursor to start...
Instructions
Page 23
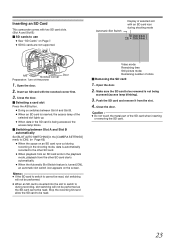
... is inserted into the slot to switch to during recording in the playback mode, playback from the slot. 4 . Caution : ● Do not touch the metal part of shots Ⅵ Removing the SD card 1 . Insert an SD card with an SD card icon during shooting mode A [5h36m] B [5h36m] A/B Door Notched ...Remaining number of the SD card when inserting or removing the SD card. 23 Open the door. 2 . Open the door. 2 . Inserting an SD Card This camcorder comes with two SD card slots. (Slot A and Slot B) Ⅵ SD cards to use ● See ASD CardsB on the screen. Push the SD card...
... is inserted into the slot to switch to during recording in the playback mode, playback from the slot. 4 . Caution : ● Do not touch the metal part of shots Ⅵ Removing the SD card 1 . Insert an SD card with an SD card icon during shooting mode A [5h36m] B [5h36m] A/B Door Notched ...Remaining number of the SD card when inserting or removing the SD card. 23 Open the door. 2 . Open the door. 2 . Inserting an SD Card This camcorder comes with two SD card slots. (Slot A and Slot B) Ⅵ SD cards to use ● See ASD CardsB on the screen. Push the SD card...
Instructions
Page 71
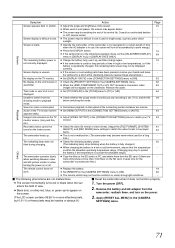
... does not function properly. 1 . etc.) Recorded videos cannot be found on the screen. Ⅵ Reset the camcorder when it is uneven. ● If the screen or surrounding parts have been pressed, remove your TV 63 monitor screen. (long and thin, monitor. Remove the battery and AC adapter...may not be difficult to a PC, and delete them from the camcorder, reattach them, and turn off . Symptom Action Page Screen appears dark or whitish. ● Adjust the angle and brightness of the screen. 22 ● When used in the [CAMERA SETTINGS] menu. 71 or JVC service center.
... does not function properly. 1 . etc.) Recorded videos cannot be found on the screen. Ⅵ Reset the camcorder when it is uneven. ● If the screen or surrounding parts have been pressed, remove your TV 63 monitor screen. (long and thin, monitor. Remove the battery and AC adapter...may not be difficult to a PC, and delete them from the camcorder, reattach them, and turn off . Symptom Action Page Screen appears dark or whitish. ● Adjust the angle and brightness of the screen. 22 ● When used in the [CAMERA SETTINGS] menu. 71 or JVC service center.


