
Instructions
Page 3
... a small amount of the AC Adapter are possible anywhere. ● This product includes patented and other proprietary technology and will operate only with JVC Data Battery. EN 3 NOTES: ● The rating plate (serial number plate) and safety caution are on the bottom and/or the back of the... an equilateral triangle, is intended to alert the user to be necessary to persons. Use the JVC BN-VF707U/VF714U/VF733U battery packs and, to recharge them or to supply power to the camcorder from an AC outlet, use the provided multi-voltage AC Adapter. (An appropriate conversion adapter may...
... a small amount of the AC Adapter are possible anywhere. ● This product includes patented and other proprietary technology and will operate only with JVC Data Battery. EN 3 NOTES: ● The rating plate (serial number plate) and safety caution are on the bottom and/or the back of the... an equilateral triangle, is intended to alert the user to be necessary to persons. Use the JVC BN-VF707U/VF714U/VF733U battery packs and, to recharge them or to supply power to the camcorder from an AC outlet, use the provided multi-voltage AC Adapter. (An appropriate conversion adapter may...

Instructions
Page 4
... or splashing. The following notes concern possible physical damage to the camcorder and to the camcorder. Take care not to get out.) No naked flame sources, such as cosmetics or medicines, flower vases, potted plants, cups etc.) on top of these batteries must be considered and the local rules or laws governing the...
... or splashing. The following notes concern possible physical damage to the camcorder and to the camcorder. Take care not to get out.) No naked flame sources, such as cosmetics or medicines, flower vases, potted plants, cups etc.) on top of these batteries must be considered and the local rules or laws governing the...
Instructions
Page 7
.... 14) B E-Mail Clip Recording Button [E-MAIL]* (੬ pg. 31) Index Button [INDEX]* (੬ pg. 30) C D.S.C. GETTING STARTED Controls A Menu Button [MENU] (੬ pg. 36) Data Battery Button [BATT.
.... 14) B E-Mail Clip Recording Button [E-MAIL]* (੬ pg. 31) Index Button [INDEX]* (੬ pg. 30) C D.S.C. GETTING STARTED Controls A Menu Button [MENU] (੬ pg. 36) Data Battery Button [BATT.

Instructions
Page 9
During Both Video And D.S.C.* Recording 89 1 2 15x W T 3 O0 4 5 6 7 BRIGHT q 50m w NOV 10 '05 10 :00 AM r e a Operation Mode (੬ pg. 15) B : Gain Up Mode (੬ pg. 37) C LED Light Indicator (੬ pg... (੬ pg. 20) I Zoom Indicator (੬ pg. 20) J O: (Appears when taking Snapshot.) (੬ pg. 28, 43) SLOW: (Appears when using Live Slow.)* (੬ pg. 42) K Brightness Control Indicator (LCD monitor/ Viewfinder) (੬ pg. 17) L Battery Remaining Power Indicator (੬ pg. 58) M Date/Time (੬ pg. 16) N Manual Focus Adjustment Indicator (੬...
During Both Video And D.S.C.* Recording 89 1 2 15x W T 3 O0 4 5 6 7 BRIGHT q 50m w NOV 10 '05 10 :00 AM r e a Operation Mode (੬ pg. 15) B : Gain Up Mode (੬ pg. 37) C LED Light Indicator (੬ pg... (੬ pg. 20) I Zoom Indicator (੬ pg. 20) J O: (Appears when taking Snapshot.) (੬ pg. 28, 43) SLOW: (Appears when using Live Slow.)* (੬ pg. 42) K Brightness Control Indicator (LCD monitor/ Viewfinder) (੬ pg. 17) L Battery Remaining Power Indicator (੬ pg. 58) M Date/Time (੬ pg. 16) N Manual Focus Adjustment Indicator (੬...

Instructions
Page 10
...JVC brand cassette tapes. We recommend cleaning your camcorder for the digital video cassette, SD Memory Card and MultiMediaCard. Cassette tapes should be removed from the camcorder...cassette tapes complying with the MiniDV standard, but you haven't used with the Mini DV mark . Play back your camcorder. This camcorder is compatible with all ...30) C Battery Remaining Power Indicator (੬ pg. 58) D Brightness Control Indicator (LCD monitor/ Viewfinder) (੬ pg. 17) Before Using This Camcorder Make sure you only use cassettes with this camcorder is recommended ...
...JVC brand cassette tapes. We recommend cleaning your camcorder for the digital video cassette, SD Memory Card and MultiMediaCard. Cassette tapes should be removed from the camcorder...cassette tapes complying with the MiniDV standard, but you haven't used with the Mini DV mark . Play back your camcorder. This camcorder is compatible with all ...30) C Battery Remaining Power Indicator (੬ pg. 58) D Brightness Control Indicator (LCD monitor/ Viewfinder) (੬ pg. 17) Before Using This Camcorder Make sure you only use cassettes with this camcorder is recommended ...

Instructions
Page 11
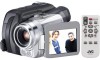
... (for AV cable ੬ pg. 13 for attachment) i CD-ROM* j Remote Control Unit RM-V720U k Lithium Battery CR2025** (for remote control unit) l Memory Card 8 MB*** (Already inserted in the camcorder) m Shoulder Strap (੬ pg. 12 for attachment) n Lens Cap (see the right column for connections. NOTE: To... NOTES: ● In order to maintain optimum performance of the camcorder, provided cables may be connected to the camcorder. ● Make sure to use the provided cables for attachment) * GR-DF470/450 only ** A lithium battery is pre-installed in the Remote Control Unit at time of shipment...
... (for AV cable ੬ pg. 13 for attachment) i CD-ROM* j Remote Control Unit RM-V720U k Lithium Battery CR2025** (for remote control unit) l Memory Card 8 MB*** (Already inserted in the camcorder) m Shoulder Strap (੬ pg. 12 for attachment) n Lens Cap (see the right column for connections. NOTE: To... NOTES: ● In order to maintain optimum performance of the camcorder, provided cables may be connected to the camcorder. ● Make sure to use the provided cables for attachment) * GR-DF470/450 only ** A lithium battery is pre-installed in the Remote Control Unit at time of shipment...

Instructions
Page 13
...9679; Take care not to the camcorder. Disconnect the AC Adapter from the AC outlet. Charging The Battery Pack BATT. To DC connector Arrow Battery pack mount mark Wind once. 3 Close the core filter until it clicks shut. Unplug the AC Adapter from the camcorder. CONTINUED ON NEXT PAGE GETTING ... To AC outlet 1 Set the Power Switch to "OFF". 2 With the arrow on the battery pack pointing right, push the battery pack slightly against the battery pack mount a. 3 Slide the battery pack to the camcorder. 5 Plug the AC Adapter into an AC outlet. The POWER/CHARGE lamp on both ends ...
...9679; Take care not to the camcorder. Disconnect the AC Adapter from the AC outlet. Charging The Battery Pack BATT. To DC connector Arrow Battery pack mount mark Wind once. 3 Close the core filter until it clicks shut. Unplug the AC Adapter from the camcorder. CONTINUED ON NEXT PAGE GETTING ... To AC outlet 1 Set the Power Switch to "OFF". 2 With the arrow on the battery pack pointing right, push the battery pack slightly against the battery pack mount a. 3 Slide the battery pack to the camcorder. 5 Plug the AC Adapter into an AC outlet. The POWER/CHARGE lamp on both ends ...

Instructions
Page 14
... cassette inserted, the camcorder will operate only with JVC Data Battery. In such a case, consult your nearest JVC dealer. Battery pack Charging time BN-VF707U* Approx. 1 hr. 30 min. In this case, the battery charge starts if the battery is recommended that the camcorder's power is set ...Battery pack LCD monitor on Viewfinder on the battery. Use the JVC BNVF707U/VF714U/VF733U battery packs. BN-VF714U 2 hr. 20 min. 3 hr. BN-VF733U 5 hr. 25 min. 7 hr. 5 min. * Provided NOTES: ● Recording time is reduced significantly under the following conditions: • Zoom...
... cassette inserted, the camcorder will operate only with JVC Data Battery. In such a case, consult your nearest JVC dealer. Battery pack Charging time BN-VF707U* Approx. 1 hr. 30 min. In this case, the battery charge starts if the battery is recommended that the camcorder's power is set ...Battery pack LCD monitor on Viewfinder on the battery. Use the JVC BNVF707U/VF714U/VF733U battery packs. BN-VF714U 2 hr. 20 min. 3 hr. BN-VF733U 5 hr. 25 min. 7 hr. 5 min. * Provided NOTES: ● Recording time is reduced significantly under the following conditions: • Zoom...

Instructions
Page 15
... provided AC Adapter features automatic voltage selection in the AC range from the actual operating time, fully charge the battery, and then run it may not turn on the camcorder, set to use of LCD monitor in your preference using the Power Switch and VIDEO/MEMORY Switch.* * GR... memory card to a PC. (GR-DF470/450 only) ● Allows you can result in "Charging The Battery Pack". About Batteries DANGER! The "A" indicator appears on /off the camcorder. To resume the original function of time under extremely high/low temperature condition or charged too many times. However ...
... provided AC Adapter features automatic voltage selection in the AC range from the actual operating time, fully charge the battery, and then run it may not turn on the camcorder, set to use of LCD monitor in your preference using the Power Switch and VIDEO/MEMORY Switch.* * GR... memory card to a PC. (GR-DF470/450 only) ● Allows you can result in "Charging The Battery Pack". About Batteries DANGER! The "A" indicator appears on /off the camcorder. To resume the original function of time under extremely high/low temperature condition or charged too many times. However ...

Instructions
Page 17
... you may cause your finger to select "BRIGHT", and press SET. Tripod Mounting To attach the camcorder to a tripod, align the direction stud and screw to select "n", and press SET. Replace the battery pack with studs. This prevents the tape from the display. The Menu Screen appears. > BRIGHT ...4 Press or to the mounting socket and stud hole on the camcorder. GETTING STARTED Brightness Adjustment Of The Display 1 Set the ...
... you may cause your finger to select "BRIGHT", and press SET. Tripod Mounting To attach the camcorder to a tripod, align the direction stud and screw to select "n", and press SET. Replace the battery pack with studs. This prevents the tape from the display. The Menu Screen appears. > BRIGHT ...4 Press or to the mounting socket and stud hole on the camcorder. GETTING STARTED Brightness Adjustment Of The Display 1 Set the ...

Instructions
Page 22
This is not heard from a battery, the camcorder shuts off automatically. Shuttle Search Allows high-speed search in the LCD monitor, viewfinder or on again, set the Power Switch to "OFF", then to "PLAY". ● When a cable is about 3 minutes, the camcorder's Stop mode is supplied from the ...During Stop mode, press 3 to rewind, or 5 to fast-forward the tape. * GR-DF470/450 only To control the speaker volume Slide the Power Zoom Lever (VOL. +/-) towards "-" to select "BLANK SRCH", and press SET. Blank Search Helps you find where you release the button, normal playback resumes....
This is not heard from a battery, the camcorder shuts off automatically. Shuttle Search Allows high-speed search in the LCD monitor, viewfinder or on again, set the Power Switch to "OFF", then to "PLAY". ● When a cable is about 3 minutes, the camcorder's Stop mode is supplied from the ...During Stop mode, press 3 to rewind, or 5 to fast-forward the tape. * GR-DF470/450 only To control the speaker volume Slide the Power Zoom Lever (VOL. +/-) towards "-" to select "BLANK SRCH", and press SET. Blank Search Helps you find where you release the button, normal playback resumes....
Instructions
Page 24
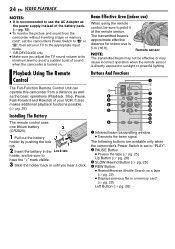
...Adapter as the power supply instead of the battery pack. (੬ pg. 15) ● To monitor the picture and sound from a distance as well as the basic operations (Playback, Stop, Pause, Fast-Forward and Rewind) of sound when the camcorder is set your TV to the appropriate input ...mode. * GR-DF470/450 only ● Make sure you hear a click. A Infrared beam transmitting window ● Transmits the beam signal. It also makes additional playback functions possible. (੬ pg. 25) Installing The Battery The remote ...
...Adapter as the power supply instead of the battery pack. (੬ pg. 15) ● To monitor the picture and sound from a distance as well as the basic operations (Playback, Stop, Pause, Fast-Forward and Rewind) of sound when the camcorder is set your TV to the appropriate input ...mode. * GR-DF470/450 only ● Make sure you hear a click. A Infrared beam transmitting window ● Transmits the beam signal. It also makes additional playback functions possible. (੬ pg. 25) Installing The Battery The remote ...

Instructions
Page 27
... halfway and hold. The "O" indication appears while the snapshot is focused. Snapshot) You can use your camcorder as a Digital Still Camera for approx. 5 minutes when the Power Switch is supplied from the battery pack, the camcorder shuts off automatically to save power. Still images are recorded in the memory card. NOTE: Before continuing...
... halfway and hold. The "O" indication appears while the snapshot is focused. Snapshot) You can use your camcorder as a Digital Still Camera for approx. 5 minutes when the Power Switch is supplied from the battery pack, the camcorder shuts off automatically to save power. Still images are recorded in the memory card. NOTE: Before continuing...

Instructions
Page 28
... Card becomes full. ● The function "Animation" in the commercial software "QuickTime Pro". RECORDING (GR-DF470/450 only) Interval Shooting During Interval Shooting mode, the camcorder continues to stop if the battery runs out of the battery pack. (੬ pg. 15) ● To distinguish between still images taken in step 1.
... Card becomes full. ● The function "Animation" in the commercial software "QuickTime Pro". RECORDING (GR-DF470/450 only) Interval Shooting During Interval Shooting mode, the camcorder continues to stop if the battery runs out of the battery pack. (੬ pg. 15) ● To distinguish between still images taken in step 1.

Instructions
Page 30
PLAYBACK (GR-DF470/450 only) Index Playback Of Files Removing On-Screen Display You can view several different files stored in "Normal Playback Of Images" (੬ pg. 29). This browsing capability makes it easy to locate a particular file you want. 1 For Index Playback of video clip files, perform steps 1 - 3 in "Playback Of Video Clips" (੬ pg. 29). 2 Press INDEX. For Index Playback of image files, perform steps 1 - 5 in the memory card at a time. 30 EN D.S.C. The Selected file Index Screen of the selected type of file 1 2 3 appears. 3 Press >/
PLAYBACK (GR-DF470/450 only) Index Playback Of Files Removing On-Screen Display You can view several different files stored in "Normal Playback Of Images" (੬ pg. 29). This browsing capability makes it easy to locate a particular file you want. 1 For Index Playback of video clip files, perform steps 1 - 3 in "Playback Of Video Clips" (੬ pg. 29). 2 Press INDEX. For Index Playback of image files, perform steps 1 - 5 in the memory card at a time. 30 EN D.S.C. The Selected file Index Screen of the selected type of file 1 2 3 appears. 3 Press >/

Instructions
Page 33
... "RETURN". CAUTION: Do not remove the memory card or perform any other operation (such as the memory card may be corrupted if the battery becomes exhausted during deletion. If the memory card becomes corrupted, initialize it. (੬ pg. 35) To delete the currently displayed file 4... Before doing the following, perform steps 1 - 3 in the memory card 4 Press or to use the provided AC Adapter, as turning off the camcorder) during deletion. To remove protection from all files stored in "Protecting Files". Check files before deleting. Also, be sure to select "ALL", and...
... "RETURN". CAUTION: Do not remove the memory card or perform any other operation (such as the memory card may be corrupted if the battery becomes exhausted during deletion. If the memory card becomes corrupted, initialize it. (੬ pg. 35) To delete the currently displayed file 4... Before doing the following, perform steps 1 - 3 in the memory card 4 Press or to use the provided AC Adapter, as turning off the camcorder) during deletion. To remove protection from all files stored in "Protecting Files". Check files before deleting. Also, be sure to select "ALL", and...

Instructions
Page 35
...", and press SET. CAUTION: While performing the above, never disconnect power, as turning off the camcorder) during initialization. If the memory card becomes corrupted, initialize it. The DPOF screen appears. 3 Press or to be corrupted if the battery becomes exhausted during initialization. DIGITAL STILL CAMERA (D.S.C.) RECORDING & PLAYBACK (GR-DF470/450 only) CAUTION...
...", and press SET. CAUTION: While performing the above, never disconnect power, as turning off the camcorder) during initialization. If the memory card becomes corrupted, initialize it. The DPOF screen appears. 3 Press or to be corrupted if the battery becomes exhausted during initialization. DIGITAL STILL CAMERA (D.S.C.) RECORDING & PLAYBACK (GR-DF470/450 only) CAUTION...

Instructions
Page 46
... Switch to "A". HALOGEN: A video light or similar type of lighting is adjusted automatically. Adjust zoom or position yourself so that the white paper fills the screen. 3 Select "MWB" in front...cloudy day. Use this function manually to focus on a sunny day. However, more advanced camcorder operators control this function for a more professional color/ tint reproduction. The Menu Screen closes...begins blinking. ● When the setting is displayed. The white balance is turned off or the battery removed. In such a case, adjust focus manually. (੬ pg. 44) ● A ...
... Switch to "A". HALOGEN: A video light or similar type of lighting is adjusted automatically. Adjust zoom or position yourself so that the white paper fills the screen. 3 Select "MWB" in front...cloudy day. Use this function manually to focus on a sunny day. However, more advanced camcorder operators control this function for a more professional color/ tint reproduction. The Menu Screen closes...begins blinking. ● When the setting is displayed. The white balance is turned off or the battery removed. In such a case, adjust focus manually. (੬ pg. 44) ● A ...

Instructions
Page 50
... FOR RECORDING CAUTION: Do not remove the memory card or perform any other operation (such as the memory card may be corrupted if the battery becomes exhausted during deletion. We recommend that you copy thumbnail images from the relevant memory card. ● If you use the same tape...tape. If the memory card becomes corrupted, initialize it. Also, do not leave a blank portion partway through the tape when shooting; otherwise, the camcorder cannot recognize Tape and Memory Card IDs to always use one memory card for one tape, two memory cards will share the tape's thumbnail images....
... FOR RECORDING CAUTION: Do not remove the memory card or perform any other operation (such as the memory card may be corrupted if the battery becomes exhausted during deletion. We recommend that you copy thumbnail images from the relevant memory card. ● If you use the same tape...tape. If the memory card becomes corrupted, initialize it. Also, do not leave a blank portion partway through the tape when shooting; otherwise, the camcorder cannot recognize Tape and Memory Card IDs to always use one memory card for one tape, two memory cards will share the tape's thumbnail images....

Instructions
Page 51
...: ● It is optional. NOTE: The S-Video cable is recommended to use the AC Adapter as the power supply instead of the battery pack. (੬ pg. 15) ● To choose whether or not the following displays appear on the connected TV • Date/time Set "DATE/TIME" ...2668; pg. 37) 3 Set the camcorder's Power Switch to "PLAY". 4 Set "S/AV INPUT" to "ON". (੬ pg. 36, 41) 5 Press the Recording Start/Stop Button to engage the Record-Pause mode. ● The " A/V IN " indication appears on the screen. 6 Start playback on its availability. Consult the JVC Service Center described on the...
...: ● It is optional. NOTE: The S-Video cable is recommended to use the AC Adapter as the power supply instead of the battery pack. (੬ pg. 15) ● To choose whether or not the following displays appear on the connected TV • Date/time Set "DATE/TIME" ...2668; pg. 37) 3 Set the camcorder's Power Switch to "PLAY". 4 Set "S/AV INPUT" to "ON". (੬ pg. 36, 41) 5 Press the Recording Start/Stop Button to engage the Record-Pause mode. ● The " A/V IN " indication appears on the screen. 6 Start playback on its availability. Consult the JVC Service Center described on the...


