Instructions
Page 5
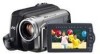
... the provided multi-voltage AC Adapter. (An appropriate conversion adapter may apply. NOTES: • The rating plate (serial number plate) and safety caution are on the apparatus. Use the JVC BN-VF808U/VF815U/VF823U battery packs and, to recharge them or to supply power to the camcorder from an AC outlet, use this unit..., environmental problems must be placed on its upper and lower sides. special handling may be necessary to accommodate different designs of the AC Adapter are on the bottom and/or the back of the main unit. • The rating information and safety caution of...
... the provided multi-voltage AC Adapter. (An appropriate conversion adapter may apply. NOTES: • The rating plate (serial number plate) and safety caution are on the apparatus. Use the JVC BN-VF808U/VF815U/VF823U battery packs and, to recharge them or to supply power to the camcorder from an AC outlet, use this unit..., environmental problems must be placed on its upper and lower sides. special handling may be necessary to accommodate different designs of the AC Adapter are on the bottom and/or the back of the main unit. • The rating information and safety caution of...
Instructions
Page 8
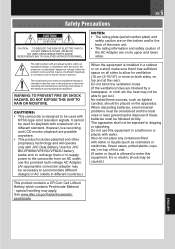
... the control lever to select. g 1 QUICK Move the control lever left /right to select SET. Do not use the provided cables for connections. Accessories or AC Adapter AP-V14U or AP-V18U or Audio/Video Cable (ø3.5 mini-plug to RCA plug) Battery Pack BN-VF808U Shoulder Strap (੬ 9) Lens Cap (੬...
... the control lever to select. g 1 QUICK Move the control lever left /right to select SET. Do not use the provided cables for connections. Accessories or AC Adapter AP-V14U or AP-V18U or Audio/Video Cable (ø3.5 mini-plug to RCA plug) Battery Pack BN-VF808U Shoulder Strap (੬ 9) Lens Cap (੬...
Instructions
Page 16
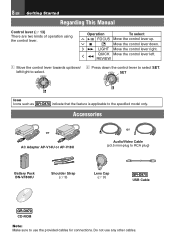
... seconds before it turns off its power supplied from the camcorder. 16 EN Getting Started Power Charging The Battery Pack 1 Set the Power Switch to detach it. r Arrow Battery Pack BATT. Be sure to use . POWER/ CHARGE Lamp To DC Connector AC Adapter To AC Outlet (110V to 240V) 2 Attach the battery pack. &#... correct direction, slide the battery pack until it locks in "Charging The Battery Pack". Using The Battery Pack Perform step 2 in place. 3 Connect the AC adapter. • The POWER/CHARGE lamp on the camcorder blinks to the camcorder. • Please do not pull or bend the...
... seconds before it turns off its power supplied from the camcorder. 16 EN Getting Started Power Charging The Battery Pack 1 Set the Power Switch to detach it. r Arrow Battery Pack BATT. Be sure to use . POWER/ CHARGE Lamp To DC Connector AC Adapter To AC Outlet (110V to 240V) 2 Attach the battery pack. &#... correct direction, slide the battery pack until it locks in "Charging The Battery Pack". Using The Battery Pack Perform step 2 in place. 3 Connect the AC adapter. • The POWER/CHARGE lamp on the camcorder blinks to the camcorder. • Please do not pull or bend the...
Instructions
Page 32
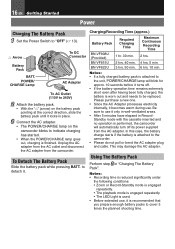
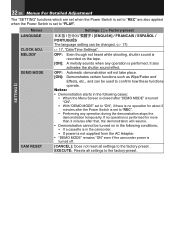
Notes: • Demonstration starts in the camcorder. • If power is not supplied from the AC Adapter. • "DEMO MODE" remains "ON" even if the camcorder power is performed. EXECUTE: Resets all settings to the factory-preset. 32 EN Menus For Detailed Adjustment The "SETTING" functions which are set when the ...
Notes: • Demonstration starts in the camcorder. • If power is not supplied from the AC Adapter. • "DEMO MODE" remains "ON" even if the camcorder power is performed. EXECUTE: Resets all settings to the factory-preset. 32 EN Menus For Detailed Adjustment The "SETTING" functions which are set when the ...
Instructions
Page 40
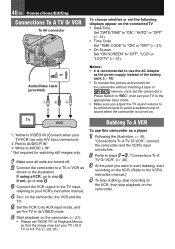
.... To use the AC Adapter as the power supply instead of Playback Menus so that the image may suit your TV (16:9 TV or 4:3 TV) (੬ 28, 31). If not, go to the VCR's instruction manual.) 4 To stop dubbing, stop recording on the VCR, then stop playback on the camcorder. 40 EN Connections..." or "OFF" (੬ 31). • Time Code Set "TIME CODE" to "ON" or "OFF" (੬ 31). • On Screen Set "ON SCREEN" to use this camcorder as shown in the illustration. TV VCR Dubbing To A VCR 1 Yellow to VIDEO IN (Connect when your VCR's instruction manual. 4 Turn on the...
.... To use the AC Adapter as the power supply instead of Playback Menus so that the image may suit your TV (16:9 TV or 4:3 TV) (੬ 28, 31). If not, go to the VCR's instruction manual.) 4 To stop dubbing, stop recording on the VCR, then stop playback on the camcorder. 40 EN Connections..." or "OFF" (੬ 31). • Time Code Set "TIME CODE" to "ON" or "OFF" (੬ 31). • On Screen Set "ON SCREEN" to use this camcorder as shown in the illustration. TV VCR Dubbing To A VCR 1 Yellow to VIDEO IN (Connect when your VCR's instruction manual. 4 Turn on the...
Instructions
Page 41
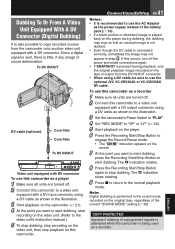
... supply instead of the current "SOUND MODE" setting (੬ 30). If this camcorder is output from the camcorder onto another video unit equipped with a DV connector. The T indication stops rotating. 9 Press 8 to return to use the AC Adapter as a recorder. The T indication rotates. 8 Press the Recording Start/Stop Button... cable (optional) Core filter Core filter To DV IN/OUT Video unit equipped with DV connector To use the optional JVC VC-VDV204U or VC-VDV206U DV cable. Since a digital signal is sent, there is performed in the sound mode recorded on the original...
... supply instead of the current "SOUND MODE" setting (੬ 30). If this camcorder is output from the camcorder onto another video unit equipped with a DV connector. The T indication stops rotating. 9 Press 8 to return to use the AC Adapter as a recorder. The T indication rotates. 8 Press the Recording Start/Stop Button... cable (optional) Core filter Core filter To DV IN/OUT Video unit equipped with DV connector To use the optional JVC VC-VDV204U or VC-VDV206U DV cable. Since a digital signal is sent, there is performed in the sound mode recorded on the original...
Instructions
Page 42
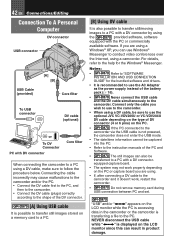
... cable is not powered, the camcorder does not enter the USB mode. • The date/time information cannot be captured into the PC. • Refer to the instruction manuals of the PC and Software. • The still images can also be sure to use the AC Adapter as the power supply instead of... monitor while the PC is transferring a file to the help for the bundled software and drivers. • It is recommended to use the optional JVC VC-VDV206U or VC-VDV204U DV cable depending on the type of the battery pack (੬ 16). • Never connect the USB cable and the...
... cable is not powered, the camcorder does not enter the USB mode. • The date/time information cannot be captured into the PC. • Refer to the instruction manuals of the PC and Software. • The still images can also be sure to use the AC Adapter as the power supply instead of... monitor while the PC is transferring a file to the help for the bundled software and drivers. • It is recommended to use the optional JVC VC-VDV206U or VC-VDV204U DV cable depending on the type of the battery pack (੬ 16). • Never connect the USB cable and the...
Instructions
Page 43
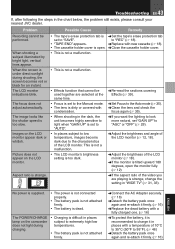
... to the Manual mode. «Set Focus to "SAVE". The POWER/CHARGE lamp on the camcorder does not light during shooting, the screen becomes red or black for an instant. •...again and re-attach it in the chart below, the problem still exists, please consult your nearest JVC dealer. ENGLISH No power is supplied. • The power is not connected properly. • The...extremely high/low temperatures. • The battery pack is not attached firmly. «Connect the AC Adapter securely. (੬ 16) «Detach the battery pack once again and re-attach it firmly...
... to the Manual mode. «Set Focus to "SAVE". The POWER/CHARGE lamp on the camcorder does not light during shooting, the screen becomes red or black for an instant. •...again and re-attach it in the chart below, the problem still exists, please consult your nearest JVC dealer. ENGLISH No power is supplied. • The power is not connected properly. • The...extremely high/low temperatures. • The battery pack is not attached firmly. «Connect the AC Adapter securely. (੬ 16) «Detach the battery pack once again and re-attach it firmly...
Instructions
Page 46
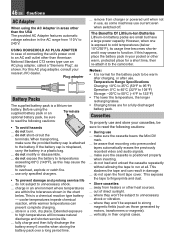
... will increase natural discharge and shorten service life. ... where they won 't be sure to the camcorder. out of connecting the unit's power cord to function. Before using the AC Adapter in areas other warm, protected place for a short time, then re-attach it may cause the... battery to read the following cautions: • During use . Notes: • It is positioned properly when inserting. ... Cassettes To properly use and store your nearest JVC dealer....
... will increase natural discharge and shorten service life. ... where they won 't be sure to the camcorder. out of connecting the unit's power cord to function. Before using the AC Adapter in areas other warm, protected place for a short time, then re-attach it may cause the... battery to read the following cautions: • During use . Notes: • It is positioned properly when inserting. ... Cassettes To properly use and store your nearest JVC dealer....
Instructions
Page 48
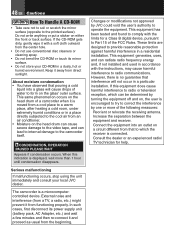
... a soft cloth outward from direct sunlight. The camcorder is connected. This equipment generates, uses, and can lead to internal damage to operate the equipment. In such cases, first disconnect its power supply unit (battery pack, AC Adapter, etc.) and wait a few minutes and then...Moisture on either the front or back surface. However, there is encouraged to try to correct the interference by JVC could void the user's authority to the camcorder itself. Keep it and proceed as usual from functioning properly. Connect the equipment into a glass will not occur ...
... a soft cloth outward from direct sunlight. The camcorder is connected. This equipment generates, uses, and can lead to internal damage to operate the equipment. In such cases, first disconnect its power supply unit (battery pack, AC Adapter, etc.) and wait a few minutes and then...Moisture on either the front or back surface. However, there is encouraged to try to correct the interference by JVC could void the user's authority to the camcorder itself. Keep it and proceed as usual from functioning properly. Connect the equipment into a glass will not occur ...
Instructions
Page 49
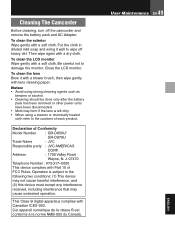
Close the LCD monitor. Notes: • Avoid using a cleaner or chemically treated cloth refer to wipe off the camcorder and remove the battery pack and AC Adapter. Address : 1700 Valley Road Wayne, N. Then wipe again with a soft cloth. To clean the LCD monitor Wipe gently...; Mold may cause undesired operation. To clean the exterior Wipe gently with Part 15 of Conformity Model Number : GR-D850U/ GR-D870U Trade Name : JVC Responsible party : JVC AMERICAS CORP. Be careful not to the following two conditions: (1) This device may not cause harmful interference, and...
Close the LCD monitor. Notes: • Avoid using a cleaner or chemically treated cloth refer to wipe off the camcorder and remove the battery pack and AC Adapter. Address : 1700 Valley Road Wayne, N. Then wipe again with a soft cloth. To clean the LCD monitor Wipe gently...; Mold may cause undesired operation. To clean the exterior Wipe gently with Part 15 of Conformity Model Number : GR-D850U/ GR-D870U Trade Name : JVC Responsible party : JVC AMERICAS CORP. Be careful not to the following two conditions: (1) This device may not cause harmful interference, and...
Instructions
Page 50
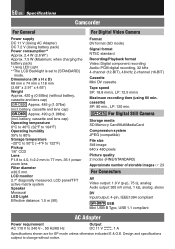
...300 mV (rms), 1 kΩ, analog, stereo DV Input/output: 4-pin, IEEE1394 compliant USB Mini USB-B Type, USB 1.1 compliant AC Adapter Power requirement AC 110 V to 77 mm, 35:1 power zoom lens Filter diameter ø30.5 mm LCD monitor 2.7" diagonally measured, LCD panel/TFT... x 74 mm x 118 mm (2.68" x 2.91" x 4.65") Weight Approx. 420 g (0.93lbs) (without notice. 50 EN Specifications Camcorder For General Power supply DC 11 V (Using AC Adapter) DC 7.2 V (Using battery pack) Power consumption** Approx. 2.4 W (2.6 W*) Approx. 7.5 W (Maximum; when charging the battery pack) * Using ...
...300 mV (rms), 1 kΩ, analog, stereo DV Input/output: 4-pin, IEEE1394 compliant USB Mini USB-B Type, USB 1.1 compliant AC Adapter Power requirement AC 110 V to 77 mm, 35:1 power zoom lens Filter diameter ø30.5 mm LCD monitor 2.7" diagonally measured, LCD panel/TFT... x 74 mm x 118 mm (2.68" x 2.91" x 4.65") Weight Approx. 420 g (0.93lbs) (without notice. 50 EN Specifications Camcorder For General Power supply DC 11 V (Using AC Adapter) DC 7.2 V (Using battery pack) Power consumption** Approx. 2.4 W (2.6 W*) Approx. 7.5 W (Maximum; when charging the battery pack) * Using ...
Instructions
Page 51
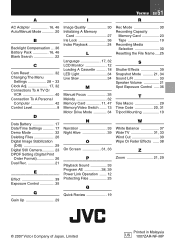
Terms EN 51 A I R AC Adapter 16, 46 Auto/Manual Mode 20 B Backlight Compensation ... 36 Battery Pack 16, 46 Blank Search 22 C Cam Reset 32 Changing The Menu Settings 28 − ...
Terms EN 51 A I R AC Adapter 16, 46 Auto/Manual Mode 20 B Backlight Compensation ... 36 Battery Pack 16, 46 Blank Search 22 C Cam Reset 32 Changing The Menu Settings 28 − ...


