
Instruction Manual
Page 13
This means the camcorder may not be reset. ● During fast-forwarding and rewinding, the time code indication does not move smoothly. ● The time code is displayed only when "TIME CODE" is ...
This means the camcorder may not be reset. ● During fast-forwarding and rewinding, the time code indication does not move smoothly. ● The time code is displayed only when "TIME CODE" is ...

Instruction Manual
Page 19
... on a nearer subject, rotate the MENU/ VOLUME wheel $ towards "-". " " q appears and blinks. To reset to Auto Focus, press FOCUS & twice or set the Power Switch y to " ". Open the LCD monitor fully or pull out the viewfinder fully. 2 Press the MENU/VOLUME wheel $ in . The Menu Screen ...disappears. Exposure adjustment is brightened. " " q appears and blinks. 4 Press the MENU/VOLUME wheel $ in . If FOCUS & is pressed once, the camcorder will blink. If you ...
... on a nearer subject, rotate the MENU/ VOLUME wheel $ towards "-". " " q appears and blinks. To reset to Auto Focus, press FOCUS & twice or set the Power Switch y to " ". Open the LCD monitor fully or pull out the viewfinder fully. 2 Press the MENU/VOLUME wheel $ in . The Menu Screen ...disappears. Exposure adjustment is brightened. " " q appears and blinks. 4 Press the MENU/VOLUME wheel $ in . If FOCUS & is pressed once, the camcorder will blink. If you ...

Instruction Manual
Page 21
...the Power Switch y is set to "16X" while using digital zoom, the zoom magnification will reset to 16X since digital zoom will be left on for a couple of minutes, a residual image...seconds for use the Digital Zoom. For Recording Menu This camcorder is equipped with an easy-to-use, on-screen menu system that simplifies many of the more detailed camcorder settings (੬ pg. 21 - 24). 1 Set..." " or " ". By digitally processing and magnifying images, zooming is left on the right. Open the LCD monitor fully or pull out the viewfinder fully. 2 Press the MENU/VOLUME wheel $ in the " CAMERA...
...the Power Switch y is set to "16X" while using digital zoom, the zoom magnification will reset to 16X since digital zoom will be left on for a couple of minutes, a residual image...seconds for use the Digital Zoom. For Recording Menu This camcorder is equipped with an easy-to-use, on-screen menu system that simplifies many of the more detailed camcorder settings (੬ pg. 21 - 24). 1 Set..." " or " ". By digitally processing and magnifying images, zooming is left on the right. Open the LCD monitor fully or pull out the viewfinder fully. 2 Press the MENU/VOLUME wheel $ in the " CAMERA...

Instruction Manual
Page 23
MELODY TALLY - LCD CAM RESET RETURN BEEP OFF: Even though not heard while shooting, shutter sound is recorded on . ● "DEMO MODE" remains "ON" even if the camcorder power is in the following cases: • When the Power Switch y is set to the factory-preset. Also to activate the shutter sound ... on or off . ● If "DEMO MODE" remains "ON", some functions will not be operated by pressing the DISPLAY Button k on the LCD monitor; The camcorder displays the date/time when scenes are recorded. • When the date is set to " ". TALLY OFF: The tally lamp remains off by...
MELODY TALLY - LCD CAM RESET RETURN BEEP OFF: Even though not heard while shooting, shutter sound is recorded on . ● "DEMO MODE" remains "ON" even if the camcorder power is in the following cases: • When the Power Switch y is set to the factory-preset. Also to activate the shutter sound ... on or off . ● If "DEMO MODE" remains "ON", some functions will not be operated by pressing the DISPLAY Button k on the LCD monitor; The camcorder displays the date/time when scenes are recorded. • When the date is set to " ". TALLY OFF: The tally lamp remains off by...
Instruction Manual
Page 24
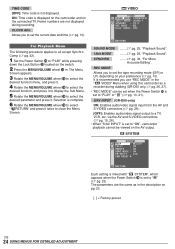
... (੬ pg. 15, 26). • When "S/AV INPUT" is set to "ON", camcorder playback cannot be set when the Power Switch y is set the tape recording mode ([SP] or LP) depending on the connected TV. LCD CAM RESET RETURN Each setting is linked with " SYSTEM", which appears when the Power Switch y is.... O REC MODE - MELODY TALLY - ON: Time code is not displayed. REC MODE Allows you use "REC MODE" in the " VIDEO" Menu when using this camcorder as in the description on the switch. 2 Press the MENU/VOLUME wheel $ in. SYSTEM S Y S T EM BEEP - STEREO 12b i t MODE-
... (੬ pg. 15, 26). • When "S/AV INPUT" is set to "ON", camcorder playback cannot be set when the Power Switch y is set the tape recording mode ([SP] or LP) depending on the connected TV. LCD CAM RESET RETURN Each setting is linked with " SYSTEM", which appears when the Power Switch y is.... O REC MODE - MELODY TALLY - ON: Time code is not displayed. REC MODE Allows you use "REC MODE" in the " VIDEO" Menu when using this camcorder as in the description on the switch. 2 Press the MENU/VOLUME wheel $ in. SYSTEM S Y S T EM BEEP - STEREO 12b i t MODE-

Instruction Manual
Page 30
...they will be erased. set will be performed by operating the VCR manually. A JVC VCR not equipped with a remote pause connector but can select up to operate with your camcorder as the source player. set once you like. VCR (Recording deck) 4 5... located on the switch. 3 Turn the VCR power on automatically. In this one to "LCD", "LCD/TV" or "OFF" in the Menu Screen (੬ pg. 24, 25). • ...to pg. 15 and 31. 1 A JVC VCR equipped with yours or may offer limited functions. The code is automatically set "ON SCREEN" to reset the VCR brand. set to 8 "cuts"...
...they will be erased. set will be performed by operating the VCR manually. A JVC VCR not equipped with a remote pause connector but can select up to operate with your camcorder as the source player. set once you like. VCR (Recording deck) 4 5... located on the switch. 3 Turn the VCR power on automatically. In this one to "LCD", "LCD/TV" or "OFF" in the Menu Screen (੬ pg. 24, 25). • ...to pg. 15 and 31. 1 A JVC VCR equipped with yours or may offer limited functions. The code is automatically set "ON SCREEN" to reset the VCR brand. set to 8 "cuts"...

Instruction Manual
Page 46
...Charge The Battery Pack pg. 7 Cinema pg. 22 Classic Film pg. 16 Clean The Camcorder pg. 38 Connections pg. 7, 15, 26, 27, 31, 33 D Darken The LCD Monitor pg. 11 Date/Time Display pg. 23 - 25 Date/Time Settings pg. 10 ... I Icons pg. 21 - 25 Insert Editing pg. 29 Iris pg. 20 Iris Lock pg. 20 J Journalistic Shooting pg. 12 L LCD monitor/Viewfinder Indications pg. 42 - 44 Load A Tape pg. 9 M Maintenance pg. 38 Manual Focus pg. 19 Menu Screen, CAMERA pg... 30 - 32 Record-Standby pg. 11 Recording Mode pg. 10 Remote Control pg. 5, 28 Reset pg. 23 Rewind The Tape pg. 13 EN 46 TERMS
...Charge The Battery Pack pg. 7 Cinema pg. 22 Classic Film pg. 16 Clean The Camcorder pg. 38 Connections pg. 7, 15, 26, 27, 31, 33 D Darken The LCD Monitor pg. 11 Date/Time Display pg. 23 - 25 Date/Time Settings pg. 10 ... I Icons pg. 21 - 25 Insert Editing pg. 29 Iris pg. 20 Iris Lock pg. 20 J Journalistic Shooting pg. 12 L LCD monitor/Viewfinder Indications pg. 42 - 44 Load A Tape pg. 9 M Maintenance pg. 38 Manual Focus pg. 19 Menu Screen, CAMERA pg... 30 - 32 Record-Standby pg. 11 Recording Mode pg. 10 Remote Control pg. 5, 28 Reset pg. 23 Rewind The Tape pg. 13 EN 46 TERMS


