
Instructions
Page 1
... whose Erase Protection tab is loaded in progress. Model No. is performed for purchasing the JVC Compact VHS camcorder. If no operation is set the Power Switch ! Serial No. INSTRUCTIONS ENGLISH COMPACT VHS CAMCORDER GR-AX890 LYT1233-001B For Customer Use: Enter below the Model No. which is turned... COMPANY OF JAPAN, LTD Dear Customer, Thank you will resume. • "DEMO MODE" remains "ON" even if the camcorder power is located on the bottom of the Automatic Demonstration activated on the switch. • Performing any operation during the demonstration stops...
... whose Erase Protection tab is loaded in progress. Model No. is performed for purchasing the JVC Compact VHS camcorder. If no operation is set the Power Switch ! Serial No. INSTRUCTIONS ENGLISH COMPACT VHS CAMCORDER GR-AX890 LYT1233-001B For Customer Use: Enter below the Model No. which is turned... COMPANY OF JAPAN, LTD Dear Customer, Thank you will resume. • "DEMO MODE" remains "ON" even if the camcorder power is located on the bottom of the Automatic Demonstration activated on the switch. • Performing any operation during the demonstration stops...

Instructions
Page 2
If a cable has only one core filter, the end that is closest to the camcorder. 2 PROVIDED ACCESSORIES • AC Adapter AP-V14U or AP-V15U • Battery Pack BN-V10U • Shoulder Strap • Cassette Adapter C-P7U • Lens Cap • AA (R6) Battery (for Cassette Adapter) NOTE: In order to maintain optimum performance of the camcorder, provided cables may be connected to the filter should be equipped with one or more core filter.
If a cable has only one core filter, the end that is closest to the camcorder. 2 PROVIDED ACCESSORIES • AC Adapter AP-V14U or AP-V15U • Battery Pack BN-V10U • Shoulder Strap • Cassette Adapter C-P7U • Lens Cap • AA (R6) Battery (for Cassette Adapter) NOTE: In order to maintain optimum performance of the camcorder, provided cables may be connected to the filter should be equipped with one or more core filter.

Instructions
Page 3
...8226; The rating information and safety caution of mercury. However, live recording and viewfinder playback are possible anywhere. • Use the JVC BN-V10U/V12U/V20U/V400U battery packs and, to recharge them or to supply power to dispose of a different standard. Disposal .... It cannot be used for details in the literature accompanying the appliance. Cassettes marked can be used with a television of this camcorder. 3 REFER SERVICING TO QUALIFIED SERVICE PERSONNEL. The exclamation point within the product's enclosure that you have purchased is recyclable. ATTENTION:...
...8226; The rating information and safety caution of mercury. However, live recording and viewfinder playback are possible anywhere. • Use the JVC BN-V10U/V12U/V20U/V400U battery packs and, to recharge them or to supply power to dispose of a different standard. Disposal .... It cannot be used for details in the literature accompanying the appliance. Cassettes marked can be used with a television of this camcorder. 3 REFER SERVICING TO QUALIFIED SERVICE PERSONNEL. The exclamation point within the product's enclosure that you have purchased is recyclable. ATTENTION:...
Instructions
Page 5
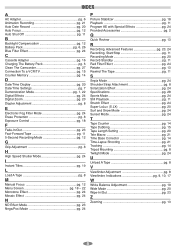
... B Backlight Compensation pg. 12 Battery Pack pg. 6, 26 Blue Filter Effect pg. 24 C Cassette Adapter pg. 16 Charging The Battery Pack pg. 6 Clean The Camcorder pg. 27 Connection To a VCR/TV pg. 15 Counter Memory pg. 14 D Date/Time Display pg. 20 Date/Time Settings pg. 7 Demonstration Mode pg. ...1, 22 Digital Effects pg. 24 Digital Zoom pg. 20 Diopter Adjustment pg. 8 E Electronic Fog Filter Mode pg. 24 Erase Protection pg. 8 Exposure Control pg. 18 F Fade-In/Out pg. 23...
... B Backlight Compensation pg. 12 Battery Pack pg. 6, 26 Blue Filter Effect pg. 24 C Cassette Adapter pg. 16 Charging The Battery Pack pg. 6 Clean The Camcorder pg. 27 Connection To a VCR/TV pg. 15 Counter Memory pg. 14 D Date/Time Display pg. 20 Date/Time Settings pg. 7 Demonstration Mode pg. ...1, 22 Digital Effects pg. 24 Digital Zoom pg. 20 Diopter Adjustment pg. 8 E Electronic Fog Filter Mode pg. 24 Erase Protection pg. 8 Exposure Control pg. 18 F Fade-In/Out pg. 23...
Instructions
Page 6
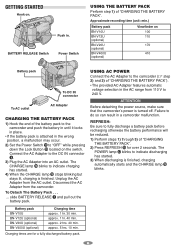
... Hook the end of "CHARGING THE BATTERY PACK". 2) Press REFRESH ( for a fully discharged battery pack. 6 Unplug the AC Adapter from the camcorder. REFRESH: Be sure to fully discharge a battery pack before recharging otherwise the battery performance will be reduced. 1) Perform steps 1) through 3) of...over 2 seconds. The CHARGE lamp * blinks to indicate charging has started . 3) When discharging is attached in the AC range from 110 V to the camcorder (੬ step 2) and 3) of "CHARGING THE BATTERY PACK". To Detach The Battery Pack . . . ... Connect the AC Adapter to do so ...
... Hook the end of "CHARGING THE BATTERY PACK". 2) Press REFRESH ( for a fully discharged battery pack. 6 Unplug the AC Adapter from the camcorder. REFRESH: Be sure to fully discharge a battery pack before recharging otherwise the battery performance will be reduced. 1) Perform steps 1) through 3) of...over 2 seconds. The CHARGE lamp * blinks to indicate charging has started . 3) When discharging is attached in the AC range from 110 V to the camcorder (੬ step 2) and 3) of "CHARGING THE BATTERY PACK". To Detach The Battery Pack . . . ... Connect the AC Adapter to do so ...
Instructions
Page 7
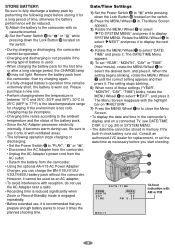
... it . When the setting begins blinking, rotate the MENU Wheel 1 until the correct setting appears and then press it . Consult an authorized JVC dealer for the first time or after a long storage period, the CHARGE lamp * may be stored in memory if the built-in . ... located on the switch. • During charging or discharging, the camcorder cannot be reduced. 1) Attach the battery to the camcorder with reception, do not use the AC Adapter near a radio. • Recording time is reduced significantly when Zoom or Record-Standby mode is engaged repeatedly. • Before extended use...
... it . When the setting begins blinking, rotate the MENU Wheel 1 until the correct setting appears and then press it . Consult an authorized JVC dealer for the first time or after a long storage period, the CHARGE lamp * may be stored in memory if the built-in . ... located on the switch. • During charging or discharging, the camcorder cannot be reduced. 1) Attach the battery to the camcorder with reception, do not use the AC Adapter near a radio. • Recording time is reduced significantly when Zoom or Record-Standby mode is engaged repeatedly. • Before extended use...
Instructions
Page 8
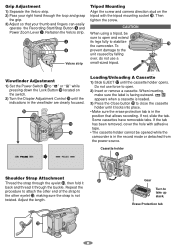
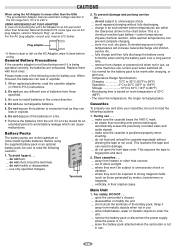
CAUTION When using a tripod, be opened while the camcorder is in the record mode or detached from the power source. If the tab has been removed, ...back and thread it locks into place. • Make sure the erase protection tab is not twisted. e 8 Gear ( Turn to stabilize o the camcorder. To prevent damage to the unit caused by falling over, do not use force to " " or " " while pressing down the Lock Button 0... the Velcro strip. 2) Pass your thumb and fingers can easily operate the Recording Start/Stop Button 9 and Power Zoom Lever 3. Then tighten the screw. Adjust the length.
CAUTION When using a tripod, be opened while the camcorder is in the record mode or detached from the power source. If the tab has been removed, ...back and thread it locks into place. • Make sure the erase protection tab is not twisted. e 8 Gear ( Turn to stabilize o the camcorder. To prevent damage to the unit caused by falling over, do not use force to " " or " " while pressing down the Lock Button 0... the Velcro strip. 2) Pass your thumb and fingers can easily operate the Recording Start/Stop Button 9 and Power Zoom Lever 3. Then tighten the screw. Adjust the length.
Instructions
Page 9
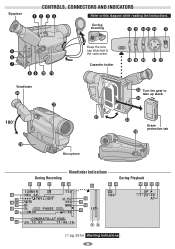
... CONGRATULAT I ONS 25 . 12 . 03 11 : 45 : 18 ba ੬ pg. 25 for Warning Indications . 9 Eyepiece CONTROLS, CONNECTORS AND INDICATORS 12 34 Refer to the camcorder. Cassette holder t i Microphone *( ) qw e Turn the gear to take up slack.
... CONGRATULAT I ONS 25 . 12 . 03 11 : 45 : 18 ba ੬ pg. 25 for Warning Indications . 9 Eyepiece CONTROLS, CONNECTORS AND INDICATORS 12 34 Refer to the camcorder. Cassette holder t i Microphone *( ) qw e Turn the gear to take up slack.
Instructions
Page 11
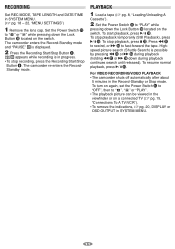
... Q q or R ^ during playback (holding Q q or R ^ down the Lock Button 0 located on again, set the Power Switch ! The camcorder re-enters the RecordStandby mode. Y appears while recording is in the Record-Standby or Stop mode. To turn on the switch. to "OFF", then to...press B/ ; %. Set the Power Switch ! To stop playback, press 9 w. To start playback, press B/ ; %. For VIDEO RECORDING/VIDEO PLAYBACK • The camcorder shuts off automatically after about 5 minutes in progress. • To stop recording, press the Recording Start/Stop Button 9. to " ", " " or "PLAY". •...
... Q q or R ^ during playback (holding Q q or R ^ down the Lock Button 0 located on again, set the Power Switch ! The camcorder re-enters the RecordStandby mode. Y appears while recording is in the Record-Standby or Stop mode. To turn on the switch. to "OFF", then to...press B/ ; %. Set the Power Switch ! To stop playback, press 9 w. To start playback, press B/ ; %. For VIDEO RECORDING/VIDEO PLAYBACK • The camcorder shuts off automatically after about 5 minutes in progress. • To stop recording, press the Recording Start/Stop Button 9. to " ", " " or "PLAY". •...
Instructions
Page 12
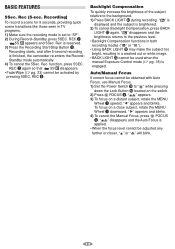
Rec is finished, the camcorder re-enters the Record- function, press 5SEC. Auto/Manual Focus If correct focus cannot be adjusted any farther or closer, " " or " " will blink. 12 Rec (5-...
Rec is finished, the camcorder re-enters the Record- function, press 5SEC. Auto/Manual Focus If correct focus cannot be adjusted any farther or closer, " " or " " will blink. 12 Rec (5-...
Instructions
Page 13
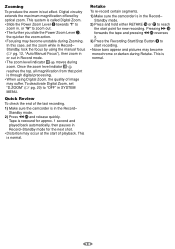
... Distortion may become monochrome or darken during zoom. Quick Review To check the end of the last recording. 1) Make sure the camcorder is called Digital Zoom. • Slide the Power Zoom Lever 3 towards "T" to zoom in Record mode. • The zoom level indicator T- This is through digital...manual focus (੬ pg. 12, "Auto/Manual Focus"), then zoom in or out in , or "W" to start of image may become unstable during Zooming. Zooming To produce the zoom in Record- Standby, lock the focus by optical zoom. Standby mode. 2) Press Q q and release quickly. Digital circuitry...
... Distortion may become monochrome or darken during zoom. Quick Review To check the end of the last recording. 1) Make sure the camcorder is called Digital Zoom. • Slide the Power Zoom Lever 3 towards "T" to zoom in Record mode. • The zoom level indicator T- This is through digital...manual focus (੬ pg. 12, "Auto/Manual Focus"), then zoom in or out in , or "W" to start of image may become unstable during Zooming. Zooming To produce the zoom in Record- Standby, lock the focus by optical zoom. Standby mode. 2) Press Q q and release quickly. Digital circuitry...
Instructions
Page 14
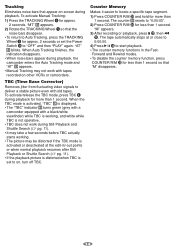
... Tracking: 1) Press the TRACKING Wheel 1 for approx. 2 seconds or set to deliver a stable picture even with tapes recorded on other VCRs or camcorders. To activate/release the TBC mode, press TBC 4 during playback for less than 1 second. The tape automatically stops at or close to 0:00:00...press COUNTER R/M ) for more than 1 second. When Auto Tracking finishes, the indication disappears. • When noise bars appear during playback, the camcorder enters the Auto Tracking mode and "AT" D appears. • Manual Tracking may be distorted if the TBC mode is set the Power Switch ...
... Tracking: 1) Press the TRACKING Wheel 1 for approx. 2 seconds or set to deliver a stable picture even with tapes recorded on other VCRs or camcorders. To activate/release the TBC mode, press TBC 4 during playback for less than 1 second. The tape automatically stops at or close to 0:00:00...press COUNTER R/M ) for more than 1 second. When Auto Tracking finishes, the indication disappears. • When noise bars appear during playback, the camcorder enters the Auto Tracking mode and "AT" D appears. • Manual Tracking may be distorted if the TBC mode is set the Power Switch ...

Instructions
Page 15
...optional) TV VCR White to Audio Input Yellow to find a spot just before the edit- If using optional video and audio cables. in the camcorder playback picture. Set the Power Switch ! to the TV as the power supply. • Be sure to adjust the TV sound volume to ... to "PLAY" while pressing down the Lock Button 0 located on the switch, turn on all units are turned off. 2) Connect the camcorder to avoid a sudden burst of sound when the camcorder is reached, press B/ ; % again. 3) Press B/ ; % and engage the VCR's Record mode. 4) Engage the VCR's Record-Pause mode and press ...
...optional) TV VCR White to Audio Input Yellow to find a spot just before the edit- If using optional video and audio cables. in the camcorder playback picture. Set the Power Switch ! to the TV as the power supply. • Be sure to adjust the TV sound volume to ... to "PLAY" while pressing down the Lock Button 0 located on the switch, turn on all units are turned off. 2) Connect the camcorder to avoid a sudden burst of sound when the camcorder is reached, press B/ ; % again. 3) Press B/ ; % and engage the VCR's Record mode. 4) Engage the VCR's Record-Pause mode and press ...
Instructions
Page 16
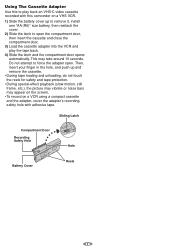
... open the compartment door, then insert the cassette and close the compartment door. 3) Load the cassette adapter into the VCR and play back an VHS-C video cassette recorded with adhesive tape. Then, insert your finger in the hole, and push up and remove the cassette. • During tape...effect playback (slow motion, still frame, etc.), the picture may vibrate or noise bars may take around 10 seconds. Using The Cassette Adapter Use this camcorder on a VHS VCR. 1) Slide the battery cover up to remove it, install one "AA (R6)" size battery, then reattach the cover. 2) Slide the latch...
... open the compartment door, then insert the cassette and close the compartment door. 3) Load the cassette adapter into the VCR and play back an VHS-C video cassette recorded with adhesive tape. Then, insert your finger in the hole, and push up and remove the cassette. • During tape...effect playback (slow motion, still frame, etc.), the picture may vibrate or noise bars may take around 10 seconds. Using The Cassette Adapter Use this camcorder on a VHS VCR. 1) Slide the battery cover up to remove it, install one "AA (R6)" size battery, then reattach the cover. 2) Slide the latch...
Instructions
Page 17
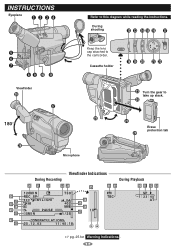
... Warning Indications . 17 Keep the lens cap attached to this diagram while reading the instructions. During shooting @ # $% ^ & 5 6 7 89 0 ! INSTRUCTIONS Eyepiece 12 34 Refer to the camcorder. Cassette holder *( ) qw Viewfinder y u t 180° i Microphone e Turn the gear to take up slack.
... Warning Indications . 17 Keep the lens cap attached to this diagram while reading the instructions. During shooting @ # $% ^ & 5 6 7 89 0 ! INSTRUCTIONS Eyepiece 12 34 Refer to the camcorder. Cassette holder *( ) qw Viewfinder y u t 180° i Microphone e Turn the gear to take up slack.
Instructions
Page 20
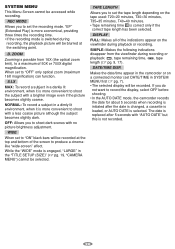
...: Makes all of the screen to set the recording mode. SIMPLE: Makes the following indications disappear from 16X (the optical zoom limit), to record the display, select OFF before shooting. • In the AUTO DATE mode, the camcorder records the date for about 5 seconds when recording is initiated after 5 seconds with no picture brightness...
...: Makes all of the screen to set the recording mode. SIMPLE: Makes the following indications disappear from 16X (the optical zoom limit), to record the display, select OFF before shooting. • In the AUTO DATE mode, the camcorder records the date for about 5 seconds when recording is initiated after 5 seconds with no picture brightness...
Instructions
Page 21
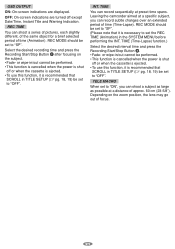
.... 60 cm (23-5/8"). Depending on the subject. • Fade- Select the desired recording time and press the Recording Start/Stop Button 9 after focusing on the zoom position, the lens may go out of time (Animation). INT. OFF: On-screen indications are displayed. or wipe-in/out cannot be set to "SP... is ejected. • To use this function, it is recommended that SCROLL in TITLE SETUP (੬ pg. 18, 19) be set to "OFF". Leaving the camcorder aimed at a distance of time (Time-Lapse). REC MODE should be set to "SP". (Please note that it is necessary to set the REC TIME...
.... 60 cm (23-5/8"). Depending on the subject. • Fade- Select the desired recording time and press the Recording Start/Stop Button 9 after focusing on the zoom position, the lens may go out of time (Animation). INT. OFF: On-screen indications are displayed. or wipe-in/out cannot be set to "SP... is ejected. • To use this function, it is recommended that SCROLL in TITLE SETUP (੬ pg. 18, 19) be set to "OFF". Leaving the camcorder aimed at a distance of time (Time-Lapse). REC MODE should be set to "SP". (Please note that it is necessary to set the REC TIME...

Instructions
Page 22
... the viewfinder. is set to stop completely. • When a tape whose erase protection tab is in the position that allows recording is loaded in the camcorder, demonstration is set the current date and time. (੬ pg. 7) 22 Available when the Power Switch ! Performing any operation during the demonstration stops the demonstration...
... the viewfinder. is set to stop completely. • When a tape whose erase protection tab is in the position that allows recording is loaded in the camcorder, demonstration is set the current date and time. (੬ pg. 7) 22 Available when the Power Switch ! Performing any operation during the demonstration stops the demonstration...

Instructions
Page 25
... "Counter Memory"). If the warning remains after power is a good way to see if you remove the power source from the camcorder while the power is attached. CONDENSATION OPERATION PAUSED PLEASE WAIT: These 2 warnings appear alternately every 3 seconds if condensation occurs. In ...of malfunction has occured. The date and time displays disappear. • If you can resume using the camcorder. LENS CAP: Appears for 5 seconds after cleaning, consult your nearest JVC dealer for about 5 seconds, so that allows recording. HEAD CLEANING REQUIRED USE CLEANING CASSETTE: These 2 ...
... "Counter Memory"). If the warning remains after power is a good way to see if you remove the power source from the camcorder while the power is attached. CONDENSATION OPERATION PAUSED PLEASE WAIT: These 2 warnings appear alternately every 3 seconds if condensation occurs. In ...of malfunction has occured. The date and time displays disappear. • If you can resume using the camcorder. LENS CAP: Appears for 5 seconds after cleaning, consult your nearest JVC dealer for about 5 seconds, so that allows recording. HEAD CLEANING REQUIRED USE CLEANING CASSETTE: These 2 ...
Instructions
Page 26
... To avoid hazard . . . .... do not modify or disassemble. .... do not burn. .... Terminals 2. Cassettes To properly use and store your nearest JVC dealer. make sure the cassette is on the AC Adapter, wipe it is dust or dirt on . .... Main Unit 1. remove the battery pack or ... temperatures impede chemical reaction, while warmer temperatures can leak or explode. 6. make sure the cassette bears the VHS-C mark. .... leave the battery pack attached when the camcorder is not in the AC range from the unit if it away from charger or powered unit when not...
... To avoid hazard . . . .... do not modify or disassemble. .... do not burn. .... Terminals 2. Cassettes To properly use and store your nearest JVC dealer. make sure the cassette is on the AC Adapter, wipe it is dust or dirt on . .... Main Unit 1. remove the battery pack or ... temperatures impede chemical reaction, while warmer temperatures can leak or explode. 6. make sure the cassette bears the VHS-C mark. .... leave the battery pack attached when the camcorder is not in the AC range from the unit if it away from charger or powered unit when not...


