
Instructions
Page 1
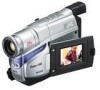
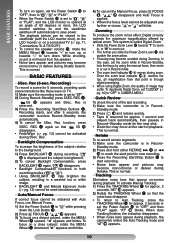
INSTRUCTIONS COMPACT VHS CAMCORDER GR-SXM38U ENGLISH For Customer Use: Enter below the Model No. Model No. Before use, please read "SAFETY PRECAUTIONS" (੬ pg. 3, 4) to ensure safe use of the camcorder. Serial No. CONTENTS GETTING STARTED 5 ~ 9 RECORDING/PLAYBACK 9 ~ 10 BASIC FEATURES 10 ~ 12 MENU SETTINGS 12 ~ 16 TERMS 24 AUTOMATIC DEMONSTRATION Automatic Demonstration takes place when "DEMO MODE" is set to "OFF" (੬ pg. 15). Dear Customer, Thank...
INSTRUCTIONS COMPACT VHS CAMCORDER GR-SXM38U ENGLISH For Customer Use: Enter below the Model No. Model No. Before use, please read "SAFETY PRECAUTIONS" (੬ pg. 3, 4) to ensure safe use of the camcorder. Serial No. CONTENTS GETTING STARTED 5 ~ 9 RECORDING/PLAYBACK 9 ~ 10 BASIC FEATURES 10 ~ 12 MENU SETTINGS 12 ~ 16 TERMS 24 AUTOMATIC DEMONSTRATION Automatic Demonstration takes place when "DEMO MODE" is set to "OFF" (੬ pg. 15). Dear Customer, Thank...

Instructions
Page 3
... supply power to the camcorder from an AC outlet, use the provided multi-voltage AC Adapter. (An appropriate conversion adapter may be used with a television of important operating and maintenance (servicing) instructions in your community due to the presence of a different standard. Check with your local solid waste officials for playback with NTSC-type color television signals. The battery is intended to alert the user...
... supply power to the camcorder from an AC outlet, use the provided multi-voltage AC Adapter. (An appropriate conversion adapter may be used with a television of important operating and maintenance (servicing) instructions in your community due to the presence of a different standard. Check with your local solid waste officials for playback with NTSC-type color television signals. The battery is intended to alert the user...
Instructions
Page 4
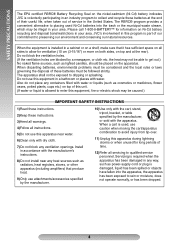
... place any way, such as power-supply cord or plug is required when the apparatus has been damaged in your area. When discarding batteries, environmental problems must be considered and the local rules or laws governing the disposal of these batteries must be caused.) IMPORTANT SAFETY INSTRUCTIONS 1)Read these instructions. 2)Keep these batteries at the rear). Servicing is damaged, liquid has...
... place any way, such as power-supply cord or plug is required when the apparatus has been damaged in your area. When discarding batteries, environmental problems must be considered and the local rules or laws governing the disposal of these batteries must be caused.) IMPORTANT SAFETY INSTRUCTIONS 1)Read these instructions. 2)Keep these batteries at the rear). Servicing is damaged, liquid has...

Instructions
Page 5
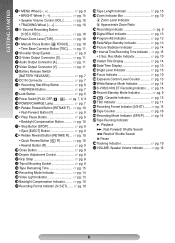
VHS REC MWB PAUSE 5M I N 1 / 2S BR I GHT CONGRATULAT I N A S - V 0 1 2 1X 3 ba 45 TBC 6 789! Erase protection tab Video Light Microphone LCD Monitor/Viewfinder Indications During Recording During Playback | / :; < = > 120M I ONS DEC 2 5 . 0 5 AM 1 1 : 4 5 : 1 8 ? During shooting %& () Keep the lens cap attached to the camcorder Cassette holder ~ 180° 90° + LCD monitor , Turn the gear to this diagram while reading the instructions. S-ET SP -1 : 23 : 45 AT VOLUME ੬...
VHS REC MWB PAUSE 5M I N 1 / 2S BR I GHT CONGRATULAT I N A S - V 0 1 2 1X 3 ba 45 TBC 6 789! Erase protection tab Video Light Microphone LCD Monitor/Viewfinder Indications During Recording During Playback | / :; < = > 120M I ONS DEC 2 5 . 0 5 AM 1 1 : 4 5 : 1 8 ? During shooting %& () Keep the lens cap attached to the camcorder Cassette holder ~ 180° 90° + LCD monitor , Turn the gear to this diagram while reading the instructions. S-ET SP -1 : 23 : 45 AT VOLUME ੬...
Instructions
Page 6
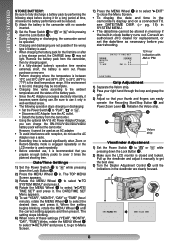
...-Forward Button [F pg. 9 ( • Play/ Pause Button pg. 9 • Backlight Compensation Button pg. 10 ) • Stop Button [STOP pg. 9 • Eject [EJECT] Button pg. 9 ~ • Retake Rewind Button [RETAKE R] ... ੬ pg. 10 • Quick Review Button [ R pg. 10 • Rewind Button [R pg. 9 + Close Button pg. 9 , Diopter Adjustment Control pg. 8 - Tracking Indicator pg. 10 " VOLUME: Speaker Volume Indicator pg. 10 6 REC pg. 10 3 Power Zoom Lever [T/W pg. 10 4 • Manual Focus Button [ FOCUS].... ੬ pg. 10 • Time Base Corrector Button...
...-Forward Button [F pg. 9 ( • Play/ Pause Button pg. 9 • Backlight Compensation Button pg. 10 ) • Stop Button [STOP pg. 9 • Eject [EJECT] Button pg. 9 ~ • Retake Rewind Button [RETAKE R] ... ੬ pg. 10 • Quick Review Button [ R pg. 10 • Rewind Button [R pg. 9 + Close Button pg. 9 , Diopter Adjustment Control pg. 8 - Tracking Indicator pg. 10 " VOLUME: Speaker Volume Indicator pg. 10 6 REC pg. 10 3 Power Zoom Lever [T/W pg. 10 4 • Manual Focus Button [ FOCUS].... ੬ pg. 10 • Time Base Corrector Button...

Instructions
Page 7
...) 330 (195) ( ): When the video light is attached wrongly, a malfunction may occur. 2) Set the Power Switch $ to indicate charging. 4) When the CHARGE lamp % stops blinking and turns off . The CHARGE lamp % blinks faster to malfunction. Connect the AC Adapter to the DC IN connector !, then plug the AC Adapter to the AC Outlet. 3) The CHARGE lamp % blinks to "OFF" while pressing down the Lock Button #. GETTING STARTED GETTING STARTED...
...) 330 (195) ( ): When the video light is attached wrongly, a malfunction may occur. 2) Set the Power Switch $ to indicate charging. 4) When the CHARGE lamp % stops blinking and turns off . The CHARGE lamp % blinks faster to malfunction. Connect the AC Adapter to the DC IN connector !, then plug the AC Adapter to the AC Outlet. 3) The CHARGE lamp % blinks to "OFF" while pressing down the Lock Button #. GETTING STARTED GETTING STARTED...
Instructions
Page 8
... when Zoom or Record-Standby mode is engaged repeatedly or the LCD monitor is used repeatedly. • Before extended use . If the environment is too cold, charging may not light. The TOP MENU Screen appears. 3) Rotate the MENU Wheel 1 to select "3TO SYSTEM MENU" and press it. 4) Rotate the MENU Wheel 1 to select "3DATE/ TIME SET" and press it manually to get the best view. 3) Turn the Diopter Adjustment Control...
... when Zoom or Record-Standby mode is engaged repeatedly or the LCD monitor is used repeatedly. • Before extended use . If the environment is too cold, charging may not light. The TOP MENU Screen appears. 3) Rotate the MENU Wheel 1 to select "3TO SYSTEM MENU" and press it. 4) Rotate the MENU Wheel 1 to select "3DATE/ TIME SET" and press it manually to get the best view. 3) Turn the Diopter Adjustment Control...

Instructions
Page 9
... tilt it through the buckle. Some cassettes have removable tabs. To start playback, press 3/8 (. Adjust the length. To stop playback, press 7 ). The camcorder is set to "PLAY" while pressing down the Lock Button #. To Adjust The Brightness Of The LCD Monitor: When the Power Switch $ is in record mode or detached from power source. + Erase protection tab RECORDING Set REC MODE, S-VHS (S-VHS ET), TAPE LENGTH and DATE/TIME. (੬ pg. 12 - 16, "MENU SETTINGS") 1) Remove the lens cap.
... tilt it through the buckle. Some cassettes have removable tabs. To start playback, press 3/8 (. Adjust the length. To stop playback, press 7 ). The camcorder is set to "PLAY" while pressing down the Lock Button #. To Adjust The Brightness Of The LCD Monitor: When the Power Switch $ is in record mode or detached from power source. + Erase protection tab RECORDING Set REC MODE, S-VHS (S-VHS ET), TAPE LENGTH and DATE/TIME. (੬ pg. 12 - 16, "MENU SETTINGS") 1) Remove the lens cap.
Instructions
Page 10
... the zoom in CAMERA MENU. In this case, set the zoom while in the viewfinder (with Auto Focus, use Manual Focus. 1) Set the Power Switch $ to " " while pressing down . "AT" ! REC 2 again so that point is normal. Backlight Compensation To increase the brightness of playback. This system is in a washed out or white image. • BACKLIGHT ( and Manual Exposure mode (੬ pg. 13) cannot be activated during Zooming. Quick Review To check...
... the zoom in CAMERA MENU. In this case, set the zoom while in the viewfinder (with Auto Focus, use Manual Focus. 1) Set the Power Switch $ to " " while pressing down . "AT" ! REC 2 again so that point is normal. Backlight Compensation To increase the brightness of playback. This system is in a washed out or white image. • BACKLIGHT ( and Manual Exposure mode (੬ pg. 13) cannot be activated during Zooming. Quick Review To check...
Instructions
Page 11
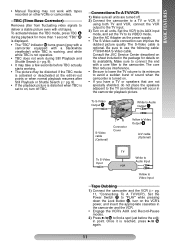
... working, and white while TBC is turned on its VIDEO mode. • Use the AC Adapter as interference will occur in the package for more than 1 second. Consult the JVC Service Center described on the sheet included in the camcorder playback picture. Set the Power Switch $ to "PLAY" while pressing down the Lock Button #, turn off . 2) Connect the camcorder to Video Input Tape Dubbing 1) Connect the camcorder and the VCR (੬ pg. 11, "Connections To A TV/VCR"). Set the VCR...
... working, and white while TBC is turned on its VIDEO mode. • Use the AC Adapter as interference will occur in the package for more than 1 second. Consult the JVC Service Center described on the sheet included in the camcorder playback picture. Set the Power Switch $ to "PLAY" while pressing down the Lock Button #, turn off . 2) Connect the camcorder to Video Input Tape Dubbing 1) Connect the camcorder and the VCR (੬ pg. 11, "Connections To A TV/VCR"). Set the VCR...
Instructions
Page 12
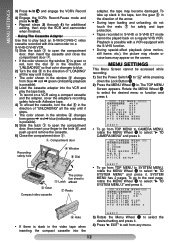
... MENU has 2 pages. Using The Cassette Adapter Use this to play the tape back. • To record on a VCR using a compact cassette and the adapter, cover the adapter's recording safety hole with Adhesive tape. 4) To unload the cassette, turn the dial 5 in the direction of "UNLOADING" all the way until it stops. • The color shown in the window 4 changes from green \ red \ blue (indicating unloading is possible). 5) Slide the latch 1 to open the...
... MENU has 2 pages. Using The Cassette Adapter Use this to play the tape back. • To record on a VCR using a compact cassette and the adapter, cover the adapter's recording safety hole with Adhesive tape. 4) To unload the cassette, turn the dial 5 in the direction of "UNLOADING" all the way until it stops. • The color shown in the window 4 changes from green \ red \ blue (indicating unloading is possible). 5) Slide the latch 1 to open the...
Instructions
Page 13
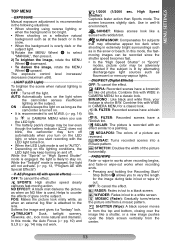
... "High Speed Shutter" mode is engaged, the light is set M.W.B. (੬ pg. 14) to in CAMERA MENU for subjects that may not work. 1/2000 (1/2000 sec. SURF&SNOW: Compensates for a classic look like a shutter, or a new image pushes open the black screen vertically from a mosaic pattern. R. FILTER: Recorded scenes have a reddish tint. MOSAIC (Fader): Gradually turns/returns the picture into a mosaic pattern. The exposure control level increases/ decreases...
... "High Speed Shutter" mode is engaged, the light is set M.W.B. (੬ pg. 14) to in CAMERA MENU for subjects that may not work. 1/2000 (1/2000 sec. SURF&SNOW: Compensates for a classic look like a shutter, or a new image pushes open the black screen vertically from a mosaic pattern. R. FILTER: Recorded scenes have a reddish tint. MOSAIC (Fader): Gradually turns/returns the picture into a mosaic pattern. The exposure control level increases/ decreases...
Instructions
Page 14
... "B/W:MONO" mode (੬ pg. 13, "Digital Effects") is switched, the playback picture will be used . When the setting is completed, "MWB" 1 stops blinking. • Once you adjust white balance manually, the setting is retained even if the power is turned off or the battery is removed. • White balance cannot be blurred at a distance of lighting is difficult to focus on the white paper, adjust focus manually (੬ pg. 10, "Auto/Manual Focus"). LANGUAGE:Select the language for TITLE...
... "B/W:MONO" mode (੬ pg. 13, "Digital Effects") is switched, the playback picture will be used . When the setting is completed, "MWB" 1 stops blinking. • Once you adjust white balance manually, the setting is retained even if the power is turned off or the battery is removed. • White balance cannot be blurred at a distance of lighting is difficult to focus on the white paper, adjust focus manually (੬ pg. 10, "Auto/Manual Focus"). LANGUAGE:Select the language for TITLE...

Instructions
Page 15
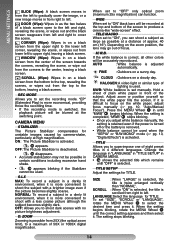
.../Stop Button " after 5 seconds with "AUTO DATE" but this function, it is selected. DISPLAY FULL: Makes all of the indications appear on a connected monitor (set DATE/TIME in the SYSTEM MENU before shooting. • In the AUTO DATE mode, the camcorder records the date for a brief selected period of time (Time-Lapse). OSD OUTPUT ON: On-screen indications are turned off or when the cassette is ejected. • To use this is completed. Available when the Power Switch...
.../Stop Button " after 5 seconds with "AUTO DATE" but this function, it is selected. DISPLAY FULL: Makes all of the indications appear on a connected monitor (set DATE/TIME in the SYSTEM MENU before shooting. • In the AUTO DATE mode, the camcorder records the date for a brief selected period of time (Time-Lapse). OSD OUTPUT ON: On-screen indications are turned off or when the cassette is ejected. • To use this is completed. Available when the Power Switch...
Instructions
Page 16
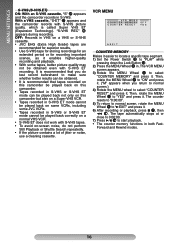
... tape automatically stops at or close to 0:00:00. 7) Press 3/8 ( to start playback. • The counter memory functions in S-VHS or S-VHS ET mode cannot be played back on -screen noise, do test record beforehand to "PLAY" while pressing down the Lock Button #. 2) Press the MENU Wheel 1 in S-VHS. With a VHS cassette, "S-ET" = appears and the camcorder records with S-VHS ET recording. "S-VHS REC" 2 appears during recording. It...
... tape automatically stops at or close to 0:00:00. 7) Press 3/8 ( to start playback. • The counter memory functions in S-VHS or S-VHS ET mode cannot be played back on -screen noise, do test record beforehand to "PLAY" while pressing down the Lock Button #. 2) Press the MENU Wheel 1 in S-VHS. With a VHS cassette, "S-ET" = appears and the camcorder records with S-VHS ET recording. "S-VHS REC" 2 appears during recording. It...

Instructions
Page 17
... battery power is used, the TV's VIDEO/ TV Switch has not been set the camcorder to begin an animated program (੬ pg. 15, REC TIME/INT. LENS CAP: Appears for them to clear, and turn the unit off automatically. : Blinks when no playback picture. • The TV has not been set to its power supply unit (battery pack, AC Adapter, etc.); Remove the tape, turn it does, you remove the power source from functioning...
... battery power is used, the TV's VIDEO/ TV Switch has not been set the camcorder to begin an animated program (੬ pg. 15, REC TIME/INT. LENS CAP: Appears for them to clear, and turn the unit off automatically. : Blinks when no playback picture. • The TV has not been set to its power supply unit (battery pack, AC Adapter, etc.); Remove the tape, turn it does, you remove the power source from functioning...

Instructions
Page 18
... prerecorded tapes In case of the viewfinder at all. do not open the camcorder's chassis. ... vertically, in places subject to an AC wall outlet automatically erases the previously recorded video and other heat sources or direct sunlight. ... away from the unit if it away from 110 V to avoid battery leakage which can cause serious damage to the camera's internal battery charging...
... prerecorded tapes In case of the viewfinder at all. do not open the camcorder's chassis. ... vertically, in places subject to an AC wall outlet automatically erases the previously recorded video and other heat sources or direct sunlight. ... away from the unit if it away from 110 V to avoid battery leakage which can cause serious damage to the camera's internal battery charging...
Instructions
Page 19
... diluted mild soap, wipe off the camcorder. 2 Open the LCD monitor to radio communications. For Your Maintenance 1) After Use 1 Turn off heavy dirt, then wipe again with a dry cloth. 2 Wipe the LCD monitor gently with the instructions, may heat up. • If you leave power on the bottom. 2) To prolong service life... ... Connect the equipment into a glass will not occur...
... diluted mild soap, wipe off the camcorder. 2 Open the LCD monitor to radio communications. For Your Maintenance 1) After Use 1 Turn off heavy dirt, then wipe again with a dry cloth. 2 Wipe the LCD monitor gently with the instructions, may heat up. • If you leave power on the bottom. 2) To prolong service life... ... Connect the equipment into a glass will not occur...
Instructions
Page 20
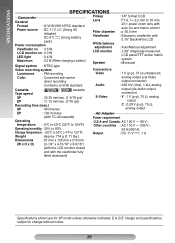
...When charging a battery) Signal system : NTSC-type Pickup Lens Filter diameter Viewfinder White balance adjustment LCD monitor Speaker : 1/6" format CCD : F1.8, f = 2.2 mm to 55 mm, 25:1 power zoom lens with auto iris and macro control : ø 30.5 mm : Electronic viewfinder with 0.16" black/white LCD : Auto/Manual adjustment : 2.50" diagonally measured, LCD panel/TFT active matrix system : Monaural Video recording system Connectors Luminance : FM recording Video : 1 V (p-p), 75 Ω unbalanced, Color : Converted sub-carrier analog output (via Video direct recording...
...When charging a battery) Signal system : NTSC-type Pickup Lens Filter diameter Viewfinder White balance adjustment LCD monitor Speaker : 1/6" format CCD : F1.8, f = 2.2 mm to 55 mm, 25:1 power zoom lens with auto iris and macro control : ø 30.5 mm : Electronic viewfinder with 0.16" black/white LCD : Auto/Manual adjustment : 2.50" diagonally measured, LCD panel/TFT active matrix system : Monaural Video recording system Connectors Luminance : FM recording Video : 1 V (p-p), 75 Ω unbalanced, Color : Converted sub-carrier analog output (via Video direct recording...
Instructions
Page 24
... Tape pg. 9 Charging The Battery Pack pg. 7 Clean The Camcorder pg. 19 Connection To a VCR/ TV pg. 11 Counter Memory pg. 16 D S Shoulder Strap Attachment pg. 9 Specifications pg. 20 Super LoLux (S. LX pg. 14 Super VHS Expansion Technology pg. 16 Date/ Time Display pg. 15 Date/ Time Settings pg. 8 Demonstration Mode pg. 1, 15 Digital Effects pg. 13 Digital Zoom pg. 14 Diopter Adjustment pg. 8 E Erase Protection pg. 9 Exposure Control...
... Tape pg. 9 Charging The Battery Pack pg. 7 Clean The Camcorder pg. 19 Connection To a VCR/ TV pg. 11 Counter Memory pg. 16 D S Shoulder Strap Attachment pg. 9 Specifications pg. 20 Super LoLux (S. LX pg. 14 Super VHS Expansion Technology pg. 16 Date/ Time Display pg. 15 Date/ Time Settings pg. 8 Demonstration Mode pg. 1, 15 Digital Effects pg. 13 Digital Zoom pg. 14 Diopter Adjustment pg. 8 E Erase Protection pg. 9 Exposure Control...


