Instructions
Page 2
... DUBBING 33 - 34 Dubbing To Or From A VCR 33 Dubbing To Or From A Video Unit Equipped With A DV Connector (Digital Dubbing 34 USING THE REMOTE CONTROL UNIT (GR-D90/D70 only 35 - 36 Slow-Motion Playback 35 Frame-By-Frame Playback 35 Playback Special Effects 35 Playback Zoom 35 Audio Dubbing 36 Insert...
... DUBBING 33 - 34 Dubbing To Or From A VCR 33 Dubbing To Or From A Video Unit Equipped With A DV Connector (Digital Dubbing 34 USING THE REMOTE CONTROL UNIT (GR-D90/D70 only 35 - 36 Slow-Motion Playback 35 Frame-By-Frame Playback 35 Playback Special Effects 35 Playback Zoom 35 Audio Dubbing 36 Insert...
Instructions
Page 5
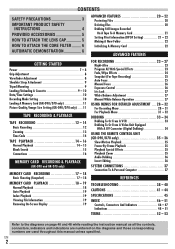
... the slot. HOW TO ATTACH THE LENS CAP To protect the lens, attach the provided lens cap to the camcorder as shown in the Remote Control Unit a time of the camcorder, provided cables may be equipped with insulation sheet). PROVIDED ACCESSORIES or AC Adapter AP-V11U or AP-V13U Battery... Pack BN-V408U USB Cable (GR-D90/D70 only) CD-ROM (GR-D90/D70 only) Lens Cap (See below for attachment) Audio/Video...
... the slot. HOW TO ATTACH THE LENS CAP To protect the lens, attach the provided lens cap to the camcorder as shown in the Remote Control Unit a time of the camcorder, provided cables may be equipped with insulation sheet). PROVIDED ACCESSORIES or AC Adapter AP-V11U or AP-V13U Battery... Pack BN-V408U USB Cable (GR-D90/D70 only) CD-ROM (GR-D90/D70 only) Lens Cap (See below for attachment) Audio/Video...
Instructions
Page 14
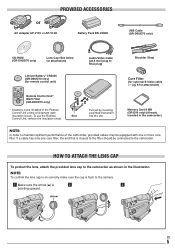
...to zoom in a previously recorded scene. Slow-Motion Playback/Playback Special Effects/ Playback Zoom: Available only with the remote control (provided with GR-D90/D70 only, ੬ pg. 35) To Control The Speaker Volume: Rotate the MENU/VOLUME wheel % so that the volume level indicator T on the switch. ...recording is resumed, the time code starts counting up to 44X), or W A to fast-forward the tape during recording. This means the camcorder may not be reset. ● During fast-forwarding and rewinding, the time code indication does not move smoothly. ● The time code...
...to zoom in a previously recorded scene. Slow-Motion Playback/Playback Special Effects/ Playback Zoom: Available only with the remote control (provided with GR-D90/D70 only, ੬ pg. 35) To Control The Speaker Volume: Rotate the MENU/VOLUME wheel % so that the volume level indicator T on the switch. ...recording is resumed, the time code starts counting up to 44X), or W A to fast-forward the tape during recording. This means the camcorder may not be reset. ● During fast-forwarding and rewinding, the time code indication does not move smoothly. ● The time code...

Instructions
Page 16
Or, press DISPLAY l on the remote control (provided with GR-D90/D70 only) to "ON" or "OFF" in the Menu Screen (੬ pg. 31, ...Connect when an S-Video cable is not used. If not . . . set "TIME CODE" to turn on/off . 2 Connect the camcorder to step 3. To S-VIDEO ) To AV ( Connector cover* Audio/Video cable (provided) S-Video cable (optional) To S-VIDEO IN TV... Yellow to VIDEO IN*** Red to AUDIO R IN** White to "LCD", "LCD/TV" or "OFF" in the camcorder playback picture. ● If no image is displayed or no sound is heard from the TV, set "...
Or, press DISPLAY l on the remote control (provided with GR-D90/D70 only) to "ON" or "OFF" in the Menu Screen (੬ pg. 31, ...Connect when an S-Video cable is not used. If not . . . set "TIME CODE" to turn on/off . 2 Connect the camcorder to step 3. To S-VIDEO ) To AV ( Connector cover* Audio/Video cable (provided) S-Video cable (optional) To S-VIDEO IN TV... Yellow to VIDEO IN*** Red to AUDIO R IN** White to "LCD", "LCD/TV" or "OFF" in the camcorder playback picture. ● If no image is displayed or no sound is heard from the TV, set "...
Instructions
Page 18
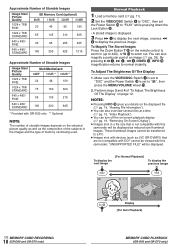
...a file size that are not compatible with DCF cannot be viewed with this camcorder will be displayed as the composition of the subjects in (up to 44X), or W A to a PC. ● Images shot with devices (such as JVC GR-DVM70) that is displayed. 3 Press 3 8 to display the next image,...Playback"). ● You can also magnify a particular part of an image (੬ pg. 35). These thumbnail images cannot be transferred to zoom out. on the remote control to " ", then press the MENU/VOLUME wheel %. 2. Normal Playback 1 Load a memory card (੬ pg. 11). 2 Set the VIDEO/DSC Switch 4...
...a file size that are not compatible with DCF cannot be viewed with this camcorder will be displayed as the composition of the subjects in (up to 44X), or W A to a PC. ● Images shot with devices (such as JVC GR-DVM70) that is displayed. 3 Press 3 8 to display the next image,...Playback"). ● You can also magnify a particular part of an image (੬ pg. 35). These thumbnail images cannot be transferred to zoom out. on the remote control to " ", then press the MENU/VOLUME wheel %. 2. Normal Playback 1 Load a memory card (੬ pg. 11). 2 Set the VIDEO/DSC Switch 4...

Instructions
Page 21
...it . OF F ON Menu Screen Setting Print Information (DPOF Setting) This camcorder is compatible with a video image you wish to dub, press it again to select " RETURN" and press it . Selection is stored on the tape using the remote control (੬ pg. 35). ● Images are 2 print information settings ...bar to select "CURRENT" and press it . The DPOF Screen appears. 5 Rotate the MENU/VOLUME wheel % to make). ADVANCED FEATURES EN 21 (GR-D90 and GR-D70 only) Rotate it to select " VIDEO" and press it. 4 Rotate the MENU/VOLUME wheel % to "PLAY" while pressing down the Lock...
...it . OF F ON Menu Screen Setting Print Information (DPOF Setting) This camcorder is compatible with a video image you wish to dub, press it again to select " RETURN" and press it . Selection is stored on the tape using the remote control (੬ pg. 35). ● Images are 2 print information settings ...bar to select "CURRENT" and press it . The DPOF Screen appears. 5 Rotate the MENU/VOLUME wheel % to make). ADVANCED FEATURES EN 21 (GR-D90 and GR-D70 only) Rotate it to select " VIDEO" and press it. 4 Rotate the MENU/VOLUME wheel % to "PLAY" while pressing down the Lock...

Instructions
Page 30
... The beep sounds when the power is turned on . ● "DEMO MODE" remains "ON" even if the camcorder power is turned off by the remote control. [ON]: Enables the camcorder to receive the remote control's beam signals. • For GR-D30 Owners: It is recommended that , the demonstration will not be displayed in the... 3 minutes after the Power Switch y is connected to the factory-preset. NOTES: ● If a tape is in the viewfinder. PRIORITY [LCD]: When the LCD monitor is fully open , the image is changed only when the Power Switch y is set to "ON", if there is no operation is ...
... The beep sounds when the power is turned on . ● "DEMO MODE" remains "ON" even if the camcorder power is turned off by the remote control. [ON]: Enables the camcorder to receive the remote control's beam signals. • For GR-D30 Owners: It is recommended that , the demonstration will not be displayed in the... 3 minutes after the Power Switch y is connected to the factory-preset. NOTES: ● If a tape is in the viewfinder. PRIORITY [LCD]: When the LCD monitor is fully open , the image is changed only when the Power Switch y is set to "ON", if there is no operation is ...

Instructions
Page 32
... in the " VIDEO DISPLAY" Menu are combined and output in stereo. ON SCREEN OFF: Camcorder's display (except the date, time and time code) is not shown on LCD or connected TV. [LCD]: Camcorder's display is called "48 kHz".) BRIGHT , DATE/TIME , TIME CODE Refer to accompany...OF F RETURN NOTES: • For GR-D90/D70 Owners: You can also use the provided remote control's AUDIO button T to change the output sound (without having to the desired parameter. Make sure you point the remote control at the camcorder's remote sensor 1. • The camcorder cannot detect the sound mode in which the...
... in the " VIDEO DISPLAY" Menu are combined and output in stereo. ON SCREEN OFF: Camcorder's display (except the date, time and time code) is not shown on LCD or connected TV. [LCD]: Camcorder's display is called "48 kHz".) BRIGHT , DATE/TIME , TIME CODE Refer to accompany...OF F RETURN NOTES: • For GR-D90/D70 Owners: You can also use the provided remote control's AUDIO button T to change the output sound (without having to the desired parameter. Make sure you point the remote control at the camcorder's remote sensor 1. • The camcorder cannot detect the sound mode in which the...

Instructions
Page 33
...4 through 6 for dubbing purposes. ● Before you start recording. 3 rotates. 6. Or, press DISPLAY l on the remote control (provided with this procedure. ● It is also possible to dub from another camcorder. 7 4 To AV ( Connector cover* To S-VIDEO ) S-Video cable (optional) To S-VIDEO IN or OUT Audio...7 on your footage it is not used. For GR-D90/D70 Owners: To Use This Camcorder As A Recorder 1. " AV. Press the Recording Start/Stop button w again to engage the Record-Pause mode. NOTES: ● As the camcorder starts to "LCD", "LCD/TV" or "OFF" in the Menu Screen (&#...
...4 through 6 for dubbing purposes. ● Before you start recording. 3 rotates. 6. Or, press DISPLAY l on the remote control (provided with this procedure. ● It is also possible to dub from another camcorder. 7 4 To AV ( Connector cover* To S-VIDEO ) S-Video cable (optional) To S-VIDEO IN or OUT Audio...7 on your footage it is not used. For GR-D90/D70 Owners: To Use This Camcorder As A Recorder 1. " AV. Press the Recording Start/Stop button w again to engage the Record-Pause mode. NOTES: ● As the camcorder starts to "LCD", "LCD/TV" or "OFF" in the Menu Screen (&#...
Instructions
Page 34
... the sound mode recorded on the original tape, regardless of the battery pack (੬ pg. 7). ● If the remote control is also possible to copy recorded scenes from this camcorder and the video unit. 3 Press 4 7 to play back the source tape. 4 While watching the playback on the ... (੬ pg. 28). ● During Digital Dubbing, incoming signals cannot be sure to use the optional JVC VC-VDV204U DV cable. 5. Set this camcorder to begin recording. Connect this camcorder's VIDEO/DSC Switch 4 (GR-D90/D70 only) to "VIDEO", then the Power Switch y to engage the Record-Pause mode.
... the sound mode recorded on the original tape, regardless of the battery pack (੬ pg. 7). ● If the remote control is also possible to copy recorded scenes from this camcorder and the video unit. 3 Press 4 7 to play back the source tape. 4 While watching the playback on the ... (੬ pg. 28). ● During Digital Dubbing, incoming signals cannot be sure to use the optional JVC VC-VDV204U DV cable. 5. Set this camcorder to begin recording. Connect this camcorder's VIDEO/DSC Switch 4 (GR-D90/D70 only) to "VIDEO", then the Power Switch y to engage the Record-Pause mode.

Instructions
Page 35
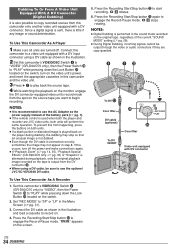
... image up to 44X at the camcorder's remote sensor and press EFFECT f. NOTES: ● Zoom can also be used during tape playback. 1 To change from Still Playback by pressing EFFECT f. USING THE REMOTE CONTROL UNIT EN 35 (GR-D90 and GR-D70 only) Make sure "REMOTE" in the SYSTEM Menu is set... To allow frame-by-frame search during slow-motion and still playback. ● Due to "ON" (੬ pg. 30) and the remote control is pointed at the camcorder's remote sensor. The selected function is played back. Or, press STOP (5) P and then press PLAY (4) j. The effects work the same in...
... image up to 44X at the camcorder's remote sensor and press EFFECT f. NOTES: ● Zoom can also be used during tape playback. 1 To change from Still Playback by pressing EFFECT f. USING THE REMOTE CONTROL UNIT EN 35 (GR-D90 and GR-D70 only) Make sure "REMOTE" in the SYSTEM Menu is set... To allow frame-by-frame search during slow-motion and still playback. ● Due to "ON" (੬ pg. 30) and the remote control is pointed at the camcorder's remote sensor. The selected function is played back. Or, press STOP (5) P and then press PLAY (4) j. The effects work the same in...

Instructions
Page 36
... separately. ● If you dub onto a blank space on the remote control, press PAUSE (6) Y. Press it is not possible on a tape recorded in the LP mode or on a blank portion of "MIC". NOTES: ● Program AE with a video unit connected to the camcorder's AV connector, first set "S/AV INPUT" to "ON" in the... to locate the point where editing will start, then press PAUSE (6) Y. 2 While holding A.DUB (e) k on the tape, the sound may be disrupted. A EN USING THE REMOTE CONTROL UNIT 36 (GR-D90 and GR-D70 only)
... separately. ● If you dub onto a blank space on the remote control, press PAUSE (6) Y. Press it is not possible on a tape recorded in the LP mode or on a blank portion of "MIC". NOTES: ● Program AE with a video unit connected to the camcorder's AV connector, first set "S/AV INPUT" to "ON" in the... to locate the point where editing will start, then press PAUSE (6) Y. 2 While holding A.DUB (e) k on the tape, the sound may be disrupted. A EN USING THE REMOTE CONTROL UNIT 36 (GR-D90 and GR-D70 only)

Instructions
Page 46
A EN 46 INDEX Remote Control (provided with GR-D90/D70 Only) Stereo microphone io p Q W Controls, Connectors And Indicators Refer to this diagram while reading the instructions. 1 4 5 6 789 LCD monitor 2 3 Viewfinder % ^&* ( ) Speaker 0 ! @ # $ q u w e r t OFF (CHARGE) PLAY y E R T Y U I O P a 6 9 0 2 4 3 w 5 e T W s d f g h j k l ;
A EN 46 INDEX Remote Control (provided with GR-D90/D70 Only) Stereo microphone io p Q W Controls, Connectors And Indicators Refer to this diagram while reading the instructions. 1 4 5 6 789 LCD monitor 2 3 Viewfinder % ^&* ( ) Speaker 0 ! @ # $ q u w e r t OFF (CHARGE) PLAY y E R T Y U I O P a 6 9 0 2 4 3 w 5 e T W s d f g h j k l ;

Instructions
Page 47
...35 * Functions the same as each corresponding button on bottom end of LCD monitor to the IEEE1394-1995 industry specification and extensions thereof. EN INDEX 47...used for indoor use is located beneath a cover. 1 • Remote Sensor (GR-D90/D70 only) The transmitted beam's approximate effective distance for products ...Control pg. 8 w Recording Start/Stop Button pg. 12 e Shoulder Strap Eyelets pg. 9 r POWER/CHARGE Lamp pg. 7, 12, 13 t Lock Button pg. 13 y Power Switch [ , , PLAY, OFF (CHARGE pg. 13 u Monitor Open Button pg. 12 For models without button, simply pull on the camcorder...
...35 * Functions the same as each corresponding button on bottom end of LCD monitor to the IEEE1394-1995 industry specification and extensions thereof. EN INDEX 47...used for indoor use is located beneath a cover. 1 • Remote Sensor (GR-D90/D70 only) The transmitted beam's approximate effective distance for products ...Control pg. 8 w Recording Start/Stop Button pg. 12 e Shoulder Strap Eyelets pg. 9 r POWER/CHARGE Lamp pg. 7, 12, 13 t Lock Button pg. 13 y Power Switch [ , , PLAY, OFF (CHARGE pg. 13 u Monitor Open Button pg. 12 For models without button, simply pull on the camcorder...

Instructions
Page 50
... camcorder is exhausted, power turns off automatically. TAPE! Appears if there is displayed, wait more than 1 hour until condensation disappears. WARNING INDICATIONS (high) (exhausted) Displays the battery remaining power level. Consult your nearest JVC dealer for 5 seconds after power is turned on the remote control is... or SNAPSHOT Button ^ is pressed while the Power Switch y is set to " " or " " and the VIDEO/DSC Switch 4 (GR-D90/D70 only) is attempted on the heads during recording or playback. Appears if Audio Dubbing is set to "VIDEO". when no memory card ...
... camcorder is exhausted, power turns off automatically. TAPE! Appears if there is displayed, wait more than 1 hour until condensation disappears. WARNING INDICATIONS (high) (exhausted) Displays the battery remaining power level. Consult your nearest JVC dealer for 5 seconds after power is turned on the remote control is... or SNAPSHOT Button ^ is pressed while the Power Switch y is set to " " or " " and the VIDEO/DSC Switch 4 (GR-D90/D70 only) is attempted on the heads during recording or playback. Appears if Audio Dubbing is set to "VIDEO". when no memory card ...

Instructions
Page 53
... Position pg. 13 Program AE With Special Effects pg. 23 Protecting Files pg. 20 Provided Accessories pg. 5 R Record-Standby pg. 12 Recording Mode pg. 10 Remote Control pg. 5, 35 Reset pg. 30 Rewind The Tape pg. 14 S SD Memory Card pg. 11, 41 Self-Recording pg. 13 Sepia pg. 23 Shuttle Search...
... Position pg. 13 Program AE With Special Effects pg. 23 Protecting Files pg. 20 Provided Accessories pg. 5 R Record-Standby pg. 12 Recording Mode pg. 10 Remote Control pg. 5, 35 Reset pg. 30 Rewind The Tape pg. 14 S SD Memory Card pg. 11, 41 Self-Recording pg. 13 Sepia pg. 23 Shuttle Search...


