Software Guide
Page 5
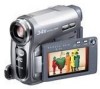
... USB connector Display: Must be capable of the software license. System Requirements Ⅲ Windows® The following requirements must be satisfied to connect a camcorder to a PC and to a PC. OS: Windows® 2000 Professional (2000) (pre-installed), Windows® XP Home Edition (XP) (pre....co.jp/ english/worldmap/index-e.html), please fill out the following requirements must be satisfied to connect a camcorder to use Digital Photo Navigator. JVC cannot answer questions regarding specifications or performance of their subject matter. Hardware: iMac, iBook, Power Mac G4 or ...
... USB connector Display: Must be capable of the software license. System Requirements Ⅲ Windows® The following requirements must be satisfied to connect a camcorder to a PC and to a PC. OS: Windows® 2000 Professional (2000) (pre-installed), Windows® XP Home Edition (XP) (pre....co.jp/ english/worldmap/index-e.html), please fill out the following requirements must be satisfied to connect a camcorder to use Digital Photo Navigator. JVC cannot answer questions regarding specifications or performance of their subject matter. Hardware: iMac, iBook, Power Mac G4 or ...

Software Guide
Page 7
...When using Windows Explorer] and click [OK]. The [Removable Disk] icon which represents the memory card in the camcorder appears in the camcorder. 2 Set the camcorder's VIDEO/ MEMORY Switch to "MEMORY". 3 Set the camcorder's Power Switch to view files using Windows® 2000: 1 Double-click the [My Computer] icon on .... Connector 1 To assure safety, make sure all units are turned off before making any connections. 2 Use the USB cable to connect the camcorder to the PC, not through a USB hub, compatibility issues between the hub and the PC may result in instability in the operation of ...
...When using Windows Explorer] and click [OK]. The [Removable Disk] icon which represents the memory card in the camcorder appears in the camcorder. 2 Set the camcorder's VIDEO/ MEMORY Switch to "MEMORY". 3 Set the camcorder's Power Switch to view files using Windows® 2000: 1 Double-click the [My Computer] icon on .... Connector 1 To assure safety, make sure all units are turned off before making any connections. 2 Use the USB cable to connect the camcorder to the PC, not through a USB hub, compatibility issues between the hub and the PC may result in instability in the operation of ...

Software Guide
Page 8
... folder. ● To copy still images: Copy the folder within the [DCIM] folder. The folders in the memory "Viewing the Contents of the camcorder, and the folder is displayed on the PC. NOTE: Never disconnect the USB cable while " " is copied from the memory card to the PC...®)" card appear. (੬ pg. 6). You may not be copied to the PC and played 2 Double-click the [Removable Disk] back on the camcorder's LCD monitor. -7- icon. 1 Perform the procedure in 6 The folders in the memory card appear. 2 Create a new folder, enter the folder name, and then...
... folder. ● To copy still images: Copy the folder within the [DCIM] folder. The folders in the memory "Viewing the Contents of the camcorder, and the folder is displayed on the PC. NOTE: Never disconnect the USB cable while " " is copied from the memory card to the PC...®)" card appear. (੬ pg. 6). You may not be copied to the PC and played 2 Double-click the [Removable Disk] back on the camcorder's LCD monitor. -7- icon. 1 Perform the procedure in 6 The folders in the memory card appear. 2 Create a new folder, enter the folder name, and then...

Software Guide
Page 9
... memory cards or turning off the PC, first disconnect the USB cable and turn off . 2 Double- currently displayed on the connected camcorder. monitor of the camcorder. ● If " " is not *The model name depends on the LCD 5 Disconnect the USB cable. To view a still...Select [USB Mass Storage Device] or [USB Disk], and then click [Stop]. The [Stop a Hardware device] dialog box appears. -8- The camcorder turns off the camcorder. 1 Confirm that can handle the JPEG click [Close]. click the [Safely Remove Hardware] or [Unplug or Eject Hardware] icon in the status...
... memory cards or turning off the PC, first disconnect the USB cable and turn off . 2 Double- currently displayed on the connected camcorder. monitor of the camcorder. ● If " " is not *The model name depends on the LCD 5 Disconnect the USB cable. To view a still...Select [USB Mass Storage Device] or [USB Disk], and then click [Stop]. The [Stop a Hardware device] dialog box appears. -8- The camcorder turns off the camcorder. 1 Confirm that can handle the JPEG click [Close]. click the [Safely Remove Hardware] or [Unplug or Eject Hardware] icon in the status...

Software Guide
Page 10
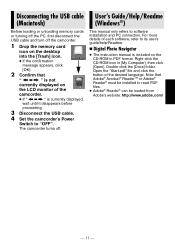
... of a Memory Card (Macintosh) 1 Make sure that there is connected, turning on or off before making any connections. 2 Use the USB cable to connect the camcorder to the PC through the hub. ● Do not use the AC Adapter as the power supply instead of the battery pack. ● When the... the PC with DPOF setting data -9- The memory card icon appears on the desktop. ● Depending on the type of the PC. Camcorder USB Cable To USB Connector PC To USB Connector 1 To assure safety, make sure all units are stored in different folders. [DCIM]: Contains folders with ...
... of a Memory Card (Macintosh) 1 Make sure that there is connected, turning on or off before making any connections. 2 Use the USB cable to connect the camcorder to the PC through the hub. ● Do not use the AC Adapter as the power supply instead of the battery pack. ● When the... the PC with DPOF setting data -9- The memory card icon appears on the desktop. ● Depending on the type of the PC. Camcorder USB Cable To USB Connector PC To USB Connector 1 To assure safety, make sure all units are stored in different folders. [DCIM]: Contains folders with ...

Software Guide
Page 11
... to the PC (Macintosh) Still image files that can cause problems with the camcorder first. The folders in the memory card appear. 2 Create a new folder, enter the folder name..., and then doubleclick it through the camcorder. ● Never disconnect the USB cable while " " is displayed on the application icon. To ...image, either double-click the still image file (extension ".jpg"), or drag and drop the file on the camcorder's LCD monitor. - 10 - You may not be copied, and then drag and drop that folder in the...
... to the PC (Macintosh) Still image files that can cause problems with the camcorder first. The folders in the memory card appear. 2 Create a new folder, enter the folder name..., and then doubleclick it through the camcorder. ● Never disconnect the USB cable while " " is displayed on the application icon. To ...image, either double-click the still image file (extension ".jpg"), or drag and drop the file on the camcorder's LCD monitor. - 10 - You may not be copied, and then drag and drop that folder in the...
Software Guide
Page 12
...or turning off the PC, first disconnect the USB cable and turn off . Right-click the CD-ROM icon in PDF format. The camcorder turns off the camcorder. 1 Drop the memory card icon on the desktop into the [Trash] icon. ● If the confirmation message appears, click [OK].... is currently displayed, wait until it disappears before proceeding. 3 Disconnect the USB cable. 4 Set the camcorder's Power Switch to "OFF". Note that " " is not currently displayed on the LCD monitor of the camcorder. ● If " " is included on the CD-ROM in [My Computer], then click [Open...
...or turning off the PC, first disconnect the USB cable and turn off . Right-click the CD-ROM icon in PDF format. The camcorder turns off the camcorder. 1 Drop the memory card icon on the desktop into the [Trash] icon. ● If the confirmation message appears, click [OK].... is currently displayed, wait until it disappears before proceeding. 3 Disconnect the USB cable. 4 Set the camcorder's Power Switch to "OFF". Note that " " is not currently displayed on the LCD monitor of the camcorder. ● If " " is included on the CD-ROM in [My Computer], then click [Open...
Instructions
Page 1
... Serial No. To deactivate the demonstration, set "DEMO MODE" to ensure safe use of the camcorder. Retain this information for purchasing this product. which is located on the bottom of this digital video camera. DIGITAL VIDEO CAMERA GR-D775U INSTRUCTIONS Dear Customer, Thank you for future reference. Serial No. Before use, please read...
... Serial No. To deactivate the demonstration, set "DEMO MODE" to ensure safe use of the camcorder. Retain this information for purchasing this product. which is located on the bottom of this digital video camera. DIGITAL VIDEO CAMERA GR-D775U INSTRUCTIONS Dear Customer, Thank you for future reference. Serial No. Before use, please read...
Instructions
Page 2
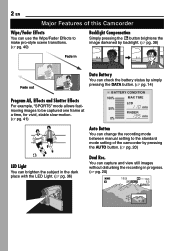
min 640F 13 PHOTO You can brighten the subject in progress. (੬ pg. 20) 16:9 --- 2 EN Major Features of this Camcorder Wipe/Fader Effects You can use the Wipe/Fader Effects to make pro-style scene transitions. (੬ pg. 40) Backlight Compensation Simply pressing the button...% MAX TIME LCD 50% min FINDER 0% min Auto Button You can change the recording mode between manual setting to the standard mode setting of the camcorder by pressing the AUTO button. (੬ pg. 20) LED Light You can capture and view still images without disturbing the recording in the dark place...
min 640F 13 PHOTO You can brighten the subject in progress. (੬ pg. 20) 16:9 --- 2 EN Major Features of this Camcorder Wipe/Fader Effects You can use the Wipe/Fader Effects to make pro-style scene transitions. (੬ pg. 40) Backlight Compensation Simply pressing the button...% MAX TIME LCD 50% min FINDER 0% min Auto Button You can change the recording mode between manual setting to the standard mode setting of the camcorder by pressing the AUTO button. (੬ pg. 20) LED Light You can capture and view still images without disturbing the recording in the dark place...
Instructions
Page 3
... The LCD monitor is recommended only genuine JVC batteries and accessories are used your cassette tapes and camcorder are either registered trademarks or trademarks of Microsoft Corporation in the proper environment. Store the camcorder in this camcorder. ● This product includes patented and ... are stored in a dusty area. Any commercial use JVC brand cassette tapes. in summer. - However, black spots or bright spots of Apple Computer, Inc. ● QuickTime is strongly recommended that this camcorder is not compatible with a cleaning cassette (optional). &#...
... The LCD monitor is recommended only genuine JVC batteries and accessories are used your cassette tapes and camcorder are either registered trademarks or trademarks of Microsoft Corporation in the proper environment. Store the camcorder in this camcorder. ● This product includes patented and ... are stored in a dusty area. Any commercial use JVC brand cassette tapes. in summer. - However, black spots or bright spots of Apple Computer, Inc. ● QuickTime is strongly recommended that this camcorder is not compatible with a cleaning cassette (optional). &#...

Instructions
Page 4
...of injury. The apparatus shall not be used in fire. CAUTION! Use the JVC BN-VF808U/VF815U/VF823U battery packs and, to recharge them or to supply power to the camcorder from children. ● Do not disassemble and do not place any containers fi... signals. Connecting cables (Audio/Video, S-Video, etc.) to the camcorder and leaving it has sufficient space on all sides to fall, resulting in the literature accompanying the appliance. Replace battery with JVC Data Battery. When discarding batteries, environmental problems must be considered and...
...of injury. The apparatus shall not be used in fire. CAUTION! Use the JVC BN-VF808U/VF815U/VF823U battery packs and, to recharge them or to supply power to the camcorder from children. ● Do not disassemble and do not place any containers fi... signals. Connecting cables (Audio/Video, S-Video, etc.) to the camcorder and leaving it has sufficient space on all sides to fall, resulting in the literature accompanying the appliance. Replace battery with JVC Data Battery. When discarding batteries, environmental problems must be considered and...

Instructions
Page 5
IMPORTANT SAFETY INSTRUCTIONS 1. Follow all warnings. 4. Install in accordance with a dry cloth. Refer all servicing to wipe off the camcorder and remove the battery pack and AC Adapter. Put the cloth in any way, such as power-supply cord or plug is damaged,... storms or when unused for long periods of each product. ● To clean the viewfinder, please consult your nearest JVC dealer. USER MAINTENANCE EN 5 Cleaning The Camcorder Before cleaning, turn off heavy dirt. Then wipe again with the manufacturer's instructions. 8. To clean the lens Blow it well ...
IMPORTANT SAFETY INSTRUCTIONS 1. Follow all warnings. 4. Install in accordance with a dry cloth. Refer all servicing to wipe off the camcorder and remove the battery pack and AC Adapter. Put the cloth in any way, such as power-supply cord or plug is damaged,... storms or when unused for long periods of each product. ● To clean the viewfinder, please consult your nearest JVC dealer. USER MAINTENANCE EN 5 Cleaning The Camcorder Before cleaning, turn off heavy dirt. Then wipe again with the manufacturer's instructions. 8. To clean the lens Blow it well ...

Instructions
Page 7
... unit) Shoulder Strap (੬ pg. 12) Lens Cap (੬ pg. 12) * A lithium battery is pre-installed in the Remote Control Unit at time of the camcorder, provided cables may be equipped with insulation sheet). To use any other cables. NOTES: ● In order to maintain optimum performance of shipment (with one... core filter, the end that is closest to the filter should be connected to the camcorder. ● Make sure to select SET: SET Lithium Battery CR2025* (for connections.
... unit) Shoulder Strap (੬ pg. 12) Lens Cap (੬ pg. 12) * A lithium battery is pre-installed in the Remote Control Unit at time of the camcorder, provided cables may be equipped with insulation sheet). To use any other cables. NOTES: ● In order to maintain optimum performance of shipment (with one... core filter, the end that is closest to the filter should be connected to the camcorder. ● Make sure to select SET: SET Lithium Battery CR2025* (for connections.

Instructions
Page 8
... desired mode in the viewfinder. Set "PRIORITY" to use. Power-linked operation When the power switch is opened, you can also turn the camcorder on/off by opening/ closing the LCD monitor or pulling out/pushing in SYSTEM Menu. (੬ pg. 34) ● Colored bright spots may appear all...
... desired mode in the viewfinder. Set "PRIORITY" to use. Power-linked operation When the power switch is opened, you can also turn the camcorder on/off by opening/ closing the LCD monitor or pulling out/pushing in SYSTEM Menu. (੬ pg. 34) ● Colored bright spots may appear all...
Instructions
Page 9
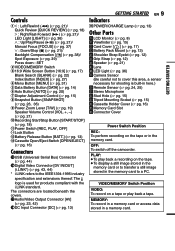
...; To display a still image stored in the memory card or to transfer a still image stored in a memory card. GETTING STARTED OFF: To switch off the camcorder. Controls 11 : Left/Rewind (1) (੬ pg. 21)/ Quick Review [QUICK REVIEW] (੬ pg. 18) 2 : Right/Fast-Forward (¡) (੬ pg. 21)/ LED Light [LIGHT] (੬...
...; To display a still image stored in the memory card or to transfer a still image stored in a memory card. GETTING STARTED OFF: To switch off the camcorder. Controls 11 : Left/Rewind (1) (੬ pg. 21)/ Quick Review [QUICK REVIEW] (੬ pg. 18) 2 : Right/Fast-Forward (¡) (੬ pg. 21)/ LED Light [LIGHT] (੬...

Instructions
Page 10
...) (੬ pg. 33) (only LP indicator is displayed) "SOUND 12BIT/16BIT: Sound Mode Indicator (੬ pg. 33) (Appears for approx. 5 seconds after turning on the camcorder.) During Both Video And D.S.C. "# $ 1 2M 3 4 5 6 7 8 10 x 640F 15 % PHOTO & 3( 11 : 13 AM DEC . 6 . 2007 ~ ) 1Battery Remaining Power Indicator 2Operation Mode (੬ pg. 20) A : Auto Mode...
...) (੬ pg. 33) (only LP indicator is displayed) "SOUND 12BIT/16BIT: Sound Mode Indicator (੬ pg. 33) (Appears for approx. 5 seconds after turning on the camcorder.) During Both Video And D.S.C. "# $ 1 2M 3 4 5 6 7 8 10 x 640F 15 % PHOTO & 3( 11 : 13 AM DEC . 6 . 2007 ~ ) 1Battery Remaining Power Indicator 2Operation Mode (੬ pg. 20) A : Auto Mode...

Instructions
Page 12
... Strap 1 Peel off the pad and thread the end of the strap through the buckle, adjust its length, and use the strap guide to the camcorder as shown in place. Grip Adjustment Open the pad and make sure the cap is on correctly make grip adjustments. ● Before making the adjustment...
... Strap 1 Peel off the pad and thread the end of the strap through the buckle, adjust its length, and use the strap guide to the camcorder as shown in place. Grip Adjustment Open the pad and make sure the cap is on correctly make grip adjustments. ● Before making the adjustment...

Instructions
Page 13
...fire. BN-VF823U Approx. 3 hrs. 50 min. * Provided GETTING STARTED EN 13 NOTES: ● If the protective cap is performed, the camcorder will blink for the first time or after having been fully charged, the battery is finished. Battery pack Charging time BN-VF808U* Approx.... 1 hr. 30 min. Do not allow the battery or its power supplied from the camcorder, then try charging again. ● If a fully charged battery pack is attached to the unit, POWER/CHARGE lamp will automatically turn off . ●...
...fire. BN-VF823U Approx. 3 hrs. 50 min. * Provided GETTING STARTED EN 13 NOTES: ● If the protective cap is performed, the camcorder will blink for the first time or after having been fully charged, the battery is finished. Battery pack Charging time BN-VF808U* Approx.... 1 hr. 30 min. Do not allow the battery or its power supplied from the camcorder, then try charging again. ● If a fully charged battery pack is attached to the unit, POWER/CHARGE lamp will automatically turn off . ●...

Instructions
Page 14
... you prepare enough battery packs to the normal screen. ● Data battery status cannot be a problem with your nearest JVC dealer. When the battery is reduced significantly under the following explanations in this manual supposes the use the viewfi...planned shooting time. NOTE: The provided AC Adapter features automatic voltage selection in progress. ● If "COMMUNICATION ERROR" appears instead of LCD monitor in a camcorder malfunction. BN-VF823U 5 hrs. 30 min. 6 hrs. 45 min. * Provided NOTES: ● Recording time is attached, press DATA. Using AC ...
... you prepare enough battery packs to the normal screen. ● Data battery status cannot be a problem with your nearest JVC dealer. When the battery is reduced significantly under the following explanations in this manual supposes the use the viewfi...planned shooting time. NOTE: The provided AC Adapter features automatic voltage selection in progress. ● If "COMMUNICATION ERROR" appears instead of LCD monitor in a camcorder malfunction. BN-VF823U 5 hrs. 30 min. 6 hrs. 45 min. * Provided NOTES: ● Recording time is attached, press DATA. Using AC ...

Instructions
Page 15
... monitor is recorded onto the tape at all times, but its display can be turned on the camcorder. Then tighten the screw clockwise. ● Some tripods are clearly focused. Tripod Mounting To attach the camcorder to a tripod, align the direction stud and screw to pinch your fingers. Example: GETTING STARTED EN...
... monitor is recorded onto the tape at all times, but its display can be turned on the camcorder. Then tighten the screw clockwise. ● Some tripods are clearly focused. Tripod Mounting To attach the camcorder to a tripod, align the direction stud and screw to pinch your fingers. Example: GETTING STARTED EN...


