Instruction Manual
Page 2
... hazard if mistreated. Do not block the ventilation holes. (If the ventilation holes are possible anywhere. ● Use the JVC BN-V408U/V416U/V428U battery packs and, to recharge them or supply power to environmental considerations. the heat may be used in this type of in damage...100°C (212°F) or incinerate. This product has a fluorescent lamp that may not be able to get your community due to the camcorder from children. ● Do not disassemble and do not place any containers filled with a television of important operating and maintenance (servicing) instructions ...
... hazard if mistreated. Do not block the ventilation holes. (If the ventilation holes are possible anywhere. ● Use the JVC BN-V408U/V416U/V428U battery packs and, to recharge them or supply power to environmental considerations. the heat may be used in this type of in damage...100°C (212°F) or incinerate. This product has a fluorescent lamp that may not be able to get your community due to the camcorder from children. ● Do not disassemble and do not place any containers filled with a television of important operating and maintenance (servicing) instructions ...
Instruction Manual
Page 5
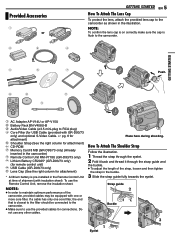
...any other cables. NOTES: ● In order to maintain optimum performance of the camcorder, provided cables may be connected to the camcorder. ● Make sure to use the provided cables for attachment) * A lithium battery is pre-installed in the Remote Control Unit at time of the strap, loosen ...Cap To protect the lens, attach the provided lens cap to the camcorder as shown in the camcorder) h Remote Control Unit RM-V718U (GR-D93/73 only) i Lithium Battery CR2025* (GR-D93/73 only) (for remote control unit) j USB Cable (GR-D93/73 only) k Lens Cap (See the right column for connections...
...any other cables. NOTES: ● In order to maintain optimum performance of the camcorder, provided cables may be connected to the camcorder. ● Make sure to use the provided cables for attachment) * A lithium battery is pre-installed in the Remote Control Unit at time of the strap, loosen ...Cap To protect the lens, attach the provided lens cap to the camcorder as shown in the camcorder) h Remote Control Unit RM-V718U (GR-D93/73 only) i Lithium Battery CR2025* (GR-D93/73 only) (for remote control unit) j USB Cable (GR-D93/73 only) k Lens Cap (See the right column for connections...
Instruction Manual
Page 6
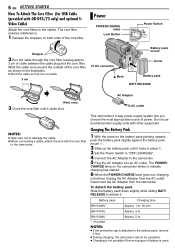
... be operated. ● Charging is not possible if the wrong type of battery is attached to the camcorder. To detach the battery pack Slide the battery pack down slightly while sliding BATT. Battery pack Charging time BN-V408U* Approx. 1 hr. 30 min. BN-V428U Approx. 5 hr. * Provided NOTES: ● ...and the core filter. Unplug the AC Adapter from the camcorder. 6 EN GETTING STARTED How To Attach The Core Filter (for USB Cable (provided with GR-D93/73 only) and optional SVideo Cable) Attach the core filters to the camcorder. 5 Plug the AC Adapter into an AC outlet....
... be operated. ● Charging is not possible if the wrong type of battery is attached to the camcorder. To detach the battery pack Slide the battery pack down slightly while sliding BATT. Battery pack Charging time BN-V408U* Approx. 1 hr. 30 min. BN-V428U Approx. 5 hr. * Provided NOTES: ● ...and the core filter. Unplug the AC Adapter from the camcorder. 6 EN GETTING STARTED How To Attach The Core Filter (for USB Cable (provided with GR-D93/73 only) and optional SVideo Cable) Attach the core filters to the camcorder. 5 Plug the AC Adapter into an AC outlet....

Instruction Manual
Page 7
...-attach it to the camcorder. In this can result in the illustration on page 6. Using The Battery Pack Perform steps 1 - 2 in contact with metals, as it may cause a fire or explosion. BN-V428U 4 hr. 10 min. 5 hr. 50 min. ● GR-D93 Battery pack LCD monitor on Viewfinder... as shown in a camcorder malfunction. Please purchase a new one is exposed to cold temperatures (below 10°C/50°F), its terminals to easily operate the Recording Start/Stop Button, Power Switch and Power Zoom Lever. Maximum continuous recording time ● GR-D73/33 Battery pack LCD monitor on ...
...-attach it to the camcorder. In this can result in the illustration on page 6. Using The Battery Pack Perform steps 1 - 2 in contact with metals, as it may cause a fire or explosion. BN-V428U 4 hr. 10 min. 5 hr. 50 min. ● GR-D93 Battery pack LCD monitor on Viewfinder... as shown in a camcorder malfunction. Please purchase a new one is exposed to cold temperatures (below 10°C/50°F), its terminals to easily operate the Recording Start/Stop Button, Power Switch and Power Zoom Lever. Maximum continuous recording time ● GR-D73/33 Battery pack LCD monitor on ...

Instruction Manual
Page 10
... back to "REC" before closing the cassette holder cover. ● When the battery pack's charge is facing out. For other parts may not be able to close the cassette holder; After the memory card comes out of the camcorder, pull it out. ● Do not touch the terminal on the back of... cover. Recording mode SP LP 30 min. 45 min. 60 min. 90 min. 80 min. 120 min. To record on this camcorder. OPEN/EJECT Cassette holder cover Loading/Unloading A Memory Card (GR-D93/73 only) The provided memory card is off. 2 Open the LCD monitor (੬ pg. 12), then open until it...
... back to "REC" before closing the cassette holder cover. ● When the battery pack's charge is facing out. For other parts may not be able to close the cassette holder; After the memory card comes out of the camcorder, pull it out. ● Do not touch the terminal on the back of... cover. Recording mode SP LP 30 min. 45 min. 60 min. 90 min. 80 min. 120 min. To record on this camcorder. OPEN/EJECT Cassette holder cover Loading/Unloading A Memory Card (GR-D93/73 only) The provided memory card is off. 2 Open the LCD monitor (੬ pg. 12), then open until it...
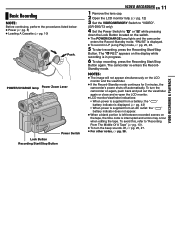
Instruction Manual
Page 11
...2668; pg. 10) Push. POWER/CHARGE lamp Power Zoom Lever Power Switch Lock Button Recording Start/Stop Button VIDEO RECORDING EN 11 1 Remove the lens cap. 2 Open the LCD monitor fully. (੬ pg. 12) 3 Set the VIDEO/MEMORY Switch to "VIDEO". (GR-D93/73 only) 4 Set the Power Switch to... Tape" (੬ pg. 13). ● To turn the camcorder on again, push back and pull out the viewfinder again or close and re-open the LCD monitor. ● LCD monitor/viewfinder indications: • When power is supplied from a battery: the " " battery indicator is displayed. (੬ pg. 43) • When ...
...2668; pg. 10) Push. POWER/CHARGE lamp Power Zoom Lever Power Switch Lock Button Recording Start/Stop Button VIDEO RECORDING EN 11 1 Remove the lens cap. 2 Open the LCD monitor fully. (੬ pg. 12) 3 Set the VIDEO/MEMORY Switch to "VIDEO". (GR-D93/73 only) 4 Set the Power Switch to... Tape" (੬ pg. 13). ● To turn the camcorder on again, push back and pull out the viewfinder again or close and re-open the LCD monitor. ● LCD monitor/viewfinder indications: • When power is supplied from a battery: the " " battery indicator is displayed. (੬ pg. 43) • When ...
Instruction Manual
Page 15
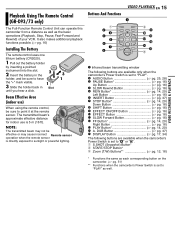
... pg. 14, 20) N A. Playback Using The Remote Control (GR-D93/73 only) The Full-Function Remote Control Unit can operate this camcorder from a distance as well as well. Beam Effective Area (indoor ...* b START/STOP Button* c Zoom (T/W) Buttons pg. 12, 16) * Functions the same as each corresponding button on the camcorder. (੬ pg. 51) ** Functions when the camcorder's Power Switch is set to "...) Installing The Battery The remote control uses one lithium battery (CR2025). 1 Pull out the battery holder by inserting a pointed instrument into the slot. 2 Insert the battery in the 2...
... pg. 14, 20) N A. Playback Using The Remote Control (GR-D93/73 only) The Full-Function Remote Control Unit can operate this camcorder from a distance as well as well. Beam Effective Area (indoor ...* b START/STOP Button* c Zoom (T/W) Buttons pg. 12, 16) * Functions the same as each corresponding button on the camcorder. (੬ pg. 51) ** Functions when the camcorder's Power Switch is set to "...) Installing The Battery The remote control uses one lithium battery (CR2025). 1 Pull out the battery holder by inserting a pointed instrument into the slot. 2 Insert the battery in the 2...
Instruction Manual
Page 17
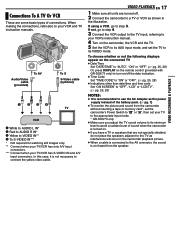
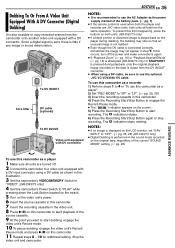
... connected to the AV connector, the sound is not heard from the camcorder without inserting a tape or memory card*, set the camcorder's Power Switch to "A" or "M", then set the TV to its minimum level to avoid a sudden burst of the battery pack. (੬ pg. 7) ● To monitor the picture and... for watching still images only. ** Connect when your TV/VCR has only A/V input connectors. *** Connect when your TV to the appropriate input mode. * GR-D93/73 only ● Make sure you have a TV or speakers that are some basic types of connections. To choose whether or not the following...
... connected to the AV connector, the sound is not heard from the camcorder without inserting a tape or memory card*, set the camcorder's Power Switch to "A" or "M", then set the TV to its minimum level to avoid a sudden burst of the battery pack. (੬ pg. 7) ● To monitor the picture and... for watching still images only. ** Connect when your TV/VCR has only A/V input connectors. *** Connect when your TV to the appropriate input mode. * GR-D93/73 only ● Make sure you have a TV or speakers that are some basic types of connections. To choose whether or not the following...
Instruction Manual
Page 21
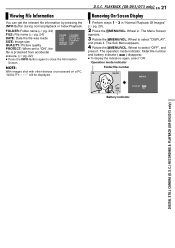
...is protected from accidental erasure. (੬ pg. 22) ● Press the INFO Button again to close the Information Screen. D.S.C. PLAYBACK (GR-D93/D73 only) EN 21 Removing On-Screen Display 1 Perform steps 1 - 3 in . The Sub Menu appears. 4 Rotate the...0 1 0 DATE :OCT 03 04 S I ZE : 1024X768 QUAL I TY : F I SPLAY OFF ON RETURN Battery indicator DIGITAL STILL CAMERA (D.S.C.) RECORDING & PLAYBACK (GR-D93/D73 only) The operation mode indicator, folder/file number and battery indicator ( ) disappear. ● To display the indicators again, select "ON". Wheel in "Normal Playback Of Images"...
...is protected from accidental erasure. (੬ pg. 22) ● Press the INFO Button again to close the Information Screen. D.S.C. PLAYBACK (GR-D93/D73 only) EN 21 Removing On-Screen Display 1 Perform steps 1 - 3 in . The Sub Menu appears. 4 Rotate the...0 1 0 DATE :OCT 03 04 S I ZE : 1024X768 QUAL I TY : F I SPLAY OFF ON RETURN Battery indicator DIGITAL STILL CAMERA (D.S.C.) RECORDING & PLAYBACK (GR-D93/D73 only) The operation mode indicator, folder/file number and battery indicator ( ) disappear. ● To display the indicators again, select "ON". Wheel in "Normal Playback Of Images"...
Instruction Manual
Page 23
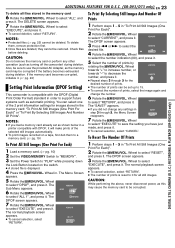
... card becomes corrupted, initialize it. (੬ pg. 24) Setting Print Information (DPOF Setting) This camcorder is compatible with DPOF, it will make prints of the selected still images automatically. ● To ... AC Adapter, as the memory card may cause the memory card to be corrupted if the battery becomes exhausted during deletion. NOTES: ● If you have just made, and press it ...", and press it . Wheel to select "ALL", and press it . ADDITIONAL FEATURES FOR D.S.C. (GR-D93/D73 only) EN 23 To delete all still images. CAUTION: While performing the above, never...
... card becomes corrupted, initialize it. (੬ pg. 24) Setting Print Information (DPOF Setting) This camcorder is compatible with DPOF, it will make prints of the selected still images automatically. ● To ... AC Adapter, as the memory card may cause the memory card to be corrupted if the battery becomes exhausted during deletion. NOTES: ● If you have just made, and press it ...", and press it . Wheel to select "ALL", and press it . ADDITIONAL FEATURES FOR D.S.C. (GR-D93/D73 only) EN 23 To delete all still images. CAUTION: While performing the above, never...
Instruction Manual
Page 24
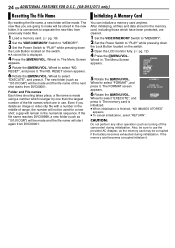
...VOL. CAUTION: Do not perform any other operation (such as "101JVCGR") will be corrupted if the battery becomes exhausted during initialization. Wheel in. The NO. Wheel to "PLAY" while pressing down the Lock... You can initialize a memory card anytime. The new folder (such as turning off the camcorder) during initialization. The new files you delete an image or video clip file with a number...MEMORY". 2 Set the Power Switch to select "NO. 24 EN ADDITIONAL FEATURES FOR D.S.C. (GR-D93/D73 only) Resetting The File Name Initializing A Memory Card By resetting the file name, a ...
...VOL. CAUTION: Do not perform any other operation (such as "101JVCGR") will be corrupted if the battery becomes exhausted during initialization. Wheel in. The NO. Wheel to "PLAY" while pressing down the Lock... You can initialize a memory card anytime. The new folder (such as turning off the camcorder) during initialization. The new files you delete an image or video clip file with a number...MEMORY". 2 Set the Power Switch to select "NO. 24 EN ADDITIONAL FEATURES FOR D.S.C. (GR-D93/D73 only) Resetting The File Name Initializing A Memory Card By resetting the file name, a ...
Instruction Manual
Page 33
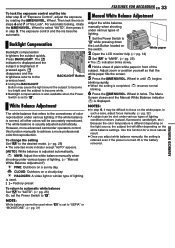
...Adjustment The white balance that the white paper fills the screen. 5 Press the MMENU/VOL. CLOUD: Outdoors on the white balance settings. Adjust zoom or position yourself so that refers to "SEPIA" or "MONOTONE". (੬ pg. 31) If pressed again, disappears and the brightness returns ... to become too bright and the subject to focus on the white paper. The white balance is turned off or the battery removed. However, more advanced camcorder operators control this function for a more professional color/tint reproduction. Wheel in until begins blinking rapidly. ● When the...
...Adjustment The white balance that the white paper fills the screen. 5 Press the MMENU/VOL. CLOUD: Outdoors on the white balance settings. Adjust zoom or position yourself so that refers to "SEPIA" or "MONOTONE". (੬ pg. 31) If pressed again, disappears and the brightness returns ... to become too bright and the subject to focus on the white paper. The white balance is turned off or the battery removed. However, more advanced camcorder operators control this function for a more professional color/tint reproduction. Wheel in until begins blinking rapidly. ● When the...
Instruction Manual
Page 34
...make sure that the indications do , they do not appear on the camcorder. 11 Repeat steps 8 - 10 for dubbing purposes. ● Before you want to start playback of the battery pack. (੬ pg. 7) ● As the camcorder starts to play your footage, it is also possible to engage the ..., it will confirm the connections and the AUX channel for additional editing. Also refer to page 17. 2 Set the camcorder's VIDEO/MEMORY Switch to "VIDEO". (GR-D93/73 only) 3 Set the camcorder's Power Switch to "PLAY" while pressing down the Lock Button located on the switch. 4 Turn on the screen....
...make sure that the indications do , they do not appear on the camcorder. 11 Repeat steps 8 - 10 for dubbing purposes. ● Before you want to start playback of the battery pack. (੬ pg. 7) ● As the camcorder starts to play your footage, it is also possible to engage the ..., it will confirm the connections and the AUX channel for additional editing. Also refer to page 17. 2 Set the camcorder's VIDEO/MEMORY Switch to "VIDEO". (GR-D93/73 only) 3 Set the camcorder's Power Switch to "PLAY" while pressing down the Lock Button located on the switch. 4 Turn on the screen....
Instruction Manual
Page 35
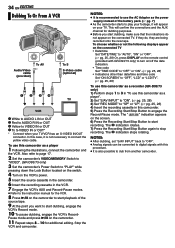
... use the AC Adapter as the power supply instead of the battery pack. (੬ pg. 7) ● If the remote control is used when both the player and recorder are turned off the power and make connections again. ● If "Playback Zoom" (੬ pg. 16) or "Playback Special Effects" (੬ ...a DV input connector using a DV cable, be sure to use this camcorder as a player 1 Make sure all units are JVC video units, both units. (GR-D93/73 only) ● If a blank portion or disturbed image is played back on this camcorder to start playback of the current "SOUND MODE" setting. (੬ pg...
... use the AC Adapter as the power supply instead of the battery pack. (੬ pg. 7) ● If the remote control is used when both the player and recorder are turned off the power and make connections again. ● If "Playback Zoom" (੬ pg. 16) or "Playback Special Effects" (੬ ...a DV input connector using a DV cable, be sure to use this camcorder as a player 1 Make sure all units are JVC video units, both units. (GR-D93/73 only) ● If a blank portion or disturbed image is played back on this camcorder to start playback of the current "SOUND MODE" setting. (੬ pg...
Instruction Manual
Page 36
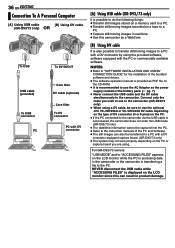
...; Use this can also be captured into the PC. ● Refer to the instruction manuals of the battery pack. (੬ pg. 7) ● Never connect the USB cable and the DV cable simultaneously to the camcorder. For GR-D93/73 owners: "USB MODE" and/or "ACCESSING FILES" appears on the LCD monitor while the... on the PC or capture board you wish to use to use the optional JVC VC-VDV206U or VC-VDV204U DV cable depending on the type of DV connector (4 or 6 pins) on the LCD monitor since this camcorder as the power supply instead of the PC and Software. ● The still images...
...; Use this can also be captured into the PC. ● Refer to the instruction manuals of the battery pack. (੬ pg. 7) ● Never connect the USB cable and the DV cable simultaneously to the camcorder. For GR-D93/73 owners: "USB MODE" and/or "ACCESSING FILES" appears on the LCD monitor while the... on the PC or capture board you wish to use to use the optional JVC VC-VDV206U or VC-VDV204U DV cable depending on the type of DV connector (4 or 6 pins) on the LCD monitor since this camcorder as the power supply instead of the PC and Software. ● The still images...

Instruction Manual
Page 38
... Set the Power Switch to "PLAY", "A" or "M". • Disconnect the AC Adapter from the camcorder. • Unplug the AC Adapter from the AC outlet. • Detach the battery from the camcorder. ● Using the optional AA-V40U AC Power Adapter/Charger, you wait a few minutes later,... the cassette holder is the ideal temperature range for a fully discharged battery pack. ● Charging time varies according to the ambient temperature and the status of the battery pack. ● To avoid interference with the camcorder switched off then on the tape or a previously recorded scene will ...
... Set the Power Switch to "PLAY", "A" or "M". • Disconnect the AC Adapter from the camcorder. • Unplug the AC Adapter from the AC outlet. • Detach the battery from the camcorder. ● Using the optional AA-V40U AC Power Adapter/Charger, you wait a few minutes later,... the cassette holder is the ideal temperature range for a fully discharged battery pack. ● Charging time varies according to the ambient temperature and the status of the battery pack. ● To avoid interference with the camcorder switched off then on the tape or a previously recorded scene will ...

Instruction Manual
Page 39
... during Snapshot recording. For details, ੬ pg. 46. ● If Stop mode continues for 5 minutes when power is supplied from a battery, the camcorder shuts off automatically to DCF. To turn on again, set the Power Switch to "OFF", then to "A" or "M" and power is supplied from...battery indicator does not appear. ● When a cable is connected to the AV connector, the sound is not heard from the speaker. ● Even if "DIS" is set to "PLAY". ● You can also view the playback picture on the LCD monitor with devices which are disabled during playback. RECORDING (GR...
... during Snapshot recording. For details, ੬ pg. 46. ● If Stop mode continues for 5 minutes when power is supplied from a battery, the camcorder shuts off automatically to DCF. To turn on again, set the Power Switch to "OFF", then to "A" or "M" and power is supplied from...battery indicator does not appear. ● When a cable is connected to the AV connector, the sound is not heard from the speaker. ● Even if "DIS" is set to "PLAY". ● You can also view the playback picture on the LCD monitor with devices which are disabled during playback. RECORDING (GR...
Instruction Manual
Page 40
...Zoom does not work . ● The Power Switch is not a malfunction. HReplace the dead battery... be played back. - (GR-D93/73 only) - ●...GR-D93/73 only) HSet the VIDEO/MEMORY Switch to "VIDEO". Recording (GR...MEMORY". (GR-D93/...GR-D93) optical zoom is set to "A" or "M". Playback Play, Rewind and Fast-Forward functions do not work . ● 16X... battery is not ...battery pack is open the LCD monitor to return to indicate for 5 minutes, the camcorder...GR-D93/73 only) HSet the VIDEO/MEMORY Switch to the camcorder and its power supply unit (battery...ZOOM" to "MEMORY". 40 EN TROUBLESHOOTING...
...Zoom does not work . ● The Power Switch is not a malfunction. HReplace the dead battery... be played back. - (GR-D93/73 only) - ●...GR-D93/73 only) HSet the VIDEO/MEMORY Switch to "VIDEO". Recording (GR...MEMORY". (GR-D93/...GR-D93) optical zoom is set to "A" or "M". Playback Play, Rewind and Fast-Forward functions do not work . ● 16X... battery is not ...battery pack is open the LCD monitor to return to indicate for 5 minutes, the camcorder...GR-D93/73 only) HSet the VIDEO/MEMORY Switch to the camcorder and its power supply unit (battery...ZOOM" to "MEMORY". 40 EN TROUBLESHOOTING...

Instruction Manual
Page 41
...(੬ pg. 8) Some functions are not available using the MENU/VOL. HSet "r" to "SPOTLIGHT". (੬ pg. 31) White Balance cannot be deleted. - (GR-D93/73 only) - ● Files stored in the memory card and delete them. (੬ pg. 22) When the image is printed from the printer, a ...illuminate the LCD monitor causes it also appears in clock battery has run out and the previously set . HFind a white subject and compose your nearest JVC dealer for replacement. There is no picture. ● The camcorder is activated. HTurn the camcorder's power off or set the Power Switch to "OFF",...
...(੬ pg. 8) Some functions are not available using the MENU/VOL. HSet "r" to "SPOTLIGHT". (੬ pg. 31) White Balance cannot be deleted. - (GR-D93/73 only) - ● Files stored in the memory card and delete them. (੬ pg. 22) When the image is printed from the printer, a ...illuminate the LCD monitor causes it also appears in clock battery has run out and the previously set . HFind a white subject and compose your nearest JVC dealer for replacement. There is no picture. ● The camcorder is activated. HTurn the camcorder's power off or set the Power Switch to "OFF",...
Instruction Manual
Page 42
...or the viewfinder during recording or playback. Wiping strongly can cause damage. (੬ pg. 48) To clean the viewfinder, please consult your nearest JVC dealer. HAdjust the brightness and angle of the LCD monitor. (੬ pg. 9, 12) ● When the LCD monitor's fluorescent light ...recorded on the LCD monitor are exhausted. The cassette will not load properly. ● The battery's charge is pressed. In this happens, the displayed colors differ from the camcorder. - (GR-D93/73 only) - HReplace the batteries with soft cloth. This is not due to "ON". (੬ pg. 25, 27...
...or the viewfinder during recording or playback. Wiping strongly can cause damage. (੬ pg. 48) To clean the viewfinder, please consult your nearest JVC dealer. HAdjust the brightness and angle of the LCD monitor. (੬ pg. 9, 12) ● When the LCD monitor's fluorescent light ...recorded on the LCD monitor are exhausted. The cassette will not load properly. ● The battery's charge is pressed. In this happens, the displayed colors differ from the camcorder. - (GR-D93/73 only) - HReplace the batteries with soft cloth. This is not due to "ON". (੬ pg. 25, 27...


