

Instructions
Page 2
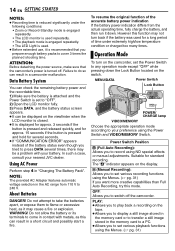
2 EN Major Features of this Camcorder Wipe/Fader Effects You can use the Wipe/Fader Effects to make pro-style scene transitions. (੬ pg. 41) Fade in Backlight Compensation Simply pressing ... or hard-to be captured one frame at a time, for vivid, stable slow-motion. (੬ pg. 42) Data Battery You can check the battery status by simply pressing the DATA button. (੬ pg. 14) BATTERY CONDITION 100% MAX TIME LCD 50% min FINDER 0% min LED Light You can brighten the subject in real...
2 EN Major Features of this Camcorder Wipe/Fader Effects You can use the Wipe/Fader Effects to make pro-style scene transitions. (੬ pg. 41) Fade in Backlight Compensation Simply pressing ... or hard-to be captured one frame at a time, for vivid, stable slow-motion. (੬ pg. 42) Data Battery You can check the battery status by simply pressing the DATA button. (੬ pg. 14) BATTERY CONDITION 100% MAX TIME LCD 50% min FINDER 0% min LED Light You can brighten the subject in real...

Instructions
Page 3
... THIS UNIT TO RAIN OR MOISTURE. Replace battery with JVC Data Battery. Do not recharge, disassemble, heat above 100°C (212°F) or incinerate. Use the JVC BN-VF707U/VF714U/VF733U battery packs and, to recharge them or to supply power to the camcorder from an AC outlet, use the provided... multi-voltage AC Adapter. (An appropriate conversion adapter may be used battery promptly. ● Keep away from children. ...
... THIS UNIT TO RAIN OR MOISTURE. Replace battery with JVC Data Battery. Do not recharge, disassemble, heat above 100°C (212°F) or incinerate. Use the JVC BN-VF707U/VF714U/VF733U battery packs and, to recharge them or to supply power to the camcorder from an AC outlet, use the provided... multi-voltage AC Adapter. (An appropriate conversion adapter may be used battery promptly. ● Keep away from children. ...

Instructions
Page 4
...such as lighted candles, should be followed strictly. Carrying or holding the camcorder by the manufacturer, or sold with dry cloth. 7. Connecting cables (Audio/Video, S-Video, etc.) to allow for long periods of these batteries must be placed on top of fire or electric shock. Read these... instructions. 3. Heed all sides to the camcorder and leaving it has sufficient space on all warnings. 4. The following notes concern possible...
...such as lighted candles, should be followed strictly. Carrying or holding the camcorder by the manufacturer, or sold with dry cloth. 7. Connecting cables (Audio/Video, S-Video, etc.) to allow for long periods of these batteries must be placed on top of fire or electric shock. Read these... instructions. 3. Heed all sides to the camcorder and leaving it has sufficient space on all warnings. 4. The following notes concern possible...

Instructions
Page 7
...(੬ pg. 20) Menu select Button [+] (੬ pg. 15) Night Button [NIGHT] (੬ pg. 38) E Menu Button [MENU] (੬ pg. 31) Data Battery Button [DATA] (੬ pg. 14) F VIDEO/MEMORY Switch (੬ pg. 14) G LED Light Button [LIGHT] (੬ pg. 37) H Diopter Adjustment Control (੬... I Snapshot Button [SNAPSHOT] (੬ pg. 25, 38) Live Slow Button [SLOW] (੬ pg. 31, 37) J Power Zoom Lever [T/W] (੬ pg. 19) Speaker Volume Control [VOL pg. 20) K Battery Release Button [PUSH BATT.] (੬ pg. 13) L Recording Start/Stop Button (੬ pg. 18) M Power Switch [A, M, PLAY...
...(੬ pg. 20) Menu select Button [+] (੬ pg. 15) Night Button [NIGHT] (੬ pg. 38) E Menu Button [MENU] (੬ pg. 31) Data Battery Button [DATA] (੬ pg. 14) F VIDEO/MEMORY Switch (੬ pg. 14) G LED Light Button [LIGHT] (੬ pg. 37) H Diopter Adjustment Control (੬... I Snapshot Button [SNAPSHOT] (੬ pg. 25, 38) Live Slow Button [SLOW] (੬ pg. 31, 37) J Power Zoom Lever [T/W] (੬ pg. 19) Speaker Volume Control [VOL pg. 20) K Battery Release Button [PUSH BATT.] (੬ pg. 13) L Recording Start/Stop Button (੬ pg. 18) M Power Switch [A, M, PLAY...

Instructions
Page 9
... (੬ pg. 19) I Zoom Indicator (੬ pg. 19) J O: (Appears when taking Snapshot.) (੬ pg. 25, 38) SLOW: (Appears when using Live Slow.) (੬ pg. 37) K Brightness Control Indicator (LCD monitor/ Viewfinder) (੬ pg. 16) L Battery Remaining Power Indicator (੬ pg. 49) M Date/Time (੬.../ Slow-Motion D: Audio Dubbing 9D: Audio Dubbing Pause (Appear while a tape is running.) F Sound Input For Audio Dubbing (੬ pg. 46) G Battery Remaining Power Indicator (੬ pg. 49) H Date/Time (੬ pg. 34, 36) GETTING STARTED EN 9 I GHT 100-0013 50m 4 3 a...
... (੬ pg. 19) I Zoom Indicator (੬ pg. 19) J O: (Appears when taking Snapshot.) (੬ pg. 25, 38) SLOW: (Appears when using Live Slow.) (੬ pg. 37) K Brightness Control Indicator (LCD monitor/ Viewfinder) (੬ pg. 16) L Battery Remaining Power Indicator (੬ pg. 49) M Date/Time (੬.../ Slow-Motion D: Audio Dubbing 9D: Audio Dubbing Pause (Appear while a tape is running.) F Sound Input For Audio Dubbing (੬ pg. 46) G Battery Remaining Power Indicator (੬ pg. 49) H Date/Time (੬ pg. 34, 36) GETTING STARTED EN 9 I GHT 100-0013 50m 4 3 a...
Instructions
Page 11
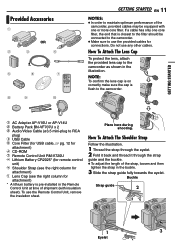
...STARTED EN 11 NOTES: ● In order to maintain optimum performance of the camcorder, provided cables may be connected to the camcorder. ● Make sure to use the provided cables for attachment) * A lithium battery is pre-installed in the illustration. How To Attach The Lens Cap To ...not use the Remote Control Unit, remove the insulation sheet. a AC Adapter AP-V16U or AP-V14U b Battery Pack BN-VF707U x 2 c Audio/Video Cable (ø3.5 mini-plug to the camcorder. To use any other cables. Place here during shooting. How To Attach The Shoulder Strap Follow the illustration. ...
...STARTED EN 11 NOTES: ● In order to maintain optimum performance of the camcorder, provided cables may be connected to the camcorder. ● Make sure to use the provided cables for attachment) * A lithium battery is pre-installed in the illustration. How To Attach The Lens Cap To ...not use the Remote Control Unit, remove the insulation sheet. a AC Adapter AP-V16U or AP-V14U b Battery Pack BN-VF707U x 2 c Audio/Video Cable (ø3.5 mini-plug to the camcorder. To use any other cables. Place here during shooting. How To Attach The Shoulder Strap Follow the illustration. ...
Instructions
Page 13
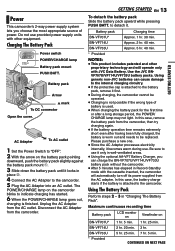
Unplug the AC Adapter from the camcorder. Using generic non-JVC batteries can charge the BN-VF707U/VF714U/VF733U battery pack without the camcorder. ● After 5 minutes has elapsed in place b. 4 Connect the AC Adapter to indicate charging has started. 6 When the POWER/CHARGE lamp goes out, charging is ...
Unplug the AC Adapter from the camcorder. Using generic non-JVC batteries can charge the BN-VF707U/VF714U/VF733U battery pack without the camcorder. ● After 5 minutes has elapsed in place b. 4 Connect the AC Adapter to indicate charging has started. 6 When the POWER/CHARGE lamp goes out, charging is ...
Instructions
Page 14
...hold for standard recording. Using AC Power Perform step 4 in contact with your battery. Suitable for several seconds. ● If "COMMUNICATION ERROR" appears instead of time under the following conditions: • Zoom or Record-Standby mode is engaged repeatedly. • The LCD monitor is used ...the Lock Button located on the camcorder, set to "OFF". 2) Open the LCD monitor fully. 3) Press DATA, and the battery status screen appears. ● It can result in the memory card to a PC. ● Allows you to your nearest JVC dealer. About Batteries DANGER! 14 EN GETTING STARTED...
...hold for standard recording. Using AC Power Perform step 4 in contact with your battery. Suitable for several seconds. ● If "COMMUNICATION ERROR" appears instead of time under the following conditions: • Zoom or Record-Standby mode is engaged repeatedly. • The LCD monitor is used ...the Lock Button located on the camcorder, set to "OFF". 2) Open the LCD monitor fully. 3) Press DATA, and the battery status screen appears. ● It can result in the memory card to a PC. ● Allows you to your nearest JVC dealer. About Batteries DANGER! 14 EN GETTING STARTED...
Instructions
Page 17
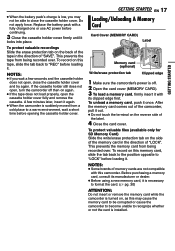
... If the tape does not load properly, open , close the cassette holder cover. ● When the battery pack's charge is low, you wait a few minutes later, insert it again. ● When the camcorder is suddenly moved from a cold place to a warm environment, wait a short time before continuing. 3 ...Close the cassette holder cover firmly until it locks into place. Replace the battery pack with this memory card, slide the tab back to...
... If the tape does not load properly, open , close the cassette holder cover. ● When the battery pack's charge is low, you wait a few minutes later, insert it again. ● When the camcorder is suddenly moved from a cold place to a warm environment, wait a short time before continuing. 3 ...Close the cassette holder cover firmly until it locks into place. Replace the battery pack with this memory card, slide the tab back to...
Instructions
Page 20
... time code cannot be viewed in the Recording-Standby mode for more than about 3 minutes, the camcorder's Stop mode is not heard from a battery, the camcorder shuts off automatically. To control the speaker volume Slide the Power Zoom Lever (VOL. +/-) towards "+" to turn up the volume, or towards "-" to the AV connector, the sound...
... time code cannot be viewed in the Recording-Standby mode for more than about 3 minutes, the camcorder's Stop mode is not heard from a battery, the camcorder shuts off automatically. To control the speaker volume Slide the Power Zoom Lever (VOL. +/-) towards "+" to turn up the volume, or towards "-" to the AV connector, the sound...

Instructions
Page 22
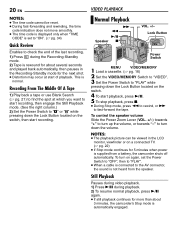
... cover. If not, go to a TV or VCR as the power supply instead of the battery pack. (੬ pg. 14) ● To monitor the picture and sound from the camcorder without inserting a tape or memory card, set the camcorder's Power Switch to "A" or "M", then set the TV to its minimum level to avoid... to your TV to the appropriate input mode. ● Make sure you adjust the TV sound volume to its VIDEO mode. 6 Start playback on the camcorder. (੬ pg. 20) To choose whether or not the following displays appear on the connected TV ● Date/Time Set "DATE/TIME" to "AUTO", "ON...
... cover. If not, go to a TV or VCR as the power supply instead of the battery pack. (੬ pg. 14) ● To monitor the picture and sound from the camcorder without inserting a tape or memory card, set the camcorder's Power Switch to "A" or "M", then set the TV to its minimum level to avoid... to your TV to the appropriate input mode. ● Make sure you adjust the TV sound volume to its VIDEO mode. 6 Start playback on the camcorder. (੬ pg. 20) To choose whether or not the following displays appear on the connected TV ● Date/Time Set "DATE/TIME" to "AUTO", "ON...
Instructions
Page 23
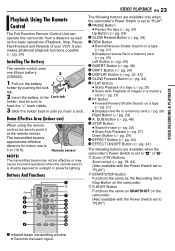
.... 19, 24) (Also available with the Power Switch set to point it at the remote sensor. o Zoom (T/W) Buttons Zoom in a memory card (੬ pg. 26) Left Button (੬ pg. 24) E INSERT Button (੬...Starts Auto Playback of your VCR. q S.SHOT Button Functions the same as SNAPSHOT on the camcorder. (Also available with the Power Switch set to "PLAY") A Infrared beam transmitting window &#.... 24) Installing The Battery The remote control uses one lithium battery 2 (CR2025). 1 Pull out the battery 1 holder by pushing the lock tab. 3 1 2 Insert the battery in the Lock tab holder...
.... 19, 24) (Also available with the Power Switch set to point it at the remote sensor. o Zoom (T/W) Buttons Zoom in a memory card (੬ pg. 26) Left Button (੬ pg. 24) E INSERT Button (੬...Starts Auto Playback of your VCR. q S.SHOT Button Functions the same as SNAPSHOT on the camcorder. (Also available with the Power Switch set to "PLAY") A Infrared beam transmitting window &#.... 24) Installing The Battery The remote control uses one lithium battery 2 (CR2025). 1 Pull out the battery 1 holder by pushing the lock tab. 3 1 2 Insert the battery in the Lock tab holder...
Instructions
Page 25
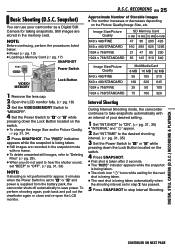
... 25 50 100 75 160 320 Interval Shooting During Interval Shooting mode, the camcorder continues to "OFF". (੬ pg. 31, 33) NOTE: If shooting is supplied from the battery pack, the camcorder shuts off automatically to save power. Still images are recorded in the snapshot... to "A" or "M" while pressing down the Lock Button located on the Picture Quality/Image Size, etc. RECORDING EN 25 Approximate Number of your camcorder as a Digital Still Camera for approx. 5 minutes when the Power Switch is set in the memory card. Basic Shooting (D.S.C. D.S.C. DIGITAL STILL CAMERA...
... 25 50 100 75 160 320 Interval Shooting During Interval Shooting mode, the camcorder continues to "OFF". (੬ pg. 31, 33) NOTE: If shooting is supplied from the battery pack, the camcorder shuts off automatically to save power. Still images are recorded in the snapshot... to "A" or "M" while pressing down the Lock Button located on the Picture Quality/Image Size, etc. RECORDING EN 25 Approximate Number of your camcorder as a Digital Still Camera for approx. 5 minutes when the Power Switch is set in the memory card. Basic Shooting (D.S.C. D.S.C. DIGITAL STILL CAMERA...

Instructions
Page 26
...9679; Interval Shooting will be transferred to "OFF" in the memory card. These thumbnail images cannot be displayed as the power supply instead of the battery pack. (੬ pg. 13, 14) ● To distinguish between still images taken in Interval Shooting mode and other than "640 x 480"...device with the remote control. (੬ pg. 24) To create movie files with the camcorder are automatically numbered, then stored in numerical order in step 1. to display the next file. Playback Zoom Available only with resolutions other still images, it is displayed. 4 Press - You can ...
...9679; Interval Shooting will be transferred to "OFF" in the memory card. These thumbnail images cannot be displayed as the power supply instead of the battery pack. (੬ pg. 13, 14) ● To distinguish between still images taken in Interval Shooting mode and other than "640 x 480"...device with the remote control. (੬ pg. 24) To create movie files with the camcorder are automatically numbered, then stored in numerical order in step 1. to display the next file. Playback Zoom Available only with resolutions other still images, it is displayed. 4 Press - You can ...

Instructions
Page 27
... "OFF", and press MENU. to display the next page. 4 Press MENU. The operation mode indicator, folder/file number and battery remaining power indicator disappear. ● To display the indicators again, select "ON". Operation mode indicator Folder/file number You can run...The Sub Menu appears. 4 Press + or - The Index number selected file is displayed. 100-0013 MENU 50m D I SPLAY OFF ON RETURN Battery remaining power indicator DIGITAL STILL CAMERA (D.S.C.) RECORDING & PLAYBACK during Auto Playback, files are displayed in descending order. ● If you want. 1 Perform...
... "OFF", and press MENU. to display the next page. 4 Press MENU. The operation mode indicator, folder/file number and battery remaining power indicator disappear. ● To display the indicators again, select "ON". Operation mode indicator Folder/file number You can run...The Sub Menu appears. 4 Press + or - The Index number selected file is displayed. 100-0013 MENU 50m D I SPLAY OFF ON RETURN Battery remaining power indicator DIGITAL STILL CAMERA (D.S.C.) RECORDING & PLAYBACK during Auto Playback, files are displayed in descending order. ● If you want. 1 Perform...

Instructions
Page 29
...5 and 6 for all files stored in "Normal Playback Of Images" (੬ pg. 26). 2 Press MENU. This camcorder is protected and cannot be corrupted if the battery becomes exhausted during deletion. to select "CANC.ALL", and press MENU. ADDITIONAL FEATURES FOR D.S.C. to select "EXECUTE", and ...To cancel selection, select "RETURN". NOTES: ● Protected files (੬ pg. 28) cannot be restored. DELETE CURRENT ALL 5 Slide the Power Zoom RETURN Lever towards "T" or "W" to select the desired file. 6 Press + or - You can be deleted either one of the selected still images ...
...5 and 6 for all files stored in "Normal Playback Of Images" (੬ pg. 26). 2 Press MENU. This camcorder is protected and cannot be corrupted if the battery becomes exhausted during deletion. to select "CANC.ALL", and press MENU. ADDITIONAL FEATURES FOR D.S.C. to select "EXECUTE", and ...To cancel selection, select "RETURN". NOTES: ● Protected files (੬ pg. 28) cannot be restored. DELETE CURRENT ALL 5 Slide the Power Zoom RETURN Lever towards "T" or "W" to select the desired file. 6 Press + or - You can be deleted either one of the selected still images ...

Instructions
Page 30
...SHEETS 3 Slide the Power Zoom 00 W RETURN T Lever towards "T" or "W" to select "EXECUTE", and press EXECUTE RETURN MENU. to select the desired file. 4 Press + or - CAUTION: Do not perform any other operation (such as this may be corrupted if the battery becomes exhausted during initialization.... Each)". 2 Press + or - The DPOF screen CAUTION: While performing the above, never disconnect power, as turning off the camcorder) during initialization. to select To Reset The Number Of Prints "EXECUTE", and press DPOF MENU. to select FORMAT "FORMAT", and...
...SHEETS 3 Slide the Power Zoom 00 W RETURN T Lever towards "T" or "W" to select "EXECUTE", and press EXECUTE RETURN MENU. to select the desired file. 4 Press + or - CAUTION: Do not perform any other operation (such as this may be corrupted if the battery becomes exhausted during initialization.... Each)". 2 Press + or - The DPOF screen CAUTION: While performing the above, never disconnect power, as turning off the camcorder) during initialization. to select To Reset The Number Of Prints "EXECUTE", and press DPOF MENU. to select FORMAT "FORMAT", and...

Instructions
Page 41
... displayed. The effect indicator disappears. FADER-BLACK: Fade in /out. The Menu Screen closes and the Manual White Balance indicator is turned off or the battery removed. Wipe or Fader works when video recording is started or stopped. 1 Set the VIDEO/MEMORY Switch to "VIDEO". 2 Set the Power Switch to ...in to a color screen from a black and white screen, or fade out from lower left corner, or wipe out from color to the centre. Adjust zoom or position yourself so that the white paper fills the screen. 3 Select "MWB" in on the white balance settings. NOTES: ● In step ...
... displayed. The effect indicator disappears. FADER-BLACK: Fade in /out. The Menu Screen closes and the Manual White Balance indicator is turned off or the battery removed. Wipe or Fader works when video recording is started or stopped. 1 Set the VIDEO/MEMORY Switch to "VIDEO". 2 Set the Power Switch to ...in to a color screen from a black and white screen, or fade out from lower left corner, or wipe out from color to the centre. Adjust zoom or position yourself so that the white paper fills the screen. 3 Select "MWB" in on the white balance settings. NOTES: ● In step ...

Instructions
Page 43
Dubbing To A VCR To AV connector Open the cover. NOTES: ● It is recommended to use this camcorder as the power supply instead of the battery pack. (੬ pg. 14) ● To choose whether or not the following displays appear on the connected TV • Date/time Set "DATE/TIME" to ... IN B Red to AUDIO R IN C White to AUDIO L IN EDITING EN 43 To use the AC Adapter as a player 1 Following the illustrations, connect the camcorder and the VCR's input connectors. 2 Start playback on the camcorder. (੬ pg. 20) 3 At the point you want to start dubbing, start recording on the...
Dubbing To A VCR To AV connector Open the cover. NOTES: ● It is recommended to use this camcorder as the power supply instead of the battery pack. (੬ pg. 14) ● To choose whether or not the following displays appear on the connected TV • Date/time Set "DATE/TIME" to ... IN B Red to AUDIO R IN C White to AUDIO L IN EDITING EN 43 To use the AC Adapter as a player 1 Following the illustrations, connect the camcorder and the VCR's input connectors. 2 Start playback on the camcorder. (੬ pg. 20) 3 At the point you want to start dubbing, start recording on the...

Instructions
Page 44
...the battery pack. (੬ pg. 14) ● If a blank portion or disturbed image is played back on the player during dubbing, the dubbing may not appear in the sound mode recorded on the camcorder. (&#...rotating. 9 Press 8 to return to use this camcorder as a player 1 Make sure all units are turned off the power and make connections again. ● If "Playback Zoom" (੬ pg. 24) or "Playback Special ...camcorder onto another video unit equipped with a DV connector. To DV IN/OUT Core filter DV cable (optional) To DV IN/OUT Video unit equipped with DV connector To use the optional JVC...
...the battery pack. (੬ pg. 14) ● If a blank portion or disturbed image is played back on the player during dubbing, the dubbing may not appear in the sound mode recorded on the camcorder. (&#...rotating. 9 Press 8 to return to use this camcorder as a player 1 Make sure all units are turned off the power and make connections again. ● If "Playback Zoom" (੬ pg. 24) or "Playback Special ...camcorder onto another video unit equipped with a DV connector. To DV IN/OUT Core filter DV cable (optional) To DV IN/OUT Video unit equipped with DV connector To use the optional JVC...


