
Instructions
Page 5
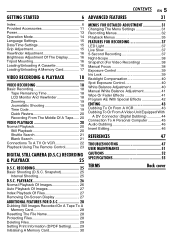
... VIDEO RECORDING 18 Basic Recording 18 Tape Remaining Time 18 LCD Monitor And Viewfinder 18 Zooming 19 Journalistic Shooting 19 Time Code 19 Quick Review 20 Recording From The Middle Of A Tape...... 20 VIDEO PLAYBACK 20 Normal Playback... 20 Still Playback 20 Shuttle Search 21 Blank Search 21 Connections To A TV Or VCR 22 Playback Using The Remote Control 23 DIGITAL STILL CAMERA (D.S.C.) RECORDING & PLAYBACK 25 D.S.C. Snapshot 25...
... VIDEO RECORDING 18 Basic Recording 18 Tape Remaining Time 18 LCD Monitor And Viewfinder 18 Zooming 19 Journalistic Shooting 19 Time Code 19 Quick Review 20 Recording From The Middle Of A Tape...... 20 VIDEO PLAYBACK 20 Normal Playback... 20 Still Playback 20 Shuttle Search 21 Blank Search 21 Connections To A TV Or VCR 22 Playback Using The Remote Control 23 DIGITAL STILL CAMERA (D.S.C.) RECORDING & PLAYBACK 25 D.S.C. Snapshot 25...
Instructions
Page 8
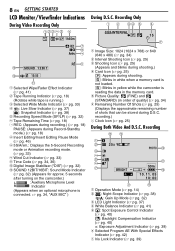
... when a memory card is not loaded. : Blinks in yellow while the camcorder is reading the data in order of quality) (੬ pg. 34) F Remaining Number Of Shots (੬ pg. 25) (Displays the approximate remaining number of shots that can be stored during Record.... 18) H Insert Editing/Insert Editing Pause Mode (੬ pg. 46) I T w 15:55 q a Selected Wipe/Fader Effect Indicator (੬ pg. 41) B Tape Running Indicator (੬ pg. 18) (Rotates while tape is connected. ੬ pg. 34, "AUX MIC" ) During D.S.C. Recording 89 1 2 25x W T 3 O0 4 5 6 7 BRIGHT q 50m w 10. 11...
... when a memory card is not loaded. : Blinks in yellow while the camcorder is reading the data in order of quality) (੬ pg. 34) F Remaining Number Of Shots (੬ pg. 25) (Displays the approximate remaining number of shots that can be stored during Record.... 18) H Insert Editing/Insert Editing Pause Mode (੬ pg. 46) I T w 15:55 q a Selected Wipe/Fader Effect Indicator (੬ pg. 41) B Tape Running Indicator (੬ pg. 18) (Rotates while tape is connected. ੬ pg. 34, "AUX MIC" ) During D.S.C. Recording 89 1 2 25x W T 3 O0 4 5 6 7 BRIGHT q 50m w 10. 11...
Instructions
Page 9
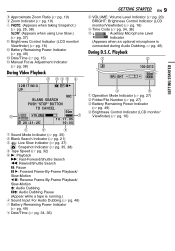
... (੬ pg. 19) I Zoom Indicator (੬ pg. 19) J O: (Appears when taking Snapshot.) (੬ pg. 25, 38) SLOW: (Appears when using Live Slow.) (੬ pg. 37) K Brightness Control Indicator (LCD monitor/ Viewfinder) (੬ pg. 16) L ... Indicator (੬ pg. 35) B Blank Search Indicator (੬ pg. 21) C : Live Slow Indicator (੬ pg. 37) : Snapshot Indicator (੬ pg. 35, 38) D Tape Speed (੬ pg. 32) E 4: Playback 5: Fast-Forward/Shuttle Search 3: Rewind/Shuttle Search 9: Pause 9 U: Forward Frame-By-Frame Playback/ Slow-Motion Y 9: Reverse Frame-By-Frame Playback...
... (੬ pg. 19) I Zoom Indicator (੬ pg. 19) J O: (Appears when taking Snapshot.) (੬ pg. 25, 38) SLOW: (Appears when using Live Slow.) (੬ pg. 37) K Brightness Control Indicator (LCD monitor/ Viewfinder) (੬ pg. 16) L ... Indicator (੬ pg. 35) B Blank Search Indicator (੬ pg. 21) C : Live Slow Indicator (੬ pg. 37) : Snapshot Indicator (੬ pg. 35, 38) D Tape Speed (੬ pg. 32) E 4: Playback 5: Fast-Forward/Shuttle Search 3: Rewind/Shuttle Search 9: Pause 9 U: Forward Frame-By-Frame Playback/ Slow-Motion Y 9: Reverse Frame-By-Frame Playback...
Instructions
Page 10
... become dirty more video than SP (Standard) mode, but JVC brand cassette tapes are stored in a dusty area. If you haven't used with this camcorder is intended for personal enjoyment, it is strongly recommended that this camcorder is designed exclusively for important video recordings. LP (Long Play...but you may be removed from the camcorder and stored in the proper environment. Your camcorder is prohibited. (Even if you record an event such as a show, performance or exhibition for private consumer use JVC brand cassette tapes. Remember that you obtain permission beforehand...
... become dirty more video than SP (Standard) mode, but JVC brand cassette tapes are stored in a dusty area. If you haven't used with this camcorder is intended for personal enjoyment, it is strongly recommended that this camcorder is designed exclusively for important video recordings. LP (Long Play...but you may be removed from the camcorder and stored in the proper environment. Your camcorder is prohibited. (Even if you record an event such as a show, performance or exhibition for private consumer use JVC brand cassette tapes. Remember that you obtain permission beforehand...
Instructions
Page 14
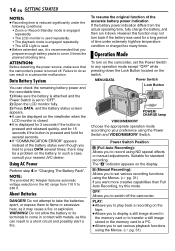
... DANGER! Do not allow the battery or its terminals to your nearest JVC dealer. However this mode. 14 EN GETTING STARTED NOTES: ● ...used for standard recording. Using AC Power Perform step 4 in a camcorder malfunction. Do not attempt to take the batteries apart, or expose ... If "COMMUNICATION ERROR" appears instead of time under the following conditions: • Zoom or Record-Standby mode is engaged repeatedly. • The LCD monitor is used repeatedly... PLAY: ● Allows you to play back a recording on the tape. ● Allows you to display a still image stored in the ...
... DANGER! Do not allow the battery or its terminals to your nearest JVC dealer. However this mode. 14 EN GETTING STARTED NOTES: ● ...used for standard recording. Using AC Power Perform step 4 in a camcorder malfunction. Do not attempt to take the batteries apart, or expose ... If "COMMUNICATION ERROR" appears instead of time under the following conditions: • Zoom or Record-Standby mode is engaged repeatedly. • The LCD monitor is used repeatedly... PLAY: ● Allows you to play back a recording on the tape. ● Allows you to display a still image stored in the ...
Instructions
Page 15
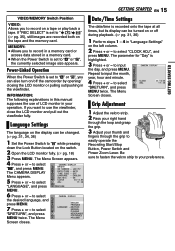
... 36) 1 Perform steps 1 - 4 in "Language Settings" on or off the camcorder by opening/ closing the LCD monitor or pulling out/pushing in the viewfinder. to your...199;AIS - Repeat to easily operate the Recording Start/Stop Button, Power Switch and Power Zoom Lever. Grip Adjustment 1 Adjust the velcro strip. 2 Pass your right hand through the ...BRETURN", and press MENU twice. to select "CLOCK ADJ.", and press MENU. MEMORY: ● Allows you to record on the tape and the memory card. The CAMERA DISPLAY Menu appears. 5 Press + or - The parameter for "Day" is highlighted. 3 ...
... 36) 1 Perform steps 1 - 4 in "Language Settings" on or off the camcorder by opening/ closing the LCD monitor or pulling out/pushing in the viewfinder. to your...199;AIS - Repeat to easily operate the Recording Start/Stop Button, Power Switch and Power Zoom Lever. Grip Adjustment 1 Adjust the velcro strip. 2 Pass your right hand through the ...BRETURN", and press MENU twice. to select "CLOCK ADJ.", and press MENU. MEMORY: ● Allows you to record on the tape and the memory card. The CAMERA DISPLAY Menu appears. 5 Press + or - The parameter for "Day" is highlighted. 3 ...
Instructions
Page 16
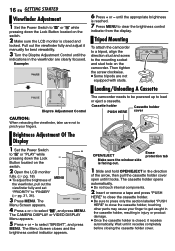
... and the brightness control indicator appears. The cassette holder opens automatically. ● Do not touch internal components. 2 Insert or remove a tape and press "PUSH HERE" to close the cassette holder; Then tighten the screw clockwise. ● Some tripods are clearly focused. Erase .... touching other parts may cause your fingers. Wait until it recedes completely before closing the cassette holder cover. Button located on the camcorder. The camcorder needs to be powered up to select "BRIGHT", and press MENU. The BRIGHT Menu Screen appears. 4 Press + or - OPEN...
... and the brightness control indicator appears. The cassette holder opens automatically. ● Do not touch internal components. 2 Insert or remove a tape and press "PUSH HERE" to close the cassette holder; Then tighten the screw clockwise. ● Some tripods are clearly focused. Erase .... touching other parts may cause your fingers. Wait until it recedes completely before closing the cassette holder cover. Button located on the camcorder. The camcorder needs to be powered up to select "BRIGHT", and press MENU. The BRIGHT Menu Screen appears. 4 Press + or - OPEN...
Instructions
Page 17
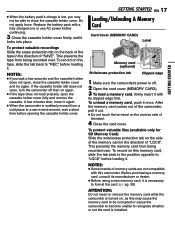
... "REC" before loading it . To record on the back of the tape in the direction of the label. 4 Close the card cover. This prevents the memory card from being recorded over . If the cassette holder still does not open, turn the camcorder off . 2 Open the card cover (MEMORY CARD). 3 To load a memory...
... "REC" before loading it . To record on the back of the tape in the direction of the label. 4 Close the card cover. This prevents the memory card from being recorded over . If the cassette holder still does not open, turn the camcorder off . 2 Open the card cover (MEMORY CARD). 3 To load a memory...
Instructions
Page 18
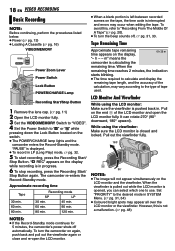
... NOTE: Before continuing, perform the procedures listed below: ● Power (੬ pg. 13) ● Loading A Cassette (੬ pg. 16) VIDEO/MEMORY Power Zoom Lever Power Switch Lock Button POWER/CHARGE Lamp Recording Start/Stop Button 1 Remove the lens cap. (੬ pg. 11) 2 Open the LCD monitor fully. 3 Set... min. 60 min. 90 min. 80 min. 120 min. ● When a blank portion is interrupted and errors may occur when editing the tape. m" means the camcorder is opened, you can rotate 270° (90° downward, 180° upward). It can select which one to the type of the ...
... NOTE: Before continuing, perform the procedures listed below: ● Power (੬ pg. 13) ● Loading A Cassette (੬ pg. 16) VIDEO/MEMORY Power Zoom Lever Power Switch Lock Button POWER/CHARGE Lamp Recording Start/Stop Button 1 Remove the lens cap. (੬ pg. 11) 2 Open the LCD monitor fully. 3 Set... min. 60 min. 90 min. 80 min. 120 min. ● When a blank portion is interrupted and errors may occur when editing the tape. m" means the camcorder is opened, you can rotate 270° (90° downward, 180° upward). It can select which one to the type of the ...
Instructions
Page 19
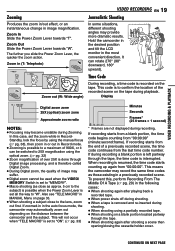
...located partway through the tape, the time code is interrupted. This code is to "ON". (੬ pg. 33) Minutes Seconds Frames* (25 frames = 1 second) 12 : 34 : 24 * Frames are not displayed during recording. If zoomed-in in the ...camcorder and the subject. It can be switched to 25X magnification using the optical zoom. (੬ pg. 32) ● Zoom magnification of over 25X is done through Digital image processing, and is therefore called Digital Zoom. ● During Digital zoom, the quality of image may become unstable during recording a blank portion is left partway through the tape...
...located partway through the tape, the time code is interrupted. This code is to "ON". (੬ pg. 33) Minutes Seconds Frames* (25 frames = 1 second) 12 : 34 : 24 * Frames are not displayed during recording. If zoomed-in in the ...camcorder and the subject. It can be switched to 25X magnification using the optical zoom. (੬ pg. 32) ● Zoom magnification of over 25X is done through Digital image processing, and is therefore called Digital Zoom. ● During Digital zoom, the quality of image may become unstable during recording a blank portion is left partway through the tape...
Instructions
Page 20
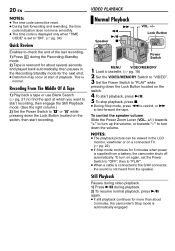
...during video playback. 1) Press 4/9 during the Recording-Standby mode. 2) Tape is rewound for about 3 minutes, the camcorder's Stop mode is normal. Recording From The Middle Of A Tape 1) Play back a tape or use Blank Search (੬ pg. 21) to find the spot ...at start playback, press 4/9. 5 To stop playback, press 8. ● During Stop mode, press 3 to rewind, or 5 to fast-forward the tape. To control the speaker volume Slide the Power Zoom...
...during video playback. 1) Press 4/9 during the Recording-Standby mode. 2) Tape is rewound for about 3 minutes, the camcorder's Stop mode is normal. Recording From The Middle Of A Tape 1) Play back a tape or use Blank Search (੬ pg. 21) to find the spot ...at start playback, press 4/9. 5 To stop playback, press 8. ● During Stop mode, press 3 to rewind, or 5 to fast-forward the tape. To control the speaker volume Slide the Power Zoom...
Instructions
Page 21
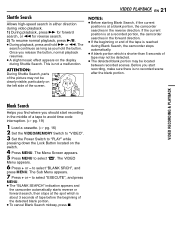
...select "EXECUTE", and press MENU. ● The "BLANK SEARCH" indication appears and the camcorder automatically starts reverse or forward search, then stops at the spot which is at a blank portion, the camcorder searches in either direction during video playback. 1) During playback, press 5 for forward search, ...& PLAYBACK Blank Search Helps you find where you start recording in the forward direction. ● If the beginning or end of the tape is reached during Shuttle Search. The search continues as long as you release the button, normal playback resumes. ● A slight mosaic...
...select "EXECUTE", and press MENU. ● The "BLANK SEARCH" indication appears and the camcorder automatically starts reverse or forward search, then stops at the spot which is at a blank portion, the camcorder searches in either direction during video playback. 1) During playback, press 5 for forward search, ...& PLAYBACK Blank Search Helps you find where you start recording in the forward direction. ● If the beginning or end of the tape is reached during Shuttle Search. The search continues as long as you release the button, normal playback resumes. ● A slight mosaic...
Instructions
Page 22
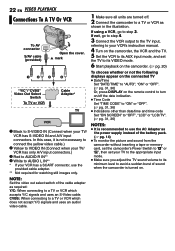
.... 14) ● To monitor the picture and sound from the camcorder without inserting a tape or memory card, set the camcorder's Power Switch to "A" or "M", then set the TV to its VIDEO mode. ...6 Start playback on the camcorder. (੬ pg. 20) To choose whether or .../ VCR has S-VIDEO IN and A/V input connectors. In this case, it is turned on /off . 2 Connect the camcorder to a TV or VCR as required: Y/C: When connecting to a TV or VCR which does not accept Y/C signals and...
.... 14) ● To monitor the picture and sound from the camcorder without inserting a tape or memory card, set the camcorder's Power Switch to "A" or "M", then set the TV to its VIDEO mode. ...6 Start playback on the camcorder. (੬ pg. 20) To choose whether or .../ VCR has S-VIDEO IN and A/V input connectors. In this case, it is turned on /off . 2 Connect the camcorder to a TV or VCR as required: Y/C: When connecting to a TV or VCR which does not accept Y/C signals and...

Instructions
Page 23
.... 24) C SLOW Rewind Button (੬ pg. 24) D REW Button ● Rewind/Reverse Shuttle Search on the camcorder. DUB Button (੬ pg. 46) L STOP Button ● Stops the tape (੬ pg. 20) ● Stops Auto Playback (੬ pg. 27) Down Button (੬ pg. 24) ...M EFFECT Button (੬ pg. 24) N EFFECT ON/OFF Button (੬ pg. 24) The following buttons are available when the camcorder's Power Switch is directly exposed to point it at the remote sensor. o Zoom (T/W) Buttons Zoom...
.... 24) C SLOW Rewind Button (੬ pg. 24) D REW Button ● Rewind/Reverse Shuttle Search on the camcorder. DUB Button (੬ pg. 46) L STOP Button ● Stops the tape (੬ pg. 20) ● Stops Auto Playback (੬ pg. 27) Down Button (੬ pg. 24) ...M EFFECT Button (੬ pg. 24) N EFFECT ON/OFF Button (੬ pg. 24) The following buttons are available when the camcorder's Power Switch is directly exposed to point it at the remote sensor. o Zoom (T/W) Buttons Zoom...
Instructions
Page 28
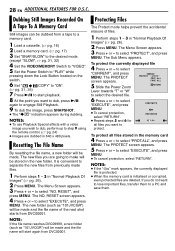
...or - The Menu Screen appears. 3 Press + or - to select the desired file. 6 Press + or - The PROTECT screen appears. ALL 5 Slide the Power Zoom RETURN Lever towards "T" or "W" to select "CURRENT", and press MENU. to step 9 using the remote control. (੬ pg. 24) ● Images are dubbed... folder will be made files. 1 Perform steps 1 - 3 in the new folder. It is initialised or corrupted, even protected files are going to start again from a tape to a memory card. 1 Load a cassette. (੬ pg. 16) 2 Load a memory card. (੬ pg. 17) 3 Set "SNAP/SLOW" to the desired ...
...or - The Menu Screen appears. 3 Press + or - to select the desired file. 6 Press + or - The PROTECT screen appears. ALL 5 Slide the Power Zoom RETURN Lever towards "T" or "W" to select "CURRENT", and press MENU. to step 9 using the remote control. (੬ pg. 24) ● Images are dubbed... folder will be made files. 1 Perform steps 1 - 3 in the new folder. It is initialised or corrupted, even protected files are going to start again from a tape to a memory card. 1 Load a cassette. (੬ pg. 16) 2 Load a memory card. (੬ pg. 17) 3 Set "SNAP/SLOW" to the desired ...
Instructions
Page 29
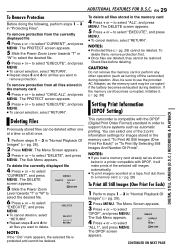
...desired file. 6 Press + or - NOTES: ● If you load a memory card already set as turning off the camcorder) during deletion. The PROTECT screen appears. 5 Slide the Power Zoom Lever towards "T" or "W" to delete. The PROTECT screen appears. 5 Press + or - CAUTION: Do not remove the memory... "DELETE", and press MENU. You can be deleted either one of the selected still images automatically. ● To print images recorded on a tape, first dub them , remove protection first. ● Once files are deleted, they cannot be deleted. RETURN The DPOF screen appears. To remove...
...desired file. 6 Press + or - NOTES: ● If you load a memory card already set as turning off the camcorder) during deletion. The PROTECT screen appears. 5 Slide the Power Zoom Lever towards "T" or "W" to delete. The PROTECT screen appears. 5 Press + or - CAUTION: Do not remove the memory... "DELETE", and press MENU. You can be deleted either one of the selected still images automatically. ● To print images recorded on a tape, first dub them , remove protection first. ● Once files are deleted, they cannot be deleted. RETURN The DPOF screen appears. To remove...
Instructions
Page 32
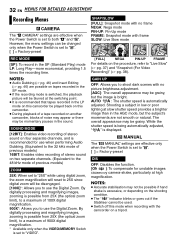
... four separate channels, and is possible from 25X (the optical zoom limit), to a maximum of noise may appear or there may be used. ● Switch off this camcorder. ● During playback of a tape recorded on another camcorder, blocks of 900X digital magnification. * Available only when ...Editing (੬ pg. 46) are possible on tapes recorded in the sound. By digitally processing and magnifying images, zooming is possible from 25X (the optical zoom limit), to a maximum of previous models) ZOOM 25X: When set to 25X since digital zoom will be momentary pauses in the SP mode. ...
... four separate channels, and is possible from 25X (the optical zoom limit), to a maximum of noise may appear or there may be used. ● Switch off this camcorder. ● During playback of a tape recorded on another camcorder, blocks of 900X digital magnification. * Available only when ...Editing (੬ pg. 46) are possible on tapes recorded in the sound. By digitally processing and magnifying images, zooming is possible from 25X (the optical zoom limit), to a maximum of previous models) ZOOM 25X: When set to 25X since digital zoom will be momentary pauses in the SP mode. ...
Instructions
Page 33
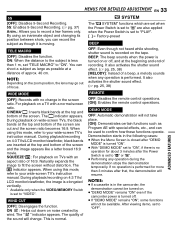
...to "M" are also applied when the Power Switch is recorded on the tape. It also activates the shutter sound effect. (੬ pg. 25, 38) [MELODY]: Instead of a beep, a melody sounds when... indicator appears. During playback/recording on . ● "DEMO MODE" remains "ON" even if the camcorder power is moving. DEMO MODE OFF: Automatic demonstration will not take place. [ON]: Demonstrates certain functions ...boxed 16:9 movie. TELE MACRO [OFF]: Disables the function. SQUEEZE* : For playback on the zoom position, the lens may go out of recording. BEEP: The beep sounds when the power is ...
...to "M" are also applied when the Power Switch is recorded on the tape. It also activates the shutter sound effect. (੬ pg. 25, 38) [MELODY]: Instead of a beep, a melody sounds when... indicator appears. During playback/recording on . ● "DEMO MODE" remains "ON" even if the camcorder power is moving. DEMO MODE OFF: Automatic demonstration will not take place. [ON]: Demonstrates certain functions ...boxed 16:9 movie. TELE MACRO [OFF]: Disables the function. SQUEEZE* : For playback on the zoom position, the lens may go out of recording. BEEP: The beep sounds when the power is ...
Instructions
Page 35
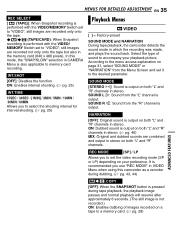
..."R" channels. It is recommended you to select the shooting interval for interval shooting. (੬ pg. 25) Playback Menus VIDEO [ ] = Factory-preset SOUND MODE and NARRATION During tape playback, the camcorder detects the sound mode in which the recording was made, and plays the sound back. NARRATION [OFF... VIDEO/MEMORY Switch set to "VIDEO", still images are recorded only onto the tape. / (TAPE/CARD): When Snapshot recording is performed with the VIDEO/ MEMORY Switch set it to the desired parameter. In this camcorder as a recorder during dubbing. (੬ pg. 43, 44) COPY [OFF...
..."R" channels. It is recommended you to select the shooting interval for interval shooting. (੬ pg. 25) Playback Menus VIDEO [ ] = Factory-preset SOUND MODE and NARRATION During tape playback, the camcorder detects the sound mode in which the recording was made, and plays the sound back. NARRATION [OFF... VIDEO/MEMORY Switch set to "VIDEO", still images are recorded only onto the tape. / (TAPE/CARD): When Snapshot recording is performed with the VIDEO/ MEMORY Switch set it to the desired parameter. In this camcorder as a recorder during dubbing. (੬ pg. 43, 44) COPY [OFF...
Instructions
Page 38
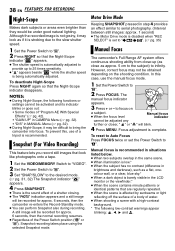
...blinking: , , and . In this , use the manual focus mode. 1 Set the Power Switch to 25 times sensitivity. ● " " appears beside " " while the shutter speed is being automatically adjusted. to...shutter speed. 1 Set the Power Switch to "M". 2 Press NIGHT so that look like photographs onto a tape. 1 Set the VIDEO/MEMORY Switch to "VIDEO". 2 Set the Power Switch to "M". 3 Set "SNAP... (difference in brightness and darkness), such as approx. 5 cm to the subject) to bring the camcorder into focus. A still image will blink. 4 Press MENU. Focus adjustment is automatically adjusted to provide...
...blinking: , , and . In this , use the manual focus mode. 1 Set the Power Switch to 25 times sensitivity. ● " " appears beside " " while the shutter speed is being automatically adjusted. to...shutter speed. 1 Set the Power Switch to "M". 2 Press NIGHT so that look like photographs onto a tape. 1 Set the VIDEO/MEMORY Switch to "VIDEO". 2 Set the Power Switch to "M". 3 Set "SNAP... (difference in brightness and darkness), such as approx. 5 cm to the subject) to bring the camcorder into focus. A still image will blink. 4 Press MENU. Focus adjustment is automatically adjusted to provide...

