Instructions
Page 2
... separation between the equipment and receiver. - Connect the equipment into functions mode, then the number buttons and 5/∞ buttons work , reset your unit. • Be careful not to beam. How to radio communications. leave all instructions carefully before operation, to ensure your unit • Your preset adjustments will not occur in a residential installation. Time countdown indicator To use the MODE button If you for help. This equipment generates, uses, and can be erased...
... separation between the equipment and receiver. - Connect the equipment into functions mode, then the number buttons and 5/∞ buttons work , reset your unit. • Be careful not to beam. How to radio communications. leave all instructions carefully before operation, to ensure your unit • Your preset adjustments will not occur in a residential installation. Time countdown indicator To use the MODE button If you for help. This equipment generates, uses, and can be erased...
Instructions
Page 3
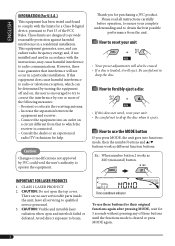
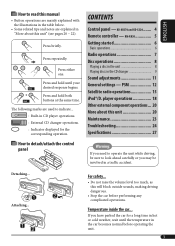
... 5 Getting started 6 Basic operations 6 Radio operations 7 Disc operations 8 Playing a disc in the unit 8 Playing discs in a traffic accident. Temperature inside the car... KD-AR370 and KD-G320 ....... 4 Remote controller - The following marks are explained in the car becomes normal before performing any complicated operations. Attaching... Press repeatedly. Detaching... If you may be involved in the CD changer 9 Sound adjustments 11 General settings - For safety... • Do not raise the volume level too much, as this...
... 5 Getting started 6 Basic operations 6 Radio operations 7 Disc operations 8 Playing a disc in the unit 8 Playing discs in a traffic accident. Temperature inside the car... KD-AR370 and KD-G320 ....... 4 Remote controller - The following marks are explained in the car becomes normal before performing any complicated operations. Attaching... Press repeatedly. Detaching... If you may be involved in the CD changer 9 Sound adjustments 11 General settings - For safety... • Do not raise the volume level too much, as this...
Instructions
Page 4
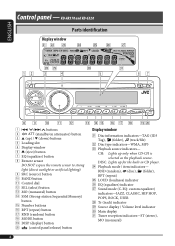
...-in CD player. ENGLISH Control panel - KKDD--GAR61327/0KaDn-Gd6K1D1-G/K3D2-0G511 Parts identification Display window 1 4 /¢ buttons 2 (standby/on attenuator) button 3 5 (up) / ∞ (down) buttons 4 Loading slot 5 Display window 6 0 (eject) button 7 EQ (equalizer) button 8 Remote sensor DO NOT expose the remote sensor to strong light (direct sunlight or artificial lighting). 9 SRC (source) button p BAND button q Control dial w SEL (select) button e MO (monaural) button r SSM (Strong-station Sequential Memory) button t Number buttons y RPT (repeat) button u RND...
...-in CD player. ENGLISH Control panel - KKDD--GAR61327/0KaDn-Gd6K1D1-G/K3D2-0G511 Parts identification Display window 1 4 /¢ buttons 2 (standby/on attenuator) button 3 5 (up) / ∞ (down) buttons 4 Loading slot 5 Display window 6 0 (eject) button 7 EQ (equalizer) button 8 Remote sensor DO NOT expose the remote sensor to strong light (direct sunlight or artificial lighting). 9 SRC (source) button p BAND button q Control dial w SEL (select) button e MO (monaural) button r SSM (Strong-station Sequential Memory) button t Number buttons y RPT (repeat) button u RND...
Instructions
Page 5
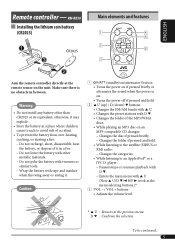
... battery with 5 U. (Now 5 U/D ∞/2 R/F 3 work as the menu selecting buttons.)* 3 VOL - / VOL + buttons • Adjusts the volume level. * 5 U : Returns to avoid risk of the MP3/WMA discs. • While playing an MP3 disc on the unit. Enters the main menu with tweezers or similar tools. - Do not leave the battery with D ∞. - Caution: 1 (standby/on/attenuator) button • Turns the power on if pressed briefly or attenuates the sound...
... battery with 5 U. (Now 5 U/D ∞/2 R/F 3 work as the menu selecting buttons.)* 3 VOL - / VOL + buttons • Adjusts the volume level. * 5 U : Returns to avoid risk of the MP3/WMA discs. • While playing an MP3 disc on the unit. Enters the main menu with tweezers or similar tools. - Do not leave the battery with D ∞. - Caution: 1 (standby/on/attenuator) button • Turns the power on if pressed briefly or attenuates the sound...
Instructions
Page 6
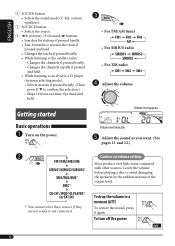
... menu selecting mode): - Volume level indicator @ Adjust the sound as you want. (See pages 11 and 12.) Ÿ Caution on the power. Basic operations ~ Turn on volume setting: Discs produce very little noise compared with other sources. To turn off the power 6 Skips 10 items at a time if pressed and held . • While listening to avoid damaging the speakers by the sudden increase of the output level. * You cannot select these sources...
... menu selecting mode): - Volume level indicator @ Adjust the sound as you want. (See pages 11 and 12.) Ÿ Caution on the power. Basic operations ~ Turn on volume setting: Discs produce very little noise compared with other sources. To turn off the power 6 Skips 10 items at a time if pressed and held . • While listening to avoid damaging the speakers by the sudden increase of the output level. * You cannot select these sources...
Instructions
Page 7
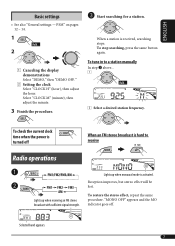
... same button again. To check the current clock time when the power is received, searching stops. above... 1 2 Select a desired station frequency. To restore the stereo effect, repeat the same procedure. When a station is turned off . ENGLISH Basic settings • See also "General settings - PSM" on pages 12 - 14. 1 2 1 Canceling the display demonstrations Select "DEMO," then "DEMO OFF." 2 Setting the clock Select "CLOCK H" (hour), then adjust the hour. To tune in to receive Radio operations ~ Lights up when receiving...
... same button again. To check the current clock time when the power is received, searching stops. above... 1 2 Select a desired station frequency. To restore the stereo effect, repeat the same procedure. When a station is turned off . ENGLISH Basic settings • See also "General settings - PSM" on pages 12 - 14. 1 2 1 Canceling the display demonstrations Select "DEMO," then "DEMO OFF." 2 Setting the clock Select "CLOCK H" (hour), then adjust the hour. To tune in to receive Radio operations ~ Lights up when receiving...

Instructions
Page 8
... eject the disc 8 SSM (Strong-station Sequential Memory) 1 Select the FM band (FM1 - FM3) you change the source or eject the disc. 2 3 Preset number flashes for each band. To check the other information while listening to an FM or AM station Clock Ô Frequency Manual presetting Ex.: Storing FM station of 92.5 MHz into . 2 Listening to a preset station 1 2 Select the preset station (1 - 6) you want to store into preset number 4 of the FM1 band. 1 Disc operations Playing a disc in the unit...
... eject the disc 8 SSM (Strong-station Sequential Memory) 1 Select the FM band (FM1 - FM3) you change the source or eject the disc. 2 3 Preset number flashes for each band. To check the other information while listening to an FM or AM station Clock Ô Frequency Manual presetting Ex.: Storing FM station of 92.5 MHz into . 2 Listening to a preset station 1 2 Select the preset station (1 - 6) you want to store into preset number 4 of the FM1 band. 1 Disc operations Playing a disc in the unit...
Instructions
Page 9
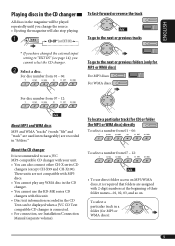
... discs: For WMA discs: For disc number from 07 - 12: • To use direct folder access on . ENGLISH Playing discs in the CD changer All discs in the magazine will be displayed when a JVC CD Text compatible CD changer is connected. • For connection, see page 14), you have changed the external input setting to use the KD-MK series CD changers with this unit. • Disc text information recorded in the CD Text can also connect other CH-X series CD changers...
... discs: For WMA discs: For disc number from 07 - 12: • To use direct folder access on . ENGLISH Playing discs in the CD changer All discs in the magazine will be displayed when a JVC CD Text compatible CD changer is connected. • For connection, see page 14), you have changed the external input setting to use the KD-MK series CD changers with this unit. • Disc text information recorded in the CD Text can also connect other CH-X series CD changers...
Instructions
Page 10
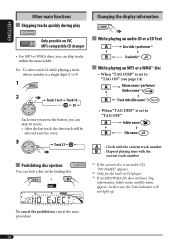
..." : Clock with the current track number : Elapsed playing time with the current track number *1 If the current disc is an audio CD, "NO NAME" appears. *2 Only for the built-in CD player. *3 If an MP3/WMA file does not have Tag information, folder name and file name appear. ENGLISH Other main functions Skipping tracks quickly during play Changing the display information Only possible on JVC...
..." : Clock with the current track number : Elapsed playing time with the current track number *1 If the current disc is an audio CD, "NO NAME" appears. *2 Only for the built-in CD player. *3 If an MP3/WMA file does not have Tag information, folder name and file name appear. ENGLISH Other main functions Skipping tracks quickly during play Changing the display information Only possible on JVC...

Instructions
Page 12
... a well-balanced sound at low volume level. [LOUD ON or LOUD OFF] SUB.W*4 (subwoofer) Adjust the subwoofer output level. [00 to 08] VOL (volume) Adjust the volume. [00 to 30 or 50*5] *1 When you adjust the bass, treble, or loudness, the adjustment you have made is stored for the currently selected sound mode (C-EQ) including "USER." *2 If you are using a two-speaker system, set to "WOOFER" (see page 14). *5 Depending on the amplifier gain control setting. (See...
... a well-balanced sound at low volume level. [LOUD ON or LOUD OFF] SUB.W*4 (subwoofer) Adjust the subwoofer output level. [00 to 08] VOL (volume) Adjust the volume. [00 to 30 or 50*5] *1 When you adjust the bass, treble, or loudness, the adjustment you have made is stored for the currently selected sound mode (C-EQ) including "USER." *2 If you are using a two-speaker system, set to "WOOFER" (see page 14). *5 Depending on the amplifier gain control setting. (See...

Instructions
Page 13
... DST. DIMMER Dimmer ON : Dims the display illumination of the setting. *1 Displayed only when SIRIUS Satellite radio or XM Satellite radio is connected. *2 Displayed only when "CLK ADJ" is automatically adjusted using a cellular phone. OFF : [Initial]; Scrolls the disc information once. To be activated automatically if no operation is subject to the beginning) DST*1, *2 Daylight savings time Activate this unit. Display demonstration will be blanked) on the display 5 seconds after "SID" is selected, [15...
... DST. DIMMER Dimmer ON : Dims the display illumination of the setting. *1 Displayed only when SIRIUS Satellite radio or XM Satellite radio is connected. *2 Displayed only when "CLK ADJ" is automatically adjusted using a cellular phone. OFF : [Initial]; Scrolls the disc information once. To be activated automatically if no operation is subject to the beginning) DST*1, *2 Daylight savings time Activate this unit. Display demonstration will be blanked) on the display 5 seconds after "SID" is selected, [15...
Instructions
Page 14
.... AM/FM intervals are used for connecting the speakers through an external amplifier. player, [18]. : To use a JVC CD changer, [9], a JVC compatible satellite (SIRIUS/XM) tuner, [15], an Apple iPod or a JVC D. Shows the Tag information while playing MP3/ WMA tracks, [10]. : Cancels. LOW PWR : VOL 00 - Select if the both LINE OUT terminals are set to 9 kHz/50 kHz (100 kHz during auto search). *1 Displayed only when "L/O MODE" is less than...
.... AM/FM intervals are used for connecting the speakers through an external amplifier. player, [18]. : To use a JVC CD changer, [9], a JVC compatible satellite (SIRIUS/XM) tuner, [15], an Apple iPod or a JVC D. Shows the Tag information while playing MP3/ WMA tracks, [10]. : Cancels. LOW PWR : VOL 00 - Select if the both LINE OUT terminals are set to 9 kHz/50 kHz (100 kHz during auto search). *1 Displayed only when "L/O MODE" is less than...

Instructions
Page 15
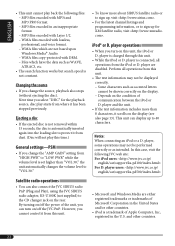
... the SIRIUS Satellite radio. • XMDirectTM Universal Tuner Box using a JVC Smart Digital Adapter-XMDJVC100 (not supplied), for listening to the XM Satellite radio. Before operating your satellite radio: • For connection, see Installation/Connection Manual (separate volume). • Refer also to the Instructions supplied with both SIRIUS Satellite radio and XM Satellite radio. ENGLISH Satellite radio operations This unit is tuned in to the preset channel, CH184. 3 Check your SIRIUS ID, see page 13. 4 Contact SIRIUS on the internet at to activate...
... the SIRIUS Satellite radio. • XMDirectTM Universal Tuner Box using a JVC Smart Digital Adapter-XMDJVC100 (not supplied), for listening to the XM Satellite radio. Before operating your satellite radio: • For connection, see Installation/Connection Manual (separate volume). • Refer also to the Instructions supplied with both SIRIUS Satellite radio and XM Satellite radio. ENGLISH Satellite radio operations This unit is tuned in to the preset channel, CH184. 3 Check your SIRIUS ID, see page 13. 4 Contact SIRIUS on the internet at to activate...

Instructions
Page 17
... change the display information while listening to a channel Clock = Category name = Channel name = Artist name = Composer name* = Song/program name/title = (back to the beginning) * Only for each band. The display alternately shows "RADIO ID" and the 8-digit (alphanumeric) ID number. ENGLISH 2 Select a channel for a while. To cancel the ID number display, select any channel other than "Channel 0." Ex.: Storing a channel into preset number 4. 1 Tune in memory You can preset six channels for SIRIUS Satellite radio...
... change the display information while listening to a channel Clock = Category name = Channel name = Artist name = Composer name* = Song/program name/title = (back to the beginning) * Only for each band. The display alternately shows "RADIO ID" and the 8-digit (alphanumeric) ID number. ENGLISH 2 Select a channel for a while. To cancel the ID number display, select any channel other than "Channel 0." Ex.: Storing a channel into preset number 4. 1 Tune in memory You can preset six channels for SIRIUS Satellite radio...
Instructions
Page 18
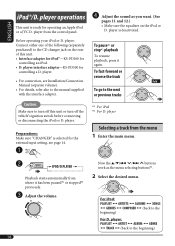
... iPod®/D. player interface adapter-KS-PD500 for operating an Apple iPod or a JVC D. player Selecting a track from the menu 1 Enter the main menu. Ÿ Playback starts automatically from the control panel. Adjust the volume. 18 Now the 5/∞/4 /¢ buttons work as you want. (See pages 11 and 12.) • Make sure the equalizer on the rear of this unit or turn off the vehicle's ignition switch before connecting or disconnecting the iPod...
... iPod®/D. player interface adapter-KS-PD500 for operating an Apple iPod or a JVC D. player Selecting a track from the menu 1 Enter the main menu. Ÿ Playback starts automatically from the control panel. Adjust the volume. 18 Now the 5/∞/4 /¢ buttons work as you want. (See pages 11 and 12.) • Make sure the equalizer on the rear of this unit or turn off the vehicle's ignition switch before connecting or disconnecting the iPod...
Instructions
Page 20
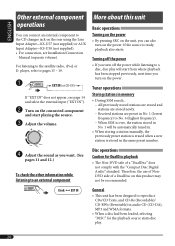
... the CD changer jack on the rear using the Line Input Adapter-KS-U57 (not supplied) or AUX Input Adapter-KS-U58 (not supplied). • For connection, see page 14 and select the external input ("EXT IN"). Ÿ Turn on the connected component and start from where playback has been stopped previously, next time you turn off the power while listening to a disc, disc play . 20 player, refer to the satellite radio, iPod, or D. Turning...
... the CD changer jack on the rear using the Line Input Adapter-KS-U57 (not supplied) or AUX Input Adapter-KS-U58 (not supplied). • For connection, see page 14 and select the external input ("EXT IN"). Ÿ Turn on the connected component and start from where playback has been stopped previously, next time you turn off the power while listening to a disc, disc play . 20 player, refer to the satellite radio, iPod, or D. Turning...
Instructions
Page 22
... power of the unit, you change the source, playback also stops (without ejecting the disc). Notice: When connecting an iPod or a D. MP3 files encoded with Layer 1/2. - player operations • When you select "DISC" for XM Satellite radio, visit «http://www.xmradio. and other countries. • iPod is set higher than 8 characters, it from this time.) General settings-PSM • If you can also connect the JVC SIRIUS radio PnP (Plug and Play), using the JVC SIRIUS radio adapter...
... power of the unit, you change the source, playback also stops (without ejecting the disc). Notice: When connecting an iPod or a D. MP3 files encoded with Layer 1/2. - player operations • When you select "DISC" for XM Satellite radio, visit «http://www.xmradio. and other countries. • iPod is set higher than 8 characters, it from this time.) General settings-PSM • If you can also connect the JVC SIRIUS radio PnP (Plug and Play), using the JVC SIRIUS radio adapter...
Instructions
Page 24
... presetting does not work at all. Reset the unit (see page 2). • Disc sound is required ("CHECK" keeps flashing on the display). Store stations manually. • Static noise while listening to non-MP3 or WMA tracks.) • A longer readout time is sometimes interrupted. • Stop playback while driving on rough roads. • Change the disc. • Check the cords and connections. • "NO DISC" appears on the CD-R/CD...
... presetting does not work at all. Reset the unit (see page 2). • Disc sound is required ("CHECK" keeps flashing on the display). Store stations manually. • Static noise while listening to non-MP3 or WMA tracks.) • A longer readout time is sometimes interrupted. • Stop playback while driving on rough roads. • Change the disc. • Check the cords and connections. • "NO DISC" appears on the CD-R/CD...
Instructions
Page 26
... unit and the satellite radio correctly, then reset the unit. • The iPod or D. The unit is distorted. Deactivate the equalizer either on the display. player. Press MODE before performing the operation. • The sound is loading the channel information and audio. the display. • Playback stops. "RESET 7" appears on Check the connecting cable and its connection. • Update the firmware version. • Change the battery. • Buttons do not work at this unit. player. iPod/D. player. player playback 26 Then, connect...
... unit and the satellite radio correctly, then reset the unit. • The iPod or D. The unit is distorted. Deactivate the equalizer either on the display. player. Press MODE before performing the operation. • The sound is loading the channel information and audio. the display. • Playback stops. "RESET 7" appears on Check the connecting cable and its connection. • Update the firmware version. • Change the battery. • Buttons do not work at this unit. player. iPod/D. player. player playback 26 Then, connect...
Instructions
Page 27
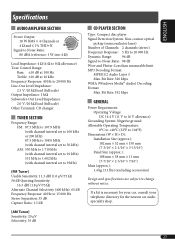
...: 35 dB Capture Ratio: 1.5 dB [AM Tuner] Sensitivity: 20 μV Selectivity: 35 dB CD PLAYER SECTION Type: Compact disc player Signal Detection System: Non-contact optical pickup (semiconductor laser) Number of Channels: 2 channels (stereo) Frequency Response: 5 Hz to 20 000 Hz Dynamic Range: 96 dB Signal-to change without notice. Bit Rate: 192 kbps GENERAL Power Requirement: Operating Voltage: DC 14.4 V (11 V to 16 V allowance...
...: 35 dB Capture Ratio: 1.5 dB [AM Tuner] Sensitivity: 20 μV Selectivity: 35 dB CD PLAYER SECTION Type: Compact disc player Signal Detection System: Non-contact optical pickup (semiconductor laser) Number of Channels: 2 channels (stereo) Frequency Response: 5 Hz to 20 000 Hz Dynamic Range: 96 dB Signal-to change without notice. Bit Rate: 192 kbps GENERAL Power Requirement: Operating Voltage: DC 14.4 V (11 V to 16 V allowance...


