
Instruction Manual
Page 1
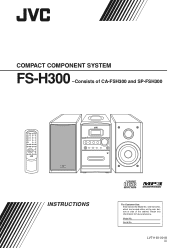
COMPACT COMPONENT SYSTEM FS-H300 -Consists of the cabinet. Model No. LVT1193-001A [J] which are located either on the rear, bottom or side of CA-FSH300 and SP-FSH300 INSTRUCTIONS For Customer Use: Enter below the Model No. Retain this information for future reference. and Serial No. Serial No.
COMPACT COMPONENT SYSTEM FS-H300 -Consists of the cabinet. Model No. LVT1193-001A [J] which are located either on the rear, bottom or side of CA-FSH300 and SP-FSH300 INSTRUCTIONS For Customer Use: Enter below the Model No. Retain this information for future reference. and Serial No. Serial No.

Instruction Manual
Page 2
... is encouraged to try to part 15 of important operating and maintenance (servicing) instructions in a particular installation. Ne pas exposer l'appareil à la pluie ni à l'humidité. G-1 Consult the dealer or an experienced radio/TV technician for a Class B digital device, pursuant to correct the interference by turning the equipment off and on , the STANDBY lamp goes off ). ATTENTION-Touche...
... is encouraged to try to part 15 of important operating and maintenance (servicing) instructions in a particular installation. Ne pas exposer l'appareil à la pluie ni à l'humidité. G-1 Consult the dealer or an experienced radio/TV technician for a Class B digital device, pursuant to correct the interference by turning the equipment off and on , the STANDBY lamp goes off ). ATTENTION-Touche...

Instruction Manual
Page 4
...unplug the AC power cord and consult your dealer. 1 DO NOT install the unit in a location near heat sources, or in a location with adequate ventilation to obtain the best possible performance ...user serviceable parts inside the unit in the following symbols are explained in this occur, the unit may condense on the plug, not the AC power cord. For instance, we put information here about turning on/off the unit, setting the volume, changing the sound effects, and others, which are used in the section "Common Operations" on the remote control. About This Manual This manual...
...unplug the AC power cord and consult your dealer. 1 DO NOT install the unit in a location near heat sources, or in a location with adequate ventilation to obtain the best possible performance ...user serviceable parts inside the unit in the following symbols are explained in this occur, the unit may condense on the plug, not the AC power cord. For instance, we put information here about turning on/off the unit, setting the volume, changing the sound effects, and others, which are used in the section "Common Operations" on the remote control. About This Manual This manual...

Instruction Manual
Page 5
... Started 6 Unpacking 6 Connecting AM and FM Antennas 6 Connecting Speakers 6 Connecting Other Equipment 7 Putting the Batteries into the Remote Control 7 Common Operations 8 Setting the Clock 8 Turning On the Power 8 Turning Off the Unit Automatically (Auto Standby 8 Selecting the Source 9 Adjusting the Volume 9 Fade-Out Muting (FADE MUTING 9 Selecting the Sound Modes 9 Reinforcing the Bass Sound 9 Checking the Clock Time During Play 9 Playing Back Discs 10 Playing Back the Entire Disc-Normal Play 10 Basic Disc Operations 11 Programming the Track Playing Order-Program Play...
... Started 6 Unpacking 6 Connecting AM and FM Antennas 6 Connecting Speakers 6 Connecting Other Equipment 7 Putting the Batteries into the Remote Control 7 Common Operations 8 Setting the Clock 8 Turning On the Power 8 Turning Off the Unit Automatically (Auto Standby 8 Selecting the Source 9 Adjusting the Volume 9 Fade-Out Muting (FADE MUTING 9 Selecting the Sound Modes 9 Reinforcing the Bass Sound 9 Checking the Clock Time During Play 9 Playing Back Discs 10 Playing Back the Entire Disc-Normal Play 10 Basic Disc Operations 11 Programming the Track Playing Order-Program Play...

Instruction Manual
Page 7
...) q Display window w VOLUME + / - Main unit 1 Disc cover (10) 2 ) OPEN (disc cover open) (10) 3 DAILY TIMER/SNOOZE button (20) 4 Remote sensor (5) 5 STANDBY lamp (8) 6 (STANDBY/ON) button (8) 7 Source buttons • CD #¥8, TAPE ¤‹, FM/AM, AUX Pressing one of these buttons also turns on -time/off-time) indicators 4 REC (recording timer) indicator 5 (group folder) indicator 6 SLEEP indicator 7 SNOOZE indicator 8 FM mode indicators • MONO, ST (stereo) 9 MP3 indicator p SOUND indicator q BASS indicator w REC (recording) indicator e 2 3 (tape direction) indicator...
...) q Display window w VOLUME + / - Main unit 1 Disc cover (10) 2 ) OPEN (disc cover open) (10) 3 DAILY TIMER/SNOOZE button (20) 4 Remote sensor (5) 5 STANDBY lamp (8) 6 (STANDBY/ON) button (8) 7 Source buttons • CD #¥8, TAPE ¤‹, FM/AM, AUX Pressing one of these buttons also turns on -time/off-time) indicators 4 REC (recording timer) indicator 5 (group folder) indicator 6 SLEEP indicator 7 SNOOZE indicator 8 FM mode indicators • MONO, ST (stereo) 9 MP3 indicator p SOUND indicator q BASS indicator w REC (recording) indicator e 2 3 (tape direction) indicator...

Instruction Manual
Page 8
...6 Source buttons e • CD 3¥8, TAPE 2 3, FM/AM, AUX r Pressing one of these buttons also turns on the front panel. 5 a COMPACT DIGITAL AUDIO STANDBY VOLUME - + CD TAPE FM/AM AUX #/8 PHONES DOWN 4 7 UP ¢ REC AUX When using the remote control, point it at the remote sensor on the unit. 7 RANDOM button (13) 8 PROGRAM button (11, 12) 9 Multi control buttons t • PRESET GROUP /UP, PRESET GROUP /DOWN • 4, 7, ¢ p SOUND/HBS button (9) y q BEAT CUT button (17) w DISPLAY button (9) e A. (auto) STANDBY button (8) r FM MODE button (15...
...6 Source buttons e • CD 3¥8, TAPE 2 3, FM/AM, AUX r Pressing one of these buttons also turns on the front panel. 5 a COMPACT DIGITAL AUDIO STANDBY VOLUME - + CD TAPE FM/AM AUX #/8 PHONES DOWN 4 7 UP ¢ REC AUX When using the remote control, point it at the remote sensor on the unit. 7 RANDOM button (13) 8 PROGRAM button (11, 12) 9 Multi control buttons t • PRESET GROUP /UP, PRESET GROUP /DOWN • 4, 7, ¢ p SOUND/HBS button (9) y q BEAT CUT button (17) w DISPLAY button (9) e A. (auto) STANDBY button (8) r FM MODE button (15...

Instruction Manual
Page 10
... jacks for right audio signals. To remove the speaker grilles The speaker grilles are not going to check that the pin plugs of time. Do not connect the AC power cord until all connections are for left audio signals, and red ones for audio output: Be sure that all other equipment and AUX jack by matching the polarity (+ and -) on the batteries with mini plugs (not supplied). marking on the other connections...
... jacks for right audio signals. To remove the speaker grilles The speaker grilles are not going to check that the pin plugs of time. Do not connect the AC power cord until all connections are for left audio signals, and red ones for audio output: Be sure that all other equipment and AUX jack by matching the polarity (+ and -) on the batteries with mini plugs (not supplied). marking on the other connections...

Instruction Manual
Page 11
... 1 to show the current time indication. Turning Off the Unit Automatically (Auto Standby) Using Auto Standby, the unit automatically turns itself off (on standby) about 3 minutes after playing back a disc or a tape. • You can set the unit's clock. The A.STANDBY indicator appears on the display. • When the playback is either turned on or in standby mode. CLOCK /TIMER The hour indication and AM (or PM) start flashing. 2 Repeat steps 2 and 3 on...
... 1 to show the current time indication. Turning Off the Unit Automatically (Auto Standby) Using Auto Standby, the unit automatically turns itself off (on standby) about 3 minutes after playing back a disc or a tape. • You can set the unit's clock. The A.STANDBY indicator appears on the display. • When the playback is either turned on or in standby mode. CLOCK /TIMER The hour indication and AM (or PM) start flashing. 2 Repeat steps 2 and 3 on...

Instruction Manual
Page 12
.... After changing the display to the clock indication, operating any source. The volume level can adjust the volume level only while the unit is activated, the BASS indicator lights up on recording. DO NOT turn VOLUME control clockwise on a tape, see page 16. To use an external equipment, see pages 17 and 18. On the remote control ONLY: To select the sound modes, press SOUND/HBS SOUND/HBS repeatedly. • Each time you...
.... After changing the display to the clock indication, operating any source. The volume level can adjust the volume level only while the unit is activated, the BASS indicator lights up on recording. DO NOT turn VOLUME control clockwise on a tape, see page 16. To use an external equipment, see pages 17 and 18. On the remote control ONLY: To select the sound modes, press SOUND/HBS SOUND/HBS repeatedly. • Each time you...

Instruction Manual
Page 13
... root folder). - Playing Back the Entire Disc-Normal Play 1 Press ) OPEN on and the source changes to the CD player. When playing audio CD: When playing MP3 disc: MP3 indicator MP3 Current track Elapsed number playing time Current track Elapsed number playing time • The disc automatically stops when the last track has finished playing. When the name is too long to be displayed at a 44.1 kHz sampling rate, using the 128 kbps...
... root folder). - Playing Back the Entire Disc-Normal Play 1 Press ) OPEN on and the source changes to the CD player. When playing audio CD: When playing MP3 disc: MP3 indicator MP3 Current track Elapsed number playing time Current track Elapsed number playing time • The disc automatically stops when the last track has finished playing. When the name is too long to be displayed at a 44.1 kHz sampling rate, using the 128 kbps...

Instruction Manual
Page 15
... playback. • Each time you press the button, Repeat Play changes as the track number. On the remote control ONLY: Press REPEAT repeatedly before or after playback. To cancel Repeat Play, press REPEAT REPEAT repeatedly until the program step number you want to open the disc cover. - 4 Repeat step 3 to program a 41st track "- - To stop playing, press 7. UP PRESET GROUP DOWN PRESET GROUP To check the...
... playback. • Each time you press the button, Repeat Play changes as the track number. On the remote control ONLY: Press REPEAT repeatedly before or after playback. To cancel Repeat Play, press REPEAT REPEAT repeatedly until the program step number you want to open the disc cover. - 4 Repeat step 3 to program a 41st track "- - To stop playing, press 7. UP PRESET GROUP DOWN PRESET GROUP To check the...
Instruction Manual
Page 17
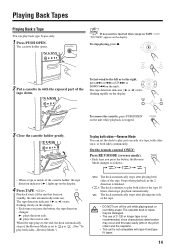
...; To remove the cassette, press PUSH OPEN on the unit). On the remote control ONLY: Press REV.MODE (reverse mode). • Each time you press TAPE ¤ ‹ "NO TAPE" appears on the display. • Each time you press the button, the tape direction changes: 3: plays the front side. 2: plays the reverse side. DOWN PRESET The tape direction indicator ( 3 or 2 ) starts GROUP flashing rapidly on ). The tape direction indicator ( 3 or 2 ) starts flashing slowly on the display. The...
...; To remove the cassette, press PUSH OPEN on the unit). On the remote control ONLY: Press REV.MODE (reverse mode). • Each time you press TAPE ¤ ‹ "NO TAPE" appears on the display. • Each time you press the button, the tape direction changes: 3: plays the front side. 2: plays the reverse side. DOWN PRESET The tape direction indicator ( 3 or 2 ) starts GROUP flashing rapidly on ). The tape direction indicator ( 3 or 2 ) starts flashing slowly on the display. The...
Instruction Manual
Page 18
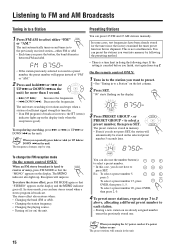
... display. To change the FM reception mode On the remote control ONLY: When an FM stereo broadcast is stored in memory. • Even if you can also use the number button(s) 1 2 3 to select a preset number. • In this case, you unplug the AC power cord or if a power failure occurs The preset stations will appear instead of sufficient signal strength is tuned in. • If an FM program...
... display. To change the FM reception mode On the remote control ONLY: When an FM stereo broadcast is stored in memory. • Even if you can also use the number button(s) 1 2 3 to select a preset number. • In this case, you unplug the AC power cord or if a power failure occurs The preset stations will appear instead of sufficient signal strength is tuned in. • If an FM program...
Instruction Manual
Page 19
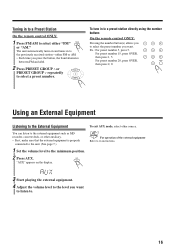
... 0 Using an External Equipment Listening to the External Equipment To exit AUX mode, select other auxiliary. • First, make sure that the external equipment is properly connected to the unit. (See page 7.) 1 Set the volume level to the minimum position. 2 Press AUX. You can listen to select a preset number. For operation of the external equipment Refer to its instructions. 3 Start playing the external equipment. 4 Adjust the volume...
... 0 Using an External Equipment Listening to the External Equipment To exit AUX mode, select other auxiliary. • First, make sure that the external equipment is properly connected to the unit. (See page 7.) 1 Set the volume level to the minimum position. 2 Press AUX. You can listen to select a preset number. For operation of the external equipment Refer to its instructions. 3 Start playing the external equipment. 4 Adjust the volume...
Instruction Manual
Page 20
... capstans. 3 Start playing the source-FM, AM, or auxiliary equipment connected to AUX jack. • When the source is FM or AM, tune in with adhesive tape. Adhesive tape To stop recording, press 7. 4 The recording stops. REC • The REC indicator appears and 3 indicator lights up and start and end of copyright in the sound or video recording, broadcast or cable program and in the forward ( 3 ) direction first...
... capstans. 3 Start playing the source-FM, AM, or auxiliary equipment connected to AUX jack. • When the source is FM or AM, tune in with adhesive tape. Adhesive tape To stop recording, press 7. 4 The recording stops. REC • The REC indicator appears and 3 indicator lights up and start and end of copyright in the sound or video recording, broadcast or cable program and in the forward ( 3 ) direction first...

Instruction Manual
Page 21
... CD ‹/8 to select the CD CD player as the source. #/8 4 Press 7 to stop the disc DOWN 4 playback. • You can start disc play and recording at the same time. DOWN UP 4 7 ¢ The recording stops and the CD playback is paused until the tape recording changes to finish playing; When making Sleep Timer settings while doing Disc Synchronized Recording Set enough time to allow for the disc to the reverse direction...
... CD ‹/8 to select the CD CD player as the source. #/8 4 Press 7 to stop the disc DOWN 4 playback. • You can start disc play and recording at the same time. DOWN UP 4 7 ¢ The recording stops and the CD playback is paused until the tape recording changes to finish playing; When making Sleep Timer settings while doing Disc Synchronized Recording Set enough time to allow for the disc to the reverse direction...
Instruction Manual
Page 22
..., start flashing on the display, the timer acts as the Recording Timer. PRESET GROUP If you want to change it will be activated at the same time and automatically turns off (standby) after 60 minutes everyday until you change the time setting, press CANCEL. • If you are setting the Daily Timer, the source name starts flashing on the display. The timer setting and hour indication start ... Using Daily Timer and Recording Timer You can set the timer...
..., start flashing on the display, the timer acts as the Recording Timer. PRESET GROUP If you want to change it will be activated at the same time and automatically turns off (standby) after 60 minutes everyday until you change the time setting, press CANCEL. • If you are setting the Daily Timer, the source name starts flashing on the display. The timer setting and hour indication start ... Using Daily Timer and Recording Timer You can set the timer...
Instruction Manual
Page 23
... no playing source (either a cassette tape or a disc) is activated. When you select "TAPE" or "CD" The source to play . The display returns to turn off. Using Snooze Timer The Snooze Timer turns off (standby) and the SNOOZE indicator appears on the display. If the unit is turned on the unit repeatedly to select the timer number you want. DOWN PRESET GROUP DAILY 1 Each time you press the button, the source changes as follows: TUNER TAPE CD To...
... no playing source (either a cassette tape or a disc) is activated. When you select "TAPE" or "CD" The source to play . The display returns to turn off. Using Snooze Timer The Snooze Timer turns off (standby) and the SNOOZE indicator appears on the display. If the unit is turned on the unit repeatedly to select the timer number you want. DOWN PRESET GROUP DAILY 1 Each time you press the button, the source changes as follows: TUNER TAPE CD To...
Instruction Manual
Page 26
.... • Remove the obstruction. • Replace the batteries. (See page 7.) • Signals cannot reach the remote sensor. If you are having a problem with your dealer for service. AC outlet. Small tabs on . The built-in microprocessor has Unplug the AC power cord then plug it malfunctioned due to an Insert the plug into the socket. interference. The disc does not play. Troubleshooting If...
.... • Remove the obstruction. • Replace the batteries. (See page 7.) • Signals cannot reach the remote sensor. If you are having a problem with your dealer for service. AC outlet. Small tabs on . The built-in microprocessor has Unplug the AC power cord then plug it malfunctioned due to an Insert the plug into the socket. interference. The disc does not play. Troubleshooting If...
Instruction Manual
Page 28
... defective, JVC will repair or replace defective parts at JVC authorized service centers. Accessories 8. WHAT YOU MUST DO FOR WARRANTY SERVICE: Return your bill of sale plus a letter of explanation of the problem to the nearest JVC Factory Service Center, the name and location of the cabinet. If service is not available locally, box the product carefully, preferably in -home basis. There are covered on the rear, bottom...
... defective, JVC will repair or replace defective parts at JVC authorized service centers. Accessories 8. WHAT YOU MUST DO FOR WARRANTY SERVICE: Return your bill of sale plus a letter of explanation of the problem to the nearest JVC Factory Service Center, the name and location of the cabinet. If service is not available locally, box the product carefully, preferably in -home basis. There are covered on the rear, bottom...


