Instruction Manual
Page 1
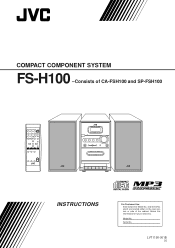
Model No. Serial No. LVT1190-001B [J] Retain this information for future reference. which are located either on the rear, bottom or side of CA-FSH100 and SP-FSH100 INSTRUCTIONS For Customer Use: Enter below the Model No. COMPACT COMPONENT SYSTEM FS-H100 -Consists of the cabinet. and Serial No.
Model No. Serial No. LVT1190-001B [J] Retain this information for future reference. which are located either on the rear, bottom or side of CA-FSH100 and SP-FSH100 INSTRUCTIONS For Customer Use: Enter below the Model No. COMPACT COMPONENT SYSTEM FS-H100 -Consists of the cabinet. and Serial No.
Instruction Manual
Page 2
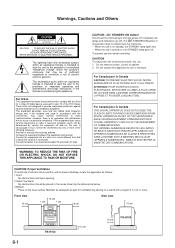
... user to shut the power off completely (all lamps and indications go off . These limits are designed to radio communications. Increase the separation between the equipment and receiver. Connect the equipment into an outlet on a stand with the instructions, may be remote controlled. Do not remove screws, covers or cabinet. 2. The lightning flash with the limits for help. REFER SERVICING TO QUALIFIED SERVICE...
... user to shut the power off completely (all lamps and indications go off . These limits are designed to radio communications. Increase the separation between the equipment and receiver. Connect the equipment into an outlet on a stand with the instructions, may be remote controlled. Do not remove screws, covers or cabinet. 2. The lightning flash with the limits for help. REFER SERVICING TO QUALIFIED SERVICE...

Instruction Manual
Page 3
...Controls 3 Main Unit 3 Remote Control 5 Getting Started 6 Unpacking 6 Putting the Batteries into the Remote Control 6 Connections 6 Connecting Other Equipment 7 Basic and Common Operations 8 Setting the Clock 8 Turning On the Power 8 Selecting the Source 9 Adjusting the Volume 9 Fade Muting 9 Selecting the Sound Modes 9 Adjusting the Tone (Bass/Treble 9 Listening to FM and AM Broadcasts 10 Tuning in to a Station 10 Presetting Stations 10 Tuning in to a Preset Station 11 Playing Back Discs 12 Playing Back the Entire Disc-Normal Play 12 Basic Disc Operations 13 Programming...
...Controls 3 Main Unit 3 Remote Control 5 Getting Started 6 Unpacking 6 Putting the Batteries into the Remote Control 6 Connections 6 Connecting Other Equipment 7 Basic and Common Operations 8 Setting the Clock 8 Turning On the Power 8 Selecting the Source 9 Adjusting the Volume 9 Fade Muting 9 Selecting the Sound Modes 9 Adjusting the Tone (Bass/Treble 9 Listening to FM and AM Broadcasts 10 Tuning in to a Station 10 Presetting Stations 10 Tuning in to a Preset Station 11 Playing Back Discs 12 Playing Back the Entire Disc-Normal Play 12 Basic Disc Operations 13 Programming...

Instruction Manual
Page 4
... manual mainly explains operations using the buttons on the remote control. Gives you information and hints you warning and caution to prevent damage or risk of our JVC products. Moisture condensation Moisture may malfunction. About This Manual This manual is not repeated for a few hours until the moisture evaporates, unplug the AC power cord, then plug it in the following symbols are no user serviceable parts...
... manual mainly explains operations using the buttons on the remote control. Gives you information and hints you warning and caution to prevent damage or risk of our JVC products. Moisture condensation Moisture may malfunction. About This Manual This manual is not repeated for a few hours until the moisture evaporates, unplug the AC power cord, then plug it in the following symbols are no user serviceable parts...

Instruction Manual
Page 6
... 8 FM mode indicators • MONO, ST (stereo) 9 REC indicator p SOUND indicator q Main display 4 Location of these buttons also turns on the unit. 7 PHONES jack (9) 8 MULTI CONTROL buttons • DOWN 4, 7, UP ¢ 9 Cassette holder (15) p Display window q VOLUME control (9) w AUX jack (7, 17) e TIMER button (20) r Tape operation buttons (15, 17) • ‡ (recording), # (play), ! (fast backward), ⁄ (fast forward), &/) (stop/cassette holder open ) (12) 3 Remote sensor (5) 4 STANDBY lamp (8) 5 (STANDBY/ON) button (8, 19) 6 Source buttons • CD #¥8, TAPE, FM/AM, AUX...
... 8 FM mode indicators • MONO, ST (stereo) 9 REC indicator p SOUND indicator q Main display 4 Location of these buttons also turns on the unit. 7 PHONES jack (9) 8 MULTI CONTROL buttons • DOWN 4, 7, UP ¢ 9 Cassette holder (15) p Display window q VOLUME control (9) w AUX jack (7, 17) e TIMER button (20) r Tape operation buttons (15, 17) • ‡ (recording), # (play), ! (fast backward), ⁄ (fast forward), &/) (stop/cassette holder open ) (12) 3 Remote sensor (5) 4 STANDBY lamp (8) 5 (STANDBY/ON) button (8, 19) 6 Source buttons • CD #¥8, TAPE, FM/AM, AUX...

Instruction Manual
Page 7
... (9) u FADE MUTING button (9) COMPACT DIGITAL AUDIO STANDBY VOLUME - + CD TAPE FM/AM AUX #/8 PHONES DOWN 4 7 UP ¢ TIMER AUX When using the remote control, point it at the remote sensor on the unit. 4 REPEAT button (14) 5 PLAY MODE button (10, 13, 14) 6 SOUND button (9) 7 BASS/TREBLE button (9) 8 STANDBY/ON button (8, 19) 9 SLEEP button (20) p CLOCK/TIMER button (8, 19) q DISPLAY button (8) w REMAIN button (14) e SET button (8, 19) r CANCEL button (20) t FM MODE button (10) y VOLUME + / - Remote Control See pages in parentheses for details. 1 2 3 4 5 6 7 STANDBY/ON...
... (9) u FADE MUTING button (9) COMPACT DIGITAL AUDIO STANDBY VOLUME - + CD TAPE FM/AM AUX #/8 PHONES DOWN 4 7 UP ¢ TIMER AUX When using the remote control, point it at the remote sensor on the unit. 4 REPEAT button (14) 5 PLAY MODE button (10, 13, 14) 6 SOUND button (9) 7 BASS/TREBLE button (9) 8 STANDBY/ON button (8, 19) 9 SLEEP button (20) p CLOCK/TIMER button (8, 19) q DISPLAY button (8) w REMAIN button (14) e SET button (8, 19) r CANCEL button (20) t FM MODE button (10) y VOLUME + / - Remote Control See pages in parentheses for details. 1 2 3 4 5 6 7 STANDBY/ON...

Instruction Manual
Page 9
... better reception of the unit, connecting cords, and the AC power cord. white plugs and jacks are complete. For playing other equipment through this unit, connect between the audio output jacks on . • DO NOT plug in any other equipment and AUX jacks by using audio cords with mini plugs (not supplied). Place the antenna away from metallic parts of both FM and AM • Make sure the antenna conductors do not touch any...
... better reception of the unit, connecting cords, and the AC power cord. white plugs and jacks are complete. For playing other equipment through this unit, connect between the audio output jacks on . • DO NOT plug in any other equipment and AUX jacks by using audio cords with mini plugs (not supplied). Place the antenna away from metallic parts of both FM and AM • Make sure the antenna conductors do not touch any...

Instruction Manual
Page 10
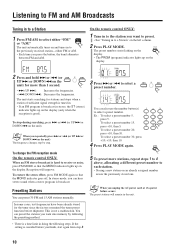
... current time indication. 2 Press SET. The minute indication starts flashing. 4 Press 4 or ¢ to "AM12:00" right away and "AM12:00" starts flashing on . When you unplug the AC power cord or if a power failure occurs The clock is turned on the display until you press the source button-CD 3/8, TAPE, FM/AM and AUX, the unit automatically turns on the display when plugging the power cord again. CLOCK/ TIMER SET To adjust the clock On the remote control...
... current time indication. 2 Press SET. The minute indication starts flashing. 4 Press 4 or ¢ to "AM12:00" right away and "AM12:00" starts flashing on . When you unplug the AC power cord or if a power failure occurs The clock is turned on the display until you press the source button-CD 3/8, TAPE, FM/AM and AUX, the unit automatically turns on the display when plugging the power cord again. CLOCK/ TIMER SET To adjust the clock On the remote control...

Instruction Manual
Page 11
... Source Selecting the Sound Modes To select the source, press CD 6, TAPE, FM/AM, or AUX. • When you turn on the display. To operate the CD player, see pages 17 and 18. To record on the unit). To use the tone adjustment function and the sound mode function at the same time. (The sound mode changes automatically into "OFF" when pressing BASS/TREBLE.) • The bass/treble setting automatically returns to the PHONES jack. Adjusting...
... Source Selecting the Sound Modes To select the source, press CD 6, TAPE, FM/AM, or AUX. • When you turn on the display. To operate the CD player, see pages 17 and 18. To record on the unit). To use the tone adjustment function and the sound mode function at the same time. (The sound mode changes automatically into "OFF" when pressing BASS/TREBLE.) • The bass/treble setting automatically returns to the PHONES jack. Adjusting...
Instruction Manual
Page 12
... "FM" FM/AM or "AM." PRGM You can preset 30 FM and 15 AM stations manually. This is hard to receive or noisy, press FM MODE so that the MONO indicator goes off. PLAY MODE The preset number starts flashing on the display. • The PRGM (program) indicator lights up on the display. In stereo mode, you press the button, the band alternates between FM and AM. The...
... "FM" FM/AM or "AM." PRGM You can preset 30 FM and 15 AM stations manually. This is hard to receive or noisy, press FM MODE so that the MONO indicator goes off. PLAY MODE The preset number starts flashing on the display. • The PRGM (program) indicator lights up on the display. In stereo mode, you press the button, the band alternates between FM and AM. The...

Instruction Manual
Page 14
... turns on and the source changes to another source. • If the disc cannot be played only if they are not available. Elapsed playing time Current track Elapsed number playing time • The disc automatically stops when the last track has finished playing. Playing Back the Entire Disc-Normal Play 1 Press 0 OPEN on the display. Playing Back Discs This unit has been designed to play back the discs containing the tracks in music CD...
... turns on and the source changes to another source. • If the disc cannot be played only if they are not available. Elapsed playing time Current track Elapsed number playing time • The disc automatically stops when the last track has finished playing. Playing Back the Entire Disc-Normal Play 1 Press 0 OPEN on the display. Playing Back Discs This unit has been designed to play back the discs containing the tracks in music CD...

Instruction Manual
Page 15
...-reverses the tracks. Track number Program step number PRGM PLAY MODE You can also use the number button(s) to select a track number. • For the operation of the current or previous tracks. You can do the following operations. On the remote control ONLY: 1 Place a disc. • If the current source is not the CD player, press CD 6, then 7 before or 4 5 6 during play allows you to program other tracks you want...
...-reverses the tracks. Track number Program step number PRGM PLAY MODE You can also use the number button(s) to select a track number. • For the operation of the current or previous tracks. You can do the following operations. On the remote control ONLY: 1 Place a disc. • If the current source is not the CD player, press CD 6, then 7 before or 4 5 6 during play allows you to program other tracks you want...

Instruction Manual
Page 17
...; DO NOT turn off the unit while playing back or recording a tape. TAPE The unit automatically turns on and the source changes to the tape by pressing TAPE on the unit. The cassette deck or tapes may be damaged. • The use buttons on the remote control. 5 Press # (play back type I tapes only. Playing Back a Tape You can select to the tape deck. • You can play ). The tape starts playing. • When...
...; DO NOT turn off the unit while playing back or recording a tape. TAPE The unit automatically turns on and the source changes to the tape by pressing TAPE on the unit. The cassette deck or tapes may be damaged. • The use buttons on the remote control. 5 Press # (play back type I tapes only. Playing Back a Tape You can select to the tape deck. • You can play ). The tape starts playing. • When...
Instruction Manual
Page 18
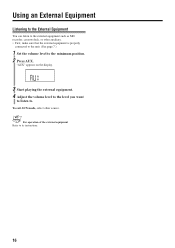
Using an External Equipment Listening to the External Equipment You can listen to the external equipment such as MD recorder, cassette deck, or other source. For operation of the external equipment Refer to . To exit AUX mode, select other auxiliary. • First, make sure that the external equipment is properly connected to the unit. (See page 7.) 1 Set the volume level to the minimum position. 2 Press AUX. "AUX" appears on the display. 3 Start playing the external equipment. 4 Adjust the volume level to the level you want to listen to its instructions. 16
Using an External Equipment Listening to the External Equipment You can listen to the external equipment such as MD recorder, cassette deck, or other source. For operation of the external equipment Refer to . To exit AUX mode, select other auxiliary. • First, make sure that the external equipment is properly connected to the unit. (See page 7.) 1 Set the volume level to the minimum position. 2 Press AUX. "AUX" appears on the display. 3 Start playing the external equipment. 4 Adjust the volume level to the level you want to listen to its instructions. 16
Instruction Manual
Page 19
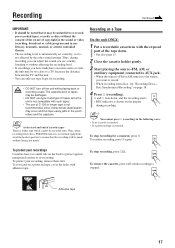
... the unit. • You can adjust the sound you are actually listening to without affecting the recording level. • If recordings you want to re-record pre-recorded tapes, records, or discs without the consent of the owner of copyright in the sound or video recording, broadcast or cable program and in any music. Recording on the back to protect...
... the unit. • You can adjust the sound you are actually listening to without affecting the recording level. • If recordings you want to re-record pre-recorded tapes, records, or discs without the consent of the owner of copyright in the sound or video recording, broadcast or cable program and in any music. Recording on the back to protect...
Instruction Manual
Page 21
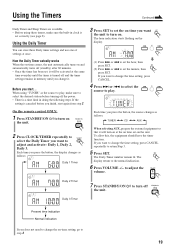
... 3. SET The Daily Timer number remain lit. Each time you press the button, the display changes as follows: 1 Daily 1 Timer 2 Daily 2 Timer 3 Daily 3 Timer Each time you does not need to change the time setting, press CANCEL. 4 Press ¢ or 4 to select the source to play , make sure the built-in clock is canceled before turning off STANDBY/ON Present time indication Normal indication If you press the button, the source changes as follows: TUNER CD AUX...
... 3. SET The Daily Timer number remain lit. Each time you press the button, the display changes as follows: 1 Daily 1 Timer 2 Daily 2 Timer 3 Daily 3 Timer Each time you does not need to change the time setting, press CANCEL. 4 Press ¢ or 4 to select the source to play , make sure the built-in clock is canceled before turning off STANDBY/ON Present time indication Normal indication If you press the button, the source changes as follows: TUNER CD AUX...
Instruction Manual
Page 22
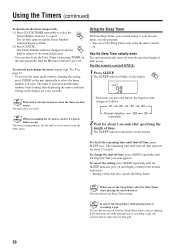
... you want . CANCEL The Timer Number indicator disappears and the display returns to blink. (2) Press CANCEL. On the remote control ONLY: 1 Press SLEEP. Set the built-in clock and activate the timer again. • Each time you press the button, the length of time you set the Sleep Timer after the Daily Timer starts playing the selected source The unit follows the Sleep Timer setting. To change the timer, repeat steps 1 to 7 on...
... you want . CANCEL The Timer Number indicator disappears and the display returns to blink. (2) Press CANCEL. On the remote control ONLY: 1 Press SLEEP. Set the built-in clock and activate the timer again. • Each time you press the button, the length of time you set the Sleep Timer after the Daily Timer starts playing the selected source The unit follows the Sleep Timer setting. To change the timer, repeat steps 1 to 7 on...
Instruction Manual
Page 24
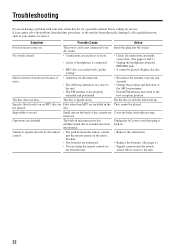
... Unplug the AC power cord then plug it malfunctioned due to the best reception position. Replace the disc. removed. interference. Specific files (tracks) on the unit is recorded with the label side up. Small tabs on . Operations are included in the They cannot be played. The disc is not connected to broadcasts because of the AM loop antenna. • Extend FM antenna and orient...
... Unplug the AC power cord then plug it malfunctioned due to the best reception position. Replace the disc. removed. interference. Specific files (tracks) on the unit is recorded with the label side up. Small tabs on . Operations are included in the They cannot be played. The disc is not connected to broadcasts because of the AM loop antenna. • Extend FM antenna and orient...

Instruction Manual
Page 25
....5 W Impedance: 6 Ω Frequency range: 100 Hz to change without notice. RMS, driven into 6 Ω at operation) 2 W (on standby) Dimensions (W/H/D) (approx.): 144 mm x 255 mm x 277 mm (5 /11 16 in. Speakers/Impedance: 6 Ω - 16 Ω Tuner FM tuning range: AM tuning range: 87.5 MHz-108.0 MHz 530 kHz-1 710 kHz CD player Dynamic range: Signal-to-noise ratio: Wow and...
....5 W Impedance: 6 Ω Frequency range: 100 Hz to change without notice. RMS, driven into 6 Ω at operation) 2 W (on standby) Dimensions (W/H/D) (approx.): 144 mm x 255 mm x 277 mm (5 /11 16 in. Speakers/Impedance: 6 Ω - 16 Ω Tuner FM tuning range: AM tuning range: 87.5 MHz-108.0 MHz 530 kHz-1 710 kHz CD player Dynamic range: Signal-to-noise ratio: Wow and...

Instruction Manual
Page 26
... in shipment, due to act of original retail purchase for Television sets having a screen size 25 inches and above . Parts used for replacement are no charge to a JVC authorized service center on an in the Owner's Manual, normal maintenance, video and audio head cleaning; 4. Initial installation and installation and removal for future reference. This warranty gives you specific legal rights and you . FOR DETAILS OF REFURBISHED...
... in shipment, due to act of original retail purchase for Television sets having a screen size 25 inches and above . Parts used for replacement are no charge to a JVC authorized service center on an in the Owner's Manual, normal maintenance, video and audio head cleaning; 4. Initial installation and installation and removal for future reference. This warranty gives you specific legal rights and you . FOR DETAILS OF REFURBISHED...


