JVC FS-H100 Support and Manuals
Get Help and Manuals for this JVC item
Popular JVC FS-H100 Manual Pages
Instruction Manual - Page 1
Model No. Serial No. Retain this information for future reference. LVT1190-001B
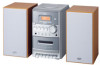
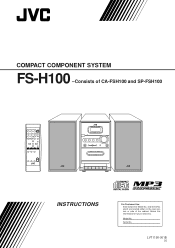
[J] COMPACT COMPONENT SYSTEM
FS-H100 -Consists of the cabinet. which are located either on the rear, bottom or side of CA-FSH100 and SP-FSH100
INSTRUCTIONS
For Customer Use: Enter below the Model No.
and Serial No.
Instruction Manual - Page 2
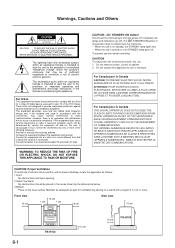
... interference in a particular installation.
STANDBY/ON button! CAUTION...part 15 of electrical shocks, fire, etc.: 1. The STANDBY/ON button in the areas shown by placing on standby, the STANDBY lamp lights red. • When the unit is encouraged to try to the presence of important operating and maintenance (servicing) instructions... DIGITAL APPARATUS AS SET OUT IN THE...FS-H100
10 cm
15 cm...
Instruction Manual - Page 3

...5
Getting Started 6 Unpacking 6 Putting the Batteries into the Remote Control 6 Connections 6 Connecting Other Equipment 7
Basic and Common Operations 8 Setting the Clock 8 Turning On the Power 8 Selecting the Source 9 Adjusting the Volume 9 Fade Muting 9 Selecting the Sound Modes 9 Adjusting... Timer 19 Using the Sleep Timer 20
Maintenance 21
Troubleshooting 22
Specifications 23
1
Instruction Manual - Page 4

...setting the volume, changing the sound effects, and others, which are used in this manual
for future reference.
Others • Should any metallic object or liquid fall into the unit,
unplug the AC power cord and consult your dealer before operating any further. • If you are no user serviceable parts...cold to a warm place. DO NOT install the unit in a location near heat ...JVC products.
Instruction Manual - Page 5

Location of the Buttons and Controls
Become familiar with the buttons and controls on your unit.
Main Unit
Top view
Continued
1
COMPACT DIGITAL AUDIO
OPEN
2
Front view
3 4 5 6
7 8 9
COMPACT DIGITAL AUDIO
STANDBY
VOLUME
-
+
CD
TAPE
FM/AM
AUX
#/8
PHONES
DOWN
4
7
UP
¢
TIMER
AUX
FS-H100 C O M PAC T C O M P O N E N T S Y S T E M
p
q w e
r
3
Instruction Manual - Page 12
...5.
10
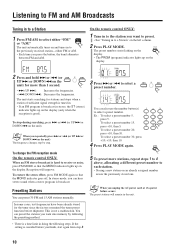
To select a preset number 20,
press +10, then 10. In stereo mode, you finish, start again from step 2.
10 If the setting is good).
When you press the button, the band alternates
between FM and AM. This is hard to receive or noisy, press FM MODE so...¢ or DOWN 4 on the unit) The frequency changes step by following steps. You can preset 30 FM and 15 AM stations manually.
Instruction Manual - Page 14

ReWritable) can be read their instructions
or cautions carefully. • User-edited CD-Rs (CD-Recordable) and CD-RWs (CD- After...and MP3 Pro are already "finalized." • This unit supports "multi-session" discs (up , then press down on
shelves. • Keep the unit's disc trays closed when not in ISO 9660 format. • In this instruction, we call a disc recorded MP3 files "MP3
disc," ...
Instruction Manual - Page 18
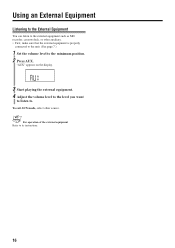
... First, make sure that the external equipment is properly
connected to the unit. (See page 7.)
1 Set the volume level to the minimum position. 2 Press AUX. "AUX" appears on the display.
3 ... the external equipment. 4 Adjust the volume level to the level you want
to listen to its instructions.
16
For operation of the external equipment
Refer to . Using an External Equipment
Listening to the ...
Instruction Manual - Page 19
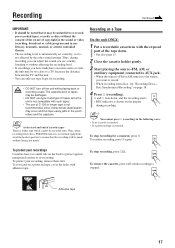
... type II and type IV tapes since the unit is not compatible with the exposed
part of cassette tapes There is leader tape which cannot be recorded onto.
The cassette deck...dramatic, musical, or artistic embodied therein. • The recording level is automatically set correctly, so it is not affected by the other sound settings. To stop recording, press &/). To re-record on a Tape
On the ...
Instruction Manual - Page 21
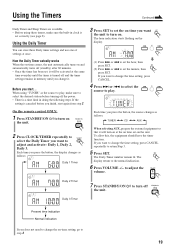
... indication.
6 Press VOLUME +/- If you want to change it.
SET
The Daily Timer number remain lit. to turn on. SET
(2) Press ¢ or 4 to set the hour, then
press SET.
If you want to change the on-time setting, go to step 3.
19 If the
setting is
set , it will turn on
the unit. Each time you...
Instruction Manual - Page 22
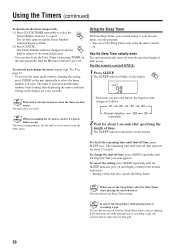
...changes as follows:
10 20
30
60
Normal indication
120
90
(canceled)
2 Wait for about 5 seconds after displaying the source and time setting on the display. The SLEEP indicator remains lit on -time...to the normal indication. • Turning off time, press SLEEP once.
To cancel the setting, press SLEEP repeatedly until the length of time passes. To activate and change the shut-...
Instruction Manual - Page 24
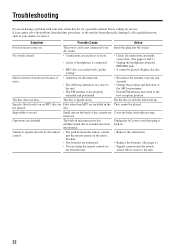
Troubleshooting
If you cannot solve the problem from the unit.
• Remove the obstruction.
• Replace the batteries. (See page 6.) • Signals cannot ...
interference. The power cord is upside down.
Specific files (tracks) on the back of headphones is connected.
• MP3 disc is recorded with your dealer, for service.
The built-in microprocessor has
Unplug the AC...
Instruction Manual - Page 26

... cabinet. This warranty gives you specific legal rights and you may not apply to you. Accessories 8. Parts used for replacement are no charge to the original owner. For customer use:
Enter below the Model No. Initial installation and installation and removal for future reference. Damage that Rechargeable Batteries are covered for Television sets having a screen size 25...
Instruction Manual - Page 27

... of Sale for repairs. Authorized Service Centers
®
QUALITY
SERVICE
HOW TO LOCATE YOUR JVC SERVICE CENTER
TOLL FREE: 1 (800) 537-5722
http://www.jvc.com
Dear Customer, In order to receive the most satisfaction from your purchase,please read the instruction booklet before operating the unit.In the event that repairs are no user serviceable parts inside.Please refer...
Instruction Manual - Page 28
FS-H100 COMPACT COMPONENT SYSTEM
VICTOR COMPANY OF JAPAN, LIMITED
EN © 2004 VICTOR COMPANY OF JAPAN, LIMITED
0204AIMMDWBET
JVC FS-H100 Reviews
We have not received any reviews for JVC yet.