
Specifications
Page 2
... Digital Still (CD-R/RW), Tuner • Power Output: 90 watts per channel* • 2-Way Bass-Reflex: 4-3/4" (12cm) Cone Woofer, 1-5/8" (4cm) Cone Tweeter • Display Dimmer • COMPU PLAY for movies or music • Front AUX Input General Specifications DVD Player: • Playable Formats: DVD-Audio/Video, DVD-R/RW (Video Format), CD, CD-R/RW, SVCD/VCD, MP3/JPEG Digital Still (CD-R/RW) • Slow/Zoom/Angle/Time/Search/Still/Resume • Dolby Digital/DTS Decoder (2ch) DISTRIBUTED BY • Digital Direct...
... Digital Still (CD-R/RW), Tuner • Power Output: 90 watts per channel* • 2-Way Bass-Reflex: 4-3/4" (12cm) Cone Woofer, 1-5/8" (4cm) Cone Tweeter • Display Dimmer • COMPU PLAY for movies or music • Front AUX Input General Specifications DVD Player: • Playable Formats: DVD-Audio/Video, DVD-R/RW (Video Format), CD, CD-R/RW, SVCD/VCD, MP3/JPEG Digital Still (CD-R/RW) • Slow/Zoom/Angle/Time/Search/Still/Resume • Dolby Digital/DTS Decoder (2ch) DISTRIBUTED BY • Digital Direct...
Instruction Manual
Page 1
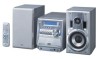
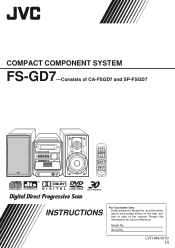
Retain this information for future reference. which are located either on the rear, bottom or side of CA-FSGD7 and SP-FSGD7 DIGITAL INSTRUCTIONS For Customer Use: Enter below the Model No. Model No. LVT1348-001D [J] Serial No. COMPACT COMPONENT SYSTEM FS-GD7-Consists of the cabinet. and Serial No.
Retain this information for future reference. which are located either on the rear, bottom or side of CA-FSGD7 and SP-FSGD7 DIGITAL INSTRUCTIONS For Customer Use: Enter below the Model No. Model No. LVT1348-001D [J] Serial No. COMPACT COMPONENT SYSTEM FS-GD7-Consists of the cabinet. and Serial No.

Instruction Manual
Page 3
CAUTION Changes or modifications not approved by JVC could void the user's authority to comply with Part 15 of Conformity Model Number: FS-GD7 Trade Name: JVC Responsible Party: JVC Americas Corp. For Canada/pour le Canada THIS DIGITAL APPARATUS DOES NOT EXCEED THE CLASS B LIMITS FOR RADIO NOISE EMISSIONS FROM DIGITAL APPARATUS AS SET OUT IN THE INTERFERENCE-CAUSING EQUIPMENT STANDARD ENTITLED "DIGITAL APPARATUS," ICES...
CAUTION Changes or modifications not approved by JVC could void the user's authority to comply with Part 15 of Conformity Model Number: FS-GD7 Trade Name: JVC Responsible Party: JVC Americas Corp. For Canada/pour le Canada THIS DIGITAL APPARATUS DOES NOT EXCEED THE CLASS B LIMITS FOR RADIO NOISE EMISSIONS FROM DIGITAL APPARATUS AS SET OUT IN THE INTERFERENCE-CAUSING EQUIPMENT STANDARD ENTITLED "DIGITAL APPARATUS," ICES...
Instruction Manual
Page 5
... Manual 2 Getting Started 3 Step 1: Unpack 3 Step 2: Prepare the Remote Control 3 Step 3: Hook Up 4 Changing the Scanning Mode 6 Before Operating the System 7 Playable Disc Types 7 Display Indicators 8 Daily Operations-Playback 10 Listening to the Radio 11 Playing Back a Disc 12 Playing Back from the PC 14 Playing Back from Other Equipment 14 Daily Operations-Sound&Other Adjustments .... 15 Adjusting the Volume 15 Adjusting the Sound 15 Making DVD Voice Clear-CLEAR VOICE 16 Presetting Automatic DVD Sound Increase Level 16 Changing...
... Manual 2 Getting Started 3 Step 1: Unpack 3 Step 2: Prepare the Remote Control 3 Step 3: Hook Up 4 Changing the Scanning Mode 6 Before Operating the System 7 Playable Disc Types 7 Display Indicators 8 Daily Operations-Playback 10 Listening to the Radio 11 Playing Back a Disc 12 Playing Back from the PC 14 Playing Back from Other Equipment 14 Daily Operations-Sound&Other Adjustments .... 15 Adjusting the Volume 15 Adjusting the Sound 15 Making DVD Voice Clear-CLEAR VOICE 16 Presetting Automatic DVD Sound Increase Level 16 Changing...

Instruction Manual
Page 6
... "Troubleshooting" (on the plug, not the AC power cord. Indicates that you press the button briefly. Moisture condensation Moisture may malfunction. If anything goes wrong, unplug the AC power cord and consult your dealer before operating any metallic object or liquid fall into the System, unplug the AC power cord and consult your dealer. In this operation is only possible using the remote control. Indicates...
... "Troubleshooting" (on the plug, not the AC power cord. Indicates that you press the button briefly. Moisture condensation Moisture may malfunction. If anything goes wrong, unplug the AC power cord and consult your dealer before operating any metallic object or liquid fall into the System, unplug the AC power cord and consult your dealer. In this operation is only possible using the remote control. Indicates...
Instruction Manual
Page 8
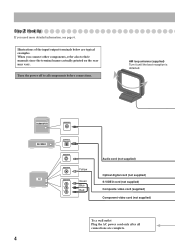
Turn the power off to their manuals since the terminal names actually printed on the rear may vary. SUBWOOFER DECODER TV AUDIO INPUT OPTICAL DIGITAL IN VIDEO INPUT VIDEO INPUT Yellow VIDEO INPUT Y Pb Pr Green Blue Red Audio cord (not supplied) Optical digital cord (not supplied) S-VIDEO cord (not supplied) Composite video cord (supplied) Component video cord (not supplied) To a wall outlet Plug the AC power cord only after all components before connections. Illustrations of the input/output terminals below are complete. 4 AM loop antenna (supplied) Turn it until the best ...
Turn the power off to their manuals since the terminal names actually printed on the rear may vary. SUBWOOFER DECODER TV AUDIO INPUT OPTICAL DIGITAL IN VIDEO INPUT VIDEO INPUT Yellow VIDEO INPUT Y Pb Pr Green Blue Red Audio cord (not supplied) Optical digital cord (not supplied) S-VIDEO cord (not supplied) Composite video cord (supplied) Component video cord (not supplied) To a wall outlet Plug the AC power cord only after all components before connections. Illustrations of the input/output terminals below are complete. 4 AM loop antenna (supplied) Turn it until the best ...

Instruction Manual
Page 10
... antenna wire or speaker cords are covered with the metallic parts of the speaker cords to be in DVD player by twisting the vinyl. • Make sure the antenna conductors do not touch any other terminals, connecting cords and power cord. To connect the AM loop antenna 1 Hold 2 Insert 3 Release PROGRE INTER (at the same time) PROGRE (Progressive) INTER (Interlaced) Progressive scanning. Interlaced scanning. To connect the speaker cords Connect the right speaker...
... antenna wire or speaker cords are covered with the metallic parts of the speaker cords to be in DVD player by twisting the vinyl. • Make sure the antenna conductors do not touch any other terminals, connecting cords and power cord. To connect the AM loop antenna 1 Hold 2 Insert 3 Release PROGRE INTER (at the same time) PROGRE (Progressive) INTER (Interlaced) Progressive scanning. Interlaced scanning. To connect the speaker cords Connect the right speaker...

Instruction Manual
Page 11
...; Turn on the TV and select an appropriate input mode on the TV to view the pictures or on-screen displays on page 32. IMPORTANT: Before playing a disc, make sure of Digital Theater Systems, Inc. "DVD Logo" is a trademark of these discs will not start. The System can play back only DVDs recorded with the "Compact Disc Digital Audio" standard. In addition to the above discs, this product may not be played back: DVD-ROM, DVD...
...; Turn on the TV and select an appropriate input mode on the TV to view the pictures or on-screen displays on page 32. IMPORTANT: Before playing a disc, make sure of Digital Theater Systems, Inc. "DVD Logo" is a trademark of these discs will not start. The System can play back only DVDs recorded with the "Compact Disc Digital Audio" standard. In addition to the above discs, this product may not be played back: DVD-ROM, DVD...

Instruction Manual
Page 12
... preset number) and station frequency appear. • While selecting "AUX"; q B.S.P. r A. (auto) STANDBY indicator • Lights when Auto Standby is tuned in. 4 Main display • While listening to radio; Blinking while playing back a disc. - indicator • Lights when the current disc is activated (see page 21). e PROGRESSIVE indicator • Lights when progressive scanning mode is detected (see page 6). w BONUS indicator • Lights when a DVD Audio with when and how the indicator illuminates on page 9. 5 SOUND...
... preset number) and station frequency appear. • While selecting "AUX"; q B.S.P. r A. (auto) STANDBY indicator • Lights when Auto Standby is tuned in. 4 Main display • While listening to radio; Blinking while playing back a disc. - indicator • Lights when the current disc is activated (see page 21). e PROGRESSIVE indicator • Lights when progressive scanning mode is detected (see page 6). w BONUS indicator • Lights when a DVD Audio with when and how the indicator illuminates on page 9. 5 SOUND...

Instruction Manual
Page 14
... press AUX or USB, start playback on the System or start . • If you turn down the volume before connecting or putting on the main unit turns off ... • Press the button again, to display the clock indication. (at the same time) 10 Be sure to an extremely high level; To turn off (standby) the System with the volume set to turn on the external component. 3 Adjust the volume. 4 Operate the target source as...
... press AUX or USB, start playback on the System or start . • If you turn down the volume before connecting or putting on the main unit turns off ... • Press the button again, to display the clock indication. (at the same time) 10 Be sure to an extremely high level; To turn off (standby) the System with the volume set to turn on the external component. 3 Adjust the volume. 4 Operate the target source as...

Instruction Manual
Page 16
... screen to indicate your current operation (for more details, see "Operations on the CONTROL Screen" on page 28. To insert a disc You can store the stop : • When current source is not disc, press DVD/CD 3 to select the disc player as the source during "PLAY" flashing on the display. or To release, press DVD/CD 3. • While playing DVD/SVCD/VCD: This System can insert a disc while playing another disc onto, the first disc tray...
... screen to indicate your current operation (for more details, see "Operations on the CONTROL Screen" on page 28. To insert a disc You can store the stop : • When current source is not disc, press DVD/CD 3 to select the disc player as the source during "PLAY" flashing on the display. or To release, press DVD/CD 3. • While playing DVD/SVCD/VCD: This System can insert a disc while playing another disc onto, the first disc tray...

Instruction Manual
Page 17
... can select a title/chapter/track directly and start playback. • For DVD Video, you can select a title before starting playback, you can operate a disc-DVD and SVCD/VCD with Playback Control (PBC)-using the disc menu ONLY You can also select items by pressing the numeric buttons to the previous page. To use this function while displaying the pull-down menu (see page 26). • With...
... can select a title/chapter/track directly and start playback. • For DVD Video, you can select a title before starting playback, you can operate a disc-DVD and SVCD/VCD with Playback Control (PBC)-using the disc menu ONLY You can also select items by pressing the numeric buttons to the previous page. To use this function while displaying the pull-down menu (see page 26). • With...
Instruction Manual
Page 18
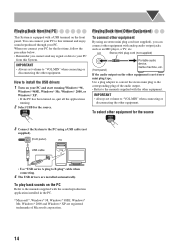
... the audio output. • Refer to install the USB drivers 1 Turn on your PC and start running . 2 Select USB for the first time, follow the procedure below. • Remember you can connect your PC for the source. IMPORTANT • Always set volume to your PC from this terminal and enjoy sound reproduced through your PC. Playing Back from the PC This System is not stereo mini plug type, Use a plug adapter to...
... the audio output. • Refer to install the USB drivers 1 Turn on your PC and start running . 2 Select USB for the first time, follow the procedure below. • Remember you can connect your PC for the source. IMPORTANT • Always set volume to your PC from this terminal and enjoy sound reproduced through your PC. Playing Back from the PC This System is not stereo mini plug type, Use a plug adapter to...

Instruction Manual
Page 20
... source. Remote Control: DIM 1 DIM 2 (at the same time) NORMAL Original recording level. You can store the settings (see next page). 16 You can adjust parameters and can set automatically to easily understand the dialog of DVD even with the volume turned down. • This function only works for the currently loaded DVD. MIDDLE Output level is ejected, this . Erase the display illumination when disc...
... source. Remote Control: DIM 1 DIM 2 (at the same time) NORMAL Original recording level. You can store the settings (see next page). 16 You can adjust parameters and can set automatically to easily understand the dialog of DVD even with the volume turned down. • This function only works for the currently loaded DVD. MIDDLE Output level is ejected, this . Erase the display illumination when disc...

Instruction Manual
Page 34
... time, Daily 2 ON time, or Daily 3 ON time. however, you want . For "DISC": Select the disc number, group number, then the track number (see page 14). Remote control CANCEL 2,3 30 Timer Operations AUDIO SET CLOCK/ TIMER Setting the Daily Timer Remote ONLY Using Daily Timer, you finish setting in the following operations until you can wake up with your favorite music. For "AUX": Connect the other equipment (see page 12). • Select "DISC -" for the last selected disc tray number...
... time, Daily 2 ON time, or Daily 3 ON time. however, you want . For "DISC": Select the disc number, group number, then the track number (see page 14). Remote control CANCEL 2,3 30 Timer Operations AUDIO SET CLOCK/ TIMER Setting the Daily Timer Remote ONLY Using Daily Timer, you finish setting in the following operations until you can wake up with your favorite music. For "AUX": Connect the other equipment (see page 12). • Select "DISC -" for the last selected disc tray number...

Instruction Manual
Page 38
... connect an amplifier with a built-in DTS decoder. • See also "OPTICAL DIGITAL OUT Signals" on the TV screen becomes dark when no operation is done for about 5 minutes. DIGITAL AUDIO OUTPUT When using the digital output on a disc, you can adjust the sound settings of the following : ON: The picture on page 42. AUDIO DIGITAL AUDIO OUTPUT DOWN MIX D. DOLBY DIGITAL To connect to the connected component. OFF: To cancel the screen saver. FILM: To play...
... connect an amplifier with a built-in DTS decoder. • See also "OPTICAL DIGITAL OUT Signals" on the TV screen becomes dark when no operation is done for about 5 minutes. DIGITAL AUDIO OUTPUT When using the digital output on a disc, you can adjust the sound settings of the following : ON: The picture on page 42. AUDIO DIGITAL AUDIO OUTPUT DOWN MIX D. DOLBY DIGITAL To connect to the connected component. OFF: To cancel the screen saver. FILM: To play...
Instruction Manual
Page 41
... USB cable and connect it works between the System and your PC. • The sound may not be skipped. Playing Back a Disc: • When using component video cord. Daily Operations-Playback (see pages 19 to 21) • During slow-motion playback, no disc is loaded on the complexity of this manual, due to the programming and disc structure; Adjusting the Sound: • This function also affects the sound through the OPTICAL DIGITAL...
... USB cable and connect it works between the System and your PC. • The sound may not be skipped. Playing Back a Disc: • When using component video cord. Daily Operations-Playback (see pages 19 to 21) • During slow-motion playback, no disc is loaded on the complexity of this manual, due to the programming and disc structure; Adjusting the Sound: • This function also affects the sound through the OPTICAL DIGITAL...

Instruction Manual
Page 42
... use Program Play and Random Play for "MENU LANGUAGE," "AUDIO LANGUAGE," or "SUBTITLE" is not recorded on a disc, the original language is used now. - Setup Menu Operations (see pages 30 and 31) • When you have selected for JPEG discs. • You cannot eject tray while in always appear on -screen bar will be shown.) - OTHERS Setup Menu-ON SCREEN GUIDE: Setup Menus and on the display regardless of this setting...
... use Program Play and Random Play for "MENU LANGUAGE," "AUDIO LANGUAGE," or "SUBTITLE" is not recorded on a disc, the original language is used now. - Setup Menu Operations (see pages 30 and 31) • When you have selected for JPEG discs. • You cannot eject tray while in always appear on -screen bar will be shown.) - OTHERS Setup Menu-ON SCREEN GUIDE: Setup Menus and on the display regardless of this setting...
Instruction Manual
Page 44
... AUDIO after starting play back through the USB connection. ] USB connection and setting is a time limit. Timer Operations: Daily Timer does not work. ] The System has been turned on when the on the writing application. Setup Menu Operations: No subtitle appears on the screen. ] Select "4:3 LB" for service. The left front and right front signals only. Disc Operations: The disc does not play back illegally produced DVD Audio discs. The disc sound is discontinuous. ] The disc is turned off. General: Adjustments or settings...
... AUDIO after starting play back through the USB connection. ] USB connection and setting is a time limit. Timer Operations: Daily Timer does not work. ] The System has been turned on when the on the writing application. Setup Menu Operations: No subtitle appears on the screen. ] Select "4:3 LB" for service. The left front and right front signals only. Disc Operations: The disc does not play back illegally produced DVD Audio discs. The disc sound is discontinuous. ] The disc is turned off. General: Adjustments or settings...
Instruction Manual
Page 48
... Macrovision, and is prohibited. Specifications Amplifier section Output Power: 90 W per channel, min. patents and other limited viewing uses only unless otherwise authorized by U.S. IN CASE OF 525 OR 625 PROGRESSIVE SCAN PICTURE PROBLEMS, IT IS RECOMMENDED THAT THE USER SWITCH THE CONNECTION TO THE 'STANDARD DEFINITION' OUTPUT. Analog input: AUX: Sensitivity/Impedance (at 1 kHz) 400 mV/47 kΩ USB input: USB Ver.1.1 Digital output: OPTICAL DIGITAL OUT: -21 dBm...
... Macrovision, and is prohibited. Specifications Amplifier section Output Power: 90 W per channel, min. patents and other limited viewing uses only unless otherwise authorized by U.S. IN CASE OF 525 OR 625 PROGRESSIVE SCAN PICTURE PROBLEMS, IT IS RECOMMENDED THAT THE USER SWITCH THE CONNECTION TO THE 'STANDARD DEFINITION' OUTPUT. Analog input: AUX: Sensitivity/Impedance (at 1 kHz) 400 mV/47 kΩ USB input: USB Ver.1.1 Digital output: OPTICAL DIGITAL OUT: -21 dBm...


