
Instruction Manual
Page 1
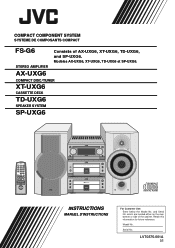
... COMPACT DISC/TUNER XT-UXG6 CASSETTE DECK TD-UXG6 SPEAKER SYSTEM SP-UXG6 REMOTE CONTROL RM-SFSG6J PANEL OPEN/CLOSE DIMMER POWER ACTIVE BASS EX. POWER STANDBY/ON CO MPACT COMPONENT SYST EM F S-G 6 OPEN/CLOSE FM/AM MULTI JOG MOS - and Serial No. Model No. COMPACT COMPONENT SYSTEM SYSTEME DE COMPOSANTS COMPACT FS-G6 STEREO AMPLIFIER Consists of the cabinet. CLOCK/TIMER SLEEP BASS TREBLE FM MODE PLAY MODE REPEAT AUTO PRESET TITTLE/EDIT ENTER DISPLAY /CHARA. FET VOLUME AUX PHONES 1 B I T P•E•M D•D•C O N V E R T E R COMPACT DIGITAL AUDIO DOLBY...
... COMPACT DISC/TUNER XT-UXG6 CASSETTE DECK TD-UXG6 SPEAKER SYSTEM SP-UXG6 REMOTE CONTROL RM-SFSG6J PANEL OPEN/CLOSE DIMMER POWER ACTIVE BASS EX. POWER STANDBY/ON CO MPACT COMPONENT SYST EM F S-G 6 OPEN/CLOSE FM/AM MULTI JOG MOS - and Serial No. Model No. COMPACT COMPONENT SYSTEM SYSTEME DE COMPOSANTS COMPACT FS-G6 STEREO AMPLIFIER Consists of the cabinet. CLOCK/TIMER SLEEP BASS TREBLE FM MODE PLAY MODE REPEAT AUTO PRESET TITTLE/EDIT ENTER DISPLAY /CHARA. FET VOLUME AUX PHONES 1 B I T P•E•M D•D•C O N V E R T E R COMPACT DIGITAL AUDIO DOLBY...

Instruction Manual
Page 2
... sufficient magnitude to persons. DO NOT REMOVE COVER (OR BACK) NO USER SERVICEABLE PARTS INSIDE. The lightning flash with arrowhead symbol, within the product's enclosure that to which can radiate radio frequency energy and, if not installed and used in a residential installation. Connect the equipment into an outlet on , the user is intended to alert the user to provide reasonable protection against harmful...
... sufficient magnitude to persons. DO NOT REMOVE COVER (OR BACK) NO USER SERVICEABLE PARTS INSIDE. The lightning flash with arrowhead symbol, within the product's enclosure that to which can radiate radio frequency energy and, if not installed and used in a residential installation. Connect the equipment into an outlet on , the user is intended to alert the user to provide reasonable protection against harmful...

Instruction Manual
Page 6
... operation using the remote control is organized as those on /off the system, setting the volume, changing the sound effects, and others, which is not good for obtaining the best possible performance from the wall outlet, always pull the plug, not the AC power cord. • The manual mainly explains operations using each procedure. In this manual: DO NOT handle the AC power cord with wet hands. Precautions Installation • Install...
... operation using the remote control is organized as those on /off the system, setting the volume, changing the sound effects, and others, which is not good for obtaining the best possible performance from the wall outlet, always pull the plug, not the AC power cord. • The manual mainly explains operations using each procedure. In this manual: DO NOT handle the AC power cord with wet hands. Precautions Installation • Install...
Instruction Manual
Page 7
...Batteries into the Remote Control 6 Connecting the System Control Cables and the External Wire 6 Connecting MD Recorder XM-G6 7 Connecting Sub Woofer System 7 Connecting Antennas 7 Connecting Speakers 8 Connecting Other Equipments 9 Basic Settings 10 Setting the Clock 10 Setting the Display Illumination (Dimmer 10 Common Operations 11 Turning On the Power and Selecting the Sources 11 Adjusting the Volume 11 Reinforcing the Bass Sound 12 Adjusting Bass and Treble Sounds 12 Operating the Sliding Panel 13 Listening to Each Program - Music Scan 21 Playing Back Dolby-Recorded Tape...
...Batteries into the Remote Control 6 Connecting the System Control Cables and the External Wire 6 Connecting MD Recorder XM-G6 7 Connecting Sub Woofer System 7 Connecting Antennas 7 Connecting Speakers 8 Connecting Other Equipments 9 Basic Settings 10 Setting the Clock 10 Setting the Display Illumination (Dimmer 10 Common Operations 11 Turning On the Power and Selecting the Sources 11 Adjusting the Volume 11 Reinforcing the Bass Sound 12 Adjusting Bass and Treble Sounds 12 Operating the Sliding Panel 13 Listening to Each Program - Music Scan 21 Playing Back Dolby-Recorded Tape...
Instruction Manual
Page 9
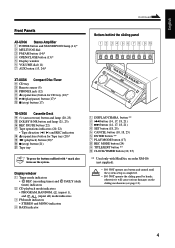
...Continued Front Panels AX-UXG6 Stereo Amplifier 1 POWER button and STANDBY/ON lamp (11)* 2 MULTI JOG dial 3 FM/AM button (14)* 4 OPEN/CLOSE button (13)* 5 Display window 6 VOLUME dial (11) 7 AUX button (13, 24)* XT-UXG6 Compact Disc/Tuner 8 CD tray 9 Remote sensor (5) p PHONES jack (12) q 0 (open /close ) button for Tape tray (20)* o ` (playback) button (20)* ; 7 (stop ) button (17) Buttons behind the sliding panel 123456789p DISPLAY /CHARA. 4 ¢ SET CANCEL ENTER PLAY MODE REC MODE TITLE /EDIT CLOCK /TIMER POWER STANDBY/ON FM/AM MULTI JOG COMPACTCOMPONENT SYSTEM FS-G6 MOS...
...Continued Front Panels AX-UXG6 Stereo Amplifier 1 POWER button and STANDBY/ON lamp (11)* 2 MULTI JOG dial 3 FM/AM button (14)* 4 OPEN/CLOSE button (13)* 5 Display window 6 VOLUME dial (11) 7 AUX button (13, 24)* XT-UXG6 Compact Disc/Tuner 8 CD tray 9 Remote sensor (5) p PHONES jack (12) q 0 (open /close ) button for Tape tray (20)* o ` (playback) button (20)* ; 7 (stop ) button (17) Buttons behind the sliding panel 123456789p DISPLAY /CHARA. 4 ¢ SET CANCEL ENTER PLAY MODE REC MODE TITLE /EDIT CLOCK /TIMER POWER STANDBY/ON FM/AM MULTI JOG COMPACTCOMPONENT SYSTEM FS-G6 MOS...
Instruction Manual
Page 10
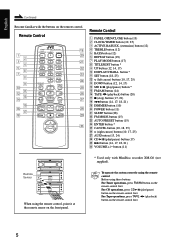
...SET > DOWN MD AUX TAPE FM/AM CD VOLUME o ; button (11) POWER STANDBY/ON COMPACT COMPONENT SYSTEM FS-G6 OPEN/CLOSE FM/AM MULTI JOG MOS - CLOCK/TIMER SLEEP BASS TREBLE FM MODE PLAY MODE REPEAT AUTOPRESET When using these buttons: For Tuner operations, press FM/AM button on the remote control first. a s d f g h j k l / Remote Control 1 PANEL OPEN/CLOSE button (13) 2 CLOCK/TIMER button (10, 25) 3 ACTIVE BASS EX. (extension) button (12) 4 TREBLE button (12) 5 BASS button (12) 6 REPEAT button (19) 7 PLAY MODE button (17) 8 TITLE/EDIT button * 9 UP button (12, 14, 17) p DISPLAY...
...SET > DOWN MD AUX TAPE FM/AM CD VOLUME o ; button (11) POWER STANDBY/ON COMPACT COMPONENT SYSTEM FS-G6 OPEN/CLOSE FM/AM MULTI JOG MOS - CLOCK/TIMER SLEEP BASS TREBLE FM MODE PLAY MODE REPEAT AUTOPRESET When using these buttons: For Tuner operations, press FM/AM button on the remote control first. a s d f g h j k l / Remote Control 1 PANEL OPEN/CLOSE button (13) 2 CLOCK/TIMER button (10, 25) 3 ACTIVE BASS EX. (extension) button (12) 4 TREBLE button (12) 5 BASS button (12) 6 REPEAT button (19) 7 PLAY MODE button (17) 8 TITLE/EDIT button * 9 UP button (12, 14, 17) p DISPLAY...
Instruction Manual
Page 11
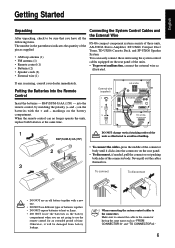
... number in the parentheses indicates the quantity of the pieces supplied. • AM loop antenna (1) • FM antenna (1) • Remote control (1) • Batteries (2) • Speaker cords (2) • External wire (1) Connecting the System Control Cables and the External Wire FS-G6 compact component system consists of three units, AX-UXG6 Stereo Amplifier, XT-UXG6 Compact Disc/ Tuner, TD-UXG6 Cassette Deck, and SP-UXG6 Speaker System. R6P(SUM-3)/AA(15F) 2 3 • To connect the cables, press the middle of the connector...
... number in the parentheses indicates the quantity of the pieces supplied. • AM loop antenna (1) • FM antenna (1) • Remote control (1) • Batteries (2) • Speaker cords (2) • External wire (1) Connecting the System Control Cables and the External Wire FS-G6 compact component system consists of three units, AX-UXG6 Stereo Amplifier, XT-UXG6 Compact Disc/ Tuner, TD-UXG6 Cassette Deck, and SP-UXG6 Speaker System. R6P(SUM-3)/AA(15F) 2 3 • To connect the cables, press the middle of the connector...
Instruction Manual
Page 12
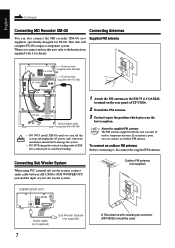
... antenna to the Instructions supplied with this unit can connect an outdoor FM antenna. Outdoor FM antenna (not supplied) ANTENNA SUBWOOFER OUT AX-UXG6 AX-UXG6 CFOMA7X5IAL LOAMOP Audio cable (not supplied) Sub Woofer System (not supplied) 7 A 75Ω antenna with XM-G6) • DO NOT install XM-G6 until you the best reception. Supplied FM antenna ANTENNA AX-UXG6 XT-UXG6 External wire (supplied with XM-G6) External wire (supplied with FS-G6) FROM CONNECTOR-C XM-G6 TO CONNECTOR-C Optical digital cable (supplied with coaxial type connector...
... antenna to the Instructions supplied with this unit can connect an outdoor FM antenna. Outdoor FM antenna (not supplied) ANTENNA SUBWOOFER OUT AX-UXG6 AX-UXG6 CFOMA7X5IAL LOAMOP Audio cable (not supplied) Sub Woofer System (not supplied) 7 A 75Ω antenna with XM-G6) • DO NOT install XM-G6 until you the best reception. Supplied FM antenna ANTENNA AX-UXG6 XT-UXG6 External wire (supplied with XM-G6) External wire (supplied with FS-G6) FROM CONNECTOR-C XM-G6 TO CONNECTOR-C Optical digital cable (supplied with coaxial type connector...

Instruction Manual
Page 14
... to standby mode with them. To audio output on the other equipment • By using audio cable (not supplied), connect between the audio output jacks on the other equipment and the ANALOG IN jacks. When connecting the AC power cord into a wall outlet, the system switches to the manuals supplied with STANDBY/ON lamp lit red. 9 used as an analog playback device. • Audio equipment with an optical digital input terminal By using an audio cable (not supplied). When you can connect the...
... to standby mode with them. To audio output on the other equipment • By using audio cable (not supplied), connect between the audio output jacks on the other equipment and the ANALOG IN jacks. When connecting the AC power cord into a wall outlet, the system switches to the manuals supplied with STANDBY/ON lamp lit red. 9 used as an analog playback device. • Audio equipment with an optical digital input terminal By using an audio cable (not supplied). When you can connect the...

Instruction Manual
Page 15
... MODE PLAY MODE REPEAT AUTO PRESET TITTLE/EDIT ENTER DISPLAY /CHARA. Each time you press DIMMER button, the display window dims and brightens alternately. • While the system is turned on the remote control. CANCEL UP < SET > DOWN MD AUX DIMMER CLOCK/TIMER MULTI JOG SET CANCEL < / > POWER STANDBY/ON CO M PA CT COMPONENT S Y S T E M F S -G 6 OPEN/CLOSE FM/AM MULTI JOG MOS - standby mode). 1 Press CLOCK/TIMER button on or turned off : Press DIMMER button, "DISPLAY OFF" appears in the display window starts blinking...
... MODE PLAY MODE REPEAT AUTO PRESET TITTLE/EDIT ENTER DISPLAY /CHARA. Each time you press DIMMER button, the display window dims and brightens alternately. • While the system is turned on the remote control. CANCEL UP < SET > DOWN MD AUX DIMMER CLOCK/TIMER MULTI JOG SET CANCEL < / > POWER STANDBY/ON CO M PA CT COMPONENT S Y S T E M F S -G 6 OPEN/CLOSE FM/AM MULTI JOG MOS - standby mode). 1 Press CLOCK/TIMER button on or turned off : Press DIMMER button, "DISPLAY OFF" appears in the display window starts blinking...
Instruction Manual
Page 16
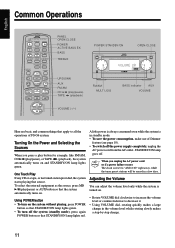
... system automatically turns on . BASS TREBLE UP/DOWN AUX FM/AM CD 6 (play/pause) TAPE ` (playback) POWER STANDBY/ON OPEN/CLOSE POWER STANDBY/ON C O M PA C T COMPONENT SYSTEM F S - G 6 OPEN/CLOSE FM/AM MULTI JOG MOS - CANCEL UP < SET > DOWN MD AUX TAPE FM/AM CD PANEL OPEN/CLOSE POWER ACTIVE BASS EX. CLOCK/TIMER SLEEP BASS TREBLE FM MODE PLAY MODE REPEAT AUTO PRESET TITTLE/EDIT ENTER DISPLAY /CHARA. STANDBY/ON lamp goes off the power supply completely, unplug the AC power cord from the AC outlet. Adjusting the Volume You...
... system automatically turns on . BASS TREBLE UP/DOWN AUX FM/AM CD 6 (play/pause) TAPE ` (playback) POWER STANDBY/ON OPEN/CLOSE POWER STANDBY/ON C O M PA C T COMPONENT SYSTEM F S - G 6 OPEN/CLOSE FM/AM MULTI JOG MOS - CANCEL UP < SET > DOWN MD AUX TAPE FM/AM CD PANEL OPEN/CLOSE POWER ACTIVE BASS EX. CLOCK/TIMER SLEEP BASS TREBLE FM MODE PLAY MODE REPEAT AUTO PRESET TITTLE/EDIT ENTER DISPLAY /CHARA. STANDBY/ON lamp goes off the power supply completely, unplug the AC power cord from the AC outlet. Adjusting the Volume You...

Instruction Manual
Page 17
... . button on the system or start playing any source. DO NOT turn down the volume level before connecting or putting headphones. For private listening Connect a pair of sound can be adjusted in seven steps from the level setting, press the button again. FET VOLUME AUX PHONES jack PHONES 1 B I T P•E•M D•D•C O N V E R T E R COMPACT DIGITAL AUDIO DOLBY B NR REC PAUSE AUTO REVERSE REC To adjust the bass 1 Press BASS button. English Continued • When using the remote control, press VOLUME + button to the PHONES jack...
... . button on the system or start playing any source. DO NOT turn down the volume level before connecting or putting headphones. For private listening Connect a pair of sound can be adjusted in seven steps from the level setting, press the button again. FET VOLUME AUX PHONES jack PHONES 1 B I T P•E•M D•D•C O N V E R T E R COMPACT DIGITAL AUDIO DOLBY B NR REC PAUSE AUTO REVERSE REC To adjust the bass 1 Press BASS button. English Continued • When using the remote control, press VOLUME + button to the PHONES jack...
Instruction Manual
Page 18
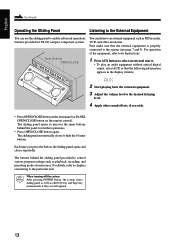
... operations. • Press OPEN/CLOSE button again. First make sure that the following information appears in the display window. 2 Start playing back the external equipment. 3 Adjust the volume level to the desired listening level. 4 Apply other sound effects, if you press the button, the sliding panel opens and closes repeatedly. FET OPEN/CLOSE VOLUME AUX 1 Press AUX button to select an external source. • To play an audio equipment without optical digital output, select AUX...
... operations. • Press OPEN/CLOSE button again. First make sure that the following information appears in the display window. 2 Start playing back the external equipment. 3 Adjust the volume level to the desired listening level. 4 Apply other sound effects, if you press the button, the sliding panel opens and closes repeatedly. FET OPEN/CLOSE VOLUME AUX 1 Press AUX button to select an external source. • To play an audio equipment without optical digital output, select AUX...
Instruction Manual
Page 19
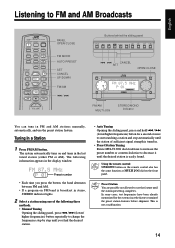
CANCEL UP < SET > DOWN MD AUX TAPE FM/AM CD PANEL OPEN/CLOSE FM MODE AUTO PRESET SET CANCEL UP/DOWN FM/AM 4 / ¢ VOLUME Buttons behind the sliding panel DISPLAY /CHARA. 4 ¢ SET CANCEL ENTER PLAY MODE REC MODE TITLE /EDIT CLOCK /TIMER 4 ¢ CANCEL SET OPEN/CLOSE POWER STANDBY/ON C O M PA C T COMPONENT SYSTEM F S - Tuning in FM and AM stations manually, automatically, and use the feature until the desired station is not a malfunction. 14 The following three methods. • Manual Tuning Opening the sliding...
CANCEL UP < SET > DOWN MD AUX TAPE FM/AM CD PANEL OPEN/CLOSE FM MODE AUTO PRESET SET CANCEL UP/DOWN FM/AM 4 / ¢ VOLUME Buttons behind the sliding panel DISPLAY /CHARA. 4 ¢ SET CANCEL ENTER PLAY MODE REC MODE TITLE /EDIT CLOCK /TIMER 4 ¢ CANCEL SET OPEN/CLOSE POWER STANDBY/ON C O M PA C T COMPONENT SYSTEM F S - Tuning in FM and AM stations manually, automatically, and use the feature until the desired station is not a malfunction. 14 The following three methods. • Manual Tuning Opening the sliding...
Instruction Manual
Page 20
... blinking). • Note that the selected channel "02" disappears, presetting procedure is cancelled. 4 Press SET button again. If the On the remote control only: setting is canceled before you finish, start from step 1 again. 1 Press FM/AM button to tune in the desired station manually. 2 Press and hold AUTO PRESET button on the remote control so that STEREO indicator lights in the display window. If this stereo mode, you unplug the AC power cord or...
... blinking). • Note that the selected channel "02" disappears, presetting procedure is cancelled. 4 Press SET button again. If the On the remote control only: setting is canceled before you finish, start from step 1 again. 1 Press FM/AM button to tune in the desired station manually. 2 Press and hold AUTO PRESET button on the remote control so that STEREO indicator lights in the display window. If this stereo mode, you unplug the AC power cord or...
Instruction Manual
Page 21
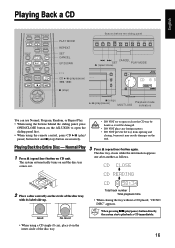
... disc tray comes out. 3 Press 0 (open or close ) button again. Good No Good • When using the remote control, press CD 6 (play /pause) 4 / ¢ ERTER 7 (stop ) 6 (play /pause) button directly, the system starts playback a CD immediately. 16 When pressing 6 (play /pause) MULTI JOG Playback mode indicators You can use Normal, Program, Random, or Repeat Play. • When using the buttons behind the sliding panel PLAY MODE REPEAT SET CANCEL UP/DOWN DISPLAY /CHARA. 4 ¢ SET CANCEL ENTER PLAY MODE REC MODE...
... disc tray comes out. 3 Press 0 (open or close ) button again. Good No Good • When using the remote control, press CD 6 (play /pause) 4 / ¢ ERTER 7 (stop ) 6 (play /pause) button directly, the system starts playback a CD immediately. 16 When pressing 6 (play /pause) MULTI JOG Playback mode indicators You can use Normal, Program, Random, or Repeat Play. • When using the buttons behind the sliding panel PLAY MODE REPEAT SET CANCEL UP/DOWN DISPLAY /CHARA. 4 ¢ SET CANCEL ENTER PLAY MODE REC MODE...
Instruction Manual
Page 29
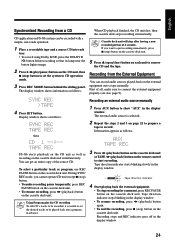
... deck unit or TAPE ` (playback) button on the remote control to CD operation mode. 3 Press REC MODE button behind the sliding panel. The external audio source is useful to set the system to start recording. To select a particular track or program, use REC PAUSE button on the cassette deck unit. Recording stops and REC indicator goes off in the display window. Recording from a CD CD application on FS-G6 system can be played back into each...
... deck unit or TAPE ` (playback) button on the remote control to CD operation mode. 3 Press REC MODE button behind the sliding panel. The external audio source is useful to set the system to start recording. To select a particular track or program, use REC PAUSE button on the cassette deck unit. Recording stops and REC indicator goes off in the display window. Recording from a CD CD application on FS-G6 system can be played back into each...

Instruction Manual
Page 30
...-G6 (not supplied) connected, you can make a tape of the timer-off (standby). Using the Timers English REMOTE CONTROL RM-SFSG6E PANEL OPEN/CLOSE DIMMER POWER ACTIVE BASS EX. The timer settings remain stored in the display window. CANCEL UP < SET > DOWN MD TAPE FM/AM AUX CD PANEL OPEN/CLOSE POWER SLEEP CLOCK/TIMER CANCEL SET < / > Buttons behind the sliding panel DISPLAY /CHARA. 4 ¢ SET CANCEL ENTER PLAY MODE REC MODE TITLE /EDIT CLOCK /TIMER SET CANCEL POWER STANDBY/ON CLOCK/TIMER OPEN/CLOSE POWER STANDBY/ON COMPACT COMPONENT SYSTEM FS-G6 OPEN...
...-G6 (not supplied) connected, you can make a tape of the timer-off (standby). Using the Timers English REMOTE CONTROL RM-SFSG6E PANEL OPEN/CLOSE DIMMER POWER ACTIVE BASS EX. The timer settings remain stored in the display window. CANCEL UP < SET > DOWN MD TAPE FM/AM AUX CD PANEL OPEN/CLOSE POWER SLEEP CLOCK/TIMER CANCEL SET < / > Buttons behind the sliding panel DISPLAY /CHARA. 4 ¢ SET CANCEL ENTER PLAY MODE REC MODE TITLE /EDIT CLOCK /TIMER SET CANCEL POWER STANDBY/ON CLOCK/TIMER OPEN/CLOSE POWER STANDBY/ON COMPACT COMPONENT SYSTEM FS-G6 OPEN...

Instruction Manual
Page 36
... system then plug it back in. 31 If you are connected. • Volume level is set to "- -". • Check all connections and make corrections (see pages 6 - 9). • Disconnect the headphones (see page 12). • Adjust the volume again (see page 7). • You are using the remote control. Unable to the best extended and positioned. reception position (see page 11). • The antenna is not connected...
... system then plug it back in. 31 If you are connected. • Volume level is set to "- -". • Check all connections and make corrections (see pages 6 - 9). • Disconnect the headphones (see page 12). • Adjust the volume again (see page 7). • You are using the remote control. Unable to the best extended and positioned. reception position (see page 11). • The antenna is not connected...
Instruction Manual
Page 39
...-in the Owner's Manual, normal maintenance, video and audio head cleaning; 4. Model No.: Serial No.: Purchase date: Name of purchase); Such repair and replacement services shall be given to you have been subject to any questions concerning your bill of reasonable care, or if repaired or serviced by anyone other rights which will repair or replace defective parts at JVC authorized service centers. Parts used for replacement are covered for...
...-in the Owner's Manual, normal maintenance, video and audio head cleaning; 4. Model No.: Serial No.: Purchase date: Name of purchase); Such repair and replacement services shall be given to you have been subject to any questions concerning your bill of reasonable care, or if repaired or serviced by anyone other rights which will repair or replace defective parts at JVC authorized service centers. Parts used for replacement are covered for...


