Specifications
Page 2
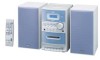
... switching • 4-mode sound equalizer (ROCK / POP / CLASSIC / JAZZ) and manual setting • CD Synchro Start recording • Electronic Bass/Treble Tone Controls • Program (32 tracks) / Random / Repeat Play • Front AUX Input Center Unit: Dimensions (WxHxD) inches: Approximate Weight (lbs./kg.): Speakers: Dimensions (WxHxD) inches: Approximate Weight (lbs./kg.): 5 11/16 x 10 1/16 x 10 15/16 6.4/2.9 5 1/8 x 10 1/8 x 6 3.3/1.5 General Specifications Amplifier/Tuner: • Power Output: 12.5 watts per channel, min. up Volume...
... switching • 4-mode sound equalizer (ROCK / POP / CLASSIC / JAZZ) and manual setting • CD Synchro Start recording • Electronic Bass/Treble Tone Controls • Program (32 tracks) / Random / Repeat Play • Front AUX Input Center Unit: Dimensions (WxHxD) inches: Approximate Weight (lbs./kg.): Speakers: Dimensions (WxHxD) inches: Approximate Weight (lbs./kg.): 5 11/16 x 10 1/16 x 10 15/16 6.4/2.9 5 1/8 x 10 1/8 x 6 3.3/1.5 General Specifications Amplifier/Tuner: • Power Output: 12.5 watts per channel, min. up Volume...
Instruction Manual
Page 1
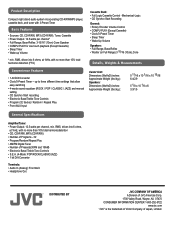
Retain this information for future reference. and Serial No. Serial No. Model No. which are located either on the rear, bottom or side of CA-FSG2 and SP-FSG2 INSTRUCTIONS For Customer Use: Enter below the Model No. COMPACT COMPONENT SYSTEM FS-G2 -Consists of the cabinet. LVT1345-001B [J]
Retain this information for future reference. and Serial No. Serial No. Model No. which are located either on the rear, bottom or side of CA-FSG2 and SP-FSG2 INSTRUCTIONS For Customer Use: Enter below the Model No. COMPACT COMPONENT SYSTEM FS-G2 -Consists of the cabinet. LVT1345-001B [J]
Instruction Manual
Page 2
... the mains plug to qualified service personnel. 2. The STANDBY/ON button in the areas shown by the dimensions below. 3 Bottom: Place on a circuit different from that may result in hazardous radiation exposure. Avoid direct exposure to part 15 of electrical shocks, fire, etc.: 1. Use of controls, adjustments or performance of 10 cm or more of important operating and maintenance (servicing) instructions in...
... the mains plug to qualified service personnel. 2. The STANDBY/ON button in the areas shown by the dimensions below. 3 Bottom: Place on a circuit different from that may result in hazardous radiation exposure. Avoid direct exposure to part 15 of electrical shocks, fire, etc.: 1. Use of controls, adjustments or performance of 10 cm or more of important operating and maintenance (servicing) instructions in...

Instruction Manual
Page 3
...Controls 3 Main Unit 3 Remote Control 5 Getting Started 6 Unpacking 6 Putting the Batteries into the Remote Control 6 Connections 6 Connecting Other Equipment 7 Basic and Common Operations 8 Setting the Clock 8 Turning On the Power 8 Selecting the Source 9 Adjusting the Volume 9 Fade Muting 9 Selecting the Sound Modes 9 Adjusting the Tone (Bass/Treble 9 Listening to FM and AM Broadcasts 10 Tuning in to a Station 10 Presetting Stations 10 Tuning in to a Preset Station 11 Playing Back Discs 12 Playing Back the Entire Disc-Normal Play 12 Basic Disc Operations 13 Programming...
...Controls 3 Main Unit 3 Remote Control 5 Getting Started 6 Unpacking 6 Putting the Batteries into the Remote Control 6 Connections 6 Connecting Other Equipment 7 Basic and Common Operations 8 Setting the Clock 8 Turning On the Power 8 Selecting the Source 9 Adjusting the Volume 9 Fade Muting 9 Selecting the Sound Modes 9 Adjusting the Tone (Bass/Treble 9 Listening to FM and AM Broadcasts 10 Tuning in to a Station 10 Presetting Stations 10 Tuning in to a Preset Station 11 Playing Back Discs 12 Playing Back the Entire Disc-Normal Play 12 Basic Disc Operations 13 Programming...

Instruction Manual
Page 4
... about turning on/off the unit, setting the volume, changing the sound effects, and others, which is organized as follows: • This manual mainly explains operations using the buttons on the unit for the same operations if ...Operations" on the lenses inside . Precautions Installation • Install in a place which are no user serviceable parts inside the unit in one of our JVC products. Gives you information and hints you need to direct sunlight, excessive dust or vibration. Introduction We would like to thank you for an extended period of time, unplug the AC power cord...
... about turning on/off the unit, setting the volume, changing the sound effects, and others, which is organized as follows: • This manual mainly explains operations using the buttons on the unit for the same operations if ...Operations" on the lenses inside . Precautions Installation • Install in a place which are no user serviceable parts inside the unit in one of our JVC products. Gives you information and hints you need to direct sunlight, excessive dust or vibration. Introduction We would like to thank you for an extended period of time, unplug the AC power cord...

Instruction Manual
Page 6
... PHONES jack (9) 8 MULTI CONTROL buttons • DOWN 4, 7, UP ¢ 9 Cassette holder (15) p Display window q VOLUME control (9) w AUX jack (7, 17) e TIMER button (20) r Tape operation buttons (15, 17) • ‡ (recording), # (play), ! (fast backward), ⁄ (fast forward), &/) (stop/cassette holder open), * (pause) Display window 1 SLEEP indicator 2 (timer) indicator 3 Timer number indicators 4 MP3 indicator 5 Repeat indicators • , ALL 6 PRGM (program) indicator 7 RANDOM indicator 8 FM mode indicators • MONO, ST (stereo) 9 REC indicator p SOUND indicator q Main display...
... PHONES jack (9) 8 MULTI CONTROL buttons • DOWN 4, 7, UP ¢ 9 Cassette holder (15) p Display window q VOLUME control (9) w AUX jack (7, 17) e TIMER button (20) r Tape operation buttons (15, 17) • ‡ (recording), # (play), ! (fast backward), ⁄ (fast forward), &/) (stop/cassette holder open), * (pause) Display window 1 SLEEP indicator 2 (timer) indicator 3 Timer number indicators 4 MP3 indicator 5 Repeat indicators • , ALL 6 PRGM (program) indicator 7 RANDOM indicator 8 FM mode indicators • MONO, ST (stereo) 9 REC indicator p SOUND indicator q Main display...
Instruction Manual
Page 7
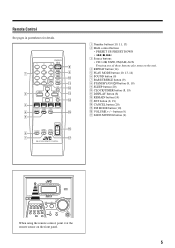
... DISPLAY q PRESET UP SET w 2 e PRESET DOWN CANCEL r 3 CD3/8 TAPE FM/AM AUX 4 PLAY FM REPEAT MODE MODE t 5 6 7 VOLUME BASS/ FADE SOUND TREBLE MUTING RM-SFSG2J REMOTE CONTROL y u 1 Number buttons (10, 11, 13) 2 Multi control buttons • PRESET UP, PRESET DOWN • 4, 7, ¢ 3 Source buttons • CD #¥8, TAPE, FM/AM, AUX Pressing one of these buttons also turns on the front panel. 5 buttons (9) u FADE MUTING button (9) COMPACT DIGITAL AUDIO STANDBY VOLUME - + CD TAPE FM/AM AUX #/8 PHONES DOWN 4 7 UP ¢ TIMER AUX When using the remote...
... DISPLAY q PRESET UP SET w 2 e PRESET DOWN CANCEL r 3 CD3/8 TAPE FM/AM AUX 4 PLAY FM REPEAT MODE MODE t 5 6 7 VOLUME BASS/ FADE SOUND TREBLE MUTING RM-SFSG2J REMOTE CONTROL y u 1 Number buttons (10, 11, 13) 2 Multi control buttons • PRESET UP, PRESET DOWN • 4, 7, ¢ 3 Source buttons • CD #¥8, TAPE, FM/AM, AUX Pressing one of these buttons also turns on the front panel. 5 buttons (9) u FADE MUTING button (9) COMPACT DIGITAL AUDIO STANDBY VOLUME - + CD TAPE FM/AM AUX #/8 PHONES DOWN 4 7 UP ¢ TIMER AUX When using the remote...

Instruction Manual
Page 9
... audio output 2 Adjust the position for the FM antenna for the best reception. When the audio equipment has pin jacks for right audio signals. IMPORTANT: Be sure to check that the pin plugs of the audio cords are colored- Do not connect the AC power cord until all connections are complete. For playing other equipment and AUX jacks by using audio cords with mini plugs (not supplied). white plugs and jacks are for left audio signals, and red...
... audio output 2 Adjust the position for the FM antenna for the best reception. When the audio equipment has pin jacks for right audio signals. IMPORTANT: Be sure to check that the pin plugs of the audio cords are colored- Do not connect the AC power cord until all connections are complete. For playing other equipment and AUX jacks by using audio cords with mini plugs (not supplied). white plugs and jacks are for left audio signals, and red...

Instruction Manual
Page 10
... in clock starts. 3 Press 4 or ¢ to adjust the minute, then press SET. • When you press and hold 4 or ¢, the hour indication changes continuously. SET The built-in standby mode. To show the current time indication. 2 Press SET. You can set the unit's clock. DISPLAY • Each time you press the source button-CD 3/8, TAPE, FM/AM and AUX, the unit automatically turns on the unit, press STANDBY/ON . STANDBY...
... in clock starts. 3 Press 4 or ¢ to adjust the minute, then press SET. • When you press and hold 4 or ¢, the hour indication changes continuously. SET The built-in standby mode. To show the current time indication. 2 Press SET. You can set the unit's clock. DISPLAY • Each time you press the source button-CD 3/8, TAPE, FM/AM and AUX, the unit automatically turns on the unit, press STANDBY/ON . STANDBY...

Instruction Manual
Page 11
... speakers. VOLUME To increase the volume, press VOLUME + (or turn VOLUME control counterclockwise on recording. Selecting the Source Selecting the Sound Modes To select the source, press CD 6, TAPE, FM/AM, or AUX. • When you press the button, the sound mode changes as the source, playback starts automatically. POP: More presence in the vocals and midrange. PRESET UP PRESET DOWN • You cannot use an external equipment, see "Selecting the Sound Modes" above). 9 To operate...
... speakers. VOLUME To increase the volume, press VOLUME + (or turn VOLUME control counterclockwise on recording. Selecting the Source Selecting the Sound Modes To select the source, press CD 6, TAPE, FM/AM, or AUX. • When you press the button, the sound mode changes as the source, playback starts automatically. POP: More presence in the vocals and midrange. PRESET UP PRESET DOWN • You cannot use an external equipment, see "Selecting the Sound Modes" above). 9 To operate...

Instruction Manual
Page 12
... 10. 4 Press PLAY MODE again. 2 3 5 6 8 9 +10 PLAY MODE To change the FM reception mode On the remote control ONLY: When an FM stereo broadcast is a time limit in the unit. To stop during searching, press ¢ or 4 (or UP ¢ or DOWN 4 on the display. Presetting Stations You can hear stereo sound when a stereo program is canceled before shipment. You can also use the number button(s) 1 to select a preset number. Listening to...
... 10. 4 Press PLAY MODE again. 2 3 5 6 8 9 +10 PLAY MODE To change the FM reception mode On the remote control ONLY: When an FM stereo broadcast is a time limit in the unit. To stop during searching, press ¢ or 4 (or UP ¢ or DOWN 4 on the display. Presetting Stations You can hear stereo sound when a stereo program is canceled before shipment. You can also use the number button(s) 1 to select a preset number. Listening to...

Instruction Manual
Page 14
...-DVD side of the disc starts playing. The total track number and total playing time appear on and the source changes to another source. Playing Back the Entire Disc-Normal Play 2 Place a disc correctly with "MP3" or "mp3" as it at a 44.1 kHz sampling rate, using the 128 kbps data transfer rate. • Some MP3 files or discs may not be damaged. 12 To remove the disc, press 0 OPEN...
...-DVD side of the disc starts playing. The total track number and total playing time appear on and the source changes to another source. Playing Back the Entire Disc-Normal Play 2 Place a disc correctly with "MP3" or "mp3" as it at a 44.1 kHz sampling rate, using the 128 kbps data transfer rate. • Some MP3 files or discs may not be damaged. 12 To remove the disc, press 0 OPEN...

Instruction Manual
Page 15
... elapsed playing time flashes on the unit) repeatedly. • ¢ (UP ¢): Skips to the beginning of the next or succeeding tracks. • 4 (DOWN 4): Goes back to the beginning of the number buttons, see "To go to another track directly using the number buttons" on the display for a moment During play, press CD 3/8. To go to another track directly using the number buttons On the remote control ONLY...
... elapsed playing time flashes on the unit) repeatedly. • ¢ (UP ¢): Skips to the beginning of the next or succeeding tracks. • 4 (DOWN 4): Goes back to the beginning of the number buttons, see "To go to another track directly using the number buttons" on the display for a moment During play, press CD 3/8. To go to another track directly using the number buttons On the remote control ONLY...

Instruction Manual
Page 17
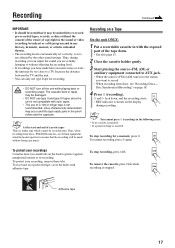
TAPE The unit automatically turns on and the source changes to the tape deck. • You can play ). The tape starts playing. • When the end of the tape is stopped. 3 Close the cassette holder gently. • DO NOT turn off the unit while playing back or recording a tape. The cassette holder opens. 4 Press TAPE. To stop /cassette holder open). To resume playing, press * again. 2 Put a cassette in...
TAPE The unit automatically turns on and the source changes to the tape deck. • You can play ). The tape starts playing. • When the end of the tape is stopped. 3 Close the cassette holder gently. • DO NOT turn off the unit while playing back or recording a tape. The cassette holder opens. 4 Press TAPE. To stop /cassette holder open). To resume playing, press * again. 2 Put a cassette in...

Instruction Manual
Page 18
"AUX" appears on the display. 3 Start playing the external equipment. 4 Adjust the volume level to the level you want to listen to its instructions. 16 For operation of the external equipment Refer to . To exit AUX mode, select other auxiliary. • First, make sure that the external equipment is properly connected to the unit. (See page 7.) 1 Set the volume level to the minimum position. 2 Press AUX. Using an External Equipment Listening to the External Equipment You can listen to the external equipment such as MD recorder, cassette deck, or other source.
"AUX" appears on the display. 3 Start playing the external equipment. 4 Adjust the volume level to the level you want to listen to its instructions. 16 For operation of the external equipment Refer to . To exit AUX mode, select other auxiliary. • First, make sure that the external equipment is properly connected to the unit. (See page 7.) 1 Set the volume level to the minimum position. 2 Press AUX. Using an External Equipment Listening to the External Equipment You can listen to the external equipment such as MD recorder, cassette deck, or other source.
Instruction Manual
Page 19
.... • DO NOT turn off the unit while playing back or recording a tape. Adhesive tape 17 Disc Synchronized Recording" on page 18. 4 Press ‡ (recording). ‡ and # lock down . • See also page 15. 2 Close the cassette holder gently. 3 Start playing the source-FM, AM, or auxiliary equipment connected to AUX jack. • When the source is FM or AM, tune in the pinch...
.... • DO NOT turn off the unit while playing back or recording a tape. Adhesive tape 17 Disc Synchronized Recording" on page 18. 4 Press ‡ (recording). ‡ and # lock down . • See also page 15. 2 Close the cassette holder gently. 3 Start playing the source-FM, AM, or auxiliary equipment connected to AUX jack. • When the source is FM or AM, tune in the pinch...
Instruction Manual
Page 21
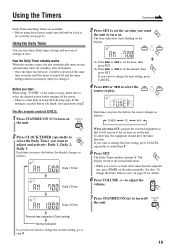
... VOLUME +/- The display return to the normal indication. • When you want to change the time setting, press CANCEL. 4 Press ¢ or 4 to select the source to play , make sure the built-in clock is set correctly (see page 8). When using these timers, make sure to select the desired station before you finish, start ... If you want to change the on the unit repeatedly. SET The Daily Timer number...
... VOLUME +/- The display return to the normal indication. • When you want to change the time setting, press CANCEL. 4 Press ¢ or 4 to select the source to play , make sure the built-in clock is set correctly (see page 8). When using these timers, make sure to select the desired station before you finish, start ... If you want to change the on the unit repeatedly. SET The Daily Timer number...
Instruction Manual
Page 22
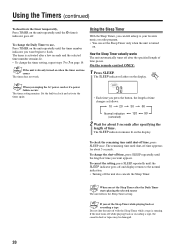
... power cord or if a power failure occurs The timer setting remains. To change the timer setting, repeat steps 1 to 7 on page 19. How the Sleep Timer actually works The unit automatically turns off after the Daily Timer starts playing the selected source The unit follows the Sleep Timer setting. Set the built-in clock and activate the timer again. The timer is already turned on when the timer on-time comes The timer does not work. Using the Timers...
... power cord or if a power failure occurs The timer setting remains. To change the timer setting, repeat steps 1 to 7 on page 19. How the Sleep Timer actually works The unit automatically turns off after the Daily Timer starts playing the selected source The unit follows the Sleep Timer setting. Set the built-in clock and activate the timer again. The timer is already turned on when the timer on-time comes The timer does not work. Using the Timers...
Instruction Manual
Page 24
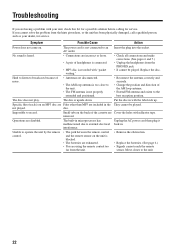
... the PHONES jack. • It cannot be played. The power cord is upside down. not played. Operations are having a problem with adhesive tape. Move closer to record. Replace the disc. Impossible to the unit. 22 The built-in the They cannot be played. No sound is heard. • Connections are incorrect or loose. • A pair of the cassette are disconnected. • The AM loop antenna...
... the PHONES jack. • It cannot be played. The power cord is upside down. not played. Operations are having a problem with adhesive tape. Move closer to record. Replace the disc. Impossible to the unit. 22 The built-in the They cannot be played. No sound is heard. • Connections are incorrect or loose. • A pair of the cassette are disconnected. • The AM loop antenna...

Instruction Manual
Page 28
EN © 2004 Victor Company of Japan, Limited 1204AIMMDWBET FS-G2 COMPACT COMPONENT SYSTEM
EN © 2004 Victor Company of Japan, Limited 1204AIMMDWBET FS-G2 COMPACT COMPONENT SYSTEM


