JVC FS-G2 Support and Manuals
Get Help and Manuals for this JVC item
Popular JVC FS-G2 Manual Pages
Specifications - Page 1
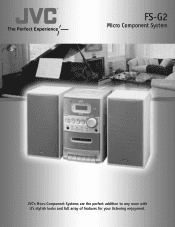
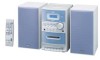
FS-G2
Micro Component System
JVC's Micro Component Systems are the perfect addition to any room with it's stylish looks and full array of features for your listening enjoyment.
Specifications - Page 2
... manual
setting • CD Synchro Start recording • Electronic Bass/Treble Tone Controls • Program (32 tracks) / Random / Repeat Play • Front AUX Input
Center Unit: Dimensions (WxHxD) inches: Approximate Weight (lbs./kg.): Speakers: Dimensions (WxHxD) inches: Approximate Weight (lbs./kg.):
5 11/16 x 10 1/16 x 10 15/16 6.4/2.9
5 1/8 x 10 1/8 x 6 3.3/1.5
General Specifications...
Instruction Manual - Page 1
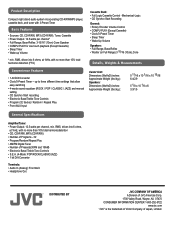
Serial No. COMPACT COMPONENT SYSTEM
FS-G2 -Consists of the cabinet.
LVT1345-001B
[J] which are located either on the rear, bottom or side of CA-FSG2 and SP-FSG2
INSTRUCTIONS
For Customer Use: Enter below the Model No. Retain this information for future reference. Model No. and Serial No.
Instruction Manual - Page 2
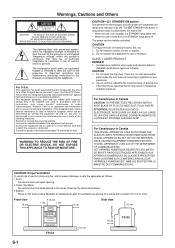
... no user serviceable
parts inside the unit;
Use of controls, adjustments or performance of electrical shocks, fire, etc.: 1. Front view 15 cm
15 cm
1 cm
1 cm
15 cm
Side view
15 cm
G-1
FS-G2
10 cm
15 cm
FS-G2 CLASS 1 LASER PRODUCT DANGER 1.
The power can radiate radio frequency energy and, if not installed and used...
Instruction Manual - Page 4

...JVC products.
Precautions
Installation • Install in a place which is organized as follows: • This manual...manual:
Gives you warning and caution to prevent damage or risk of time, unplug the AC power cord from the wall outlet, always pull
on pages 8 and 9. • The following symbols are no user serviceable parts... turning on/off the unit, setting the volume, changing the sound ...
Instruction Manual - Page 5
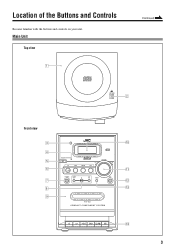
Main Unit
Top view
Continued
1
COMPACT DIGITAL AUDIO
OPEN
2
Front view
3 4 5 6
7 8 9
COMPACT DIGITAL AUDIO
STANDBY
VOLUME
-
+
CD
TAPE
FM/AM
AUX
#/8
PHONES
DOWN
4
7
UP
¢
TIMER
AUX
FS-G2 C O M PAC T C O M P O N E N T S Y S T E M
p
q w e
r
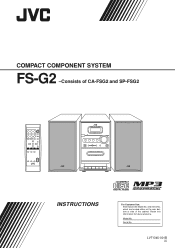
3 Location of the Buttons and Controls
Become familiar with the buttons and controls on your unit.
Instruction Manual - Page 7
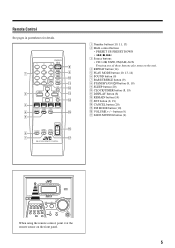
... SLEEP button (20) p CLOCK/TIMER button (8, 19) q DISPLAY button (8) w REMAIN button (14) e SET button (8, 19) r CANCEL button (20) t FM MODE button (10) y VOLUME + / - STANDBY/ON
1
2
3
8
4
...5
6
SLEEP
1
9
7
8
9
CLOCK/ TIMER
p
10
+10 REMAIN DISPLAY
q
PRESET UP
SET
w
2
e
PRESET DOWN CANCEL
r
3
CD3/8 TAPE FM/AM AUX
4
PLAY
FM
REPEAT MODE MODE
t
5
...
Instruction Manual - Page 12

When you repeatedly press ¢ or 4 (or UP ¢ or DOWN 4 on the
display. PRGM
You can preset 30 FM and 15 AM stations manually.
If the setting is good).
Reception will remain in the unit. Presetting Stations
You can also use the number button(s) 1
to select a preset number. This is broadcast in...
Instruction Manual - Page 14

...or "mp3"
as the extensions, which can be read their disc characteristics, damage or stain on this instruction, we call a disc recorded MP3 files "MP3
disc," and "file" is not available. • MP3i... and MP3 Pro are already "finalized." • This unit supports "multi-session" discs (up to 5 sessions). • This unit cannot play on them in ...
Instruction Manual - Page 18

...the external equipment. 4 Adjust the volume level to the level you want
to listen to its instructions.
16 For operation of the external equipment
Refer to . To exit AUX mode, select other ...First, make sure that the external equipment is properly
connected to the unit. (See page 7.)
1 Set the volume level to the minimum position. 2 Press AUX.
Using an External Equipment
Listening to the External...
Instruction Manual - Page 19
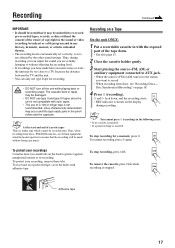
... capstans. To stop recording, press &/).
To re-record on a protected tape, cover the holes with the exposed
part of the tape down , and the recording starts. • REC indicator is shown on page 18.
4 Press..., dramatic, musical, or artistic embodied therein. • The recording level is automatically set correctly, so it may be unlawful to re-record
pre-recorded tapes, records, or...
Instruction Manual - Page 21
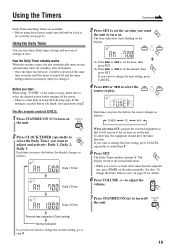
...source to play , make sure the built-in doing the following steps. SET
(2) Press ¢ or 4 to set the hour, then
press SET.
To allow this, the equipment should have the timer function. Using ...to
step 3.
19
to adjust the VOLUME
volume.
3
7 Press STANDBY/ON
to set the minute, then
press SET. How the Daily Timer actually works When the on-time comes, the unit automatically...
Instruction Manual - Page 22
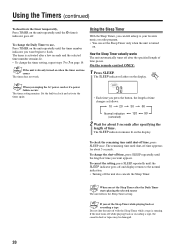
...5 seconds after the Daily Timer starts playing the selected source The unit follows the Sleep Timer setting.
SLEEP
The SLEEP indicator flashes on the display. The SLEEP indicator remains lit on the display...not work.
Using the Sleep Timer
With the Sleep Timer, you want appears.
When you set the Sleep Timer only when the unit is activated after the specified length of time you...
Instruction Manual - Page 24
...headphones from the PHONES jack.
• It cannot be played. Specific files (tracks) on the unit is not connected to operate the....
22 removed. If you are having a problem with your dealer, for service. No sound is heard.
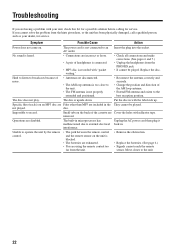
• Connections are...side up. Troubleshooting
If you cannot solve the problem from the unit.
• Remove the obstruction.
• Replace the batteries. ...
Instruction Manual - Page 28
EN © 2004 Victor Company of Japan, Limited
1204AIMMDWBET
FS-G2 COMPACT COMPONENT SYSTEM
JVC FS-G2 Reviews
We have not received any reviews for JVC yet.