
Instruction Manual
Page 62
... not enter the USB mode. ● The date/time information cannot be transferred to the camcorder. NOTES: ● Refer to "SOFTWARE INSTALLATION AND USB CONNECTION GUIDE" for the installation of the bundled software and drivers. ● The software operation manual is provided as the power supply instead of DV connector (4 or ...PC or capture board you wish to use to the camcorder. ● When using a DV cable, be sure to use the AC Power Adapter/ Charger as PDF file on the CD-ROM. ● It is recommended to use the optional JVC VC-VDV206U or VC-VDV204U DV cable depending on ...
... not enter the USB mode. ● The date/time information cannot be transferred to the camcorder. NOTES: ● Refer to "SOFTWARE INSTALLATION AND USB CONNECTION GUIDE" for the installation of the bundled software and drivers. ● The software operation manual is provided as the power supply instead of DV connector (4 or ...PC or capture board you wish to use to the camcorder. ● When using a DV cable, be sure to use the AC Power Adapter/ Charger as PDF file on the CD-ROM. ● It is recommended to use the optional JVC VC-VDV206U or VC-VDV204U DV cable depending on ...
Instruction Manual
Page 87
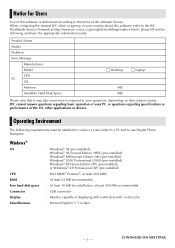
Notice for installation, at least 500 MB recommended : USB connector : Must be satisfied to connect a camcorder to a PC and to use Digital Photo Navigator. JVC cannot answer questions regarding specifications or performance of the software license. Windows® OS CPU RAM Free hard disk space Connector Display ...it may take some time to respond to the terms of the OS, other applications or drivers. When contacting the nearest JVC office or agency in your country about this software (refer to the JVC Worldwide Service Network at least 200 MHz : At least 64 MB recommended : At least...
Notice for installation, at least 500 MB recommended : USB connector : Must be satisfied to connect a camcorder to a PC and to use Digital Photo Navigator. JVC cannot answer questions regarding specifications or performance of the software license. Windows® OS CPU RAM Free hard disk space Connector Display ...it may take some time to respond to the terms of the OS, other applications or drivers. When contacting the nearest JVC office or agency in your country about this software (refer to the JVC Worldwide Service Network at least 200 MHz : At least 64 MB recommended : At least...
Instruction Manual
Page 89
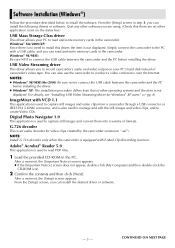
... the PC before installing the driver. ● Windows® XP: The installation procedure differs from a camcorder through a USB connector or IEEE1394 (i.LINK) connector, and is an audio decoder for Windows® XP users" (੬ pg. 8). Digital Photo Navigator 1.0 This application is not displayed. ...asf"). From the [Setup] screen, you to install the software. From the [Setup] screen in the camcorder. USB Video Streaming driver This driver allows you can also use the camcorder to create Video CDs. After a moment, the [Important Notice] screen appears. ● If the [...
... the PC before installing the driver. ● Windows® XP: The installation procedure differs from a camcorder through a USB connector or IEEE1394 (i.LINK) connector, and is an audio decoder for Windows® XP users" (੬ pg. 8). Digital Photo Navigator 1.0 This application is not displayed. ...asf"). From the [Setup] screen, you to install the software. From the [Setup] screen in the camcorder. USB Video Streaming driver This driver allows you can also use the camcorder to create Video CDs. After a moment, the [Important Notice] screen appears. ● If the [...

Instruction Manual
Page 90
...Next]. When the installation is the example of the selected driver or software starts. Click [Finish]. Click [Yes]. Click [Finish] and then [Setup] screen reappears. -6- Click [Next]. The installation of Digital Photo Navigator on Windows® 98SE. [Installation Folder] ...screen appears. The following is the example of USB Mass Storage Class driver on Windows® 98SE. [License Agreement] screen appears. CONTINUED ...
...Next]. When the installation is the example of the selected driver or software starts. Click [Finish]. Click [Yes]. Click [Finish] and then [Setup] screen reappears. -6- Click [Next]. The installation of Digital Photo Navigator on Windows® 98SE. [Installation Folder] ...screen appears. The following is the example of USB Mass Storage Class driver on Windows® 98SE. [License Agreement] screen appears. CONTINUED ...

Instruction Manual
Page 91
...WINASPI] screen appears. To install DirectX, select "DirectX" on the installation screen of ImageMixer with VCD 1.1. ● When you install USB Video Streaming driver with VCD 1.1], select the desired language in the [Choose Setup Language] screen. ● If you perform installation of a software that Adobe® ... details on how to use of the desired language. Double-click the [JVC] folder and then double-click the [Docs] folder. Note that is OK to create the icon on the CD-ROM in the Digital Photo Navigator instruction manual on the CD-ROM. ● When installing the...
...WINASPI] screen appears. To install DirectX, select "DirectX" on the installation screen of ImageMixer with VCD 1.1. ● When you install USB Video Streaming driver with VCD 1.1], select the desired language in the [Choose Setup Language] screen. ● If you perform installation of a software that Adobe® ... details on how to use of the desired language. Double-click the [JVC] folder and then double-click the [Docs] folder. Note that is OK to create the icon on the CD-ROM in the Digital Photo Navigator instruction manual on the CD-ROM. ● When installing the...
Instruction Manual
Page 92
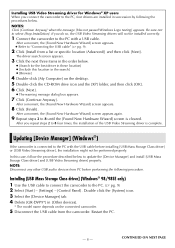
...appears. 3 Click the next three items in the order below. ● [Search for Windows® XP users When you connect the camcorder to the PC, four drivers are installed in succession by following procedure. After a moment, the [Found New Hardware Wizard] screen appears again. 9 Repeat steps 2 to...Advanced)] and then click [Next]. Updating [Device Manager] (Windows®) If the camcorder is connected to the PC with a USB cable. Double click the [System] icon. 3 Select the [Device Manager] tab. 4 Delete [GR-DVP9*] in [Other devices]. * The model name depends on the desktop. 5 Double-...
...appears. 3 Click the next three items in the order below. ● [Search for Windows® XP users When you connect the camcorder to the PC, four drivers are installed in succession by following procedure. After a moment, the [Found New Hardware Wizard] screen appears again. 9 Repeat steps 2 to...Advanced)] and then click [Next]. Updating [Device Manager] (Windows®) If the camcorder is connected to the PC with a USB cable. Double click the [System] icon. 3 Select the [Device Manager] tab. 4 Delete [GR-DVP9*] in [Other devices]. * The model name depends on the desktop. 5 Double-...
Instruction Manual
Page 93
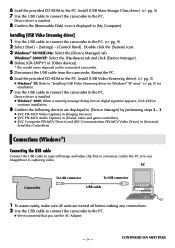
... Class driver]. (੬ pg. 5) 7 Use the USB cable to connect the camcorder to the PC. Double click the [System] icon. 3 Windows® 98/98SE/Me: Select the [Device Manager] tab. 6 Load the provided CD-ROM in [Other devices]. * The model name depends on digital signature ... Manager] by performing steps 2 - 3. ● [JVC PIX-MCV Video Capture] in [Imaging Devices] ● [JVC PIX-MCV Audio Capture] in [Sound, video and game controllers] ● [JVC Composite PIX-MCV Device] and [JVC Communication PIX-MCV Video Driver] in [Universal Serial Bus Controllers] Connections (Windows®...
... Class driver]. (੬ pg. 5) 7 Use the USB cable to connect the camcorder to the PC. Double click the [System] icon. 3 Windows® 98/98SE/Me: Select the [Device Manager] tab. 6 Load the provided CD-ROM in [Other devices]. * The model name depends on digital signature ... Manager] by performing steps 2 - 3. ● [JVC PIX-MCV Video Capture] in [Imaging Devices] ● [JVC PIX-MCV Audio Capture] in [Sound, video and game controllers] ● [JVC Composite PIX-MCV Device] and [JVC Communication PIX-MCV Video Driver] in [Universal Serial Bus Controllers] Connections (Windows®...

Instruction Manual
Page 94
In this driver. The following folders are stored in different folders. NOTES: ● When the USB cable is connected, turning on or off the camcorder or switching the VIDEO/MEMORY (DSC) mode on the camcorder causes malfunctions of the PC. ● If you can also use an extension USB ...with a USB cable, and you connect the camcorder to "Updating [Device Manager] (Windows®)" (੬ pg. 8). 6 Double-click the [Removable Disk] icon. NOTE: Windows® 98/98SE: [Removable Disk] icon does not appear if USB Mass Storage Class driver is no need to capture video from a ...
In this driver. The following folders are stored in different folders. NOTES: ● When the USB cable is connected, turning on or off the camcorder or switching the VIDEO/MEMORY (DSC) mode on the camcorder causes malfunctions of the PC. ● If you can also use an extension USB ...with a USB cable, and you connect the camcorder to "Updating [Device Manager] (Windows®)" (੬ pg. 8). 6 Double-click the [Removable Disk] icon. NOTE: Windows® 98/98SE: [Removable Disk] icon does not appear if USB Mass Storage Class driver is no need to capture video from a ...

Instruction Manual
Page 130
... connected to the PC with a USB cable, the video from the camcorder can be recorded on the PC's hard drive instead of on the camcorder's LCD monitor. ● If " " does not appear, install [USB Video Streaming driver]. NOTE: The procedure is now on the PC. ImageMixer starts up. ...4 Click the Input button. The input mode screen appears. The camcorder is different when reading or writing a ...
... connected to the PC with a USB cable, the video from the camcorder can be recorded on the PC's hard drive instead of on the camcorder's LCD monitor. ● If " " does not appear, install [USB Video Streaming driver]. NOTE: The procedure is now on the PC. ImageMixer starts up. ...4 Click the Input button. The input mode screen appears. The camcorder is different when reading or writing a ...

Instruction Manual
Page 131
... (USB) button. Capture Disconnecting the USB cable Still image 1 Disconnect the USB cable. 2 Set the Power Switch on the camcorder to capture videos or still images if the USB Mass Storage Class driver is registered in the Software Installation and USB Connection Guide. ● On the information display panel or the file.... 8 Click the Capture button again. NOTE: If the MPEG1 files cannot be converted to "Updating [Device Manager] (Windows®)" (੬ pg. 8) in the album. The camcorder turns off. Information display panel
... (USB) button. Capture Disconnecting the USB cable Still image 1 Disconnect the USB cable. 2 Set the Power Switch on the camcorder to capture videos or still images if the USB Mass Storage Class driver is registered in the Software Installation and USB Connection Guide. ● On the information display panel or the file.... 8 Click the Capture button again. NOTE: If the MPEG1 files cannot be converted to "Updating [Device Manager] (Windows®)" (੬ pg. 8) in the album. The camcorder turns off. Information display panel
Instruction Manual
Page 140
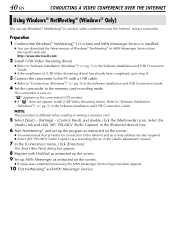
... window appears. 10 Exit NetMeeting® and MSN Messenger Service. NOTE: The procedure is now on the camcorder's LCD monitor. ● If " " does not appear, install [USB Video Streaming driver]. Select the [Audio] tab and click [JVC PIX-MCV Audio Capture] in the [Preferred device] box. 6 Start NetMeeting®, and set up the...
... window appears. 10 Exit NetMeeting® and MSN Messenger Service. NOTE: The procedure is now on the camcorder's LCD monitor. ● If " " does not appear, install [USB Video Streaming driver]. Select the [Audio] tab and click [JVC PIX-MCV Audio Capture] in the [Preferred device] box. 6 Start NetMeeting®, and set up the...
Instruction Manual
Page 141
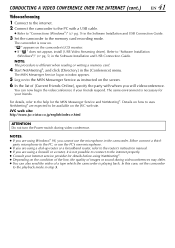
...for details before using Windows® 98, you will videoconference. " " appears on the screen. 6 In the list of a tape which the camcorder is different when reading or writing a memory card. 4 Start NetMeeting®, and click [Directory] in step 3. The MSN Messenger Service logon window... site. For details, refer to the MSN Messenger Service as instructed on the camcorder's LCD monitor. ● If " " does not appear, install [USB Video Streaming driver]. JVC web site: http://www.jvc-victor.co.jp/english/index-e.html ATTENTION Do not turn the Power switch during videoconferences...
...for details before using Windows® 98, you will videoconference. " " appears on the screen. 6 In the list of a tape which the camcorder is different when reading or writing a memory card. 4 Start NetMeeting®, and click [Directory] in step 3. The MSN Messenger Service logon window... site. For details, refer to the MSN Messenger Service as instructed on the camcorder's LCD monitor. ● If " " does not appear, install [USB Video Streaming driver]. JVC web site: http://www.jvc-victor.co.jp/english/index-e.html ATTENTION Do not turn the Power switch during videoconferences...
Instruction Manual
Page 142
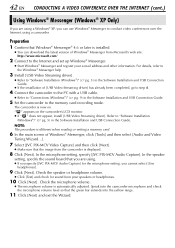
...pg. 5) in the Software Installation and USB Connection Guide. ● If the installation of [USB Video Streaming driver] has already been completed, go to step 4. 4 Connect the camcorder to the PC with a USB cable. ● Refer to the Internet and set up Windows® Messenger....Video Streaming driver]. " " appears on . In the speaker setting, specify the sound board that the green bar extends into the camcorder microphone and check the microphone volume level so that you are using a camcorder. The camcorder is automatically adjusted. In the microphone setting, specify [JVC PIX-MCV...
...pg. 5) in the Software Installation and USB Connection Guide. ● If the installation of [USB Video Streaming driver] has already been completed, go to step 4. 4 Connect the camcorder to the PC with a USB cable. ● Refer to the Internet and set up Windows® Messenger....Video Streaming driver]. " " appears on . In the speaker setting, specify the sound board that the green bar extends into the camcorder microphone and check the microphone volume level so that you are using a camcorder. The camcorder is automatically adjusted. In the microphone setting, specify [JVC PIX-MCV...
Instruction Manual
Page 143
... web site. Click the [Start], and select [Windows Update] in step 3. In this case, set the camcorder to the playback mode in [All Programs]. JVC web site: http://www.jvc-victor.co.jp/english/index-e.html NOTES: ● When you use Windows® Messenger, your friend. Refer...]. You can also send the video of Windows® Messenger from your friend must be available on the camcorder's LCD monitor. ● If " " does not appear, install [USB Video Streaming driver]. CONDUCTING A VIDEO CONFERENCE OVER THE INTERNET (cont.) EN 43 Videoconferencing 1 Connect to the internet. 2 ...
... web site. Click the [Start], and select [Windows Update] in step 3. In this case, set the camcorder to the playback mode in [All Programs]. JVC web site: http://www.jvc-victor.co.jp/english/index-e.html NOTES: ● When you use Windows® Messenger, your friend. Refer...]. You can also send the video of Windows® Messenger from your friend must be available on the camcorder's LCD monitor. ● If " " does not appear, install [USB Video Streaming driver]. CONDUCTING A VIDEO CONFERENCE OVER THE INTERNET (cont.) EN 43 Videoconferencing 1 Connect to the internet. 2 ...

Instruction Manual
Page 147
... are odd. You can download the latest version of the still image data prevents it from being loaded into Digital Photo Navigator. • Sometimes the format of the drivers from the [StartUp] folder and reboot your PC's power management function... Close the application, or delete/move its...is not set are using a laptop PC, operation may be displayed correctly if the display is set on not displayed correctly on the the camcorder. No audio or video during ImageMixer operations • Verify and change Windows® and ImageMixer settings. Right-click the [My Computer] ...
... are odd. You can download the latest version of the still image data prevents it from being loaded into Digital Photo Navigator. • Sometimes the format of the drivers from the [StartUp] folder and reboot your PC's power management function... Close the application, or delete/move its...is not set are using a laptop PC, operation may be displayed correctly if the display is set on not displayed correctly on the the camcorder. No audio or video during ImageMixer operations • Verify and change Windows® and ImageMixer settings. Right-click the [My Computer] ...


