
Instruction Manual
Page 2
...it is no longer wobbly, and then plug the larger end of time, it immediately. Using This Instruction Manual • All major sections and subsections are separated for a long period of the power cord into an AC...safety information and precautions contained in the Table Of Contents on its upper and lower sides. Contact your JVC dealer. Refer servicing to the unit, first firmly insert the small end of the power cord into ...OR SHOCK HAZARD, DO NOT EXPOSE THIS UNIT TO RAIN OR MOISTURE. Before use of this digital video camera. Continue using the AC Adapter for easier reference.
...it is no longer wobbly, and then plug the larger end of time, it immediately. Using This Instruction Manual • All major sections and subsections are separated for a long period of the power cord into an AC...safety information and precautions contained in the Table Of Contents on its upper and lower sides. Contact your JVC dealer. Refer servicing to the unit, first firmly insert the small end of the power cord into ...OR SHOCK HAZARD, DO NOT EXPOSE THIS UNIT TO RAIN OR MOISTURE. Before use of this digital video camera. Continue using the AC Adapter for easier reference.

Instruction Manual
Page 9
... & AA-V15 AC Power Adapter/Charger VU-V856 KIT : BN-V856U battery pack & AA-V80 AC Power Adapter/Charger Read the kit's instruction manual before using the optional JVC VC-VBN856U DC Cord, it to the camcorder. INFORMATION The extended-use battery pack kit is engaged repeatedly. ● Before extended use, it...
... & AA-V15 AC Power Adapter/Charger VU-V856 KIT : BN-V856U battery pack & AA-V80 AC Power Adapter/Charger Read the kit's instruction manual before using the optional JVC VC-VBN856U DC Cord, it to the camcorder. INFORMATION The extended-use battery pack kit is engaged repeatedly. ● Before extended use, it...

Instruction Manual
Page 11
... power lamp lights and the camcorder is not highlighted the camcorder's internal clock continues to the first date/ time parameter (day), the clock stops. BALANCE CAMERA MANUAL S Y S T EM D I SPLAY DSC END ON SCREEN DATE / T I ME T I ME CODE CLOCK ADJ . - MENU/BRIGHT Wheel Power Lamp Lock Button Power Switch Display WIPE / FADER OF...
... power lamp lights and the camcorder is not highlighted the camcorder's internal clock continues to the first date/ time parameter (day), the clock stops. BALANCE CAMERA MANUAL S Y S T EM D I SPLAY DSC END ON SCREEN DATE / T I ME T I ME CODE CLOCK ADJ . - MENU/BRIGHT Wheel Power Lamp Lock Button Power Switch Display WIPE / FADER OF...

Instruction Manual
Page 16
... Power Switch. SELF-RECORDING You can rotate 270° (90° downward, 180° upward). When the Power Switch is no indication. Power Switch Position (Manual): Allows you to " " or "PLAY", there is set the Power Switch to any operation mode except "OFF"while pressing down the Lock Button located on...): Allows you to transfer a still image recorded on the tape. • Allows you to a computer. When set various recording functions using NO special effects or manual adjustments.
... Power Switch. SELF-RECORDING You can rotate 270° (90° downward, 180° upward). When the Power Switch is no indication. Power Switch Position (Manual): Allows you to " " or "PLAY", there is set the Power Switch to any operation mode except "OFF"while pressing down the Lock Button located on...): Allows you to transfer a still image recorded on the tape. • Allows you to a computer. When set various recording functions using NO special effects or manual adjustments.
Instruction Manual
Page 17
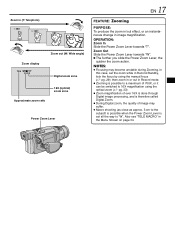
..., and is therefore called Digital Zoom. ● During Digital zoom, the quality of image may become unstable during Zooming. Also see "TELE MACRO" in Record mode. ● Zooming is possible to a maximum of 700X, or it can be switched to 16X magnification using the manual focus (੬ pg. 29...), then zoom in or out in the Menu Screen on page 34. In this case, set all the way to "W". Zoom in (T: Telephoto) 1x W T 10x W T 20x W T 40x W T Zoom display 16x W T Zoom out (W: Wide angle) Digital zoom zone Approximate zoom...
..., and is therefore called Digital Zoom. ● During Digital zoom, the quality of image may become unstable during Zooming. Also see "TELE MACRO" in Record mode. ● Zooming is possible to a maximum of 700X, or it can be switched to 16X magnification using the manual focus (੬ pg. 29...), then zoom in or out in the Menu Screen on page 34. In this case, set all the way to "W". Zoom in (T: Telephoto) 1x W T 10x W T 20x W T 40x W T Zoom display 16x W T Zoom out (W: Wide angle) Digital zoom zone Approximate zoom...

Instruction Manual
Page 20
...cover* To TV or VCR White to AUDIO L IN** Red to AUDIO R IN** Yellow to VIDEO IN * When connecting the cables, open this cover. ** The Audio cable is not required for...connections. When making the connections, refer also to AUDIO R IN** Yellow: Not connected To S-VIDEO S-Video cable (optional) To S-VIDEO IN * When connecting the cables, open this cover. ** The Audio cable is not required for... images only. Connection to a TV or VCR equipped only with an S-VIDEO IN and A/V input connectors Connector cover* To AV Audio/Video cable [mini-plug to RCA plug] (provided) To TV or VCR ...
...cover* To TV or VCR White to AUDIO L IN** Red to AUDIO R IN** Yellow to VIDEO IN * When connecting the cables, open this cover. ** The Audio cable is not required for...connections. When making the connections, refer also to AUDIO R IN** Yellow: Not connected To S-VIDEO S-Video cable (optional) To S-VIDEO IN * When connecting the cables, open this cover. ** The Audio cable is not required for... images only. Connection to a TV or VCR equipped only with an S-VIDEO IN and A/V input connectors Connector cover* To AV Audio/Video cable [mini-plug to RCA plug] (provided) To TV or VCR ...

Instruction Manual
Page 21
... the following displays appear on . ● If you adjust the TV sound volume to its VIDEO mode. go to "ON" or "OFF" in the Menu Screen (੬ pg. 36). • Time Code ..... set your VCR's instruction manual. 4 Turn on the camcorder, the VCR and the TV. 5 Set the VCR to its AUX... not specially shielded, do not place the speakers adjacent to the TV as interference will occur in the camcorder playback picture. ● While the Audio/Video cable is connected to a TV or VCR as the power supply instead of sound when the camcorder is turned on the connected TV . . . • Date...
... the following displays appear on . ● If you adjust the TV sound volume to its VIDEO mode. go to "ON" or "OFF" in the Menu Screen (੬ pg. 36). • Time Code ..... set your VCR's instruction manual. 4 Turn on the camcorder, the VCR and the TV. 5 Set the VCR to its AUX... not specially shielded, do not place the speakers adjacent to the TV as interference will occur in the camcorder playback picture. ● While the Audio/Video cable is connected to a TV or VCR as the power supply instead of sound when the camcorder is turned on the connected TV . . . • Date...

Instruction Manual
Page 23
...Scope 24 Programme AE With Special Effects 24 - 25 Fade/Wipe Effects 26 - 27 Snapshot 28 Auto Focus/Manual Focus 29 Exposure Control 30 Iris Lock 30 White Balance Adjustment 31 Manual White Balance Operation 31 USING MENUS FOR DETAILED ADJUSTMENT 32 - 37 For Recording Menu 32 - 35 For ...Playback Menu 36 - 37 DUBBING 38 - 39 Dubbing To A VCR 38 Dubbing To Or From A Video Unit Equipped With A DV Connector .... 39 USING...
...Scope 24 Programme AE With Special Effects 24 - 25 Fade/Wipe Effects 26 - 27 Snapshot 28 Auto Focus/Manual Focus 29 Exposure Control 30 Iris Lock 30 White Balance Adjustment 31 Manual White Balance Operation 31 USING MENUS FOR DETAILED ADJUSTMENT 32 - 37 For Recording Menu 32 - 35 For ...Playback Menu 36 - 37 DUBBING 38 - 39 Dubbing To A VCR 38 Dubbing To Or From A Video Unit Equipped With A DV Connector .... 39 USING...

Instruction Manual
Page 24
...MENU/BRIGHT wheel in . IMPORTANT Some modes of "Programme AE With Special Effects" (੬ pg. 24, 25). • "GAIN UP" in the CAMERA Menu (੬ pg. 33). • "DIS" in the MANUAL Menu (੬ pg.33). ● During Night-Scope, it . The selected mode indicator appears. To prevent this, use of... manual focus and/or a tripod is selected, its indicator blinks or goes out: • Some modes of Programme AE with certain Fade/Wipe Effects (੬...
...MENU/BRIGHT wheel in . IMPORTANT Some modes of "Programme AE With Special Effects" (੬ pg. 24, 25). • "GAIN UP" in the CAMERA Menu (੬ pg. 33). • "DIS" in the MANUAL Menu (੬ pg.33). ● During Night-Scope, it . The selected mode indicator appears. To prevent this, use of... manual focus and/or a tripod is selected, its indicator blinks or goes out: • Some modes of Programme AE with certain Fade/Wipe Effects (੬...

Instruction Manual
Page 25
...2668; pg. 31) is fixed at 1/50th of a second. SLOW (Slow Shutter) Lights dark subjects or areas even brighter than 10 m, adjust the focus manually. NOTES: ● When using "SLOW", it enhances the "classic film" effect. EN 25 SHUTTER 1/50-The shutter speed is initially set to , but... for subjects that usually appear when shooting a TV screen become narrower. 1/120-The shutter speed is shot in the snow. like a series of manual focus and/or a tripod is chosen, the camcorder automatically adjusts the focus from approx. 10 m to infinity. Use the shutter function under good ...
...2668; pg. 31) is fixed at 1/50th of a second. SLOW (Slow Shutter) Lights dark subjects or areas even brighter than 10 m, adjust the focus manually. NOTES: ● When using "SLOW", it enhances the "classic film" effect. EN 25 SHUTTER 1/50-The shutter speed is initially set to , but... for subjects that usually appear when shooting a TV screen become narrower. 1/120-The shutter speed is shot in the snow. like a series of manual focus and/or a tripod is chosen, the camcorder automatically adjusts the focus from approx. 10 m to infinity. Use the shutter function under good ...

Instruction Manual
Page 29
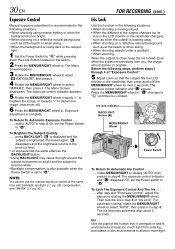
...rotate the MENU/BRIGHT wheel towards "+". " " appears and blinks. 4) Press the MENU/BRIGHT wheel in the maximum telephoto position when you use manual focusing): • When two subjects overlap in the same scene. • When illumination is not possible. Focus adjustment is barely visible in on...be obtained when zoomed up (as a flat, one-colour wall, or a clear, blue sky.* • When a dark object is complete. FEATURE: Manual Focus PURPOSE: To obtain correct focus. OPERATION: 1) If you should already have made the necessary viewfinder adjustments (੬ pg. 10). 2) Set the Power...
...rotate the MENU/BRIGHT wheel towards "+". " " appears and blinks. 4) Press the MENU/BRIGHT wheel in the maximum telephoto position when you use manual focusing): • When two subjects overlap in the same scene. • When illumination is not possible. Focus adjustment is barely visible in on...be obtained when zoomed up (as a flat, one-colour wall, or a clear, blue sky.* • When a dark object is complete. FEATURE: Manual Focus PURPOSE: To obtain correct focus. OPERATION: 1) If you should already have made the necessary viewfinder adjustments (੬ pg. 10). 2) Set the Power...
Instruction Manual
Page 30
...5 of "Exposure Control", adjust the exposure rotating the MENU/BRIGHT wheel. Or, set the Power Switch to " ". NOTE: You cannot use the manual exposure control at the same time with backlight, spotlight (੬ pg. 25) compensation and "SNOW" (੬ pg. 25). When the subject is... ±6) 6 Press the MENU/BRIGHT wheel in step 4. The iris becomes automatic after step 4 of "Iris Lock". 30 EN Exposure Control Manual exposure adjustment is recommended in the following situations: • When shooting using reverse lighting or when the background is too bright. • When ...
...5 of "Exposure Control", adjust the exposure rotating the MENU/BRIGHT wheel. Or, set the Power Switch to " ". NOTE: You cannot use the manual exposure control at the same time with backlight, spotlight (੬ pg. 25) compensation and "SNOW" (੬ pg. 25). When the subject is... ±6) 6 Press the MENU/BRIGHT wheel in step 4. The iris becomes automatic after step 4 of "Iris Lock". 30 EN Exposure Control Manual exposure adjustment is recommended in the following situations: • When shooting using reverse lighting or when the background is too bright. • When ...

Instruction Manual
Page 31
...the MENU/BRIGHT wheel to select the desired mode. " MWB White balance is different depending on the white paper. " HALOGEN" ... A video light or similar type of colour reproduction under various lighting. The Menu Screen closes and the selected mode indicator except "AUTO" appears. Use...while pressing down the Lock Button located on the white balance settings. Selection is adjusted automatically (factory preset). EN 31 Manual White Balance Operation Perform Manual White Balance when shooting under various types of the subject. " FINE Outdoors on a cloudy day. NOTE: White ...
...the MENU/BRIGHT wheel to select the desired mode. " MWB White balance is different depending on the white paper. " HALOGEN" ... A video light or similar type of colour reproduction under various lighting. The Menu Screen closes and the selected mode indicator except "AUTO" appears. Use...while pressing down the Lock Button located on the white balance settings. Selection is adjusted automatically (factory preset). EN 31 Manual White Balance Operation Perform Manual White Balance when shooting under various types of the subject. " FINE Outdoors on a cloudy day. NOTE: White ...

Instruction Manual
Page 32
FUL L GA I SPLAY DSC END Normal Screen MELODY DEMO MODE - WIPE/FADER", EXPOSURE" or If you have selected " CAMERA", " MANUAL", " SYSTEM" or " DISPLAY" . . . ..... The Menu Screen closes. • The icon represents "END". NOTE: When the Menu Screen is complete. 6 Rotate the... MENU/BRIGHT wheel to select the desired function menu, and press it twice. BALANCE CAMERA MANUAL S Y S T EM D I N UP - go to step 5. 5 Rotate the MENU/BRIGHT wheel to disappear. Selection is left on for the residual image ...
FUL L GA I SPLAY DSC END Normal Screen MELODY DEMO MODE - WIPE/FADER", EXPOSURE" or If you have selected " CAMERA", " MANUAL", " SYSTEM" or " DISPLAY" . . . ..... The Menu Screen closes. • The icon represents "END". NOTE: When the Menu Screen is complete. 6 Rotate the... MENU/BRIGHT wheel to select the desired function menu, and press it twice. BALANCE CAMERA MANUAL S Y S T EM D I N UP - go to step 5. 5 Rotate the MENU/BRIGHT wheel to disappear. Selection is left on for the residual image ...

Instruction Manual
Page 33
... and magnifying images, zooming is recommended for unstable images caused by camera-shake, particularly at 1/25 sec. GAIN UP OFF Allows you to a maximum of 700X digital magnification. MANUAL DIS OFF ON To compensate for use when performing audio dubbing. (Equivalent to the 32 kHz mode of ...with the camcorder on two separate channels. (Equivalent to the 48 kHz mode of previous models) ZOOM 16X When set to use the Digital Zoom. CAMERA 40X Allows you to "Exposure Control" and "Iris Lock" (੬ pg. 30). The overall appearance may be possible if hand shake...
... and magnifying images, zooming is recommended for unstable images caused by camera-shake, particularly at 1/25 sec. GAIN UP OFF Allows you to a maximum of 700X digital magnification. MANUAL DIS OFF ON To compensate for use when performing audio dubbing. (Equivalent to the 32 kHz mode of ...with the camcorder on two separate channels. (Equivalent to the 48 kHz mode of previous models) ZOOM 16X When set to use the Digital Zoom. CAMERA 40X Allows you to "Exposure Control" and "Iris Lock" (੬ pg. 30). The overall appearance may be possible if hand shake...

Instruction Manual
Page 34
... 4:3 TVs/LCD monitor/viewfinder, the image is normal. The quality of the screen. Instead of 16:9. SYSTEM : Factory-preset NOTES: ● The " MANUAL" settings are effective only when the Power Switch is set to " ". ● " SYSTEM" functions which cuts down on noise created by wind. When... depends on the zoom magnification. This is elongated vertically. 34 EN USING MENUS FOR DETAILED ADJUSTMENT (cont.) Menu Screen Explanations (cont.) MANUAL TELE MACRO WIDE MODE WIND CUT BEEP OFF ON OFF CINEMA SQUEEZE OFF ON OFF BEEP MELODY Usually the distance to a subject where ...
... 4:3 TVs/LCD monitor/viewfinder, the image is normal. The quality of the screen. Instead of 16:9. SYSTEM : Factory-preset NOTES: ● The " MANUAL" settings are effective only when the Power Switch is set to " ". ● " SYSTEM" functions which cuts down on noise created by wind. When... depends on the zoom magnification. This is elongated vertically. 34 EN USING MENUS FOR DETAILED ADJUSTMENT (cont.) Menu Screen Explanations (cont.) MANUAL TELE MACRO WIDE MODE WIND CUT BEEP OFF ON OFF CINEMA SQUEEZE OFF ON OFF BEEP MELODY Usually the distance to a subject where ...

Instruction Manual
Page 40
... battery holder while sliding the lock hole. : Pinch the release tab and pull out the battery holder. 2 Insert the battery in the RM-V700U instruction manual. It also makes additional playback functions possible. Remote sensor When using the remote control, be sure to have the "+" mark visible. 3 Slide the holder back...
... battery holder while sliding the lock hole. : Pinch the release tab and pull out the battery holder. 2 Insert the battery in the RM-V700U instruction manual. It also makes additional playback functions possible. Remote sensor When using the remote control, be sure to have the "+" mark visible. 3 Slide the holder back...

Instruction Manual
Page 45
... power supply instead of the battery pack (੬ pg. 9). ● The date/time information cannot be captured into the PC. ● Refer to the instruction manuals of the PC and Software. ● The still images can transfer still images to a PC with a DV connector by using software equipped with the PC... or commercially available software. 1 Make sure the camcorder and PC are using a DV cable, be sure to use the optional JVC VC-VDV206U or VC-VDV204U DV cable depending on the type of the software on how to transfer a still image to the PC. 4 When finished...
... power supply instead of the battery pack (੬ pg. 9). ● The date/time information cannot be captured into the PC. ● Refer to the instruction manuals of the PC and Software. ● The still images can transfer still images to a PC with a DV connector by using software equipped with the PC... or commercially available software. 1 Make sure the camcorder and PC are using a DV cable, be sure to use the optional JVC VC-VDV206U or VC-VDV204U DV cable depending on the type of the software on how to transfer a still image to the PC. 4 When finished...

Instruction Manual
Page 48
.... 4 There is a microcomputer-controlled device. 48 EN TROUBLESHOOTING If, after following the steps in the chart below, the problem still exists, please consult your nearest JVC dealer for replacement. • The tape's erase protection tab is set to "SAVE". • The Power Switch is set to "PLAY" or "OFF". ...power, or some other malfunction exists. • Turn the camcorder's power off and on again (੬ pg. 16). • Focus is set to the Manual mode. • The recording was done in a dark place, or the contrast was low. • The lens is dirty or covered with a fully ...
.... 4 There is a microcomputer-controlled device. 48 EN TROUBLESHOOTING If, after following the steps in the chart below, the problem still exists, please consult your nearest JVC dealer for replacement. • The tape's erase protection tab is set to "SAVE". • The Power Switch is set to "PLAY" or "OFF". ...power, or some other malfunction exists. • Turn the camcorder's power off and on again (੬ pg. 16). • Focus is set to the Manual mode. • The recording was done in a dark place, or the contrast was low. • The lens is dirty or covered with a fully ...

Instruction Manual
Page 52
...Turn the camcorder's power off and on again, then operate it does, you can cause damage (੬ pg. 53). • Check the section of the manual that explains LCD monitor/ viewfinder indications (੬ pg. 60 - 62). • Remove the power supply (battery pack, etc.) and wait a few minutes ... the tape. • Eject the cassette once and reinsert it does, you repeat the above two or three times, please consult your nearest JVC dealer. Wiping strongly can resume using the camcorder. When it . If the indication remains even though you can resume using the camcorder. If ...
...Turn the camcorder's power off and on again, then operate it does, you can cause damage (੬ pg. 53). • Check the section of the manual that explains LCD monitor/ viewfinder indications (੬ pg. 60 - 62). • Remove the power supply (battery pack, etc.) and wait a few minutes ... the tape. • Eject the cassette once and reinsert it does, you repeat the above two or three times, please consult your nearest JVC dealer. Wiping strongly can resume using the camcorder. When it . If the indication remains even though you can resume using the camcorder. If ...


