JVC VN-C1U - Digital Ethernet Color Camera Support and Manuals
Get Help and Manuals for this JVC item
Popular JVC VN-C1U Manual Pages
Instruction Manual - Page 1

....
For Customer Use: Enter below the Model No. SS961457-002 and Serial No. Retain this instruction manual carefully before use and retain it for maintaining quality of your product. The serial number is very important for future reference. Serial No. To gain maximum benefit from this product, read this information for purchasing the JVC VN-C1U.
Instruction Manual - Page 5

CONTENTS
Warnings cautions and Others i Package Contens 1 Operational Environment 1 About Upgrades ...2 Installation and Setup 3
Before starting installation and setup 3 Names of VN-C1U parts 3 Installation and set up 3 Operating the Controller Software 12 Establishing connection and changing the connection point 12 Controller 1,2 ...12 Creating a new connection point 13 Deleting a ...
Instruction Manual - Page 7

...??; About Upgrades
Upgrades of the software (VN-C1U) can ...be downloaded from that of the actual color due to as lamps, etc. white tails may appear above and below the object on for the white balance of this unit in the following homepage: http://www.jvc-victor.co.jp
2 The upgrade software can obtained via the Internet. Precautionary Notes
Avoid installing...
Instruction Manual - Page 8

... Install VN-C1U When installing in a location where it is difficult to step 2.
4. Set the IP address of VN-C1U Always contact the network management for each VN-C1U, follow the procedure given below to a network (turn the power on and off .
1.
Installation and Setup
Before starting installation and setup
Since a setup of VN-C1U on)
3. Connect VN-C1U to setup each unit (the installation...
Instruction Manual - Page 10
... core Install the ferrite core within 50mm of IP addresses occur, correct access may not be obtained when turning the power of one VN-C1U. Note All VN-C1U at the... VN-C1U IP address setup. Connecting VN-C1U to VN-C1U. Always turn on the power of multiple units on .
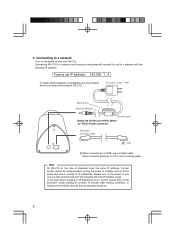
5 Connecting to a network
Turn on the power will connect the unit to a PC, use a crossing cable.
Factory set ...
Instruction Manual - Page 11
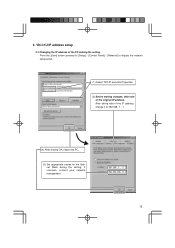
3. VN-C1U IP address setup
3-1 Changing the IP address of the PC making the setting From the [Start] button proceed to [Setup] - [Control Panel] - [Network] to display the network setup panel.
(1) Select TCP/IP and click Properties.
(2) Before making changes, take note of the IP address, change it to:192.168. 1. 1
(4) After clicking OK, reboot ...
Instruction Manual - Page 12

The setup program is located in the \JVC folder of the CD-ROM. 3-2 Installing the software Insert the VN-C1U controller CD-ROM into the CD-ROM drive. Execute \JVC\Setup.exe, then follow the on-screen guidance to setup the software.
7
Instruction Manual - Page 13

... a special installation, select Normal)
Setting to the ID code of the VN-C1U main unit. Input the IP address assigned or authorized by numbering up.
Execute \JVC\setup\vsetup.exe (execute directly from the CD-ROM).
Input using 172.16. 1. 50.)
Depending on the installation condition, select either Normal installation (JVC mark on the power supply frequency of the password button...
Instruction Manual - Page 14

... matches.
Enter the same password when setting the password protection or when changing the password.
The following screen will be set with an access protection feature using the V.NETWORKS setup tool. This password can only be updated when clicking Yes.
Password protection feature VN-C1U is equipped with password protection.
Entered characters will appear when...
Instruction Manual - Page 15

For PC's that have executed setup.exe can set IP address
Turn the power of VN-C1U off, then turn the power back on -screen instructions.
4. Enabling the set the time for search from the [Start] button then go [Setup]-[Control Panel][Network], then correct/restore the TCP/IP properties of VNC1U is turned off .)
[ IP ADDRESS SEARCH FUNCTION...
Instruction Manual - Page 16

... up the VN-C1U controller (VN-C1U connection software: vn-c1u.exe). To make correction after completing registration, first delete all settings then re-register. Connection point information can easily be copied to another PC The VN-C1U connection point information is created as a dat file (extension: .dat) in the folder where the connection software was installed. Enter the VN-C1U IP address...
Instruction Manual - Page 17

...following screen. When the VN-C1U controller: vnc1u.exe is displayed.
Controller 1
The VN-C1U screen appears immediately when connected. To make the connection, select the registered connection point. Currently connected VN-C1U
12
Operating the Controller Software
Establishing Connection and changing the connection point
For the installation procedure, see page 7 Installing the software.
Instruction Manual - Page 18

... clicking this button.
For details, see page 20 Still image save 1 frame of a balloon display. The entire VN-C1U name will display the VN-C1U name in the balloon display, even for long names. Controller 2
Placing the mouse pointer on the VNC1U and waiting momentarily will appear in a form of the images from the connected...
Instruction Manual - Page 21

... will switch to manual.)
Internal amp gain adjustment (Operated only when there is shortage of light)
Exposure time adjustment (The exposure time increases when the value is increased and the time decreases when the value is possible to adjust the image by changing the image sensor settings. Image sensor settings
The VN-C1U uses a CMOS...
Instruction Manual - Page 26

...the automatic white balance tracking. When the same VN-C1U is set to adjust the tint using the WBRed and WB...problem with different light sources (for immediate operation of natural colors becomes difficult when the PC is connected to multiple PCs, the PC used to operate. When there is also possible to High Color (16 bit) or lower.
It is recommended that the PC is set or control VN-C1U...
JVC VN-C1U Reviews
We have not received any reviews for JVC yet.