

Instruction Manual
Page 1
... No. Instrucción para el cliente : Introduzca a continuación el nº de serie que aparece en la parte inferior lateral de la caja. D-ILA PROJECTOR DLA-X950R DLA-X750R DLA-X550R INSTRUCTIONS Set up Operate Adjust/Set Maintenance Troubleshooting . Getting Started . which is located on mobile internet devices including smartphones and tablets. . Garder cetteinformation comme...
... No. Instrucción para el cliente : Introduzca a continuación el nº de serie que aparece en la parte inferior lateral de la caja. D-ILA PROJECTOR DLA-X950R DLA-X750R DLA-X550R INSTRUCTIONS Set up Operate Adjust/Set Maintenance Troubleshooting . Getting Started . which is located on mobile internet devices including smartphones and tablets. . Garder cetteinformation comme...

Instruction Manual
Page 2
... equipment into the outlet, contact your local authorities or for USA, the Electronic Industries Alliance: http://www.eiae.org. This projector is subject to the following measures: Reorient or relocate the receiving antenna. FCC INFORMATION (U.S.A. If this device must accept any ...-252-5722(For USA) or 1-800-964-2650(For Canada). CAUTION: To reduce the risk of Conformity Model Number: DLA-X950RBU, DLA-X750RBU, DLA-X550RBU Trade Name: JVC Responsible party: JVCKENWOOD USA Corporation Address: 1700 Valley Road Wayne, N. Increase the separation between the equipment and receiver. ...
... equipment into the outlet, contact your local authorities or for USA, the Electronic Industries Alliance: http://www.eiae.org. This projector is subject to the following measures: Reorient or relocate the receiving antenna. FCC INFORMATION (U.S.A. If this device must accept any ...-252-5722(For USA) or 1-800-964-2650(For Canada). CAUTION: To reduce the risk of Conformity Model Number: DLA-X950RBU, DLA-X750RBU, DLA-X550RBU Trade Name: JVC Responsible party: JVCKENWOOD USA Corporation Address: 1700 Valley Road Wayne, N. Increase the separation between the equipment and receiver. ...
Instruction Manual
Page 3
But IMPROPER USE CAN RESULT IN POTENTIAL ELECTRICAL SHOCK OR FIRE HAZARD. All warnings on bed, sofa, rug, or similar surface. Place the projector near water. Slots and openings in installation such as a bookcase or rack unless proper ventilation is equipped with same characteristics as the original part. These ...
But IMPROPER USE CAN RESULT IN POTENTIAL ELECTRICAL SHOCK OR FIRE HAZARD. All warnings on bed, sofa, rug, or similar surface. Place the projector near water. Slots and openings in installation such as a bookcase or rack unless proper ventilation is equipped with same characteristics as the original part. These ...
Instruction Manual
Page 4
...it is not appropriate. Do not look into the electronic com ponent parts. Do not ceiling-mount the projector to a place which could be broken by the vibration, possibly causing it should be higher than our ...of moving images, e.g. There is impos sible to deteriorate very quickly. It is no problem with the playback of the projector could lead to the picture element. Getting Started - For health reasons, please take any problem concerning 3D-images if ... If anything is unclear, please consult your dealer, or the nearest authorized JVC service center. -
...it is not appropriate. Do not look into the electronic com ponent parts. Do not ceiling-mount the projector to a place which could be broken by the vibration, possibly causing it should be higher than our ...of moving images, e.g. There is impos sible to deteriorate very quickly. It is no problem with the playback of the projector could lead to the picture element. Getting Started - For health reasons, please take any problem concerning 3D-images if ... If anything is unclear, please consult your dealer, or the nearest authorized JVC service center. -
Instruction Manual
Page 5
...Kanagawa-ku, Yokohama-shi, Kanagawa, 221-0022, JAPAN Importer (EU only): JVC KENWOOD U.K. Ensure that the power cable used for the AC outlet in your home or the cable is the correct type for the projector is too short to the main supply. If a new main plug has to... the valid European directives and standards regarding electromagnetic compatibility and electrical safety. Power cord The power supply voltage rating of this product is : JVC Technical Services Europe GmbH Konrad-Adenauer-Allee 1-11 61118 Bad Vilbel Germany . Consult your plug, proceed as follows: The wire which is ...
...Kanagawa-ku, Yokohama-shi, Kanagawa, 221-0022, JAPAN Importer (EU only): JVC KENWOOD U.K. Ensure that the power cable used for the AC outlet in your home or the cable is the correct type for the projector is too short to the main supply. If a new main plug has to... the valid European directives and standards regarding electromagnetic compatibility and electrical safety. Power cord The power supply voltage rating of this product is : JVC Technical Services Europe GmbH Konrad-Adenauer-Allee 1-11 61118 Bad Vilbel Germany . Consult your plug, proceed as follows: The wire which is ...
Instruction Manual
Page 8
... Terminal 19 Connecting to the TRIGGER Terminal 20 Connecting the Power Cord (Supplied Accessory) ...... 20 Operate Viewing Videos 21 Adjusting the Projector Screen 23 Adjusting the Lens According to the Projection Position 23 Saving and Retrieving Adjustment Settings ....... 24 Setting Screen Correction 26 Adjusting ...Viewing High Contrast Images (Lens Aperture) . 40 Adjustments and Settings in the Menu 41 List of the above symbols are supported by DLA-X550R. Front 10 Main Unit - Items not marked with any of Menu Items 41 Picture Adjust 43 Input Signal 46 Installation 48 Display ...
... Terminal 19 Connecting to the TRIGGER Terminal 20 Connecting the Power Cord (Supplied Accessory) ...... 20 Operate Viewing Videos 21 Adjusting the Projector Screen 23 Adjusting the Lens According to the Projection Position 23 Saving and Retrieving Adjustment Settings ....... 24 Setting Screen Correction 26 Adjusting ...Viewing High Contrast Images (Lens Aperture) . 40 Adjustments and Settings in the Menu 41 List of the above symbols are supported by DLA-X550R. Front 10 Main Unit - Items not marked with any of Menu Items 41 Picture Adjust 43 Input Signal 46 Installation 48 Display ...

Instruction Manual
Page 9
... (Infrared)) PK-EM2 - - Accessories/Optional Accessories Getting Started Check the Accessories Lens cover 6 1 piece * It is attached to read the "Safety Precautions" before using this projector. Remote control 1 piece .
... (Infrared)) PK-EM2 - - Accessories/Optional Accessories Getting Started Check the Accessories Lens cover 6 1 piece * It is attached to read the "Safety Precautions" before using this projector. Remote control 1 piece .
Instruction Manual
Page 10
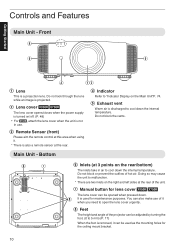
B Lens cover 4 5 The lens cover opens/closes when the power supply is turned on the rear/bottom) The inlets take in use of the projector can also make use . C Remote Sensor (front) Please aim the remote control at this area when using it can be used for the ceiling mount ...
B Lens cover 4 5 The lens cover opens/closes when the power supply is turned on the rear/bottom) The inlets take in use of the projector can also make use . C Remote Sensor (front) Please aim the remote control at this area when using it can be used for the ceiling mount ...
Instruction Manual
Page 12
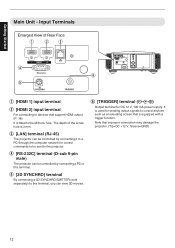
... hole is 3 mm. D [RS-232C] terminal (D-sub 9-pin male) The projector can view 3D movies. Getting Started Main Unit - A [HDMI 1] input terminal B [HDMI 2] input terminal For connecting to the projector. It is used for sending output signals to control devices such as an elevating screen... that improper connection may damage the projector. (Tip=DC +12 V, Sleeve=GND) 12 The depth of Rear Face A BC D F ...
... hole is 3 mm. D [RS-232C] terminal (D-sub 9-pin male) The projector can view 3D movies. Getting Started Main Unit - A [HDMI 1] input terminal B [HDMI 2] input terminal For connecting to the projector. It is used for sending output signals to control devices such as an elevating screen... that improper connection may damage the projector. (Tip=DC +12 V, Sleeve=GND) 12 The depth of Rear Face A BC D F ...
Instruction Manual
Page 14
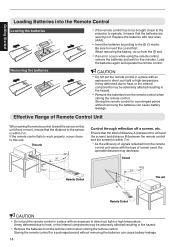
... is within 7 m. Storing the remote control for five minutes. It may deformed due to heat, or the internal components may be brought closer to the projector to heat, or the internal components may be adversely affected resulting in fire hazard. 0 Remove the batteries from the t end. 0 If an error occurs while...
... is within 7 m. Storing the remote control for five minutes. It may deformed due to heat, or the internal components may be brought closer to the projector to heat, or the internal components may be adversely affected resulting in fire hazard. 0 Remove the batteries from the t end. 0 If an error occurs while...
Instruction Manual
Page 15
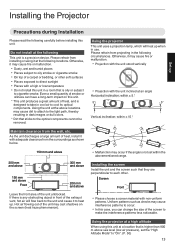
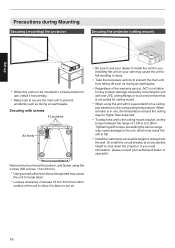
...the unit unblocked. Installing the screen Install the unit and the screen such that sticks to make the interference patterns less noticeable. Using the projector This unit uses a projection lamp, which will flow back to heat up. Otherwise, it to the unit and cause it may cast ...shadows on this unit in a room that is designed to take in the following circumstances. Installing the Projector Set up Precautions during Installation Please read the following carefully before installing this case, you can have a long-term impact on the screen ...
...the unit unblocked. Installing the screen Install the unit and the screen such that sticks to make the interference patterns less noticeable. Using the projector This unit uses a projection lamp, which will flow back to heat up. Otherwise, it to the unit and cause it may cast ...shadows on this unit in a room that is designed to take in the following circumstances. Installing the Projector Set up Precautions during Installation Please read the following carefully before installing this case, you can have a long-term impact on the screen ...
Instruction Manual
Page 16
... it to take in injury. 0 Take the necessary actions to prevent the main unit from falling off such as during Mounting Securing (mounting) the projector Securing the projector (ceiling mount) . 0 When this unit is not suited for ceiling mount. 0 When using the screws (M5 screws, 13 to 23 mm). * Using ... the main unit to prevent accidents such as during an earthquake. 0 Regardless of the warranty period, JVC is not liable for any product damage caused by mounting the unit with non-JVC ceiling fittings or to an environment that is to be higher than those designated may result the unit...
... it to take in injury. 0 Take the necessary actions to prevent the main unit from falling off such as during Mounting Securing (mounting) the projector Securing the projector (ceiling mount) . 0 When this unit is not suited for ceiling mount. 0 When using the screws (M5 screws, 13 to 23 mm). * Using ... the main unit to prevent accidents such as during an earthquake. 0 Regardless of the warranty period, JVC is not liable for any product damage caused by mounting the unit with non-JVC ceiling fittings or to an environment that is to be higher than those designated may result the unit...
Instruction Manual
Page 17
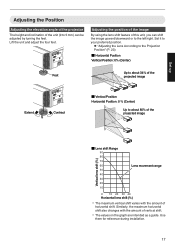
... be adjusted by turning the feet. Lift the unit and adjust the four feet. Set up Adjusting the Position Adjusting the elevation angle of the projector The height and inclination of the unit (0 to the left/right.
... be adjusted by turning the feet. Lift the unit and adjust the four feet. Set up Adjusting the Position Adjusting the elevation angle of the projector The height and inclination of the unit (0 to the left/right.
Instruction Manual
Page 18
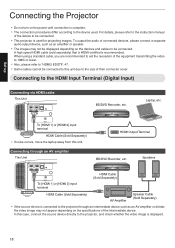
...input terminal HDMI Cable (Sold Separately) . 0 If noise occurs, move the laptop away from this case, connect the source device directly to the projector, and check whether the video image is used . A high speed HDMI cable (sold separately) that is HDMI-certified is connected to the...connected. When using a standard cable, you are recommended to set the resolution of the device to be connected. 0 This projector is displayed. 18 Set up Connecting the Projector 0 Do not turn on the power until connection is complete. 0 The connection procedures differ according to the device used ...
...input terminal HDMI Cable (Sold Separately) . 0 If noise occurs, move the laptop away from this case, connect the source device directly to the projector, and check whether the video image is used . A high speed HDMI cable (sold separately) that is HDMI-certified is connected to the...connected. When using a standard cable, you are recommended to set the resolution of the device to be connected. 0 This projector is displayed. 18 Set up Connecting the Projector 0 Do not turn on the power until connection is complete. 0 The connection procedures differ according to the device used ...
Instruction Manual
Page 20
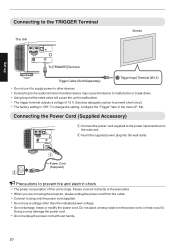
Exercise adequate caution to the power input terminal on the power cord, or heat or pull it using the projector, please unplug the power cord from the outlet. 0 Connect it . Connecting the Power Cord (Supplied Accessory) A Connect the power cord supplied to prevent short circuit. 0 ...
Exercise adequate caution to the power input terminal on the power cord, or heat or pull it using the projector, please unplug the power cord from the outlet. 0 Connect it . Connecting the Power Cord (Supplied Accessory) A Connect the power cord supplied to prevent short circuit. 0 ...
Instruction Manual
Page 21
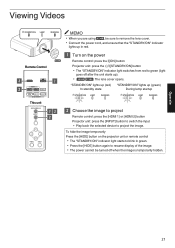
...green (light goes off when the image is temporarily hidden. Operate 21 MEMORY MENU MEMORY1 MEMORY2 LENS MEMORY This unit 6 1 1 Turn on the projector unit or remote control 0 The "STANDBY/ON" indicator light starts to blink in red. To hide the image temporarily Press the [HIDE] button ... STANDBY/ON LAMP WARNING STANDBY/ON LAMP WARNING . 13 2 2 Choose the image to project Remote control: press the [HDMI 1] or [HDMI 2] button Projector unit: press the [INPUT] button to switch the input 0 Play back the selected device to remove the lens cover. 0 Connect the power cord, and ...
...green (light goes off when the image is temporarily hidden. Operate 21 MEMORY MENU MEMORY1 MEMORY2 LENS MEMORY This unit 6 1 1 Turn on the projector unit or remote control 0 The "STANDBY/ON" indicator light starts to blink in red. To hide the image temporarily Press the [HIDE] button ... STANDBY/ON LAMP WARNING STANDBY/ON LAMP WARNING . 13 2 2 Choose the image to project Remote control: press the [HDMI 1] or [HDMI 2] button Projector unit: press the [INPUT] button to switch the input 0 Play back the selected device to remove the lens cover. 0 Connect the power cord, and ...
Instruction Manual
Page 22
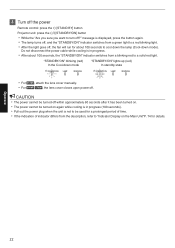
3 Turn off the power Remote control: press the B [STAND BY] button Projector unit: press the A [STANDBY/ON] button 0 While the "Are you sure you want to turn off . CAUTION 0 The power cannot be turned off within approximately ...
3 Turn off the power Remote control: press the B [STAND BY] button Projector unit: press the A [STANDBY/ON] button 0 While the "Are you sure you want to turn off . CAUTION 0 The power cannot be turned off within approximately ...
Instruction Manual
Page 23
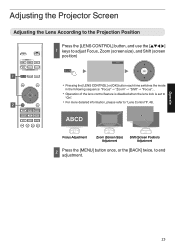
... MENU MEMORY1 MEMORY2 LENS MEMORY 1 LENS CONTROL LENS AP. ADJ. NATURAL THX USER MPC P.ANALYZER ADVANCED MENU GAMMA COLOR TEMP. 3D FORMAT PIC. Adjusting the Projector Screen Adjusting the Lens According to "Lens Control"P. 48. Operate 23 ABCD Focus Adjustment . Zoom (Screen Size) Adjustment Shift (Screen Position) Adjustment 2 Press the [MENU...
... MENU MEMORY1 MEMORY2 LENS MEMORY 1 LENS CONTROL LENS AP. ADJ. NATURAL THX USER MPC P.ANALYZER ADVANCED MENU GAMMA COLOR TEMP. 3D FORMAT PIC. Adjusting the Projector Screen Adjusting the Lens According to "Lens Control"P. 48. Operate 23 ABCD Focus Adjustment . Zoom (Screen Size) Adjustment Shift (Screen Position) Adjustment 2 Press the [MENU...
Instruction Manual
Page 26
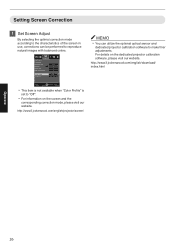
...the optimal correction mode according to the characteristics of the screen in use, corrections can utilize the optional optical sensor and dedicated projector calibration software to make finer adjustments. Select Operate Back BACK 0 This item is not available when "Color Profile" is set... to "Off". 0 For information on the dedicated projector calibration software, please visit our website. Installation Lens Control Pixel Adjust Installation Style Keystone 0 Anamorphic High Altitude Mode Front Off Off Screen...
...the optimal correction mode according to the characteristics of the screen in use, corrections can utilize the optional optical sensor and dedicated projector calibration software to make finer adjustments. Select Operate Back BACK 0 This item is not available when "Color Profile" is set... to "Off". 0 For information on the dedicated projector calibration software, please visit our website. Installation Lens Control Pixel Adjust Installation Style Keystone 0 Anamorphic High Altitude Mode Front Off Off Screen...
Instruction Manual
Page 31
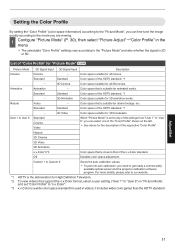
..., select a user setting ("User 1" to "User 6") in the menu 0 The selectable "Color Profile" settings vary according to get ready a commercially available optical sensor and the projector calibration software program. For more details, please refer to our website. *1 HDTV is the abbreviation for all 3D movies.
..., select a user setting ("User 1" to "User 6") in the menu 0 The selectable "Color Profile" settings vary according to get ready a commercially available optical sensor and the projector calibration software program. For more details, please refer to our website. *1 HDTV is the abbreviation for all 3D movies.


