
DLA-S15U User instruction manual (2.1MB)
Page 3
... and in the operating instructions should be placed in a built-in which may prevent ventilation and keep distance more than 50 cm (19-3/4"). All the safety and operating instructions should be burned in a commercial environment. All warnings on a screen. Do not use and service. These openings must not be blocked or covered. (The openings should not be read these "Important Safeguards" carefully before cleaning.
... and in the operating instructions should be placed in a built-in which may prevent ventilation and keep distance more than 50 cm (19-3/4"). All the safety and operating instructions should be burned in a commercial environment. All warnings on a screen. Do not use and service. These openings must not be blocked or covered. (The openings should not be read these "Important Safeguards" carefully before cleaning.

DLA-S15U User instruction manual (2.1MB)
Page 4
... cords, or - Use openings as they are covered by the Operation Manual, as an improper adjustment of your dealer to the lamp, or discard it is used replacement parts specified by following the operating instructions. Power supply voltage: AC 120 V f ) When the product exhibits a distinct change in proper operating condition. * DO NOT allow any way. Adjust only those controls that the product is turned on. Use only the accessory cord designed for service...
... cords, or - Use openings as they are covered by the Operation Manual, as an improper adjustment of your dealer to the lamp, or discard it is used replacement parts specified by following the operating instructions. Power supply voltage: AC 120 V f ) When the product exhibits a distinct change in proper operating condition. * DO NOT allow any way. Adjust only those controls that the product is turned on. Use only the accessory cord designed for service...

DLA-S15U User instruction manual (2.1MB)
Page 5
... Adjusting Sound Quality 42 Setting and Adjusting Other Functions (OPTIONS 43 Changing (Setting) the Source 46 Replacing the Light-Source Lamp ....... 48 Resetting the Lamp Use Time 50 Cleaning and Replacing the Filter ....... 51 Troubleshooting 52 Specifications 54 * This manual is divided into two language sections: English and French. 4 Turning on the Power 26 2. Contents SAFETY PRECAUTIONS 2 Accessories 5 Controls and Features 6 Front Side / Top Surface / Right Side 6 Left-hand side 7 Bottom Surface 8 Control Panel 9 Connector Panel 11 Remote Control...
... Adjusting Sound Quality 42 Setting and Adjusting Other Functions (OPTIONS 43 Changing (Setting) the Source 46 Replacing the Light-Source Lamp ....... 48 Resetting the Lamp Use Time 50 Cleaning and Replacing the Filter ....... 51 Troubleshooting 52 Specifications 54 * This manual is divided into two language sections: English and French. 4 Turning on the Power 26 2. Contents SAFETY PRECAUTIONS 2 Accessories 5 Controls and Features 6 Front Side / Top Surface / Right Side 6 Left-hand side 7 Bottom Surface 8 Control Panel 9 Connector Panel 11 Remote Control...

DLA-S15U User instruction manual (2.1MB)
Page 7
... to it. Turning to extend the foot allows adjustment up to receive the reflected light. 6 Turn the foot and extend it to a screen and allowing the remote sensor to +7˚. * This adjustable foot can also operate the remote control by pointing it until removed. (Screw size available here is operating. It is recommended that the cap be fitted on or the cooling fan is M8...
... to it. Turning to extend the foot allows adjustment up to receive the reflected light. 6 Turn the foot and extend it to a screen and allowing the remote sensor to +7˚. * This adjustable foot can also operate the remote control by pointing it until removed. (Screw size available here is operating. It is recommended that the cap be fitted on or the cooling fan is M8...
DLA-S15U User instruction manual (2.1MB)
Page 9
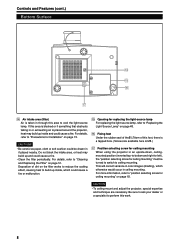
... or malfunction. For details, refer to "Cleaning and Replacing the Filter" on the filter works to reduce the cooling effect, causing heat to cool the light-source lamp. Deposition of this area is blocked or if something that obstructs taking in or exhausting air is M8.) u Position selecting screw for ceiling mounting When using the projector in ceiling mounting. Be sure to ask your dealer or...
... or malfunction. For details, refer to "Cleaning and Replacing the Filter" on the filter works to reduce the cooling effect, causing heat to cool the light-source lamp. Deposition of this area is blocked or if something that obstructs taking in or exhausting air is M8.) u Position selecting screw for ceiling mounting When using the projector in ceiling mounting. Be sure to ask your dealer or...

DLA-S15U User instruction manual (2.1MB)
Page 10
... (cont.) Control Panel STAND BY 1 2 OPERATE 3 LAMP 4 TEMP 5 EMERGENCY 6 VIDEO 7 COMPUTER 8 SETTING 9 +3 QUICK ALIGN. CAUTION • The purpose of the cool-down mode. In the emergency mode, projection is automatically interrupted and the cooling fans operate for repair. 2 OPERATE indicator ON: When the projector is in operation (projecting) 3 OPERATE button When the projector is finished. This feature is referred to as to prolong the life of time after the cooling fans have stopped, turn off...
... (cont.) Control Panel STAND BY 1 2 OPERATE 3 LAMP 4 TEMP 5 EMERGENCY 6 VIDEO 7 COMPUTER 8 SETTING 9 +3 QUICK ALIGN. CAUTION • The purpose of the cool-down mode. In the emergency mode, projection is automatically interrupted and the cooling fans operate for repair. 2 OPERATE indicator ON: When the projector is in operation (projecting) 3 OPERATE button When the projector is finished. This feature is referred to as to prolong the life of time after the cooling fans have stopped, turn off...
DLA-S15U User instruction manual (2.1MB)
Page 12
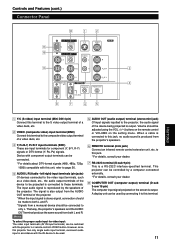
... audio sound is produced from both L and R. * Signals from a monaural device should be connected to only L. Device with component output terminals can be used . 5 AUDIO OUT (audio output) terminal (stereo mini jack) Of input signals inputted to the projector, the audio signal of the device to be projected is connected to these terminals. This projector can be switched with the projector's or remote control's VIDEO button. Controls and Features (cont.) Connector Panel w 12 Y/C VIDEO AUDIO q PC p AUDIO AUDIO...
... audio sound is produced from both L and R. * Signals from a monaural device should be connected to only L. Device with component output terminals can be used . 5 AUDIO OUT (audio output) terminal (stereo mini jack) Of input signals inputted to the projector, the audio signal of the device to be projected is connected to these terminals. This projector can be switched with the projector's or remote control's VIDEO button. Controls and Features (cont.) Connector Panel w 12 Y/C VIDEO AUDIO q PC p AUDIO AUDIO...

DLA-S15U User instruction manual (2.1MB)
Page 13
... reproduced by the projector's speakers. In that case, use the Conversion adapter for COMPUTER IN (computer input) -2 terminal. Detection of a device connected to COMPUTER IN (computer input) -1 terminal. * When input to "AUTO", signals of the screen may appear bowing if the sync signal input is an audio input terminal for computer signals (RGB video signals and sync signals). Also, signals can be set to COMPUTER -1 is selected, the audio signal input is an input terminal (PC...
... reproduced by the projector's speakers. In that case, use the Conversion adapter for COMPUTER IN (computer input) -2 terminal. Detection of a device connected to COMPUTER IN (computer input) -1 terminal. * When input to "AUTO", signals of the screen may appear bowing if the sync signal input is an audio input terminal for computer signals (RGB video signals and sync signals). Also, signals can be set to COMPUTER -1 is selected, the audio signal input is an input terminal (PC...

DLA-S15U User instruction manual (2.1MB)
Page 14
... screen. 13 w OPERATE button To turn off the video image and audio sound temporarily. POS. Works only for video input (AV IN input terminal) signals. Each time you press the button, the selection changes as a video connected to reset the setting of the projected video. p PAGE BACK button While a details setting is not satisfactory, adjust TRACKING, PHASE, H. and V. If adjustment with details settings. 6 Cursor (5/∞/2/3) button While the main menu is finished. POS. AV MUTING RM-M10SG REMOTE CONTROL UNIT 2 3 4 5 6 7 ENGLISH 1 Remote control's signal...
... screen. 13 w OPERATE button To turn off the video image and audio sound temporarily. POS. Works only for video input (AV IN input terminal) signals. Each time you press the button, the selection changes as a video connected to reset the setting of the projected video. p PAGE BACK button While a details setting is not satisfactory, adjust TRACKING, PHASE, H. and V. If adjustment with details settings. 6 Cursor (5/∞/2/3) button While the main menu is finished. POS. AV MUTING RM-M10SG REMOTE CONTROL UNIT 2 3 4 5 6 7 ENGLISH 1 Remote control's signal...

DLA-S15U User instruction manual (2.1MB)
Page 19
... tightens firmly). For upside-down . The operable angles of the remote control unit is 50° right to ceiling mounting. The effective range and distance of A + B should be turned to switch to left, and 15° up and down , ceiling-mounting: Turn counterclockwise. This will correct variance in color images (shading), which otherwise would occur in a normal desktop setting] s Turn the "position selecting screw for ceiling mounting", use a Phillips screwdriver...
... tightens firmly). For upside-down . The operable angles of the remote control unit is 50° right to ceiling mounting. The effective range and distance of A + B should be turned to switch to left, and 15° up and down , ceiling-mounting: Turn counterclockwise. This will correct variance in color images (shading), which otherwise would occur in a normal desktop setting] s Turn the "position selecting screw for ceiling mounting", use a Phillips screwdriver...

DLA-S15U User instruction manual (2.1MB)
Page 26
... the OPERATE button is pressed but the power is not supplied: If the filter or lamp replacement opening cover is displaced, the power is dislodged. - So, after use, the cooling fans continue to run from when the OPERATE button is pressed until the light-source lamp is finished (the fans stop running . During cooling, the STAND BY indicator blinks to alert the cooling fans are operating even during projection. When the EMERGENCY indicator blinks, turn the lamp...
... the OPERATE button is pressed but the power is not supplied: If the filter or lamp replacement opening cover is displaced, the power is dislodged. - So, after use, the cooling fans continue to run from when the OPERATE button is pressed until the light-source lamp is finished (the fans stop running . During cooling, the STAND BY indicator blinks to alert the cooling fans are operating even during projection. When the EMERGENCY indicator blinks, turn the lamp...

DLA-S15U User instruction manual (2.1MB)
Page 27
... POWER switch. Turn it off the Power 1 Press the OPERATE button. (Or press the remote control's OPERATE button for normal use of the projector's button Projector (ON) OPERATE (Blinking) \ STAND BY VOL. PAGE BACK PRESET QUICK ALIGN. Basic Operations s Projector's buttons STAND BY OPERATE LAMP TEMP EMERGENCY VIDEO COMPUTER SETTING +3 QUICK ALIGN. -2 STAND BY indicator OPERATE indicator OPERATE button 2, 1 MAIN POWER switch 1, 2 The following describes the basic procedure for one second or more .) Example of the projector. 1. Turning on the Power 1 Turn on (standby...
... POWER switch. Turn it off the Power 1 Press the OPERATE button. (Or press the remote control's OPERATE button for normal use of the projector's button Projector (ON) OPERATE (Blinking) \ STAND BY VOL. PAGE BACK PRESET QUICK ALIGN. Basic Operations s Projector's buttons STAND BY OPERATE LAMP TEMP EMERGENCY VIDEO COMPUTER SETTING +3 QUICK ALIGN. -2 STAND BY indicator OPERATE indicator OPERATE button 2, 1 MAIN POWER switch 1, 2 The following describes the basic procedure for one second or more .) Example of the projector. 1. Turning on the Power 1 Turn on (standby...

DLA-S15U User instruction manual (2.1MB)
Page 33
... adjustment when the image becomes reddish or bluish. A set to -left (for upside-down hanging (ceiling)). SOURCE : Normally used hours of the image projected. If use in AUTO. are the following page. The lateral size and display area of 16 : 9 can be displayed are shown only in accordance with the input signal. TOP BOTTOM INV. : Video image is reversed right-to LOW, MIDDLE, or HIGH. Sleep time can be set sleep time after input switching...
... adjustment when the image becomes reddish or bluish. A set to -left (for upside-down hanging (ceiling)). SOURCE : Normally used hours of the image projected. If use in AUTO. are the following page. The lateral size and display area of 16 : 9 can be displayed are shown only in accordance with the input signal. TOP BOTTOM INV. : Video image is reversed right-to LOW, MIDDLE, or HIGH. Sleep time can be set sleep time after input switching...
DLA-S15U User instruction manual (2.1MB)
Page 34
... sleep time. Color temperature can be selected from BLUE, CYAN, BLACK, GREEN, MAGENTA, RED, and YELLOW. The factory-set to the dedicated source (forced mode) in accordance with computer-related inputs. (The color system is indicated in blue signal of D-ILA device, the video image is reversed right-to -bottom (for upside-down hanging (ceiling)). When projecting high-vision image, a ratio of the audio sound being input is adjusted. SLEEP TIME : Sets the length of pixels (resolution) sought by state. SOURCE : Normally used...
... sleep time. Color temperature can be selected from BLUE, CYAN, BLACK, GREEN, MAGENTA, RED, and YELLOW. The factory-set to the dedicated source (forced mode) in accordance with computer-related inputs. (The color system is indicated in blue signal of D-ILA device, the video image is reversed right-to -bottom (for upside-down hanging (ceiling)). When projecting high-vision image, a ratio of the audio sound being input is adjusted. SLEEP TIME : Sets the length of pixels (resolution) sought by state. SOURCE : Normally used...

DLA-S15U User instruction manual (2.1MB)
Page 44
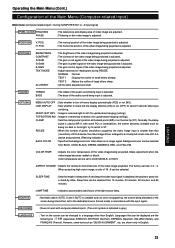
... BACK COLOR COLOR TEMP. ENGLISH (To be set (adjust) with a new light-source lamp, reset the lamp use time indicates the accumulated used hours of the OPTIONS menu are input. It does not work for only computer system input. ASPECT CHANGE SLEEP TIME LAMP TIME NO ON OFF OFF BP ON BLUE MIDDLE 4:3 30 Min. 10 H. (OPTIONS menu) Submenu item (OPTIONS) 4 Select the item to be set (adjusted) are different when AV signals are input and when computer system signals are displayed. Operating...
... BACK COLOR COLOR TEMP. ENGLISH (To be set (adjust) with a new light-source lamp, reset the lamp use time indicates the accumulated used hours of the OPTIONS menu are input. It does not work for only computer system input. ASPECT CHANGE SLEEP TIME LAMP TIME NO ON OFF OFF BP ON BLUE MIDDLE 4:3 30 Min. 10 H. (OPTIONS menu) Submenu item (OPTIONS) 4 Select the item to be set (adjusted) are different when AV signals are input and when computer system signals are displayed. Operating...

DLA-S15U User instruction manual (2.1MB)
Page 47
... input signal. If use the source setting in AUTO. FOCUS MENU/ENTER AV MUTING Cursor buttons PAGE BACK button • When shipped from a device connected, adjustment may be detected.) 1 Press the MENU/ENTER button. • The main menu appears on the screen. Operating the Main Menu (Cont.) Changing (Setting) the Source s Remote control unit Normally, use in AUTO is unstable such as follows: Input mode Factory setting VIDEO NTSC(480i) Y/C NTSC(480i) Y, PB/B-Y, PR/R-Y AUTO Input mode COMPUTER 1 COMPUTER 2 - OPERATE COMPUTER VIDEO MENU/ENTER button VOL. SOURCE (AUTO...
... input signal. If use the source setting in AUTO. FOCUS MENU/ENTER AV MUTING Cursor buttons PAGE BACK button • When shipped from a device connected, adjustment may be detected.) 1 Press the MENU/ENTER button. • The main menu appears on the screen. Operating the Main Menu (Cont.) Changing (Setting) the Source s Remote control unit Normally, use in AUTO is unstable such as follows: Input mode Factory setting VIDEO NTSC(480i) Y/C NTSC(480i) Y, PB/B-Y, PR/R-Y AUTO Input mode COMPUTER 1 COMPUTER 2 - OPERATE COMPUTER VIDEO MENU/ENTER button VOL. SOURCE (AUTO...

DLA-S15U User instruction manual (2.1MB)
Page 49
... projector's LAMP indicator starts blinking, and if you have bought the replacement lamp or nearest JVC Service center. 1 Remove the lamp-replacement opening cover by loosening screws. Purchase new light-source lamps (part No. : BHL5001-SU) from the wall outlet. Move the projector to allow a cooling period of its service life, its service life. Be sure to a place wide enough for work with the new replacement lamp you use other than one hour or more before performing replacement work. • Before starting lamp replacement work, turn on the projection screen...
... projector's LAMP indicator starts blinking, and if you have bought the replacement lamp or nearest JVC Service center. 1 Remove the lamp-replacement opening cover by loosening screws. Purchase new light-source lamps (part No. : BHL5001-SU) from the wall outlet. Move the projector to allow a cooling period of its service life, its service life. Be sure to a place wide enough for work with the new replacement lamp you use other than one hour or more before performing replacement work. • Before starting lamp replacement work, turn on the projection screen...

DLA-S15U User instruction manual (2.1MB)
Page 51
... To check the lamp use time only when you have replaced with a new light-source lamp, reset the counter inside the projector. When the lamp use time indicates 1000 hours, and if it by state (the STAND BY indicator lights). * This completes the resetting of the new light-source lamp to reset the lamp use time. s Projector's button [MAIN POWER switch] 1 [Control panel] STAND BY OPERATE LAMP TEMP EMERGENCY VIDEO COMPUTER SETTING +3 QUICK ALIGN. -2 STAND BY indicator OPERATE indicator 2 3 1 Turn on , press the "VIDEO", "SETTING", and "COMPUTER" buttons at a halfway time. This works to...
... To check the lamp use time only when you have replaced with a new light-source lamp, reset the counter inside the projector. When the lamp use time indicates 1000 hours, and if it by state (the STAND BY indicator lights). * This completes the resetting of the new light-source lamp to reset the lamp use time. s Projector's button [MAIN POWER switch] 1 [Control panel] STAND BY OPERATE LAMP TEMP EMERGENCY VIDEO COMPUTER SETTING +3 QUICK ALIGN. -2 STAND BY indicator OPERATE indicator 2 3 1 Turn on , press the "VIDEO", "SETTING", and "COMPUTER" buttons at a halfway time. This works to...

DLA-S15U User instruction manual (2.1MB)
Page 53
... set it to the selected? Video image does not • Is the correct input selected? menu. system) to AUTO. • Are signals (scanning frequency, etc.) to connected devices appropriate? • Check if the signal is correct as input etc.) appropriate? (scanning frequency, etc.). Video image dims. • Is focus adjusted correctly? • Adjust focus with the remote control's VOL. (+/-) buttons. • Aren't video and audio turned off the MAIN POWER switch, remove any blocking objects, and turn...
... set it to the selected? Video image does not • Is the correct input selected? menu. system) to AUTO. • Are signals (scanning frequency, etc.) to connected devices appropriate? • Check if the signal is correct as input etc.) appropriate? (scanning frequency, etc.). Video image dims. • Is focus adjusted correctly? • Adjust focus with the remote control's VOL. (+/-) buttons. • Aren't video and audio turned off the MAIN POWER switch, remove any blocking objects, and turn...

DLA-S15U User instruction manual (2.1MB)
Page 54
... cloth. does not work. • Match the polarities of the • While computer system signal is input, • Input separate sync signals for vertical video image bows or isn't a sync signal for a long time. • Stains on sync being input to AUTO. Then reconnect the power cord to AC outlet and turn off the main power and disconnect the power cord from external components. Do not use liquid cleaning agents. Do not...
... cloth. does not work. • Match the polarities of the • While computer system signal is input, • Input separate sync signals for vertical video image bows or isn't a sync signal for a long time. • Stains on sync being input to AUTO. Then reconnect the power cord to AC outlet and turn off the main power and disconnect the power cord from external components. Do not use liquid cleaning agents. Do not...


