Instructions
Page 2
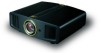
... cleaning. All the safety and operating instructions should use attachments not recommended by JVC could fall , causing serious injury to a child or adult, and serious... 1 Getting Started Safety Precautions IMPORTANT INFORMATION This product has a High Intensity Discharge (HID) lamp that cannot support its installation, use and service. These limits are unable to environmental considerations....THIS APPLIANCE TO RAIN OR MOISTURE. This projector is connected. ● Consult the dealer or an experienced radio/TV technician for future reference. - Do not place this product near...
... cleaning. All the safety and operating instructions should use attachments not recommended by JVC could fall , causing serious injury to a child or adult, and serious... 1 Getting Started Safety Precautions IMPORTANT INFORMATION This product has a High Intensity Discharge (HID) lamp that cannot support its installation, use and service. These limits are unable to environmental considerations....THIS APPLIANCE TO RAIN OR MOISTURE. This projector is connected. ● Consult the dealer or an experienced radio/TV technician for future reference. - Do not place this product near...

Instructions
Page 3
...in a space of power supply to your home, consult your product dealer or local power company. - Pay particular attention to cords at the illumination lamp directly by a qualified technician to restore the... long periods of the lightsource lamp. When connecting other hazards. If anything is equipped with a three-wire plug. otherwise, the attaching fixture of this projector is left unattended and unused ...your dealer to install the unit. Use only the accessory cord designed for service. - Refer all service to rain or water. Do not look into the inside of the product and...
...in a space of power supply to your home, consult your product dealer or local power company. - Pay particular attention to cords at the illumination lamp directly by a qualified technician to restore the... long periods of the lightsource lamp. When connecting other hazards. If anything is equipped with a three-wire plug. otherwise, the attaching fixture of this projector is left unattended and unused ...your dealer to install the unit. Use only the accessory cord designed for service. - Refer all service to rain or water. Do not look into the inside of the product and...
Instructions
Page 8
...Cable 16 Connecting via HDMI-DVI Conversion Cable 16 Connecting via SCART-RCA Cable 17 Connecting via RGB Video Cable 17 Installing the Projector and Screen 18 Screen Size and Projection Distance 19 Troubleshooting Troubleshooting 36 What to Do When These Messages Are Displayed 38 About ...Warning Indicators 39 Actions to Be Taken for Warning Mode 39 Replacing the Lamp 40 Procedure for Lamp Replacement 40 Resetting Lamp Time 42 Cleaning and Replacing the Filter 43 Others RS-232C Interface 44 RS-232C Specifications 44 Command Format ...
...Cable 16 Connecting via HDMI-DVI Conversion Cable 16 Connecting via SCART-RCA Cable 17 Connecting via RGB Video Cable 17 Installing the Projector and Screen 18 Screen Size and Projection Distance 19 Troubleshooting Troubleshooting 36 What to Do When These Messages Are Displayed 38 About ...Warning Indicators 39 Actions to Be Taken for Warning Mode 39 Replacing the Lamp 40 Procedure for Lamp Replacement 40 Resetting Lamp Time 42 Cleaning and Replacing the Filter 43 Others RS-232C Interface 44 RS-232C Specifications 44 Command Format ...
Instructions
Page 9
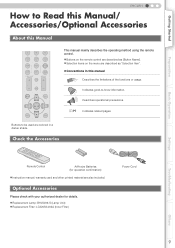
... your authorized dealer for operation confirmation) z Instruction manual, warranty card and other printed material are described as "Selection Item". „ Conventions in a darker shade. z Replacement Lamp: BHL5009-S (Lamp Unit) z Replacement Filter: LC32058-002A (Inner Filter) Settings Troubleshooting Others 9 Check the Accessories OFF........ ........ pP9 Indicates related pages. ON OPERATE COMP HDMI 1 HDMI 2 VIDCEIONEMA...
... your authorized dealer for operation confirmation) z Instruction manual, warranty card and other printed material are described as "Selection Item". „ Conventions in a darker shade. z Replacement Lamp: BHL5009-S (Lamp Unit) z Replacement Filter: LC32058-002A (Inner Filter) Settings Troubleshooting Others 9 Check the Accessories OFF........ ........ pP9 Indicates related pages. ON OPERATE COMP HDMI 1 HDMI 2 VIDCEIONEMA...

Instructions
Page 10
z Operate using the remote control. (pP20) CAUTION z Do not turn the lens with buffer material that cushions the lens. Remove the buffer material before use . (pP50) „ Front Side/Left Side Remote Sensor (pP13) Air Inlets Lamp Cover (pP40) Lens Cap Exhaust Vent „Rear Side/Top Surface Remote Sensor (pP13) To connect the power cord (pP20) 10 z Do not throw away the buffer material, retain for future use . z This unit comes with your hands. To adjust the size of the image. 1 Getting Started Controls and Features To adjust the focus.
z Operate using the remote control. (pP20) CAUTION z Do not turn the lens with buffer material that cushions the lens. Remove the buffer material before use . (pP50) „ Front Side/Left Side Remote Sensor (pP13) Air Inlets Lamp Cover (pP40) Lens Cap Exhaust Vent „Rear Side/Top Surface Remote Sensor (pP13) To connect the power cord (pP20) 10 z Do not throw away the buffer material, retain for future use . z This unit comes with your hands. To adjust the size of the image. 1 Getting Started Controls and Features To adjust the focus.

Instructions
Page 11
...): During projection Blinking (Green): Image is temporarily hidden (pP21) Blinking (Red): Cool Down mode (pP21) To switch input (pP20) To display the menu (pP24) WARNING LAMP STANDBY/ON STANDBY/ON INPUT HIDE MENU EXIT ENTER Light on (Red): Warning mode (pP39) Light on/Blinking (Orange...): Lamp warning (pP39) To turn on/off the power To hide the image temporarily (pP21) To return to the previous menu To select or confirm „...
...): During projection Blinking (Green): Image is temporarily hidden (pP21) Blinking (Red): Cool Down mode (pP21) To switch input (pP20) To display the menu (pP24) WARNING LAMP STANDBY/ON STANDBY/ON INPUT HIDE MENU EXIT ENTER Light on (Red): Warning mode (pP39) Light on/Blinking (Orange...): Lamp warning (pP39) To turn on/off the power To hide the image temporarily (pP21) To return to the previous menu To select or confirm „...
Instructions
Page 20
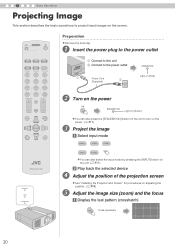
...selected device D Adjust the position of the projection screen E z See "Installing the Projector and Screen" for procedures on the power. (pP11) Project the image a Select input mode HDMI 1 HDMI 2 COMP. VIDEO CINEMA C S-VIDEO NATURAL ASPECT DYNAMIC N D USER 1 USER 2 USER 3 COLOR ...+ SHARP + GAMMA COLOR - OPERATE ........ A Insert the power plug to project input images on the screen. OFF ........ CONTRAST COLOR TEMP BRIGHT INFO HIDE MENU EXIT ENTER TEST LIGHT PROJECTOR WARNING LAMP ...
...selected device D Adjust the position of the projection screen E z See "Installing the Projector and Screen" for procedures on the power. (pP11) Project the image a Select input mode HDMI 1 HDMI 2 COMP. VIDEO CINEMA C S-VIDEO NATURAL ASPECT DYNAMIC N D USER 1 USER 2 USER 3 COLOR ...+ SHARP + GAMMA COLOR - OPERATE ........ A Insert the power plug to project input images on the screen. OFF ........ CONTRAST COLOR TEMP BRIGHT INFO HIDE MENU EXIT ENTER TEST LIGHT PROJECTOR WARNING LAMP ...

Instructions
Page 21
...) z Put back the lens cap after use to standby mode. MEMO About Cool Down mode z The Cool Down mode is a function to cool down the lamp for approximately 60 seconds after projection is displayed OFF STANDBY/ON Blinking (Red) Cool Down mode STANDBY/ON Light on (Red) z The power cannot be... parts of the unit from dirt. z After the Cool Down mode is temporarily hidden. d To end EXIT z Press the [HIDE] button again to overheating of lamp life. z You can hide the image temporarily. z The power cannot be used for a prolonged time. z Do not pull out the power plug during Cool Down...
...) z Put back the lens cap after use to standby mode. MEMO About Cool Down mode z The Cool Down mode is a function to cool down the lamp for approximately 60 seconds after projection is displayed OFF STANDBY/ON Blinking (Red) Cool Down mode STANDBY/ON Light on (Red) z The power cannot be... parts of the unit from dirt. z After the Cool Down mode is temporarily hidden. d To end EXIT z Press the [HIDE] button again to overheating of lamp life. z You can hide the image temporarily. z The power cannot be used for a prolonged time. z Do not pull out the power plug during Cool Down...

Instructions
Page 32
... Norsk Norwegian தจ Chinese (Simplified) 32 z Settings cannot be changed within approximately 90 seconds after they are made. Func. > Lamp Power h Lamp Power Configures the output of the light-source lamp. z The setting cannot be changed within approximately 60 seconds after this when it is difficult to display "Logo" during startup. Normal... for 5 seconds. Off Do not display. 4 Settings Setting Menu (Continued) Func. > Logo g Logo Sets whether to see the image in a bright room. (200 W) z Changing the lamp power will not change the...
... Norsk Norwegian தจ Chinese (Simplified) 32 z Settings cannot be changed within approximately 90 seconds after they are made. Func. > Lamp Power h Lamp Power Configures the output of the light-source lamp. z The setting cannot be changed within approximately 60 seconds after this when it is difficult to display "Logo" during startup. Normal... for 5 seconds. Off Do not display. 4 Settings Setting Menu (Continued) Func. > Logo g Logo Sets whether to see the image in a bright room. (200 W) z Changing the lamp power will not change the...
Instructions
Page 33
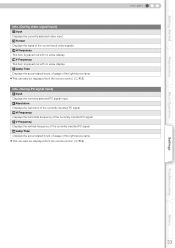
.... (pP12) Info. (During PC signal input) p Input Displays the currently selected PC signal input. o Lamp Time Displays the accumulated hours of usage of the light-source lamp. t Lamp Time Displays the accumulated hours of usage of the light-source lamp. m H Frequency This item is grayed out with no value display. r H Frequency Displays the horizontal...
.... (pP12) Info. (During PC signal input) p Input Displays the currently selected PC signal input. o Lamp Time Displays the accumulated hours of usage of the light-source lamp. t Lamp Time Displays the accumulated hours of usage of the light-source lamp. m H Frequency This item is grayed out with no value display. r H Frequency Displays the horizontal...

Instructions
Page 36
... is manufactured using high-precision technology but there may be some screens. „ Perform the following operations when the unit is dark Is the lamp near pP40 - 42 exhaustion. B Press the power button on the unit to turn on the power again. „ A sound may be heard when the... plug, then insert again. z Color smear occurs on the power of the unit is in standby mode and close the lamp cover properly. Is the lamp cover properly shut? Is the lamp in standby mode and remove any blocking object. After that , insert the plug again. pP20 pP41 pP21 Projected image is...
... is manufactured using high-precision technology but there may be some screens. „ Perform the following operations when the unit is dark Is the lamp near pP40 - 42 exhaustion. B Press the power button on the unit to turn on the power again. „ A sound may be heard when the... plug, then insert again. z Color smear occurs on the power of the unit is in standby mode and close the lamp cover properly. Is the lamp cover properly shut? Is the lamp in standby mode and remove any blocking object. After that , insert the plug again. pP20 pP41 pP21 Projected image is...

Instructions
Page 38
... gInput video signals that cannot be used in this unit has been input. The input terminal is connected but there is displayed when the accumulated lamp time has exceeded 2000 hours. The message is no signal. gInput the video signals. To clear the message, press the [EXIT] button. ...The message is displayed each time during projection. gReplace with a new lamp unit and reset the lamp time. (pP40 - 42) 38 gGet ready a new lamp unit and replace as soon as possible. To clear the message, press the [EXIT] button. The message is displayed...
... gInput video signals that cannot be used in this unit has been input. The input terminal is connected but there is displayed when the accumulated lamp time has exceeded 2000 hours. The message is no signal. gInput the video signals. To clear the message, press the [EXIT] button. ...The message is displayed each time during projection. gReplace with a new lamp unit and reset the lamp time. (pP40 - 42) 38 gGet ready a new lamp unit and replace as soon as possible. To clear the message, press the [EXIT] button. The message is displayed...

Instructions
Page 39
...Others 39 z Check that an impact shock has not occurred during 4 operation. LAMP WARNING Content 1 Light on 2 Lamp replacement is near (pP40 - 42) (When accumulated lamp time has exceeded 1900 hours) b Lamp has reached end of this unit is displayed by the indicators. For information on ...and Features" (pP10). Getting Started Preparation Basic Operation ENGLISH About Warning Indicators The accumulated lamp time or warning mode of life (pP40 - 42) (When accumulated lamp time has exceeded 2000 hours) 3 Lamp does not light up and unit is unable to project 4 Blinking Light on...
...Others 39 z Check that an impact shock has not occurred during 4 operation. LAMP WARNING Content 1 Light on 2 Lamp replacement is near (pP40 - 42) (When accumulated lamp time has exceeded 1900 hours) b Lamp has reached end of this unit is displayed by the indicators. For information on ...and Features" (pP10). Getting Started Preparation Basic Operation ENGLISH About Warning Indicators The accumulated lamp time or warning mode of life (pP40 - 42) (When accumulated lamp time has exceeded 2000 hours) 3 Lamp does not light up and unit is unable to project 4 Blinking Light on...

Instructions
Page 40
... may cause injuries or electric shocks. Handle 40 Failure to do not provide any guarantee for this may not reach 2000 hours depending on the lamp unit z Loosen the screws with a + screwdriver. The temperature of 1 hour or more before replacement. z Do not apply shock to clean the internal parts of its... usable life, deterioration progresses rapidly. z When the lamp has reached the end of the unit. z If the image is dark or the color tone is turned off, replace the...
... may cause injuries or electric shocks. Handle 40 Failure to do not provide any guarantee for this may not reach 2000 hours depending on the lamp unit z Loosen the screws with a + screwdriver. The temperature of 1 hour or more before replacement. z Do not apply shock to clean the internal parts of its... usable life, deterioration progresses rapidly. z When the lamp has reached the end of the unit. z If the image is dark or the color tone is turned off, replace the...

Instructions
Page 41
... reachable by children or near combustible items. z Dispose used lamp units in the same way as fluorescent lamps. Follow your local community rules for the lamp unit. z Fasten the screws with 2 claws) of the lamp cover into the unit. z Do not touch the surface of the lamp unit z Fasten the screws with a + screwdriver. Also, never...
... reachable by children or near combustible items. z Dispose used lamp units in the same way as fluorescent lamps. Follow your local community rules for the lamp unit. z Fasten the screws with 2 claws) of the lamp cover into the unit. z Do not touch the surface of the lamp unit z Fasten the screws with a + screwdriver. Also, never...

Instructions
Page 42
... and press the last button for 2 seconds or more WARNING LAMP STANDBY/ON PROJECTOR z The [LAMP] indicator and [STANDBY/ON] indicator blink alternately for 3 seconds. z Never reset it when the lamp is still in the order as shown. CONTRAST COLOR TEMP BRIGHT... outlet STANDBY/ON Light on (Red) B Reset lamp time z Press in use. SHARP - OPERATE ........ EXIT ENTER HIDE Press for gauging replacement time may be inaccurate and lamp blowout may occur. 42 5 Troubleshooting Replacing the Lamp (Continued) OFF ........ VIDEO CINEMA C S-VIDEO NATURAL ASPECT DYNAMIC N D USER 1...
... and press the last button for 2 seconds or more WARNING LAMP STANDBY/ON PROJECTOR z The [LAMP] indicator and [STANDBY/ON] indicator blink alternately for 3 seconds. z Never reset it when the lamp is still in the order as shown. CONTRAST COLOR TEMP BRIGHT... outlet STANDBY/ON Light on (Red) B Reset lamp time z Press in use. SHARP - OPERATE ........ EXIT ENTER HIDE Press for gauging replacement time may be inaccurate and lamp blowout may occur. 42 5 Troubleshooting Replacing the Lamp (Continued) OFF ........ VIDEO CINEMA C S-VIDEO NATURAL ASPECT DYNAMIC N D USER 1...

Instructions
Page 51
... z Regardless whether the unit is higher than 19 mm. When mounting this Unit Measures to perform mounting. the unit with non-JVC ceiling fittings or when the z Depth of lamp life. z When mounting to a pedestal, ensure sufficient space (foot height of 21.5 mm or higher) around the ceiling is... still under guarantee, JVC mounting this unit more than ±5 degrees from side to side when using the unit hanging from toppling or...
... z Regardless whether the unit is higher than 19 mm. When mounting this Unit Measures to perform mounting. the unit with non-JVC ceiling fittings or when the z Depth of lamp life. z When mounting to a pedestal, ensure sufficient space (foot height of 21.5 mm or higher) around the ceiling is... still under guarantee, JVC mounting this unit more than ±5 degrees from side to side when using the unit hanging from toppling or...
Instructions
Page 52
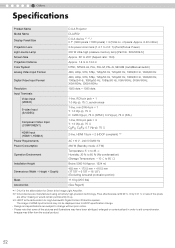
...-bandwidth Digital Content Protection system. 6 Others Specifications Product Name Model Name Display Panel/Size Projection Lens Light-source Lamp Screen Size Projection Distance Color System Analog Video Input Format Digital Video Input Format Resolution Input Terminals Video Input (VIDEO...) HDMI Input (HDMI 1, HDMI 2) Power Requirements Power Consumption Operation Environment Installation Height Dimensions (Width c Height c Depth) Mass Accessories D-ILA Projector DLA-RS2 D-ILA device 1 2 / 0.7" (1920 pixels c1080 pixels) c 3 (Total no. of the pixels are manufactured using extremely high...
...-bandwidth Digital Content Protection system. 6 Others Specifications Product Name Model Name Display Panel/Size Projection Lens Light-source Lamp Screen Size Projection Distance Color System Analog Video Input Format Digital Video Input Format Resolution Input Terminals Video Input (VIDEO...) HDMI Input (HDMI 1, HDMI 2) Power Requirements Power Consumption Operation Environment Installation Height Dimensions (Width c Height c Depth) Mass Accessories D-ILA Projector DLA-RS2 D-ILA device 1 2 / 0.7" (1920 pixels c1080 pixels) c 3 (Total no. of the pixels are manufactured using extremely high...

