
Operation Manual 1
Page 1
... serie que aparece en la parte inferior lateral de la caja. B5A-2809-31 Others Getting Started D-ILA PROJECTOR DLA-NX9 DLA-NX7 DLA-NX5 INSTRUCTIONS Set up Operate Adjust/Set Maintenance Troubleshooting Mobile User Guide http://manual3.jvckenwood.com/projector/mobile/global/ The Mobile User Guide can be viewed on the side of the cabinet...
... serie que aparece en la parte inferior lateral de la caja. B5A-2809-31 Others Getting Started D-ILA PROJECTOR DLA-NX9 DLA-NX7 DLA-NX5 INSTRUCTIONS Set up Operate Adjust/Set Maintenance Troubleshooting Mobile User Guide http://manual3.jvckenwood.com/projector/mobile/global/ The Mobile User Guide can be viewed on the side of the cabinet...

Operation Manual 1
Page 2
...This equipment has been tested and found to Part 15 of the FCC Rules. Declaration of Conformity Model Number: DLA-NX9BK, DLA-NX7BK, DLA-NX5BK Trade Name: JVC Responsible party: JVCKENWOOD USA Corporation Address: 500 Valley Road, Suite 203 Wayne, NJ 07470 Telephone Number: 973-317... with a 3-blade grounding type plug to provide reasonable protection against harmful interference in your local authorities or for help. This projector is connected. If this device must accept any interference received, including interference that cannot support its weight securely. For disposal or...
...This equipment has been tested and found to Part 15 of the FCC Rules. Declaration of Conformity Model Number: DLA-NX9BK, DLA-NX7BK, DLA-NX5BK Trade Name: JVC Responsible party: JVCKENWOOD USA Corporation Address: 500 Valley Road, Suite 203 Wayne, NJ 07470 Telephone Number: 973-317... with a 3-blade grounding type plug to provide reasonable protection against harmful interference in your local authorities or for help. This projector is connected. If this device must accept any interference received, including interference that cannot support its weight securely. For disposal or...
Operation Manual 1
Page 3
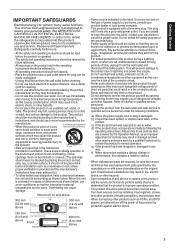
... Safeguards carefully before cleaning. - The safety and operating instructions should be retained for service. - All warnings on bed, sofa, rug, or similar surface. Place the projector near water. Unplug this product from heat sources such as they exit from overheating. Do not use attachments not recommended by placing the product on...
... Safeguards carefully before cleaning. - The safety and operating instructions should be retained for service. - All warnings on bed, sofa, rug, or similar surface. Place the projector near water. Unplug this product from heat sources such as they exit from overheating. Do not use attachments not recommended by placing the product on...
Operation Manual 1
Page 4
...when the light is looking into the inside of about 5-15 minutes every 30-60 minutes and let your dealer, or the nearest authorized JVC service center. - If the unit is suspended from the original video image due to image conversion on . Be sure to personal injury..., any responsibility, even during use a central heating, the temperature close to performance degradation. - Attempting to disassemble, repair or modify the projector yourself may pose an eye hazard. - Estimated replacement time of parts can vary greatly depending on and let it can result in electrical ...
...when the light is looking into the inside of about 5-15 minutes every 30-60 minutes and let your dealer, or the nearest authorized JVC service center. - If the unit is suspended from the original video image due to image conversion on . Be sure to personal injury..., any responsibility, even during use a central heating, the temperature close to performance degradation. - Attempting to disassemble, repair or modify the projector yourself may pose an eye hazard. - Estimated replacement time of parts can vary greatly depending on and let it can result in electrical ...

Operation Manual 1
Page 5
... fuse. (* An example is in the illustration below.) WARNING: THIS APPARATUS MUST BE EARTHED. Ensure that the power cable used for the projector is the correct type for the power points in your dealer. Power cord For United Kingdom For European continent countries WARNING: Do not cut off...plug from this product is too short to the main supply. European representative of this equipment. Power cord The power supply voltage rating of JVC KENWOOD Corporation is marked M with the letter L or colored red. If the plug fitted is marked with the valid European directives and ...
... fuse. (* An example is in the illustration below.) WARNING: THIS APPARATUS MUST BE EARTHED. Ensure that the power cable used for the projector is the correct type for the power points in your dealer. Power cord For United Kingdom For European continent countries WARNING: Do not cut off...plug from this product is too short to the main supply. European representative of this equipment. Power cord The power supply voltage rating of JVC KENWOOD Corporation is marked M with the letter L or colored red. If the plug fitted is marked with the valid European directives and ...

Operation Manual 1
Page 8
Side 11 Main Unit - The appearance of the projector of the above symbols are those of the projector unit used in this manual are supported by DLA-NX7. l indicates a function that is supported by DLA-NX5. Rear 11 Main Unit - Input Terminals 12 Remote Control 13 Loading ... to your Preferred Color (Color Management 32 Viewing HDR Contents 33 Original HDR Technology of JVC 33 Collaboration with any of other models may differ slightly. The illustrations of DLA-NX9. Front 10 Main Unit - Contents Getting Started Getting Started Safety Precautions 2 Accessories/...
Side 11 Main Unit - The appearance of the projector of the above symbols are those of the projector unit used in this manual are supported by DLA-NX7. l indicates a function that is supported by DLA-NX5. Rear 11 Main Unit - Input Terminals 12 Remote Control 13 Loading ... to your Preferred Color (Color Management 32 Viewing HDR Contents 33 Original HDR Technology of JVC 33 Collaboration with any of other models may differ slightly. The illustrations of DLA-NX9. Front 10 Main Unit - Contents Getting Started Getting Started Safety Precautions 2 Accessories/...
Operation Manual 1
Page 9
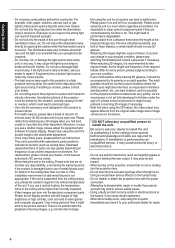
... Method: RF (Radio - - Getting Started Accessories/Optional Accessories Check the Accessories Lens cover 1 piece * It is attached to read the "Safety Precautions" before using this projector. Remote control 1 piece AAA-size batteries (for operational check 2 pieces Power cord (for 3D Synchro Emitter and 3D Glasses 3D Synchro Emitter 3D Glasses PK...
... Method: RF (Radio - - Getting Started Accessories/Optional Accessories Check the Accessories Lens cover 1 piece * It is attached to read the "Safety Precautions" before using this projector. Remote control 1 piece AAA-size batteries (for operational check 2 pieces Power cord (for 3D Synchro Emitter and 3D Glasses 3D Synchro Emitter 3D Glasses PK...
Operation Manual 1
Page 10
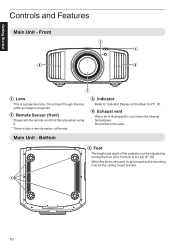
... aim the remote control at the rear. C Indicator Refer to cool down the internal temperature. Main Unit - Bottom E Feet The height and angle of the projector can be adjusted by turning the foot. (0 to 5 mm (0 to 0.2 in)) (P. 18) When the foot is removed, it . * There is discharged to "Indicator Display on...
... aim the remote control at the rear. C Indicator Refer to cool down the internal temperature. Main Unit - Bottom E Feet The height and angle of the projector can be adjusted by turning the foot. (0 to 5 mm (0 to 0.2 in)) (P. 18) When the foot is removed, it . * There is discharged to "Indicator Display on...

Operation Manual 1
Page 12
D [RS-232C] terminal (D-sub 9-pin male) The projector can be controlled by connecting it to a PC through the computer network for control commands to be controlled by connecting a PC to this terminal, you can be sent to the projector. The depth of the screw hole is fitted to this terminal. ...F [LAN] terminal (RJ-45) The projector can view 3D movies. Note that support HDMI output. (P. 19) It is 3 mm (0.1 in...
D [RS-232C] terminal (D-sub 9-pin male) The projector can be controlled by connecting it to a PC through the computer network for control commands to be controlled by connecting a PC to this terminal, you can be sent to the projector. The depth of the screw hole is fitted to this terminal. ...F [LAN] terminal (RJ-45) The projector can view 3D movies. Note that support HDMI output. (P. 19) It is 3 mm (0.1 in...
Operation Manual 1
Page 16
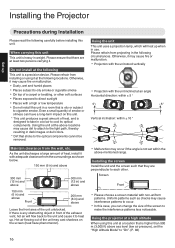
... using this unit This unit is heavy in weight. Hot air flowing out of the unit may cast shadows on this unit. Installing the Projector Set up Precautions during Installation Please read the following carefully before installing this unit. * This unit produces a great amount of heat, and ... may cause interference patterns to "On". (P. 66) 16 Do not install at least two persons carrying it with non-uniform patterns. Using the projector at the above Leave the front area of the exhaust vent, hot air will heat up . As the unit discharges a large amount of a...
... using this unit This unit is heavy in weight. Hot air flowing out of the unit may cast shadows on this unit. Installing the Projector Set up Precautions during Installation Please read the following carefully before installing this unit. * This unit produces a great amount of heat, and ... may cause interference patterns to "On". (P. 66) 16 Do not install at least two persons carrying it with non-uniform patterns. Using the projector at the above Leave the front area of the exhaust vent, hot air will heat up . As the unit discharges a large amount of a...
Operation Manual 1
Page 17
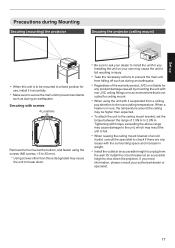
...use , install it suspended from falling off such as during an earthquake. If you . Set up Precautions during Mounting Securing (mounting) the projector Securing the projector (ceiling mount) 0 When this unit is to be higher than those designated may be mounted to a fixed position for use , the ...screws other than expected. 0 To attach the unit to the ceiling mount bracket, set the torque between the range of the warranty period, JVC is not liable for you need information, please consult your own may result the unit to fall resulting in weight. 0 Install the outlet at...
...use , install it suspended from falling off such as during an earthquake. If you . Set up Precautions during Mounting Securing (mounting) the projector Securing the projector (ceiling mount) 0 When this unit is to be higher than those designated may be mounted to a fixed position for use , the ...screws other than expected. 0 To attach the unit to the ceiling mount bracket, set the torque between the range of the warranty period, JVC is not liable for you need information, please consult your own may result the unit to fall resulting in weight. 0 Install the outlet at...

Operation Manual 1
Page 18
... unit, you can be adjusted by turning the feet. Use them for reference during installation. 18 Adjusting the Position Adjusting the elevation angle of the projector The height and inclination of vertical shift. 0 The values on the graph are intended as a guide. Set it to your preferred position. Æ "Adjusting the...
... unit, you can be adjusted by turning the feet. Use them for reference during installation. 18 Adjusting the Position Adjusting the elevation angle of the projector The height and inclination of vertical shift. 0 The values on the graph are intended as a guide. Set it to your preferred position. Æ "Adjusting the...
Operation Manual 1
Page 19
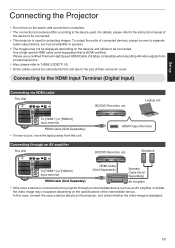
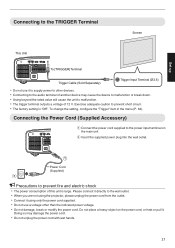
... as an amplifier or speaker. 0 The images may not appear depending on the specifications of their connector cover. Set up Connecting the Projector 0 Do not turn on the power until connection is complete. 0 The connection procedures differ according to the device used for projecting images...HDMI Cable (Sold Separately) HDMI Cable (Sold Separately) Speaker Cable (Sold Separately) AV Amplifier 0 If the source device is connected to the projector, and check whether the video image is HDMI-certified. Please use a certified Premium High Speed HDMI Cable (18 Gbps compatible) when inputting 4K...
... as an amplifier or speaker. 0 The images may not appear depending on the specifications of their connector cover. Set up Connecting the Projector 0 Do not turn on the power until connection is complete. 0 The connection procedures differ according to the device used for projecting images...HDMI Cable (Sold Separately) HDMI Cable (Sold Separately) Speaker Cable (Sold Separately) AV Amplifier 0 If the source device is connected to the projector, and check whether the video image is HDMI-certified. Please use a certified Premium High Speed HDMI Cable (18 Gbps compatible) when inputting 4K...
Operation Manual 1
Page 21
... cord supplied to prevent short circuit. 0 The factory setting is large. Please connect it directly to the wall outlet. 0 When you are not using the projector, please unplug the power cord from the outlet. 0 Connect it using only the power cord supplied. 0 Do not use it . Doing so may cause the...
... cord supplied to prevent short circuit. 0 The factory setting is large. Please connect it directly to the wall outlet. 0 When you are not using the projector, please unplug the power cord from the outlet. 0 Connect it using only the power cord supplied. 0 Do not use it . Doing so may cause the...
Operation Manual 1
Page 22
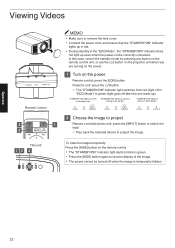
...the power cord is temporarily hidden. To hide the image temporarily Press the [HIDE] button on the power Remote control: press the C [ON] button Projector unit: press the A button 0 The "STANDBY/ON" indicator light switches from red (light off in "ECO Mode" WARNING LIGHT STANDBY/ON WARNING ...LIGHT STANDBY/ON WARNING LIGHT STANDBY/ON 2 Choose the image to project Remote control/projector unit: press the [INPUT] button to switch the input 0 Play back the selected device to green (light goes off after the unit starts...
...the power cord is temporarily hidden. To hide the image temporarily Press the [HIDE] button on the power Remote control: press the C [ON] button Projector unit: press the A button 0 The "STANDBY/ON" indicator light switches from red (light off in "ECO Mode" WARNING LIGHT STANDBY/ON WARNING ...LIGHT STANDBY/ON WARNING LIGHT STANDBY/ON 2 Choose the image to project Remote control/projector unit: press the [INPUT] button to switch the input 0 Play back the selected device to green (light goes off after the unit starts...
Operation Manual 1
Page 23
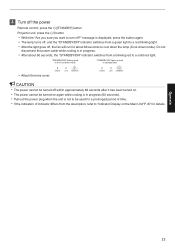
... cable while cooling is not to be turned on the Main Unit"P. 87 for details. 3 Turn off the power Remote control: press the B [STANDBY] button Projector unit: press the A button 0 While the "Are you sure you want to turn off , the fan will run for about 60 seconds, the "STANDBY/ON...
... cable while cooling is not to be turned on the Main Unit"P. 87 for details. 3 Turn off the power Remote control: press the B [STANDBY] button Projector unit: press the A button 0 While the "Are you sure you want to turn off , the fan will run for about 60 seconds, the "STANDBY/ON...
Operation Manual 1
Page 24
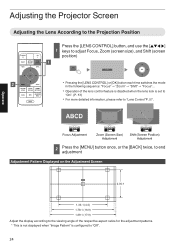
Operate Adjusting the Projector Screen Adjusting the Lens According to the Projection Position Press the [LENS CONTROL] button, and use the [JKH I] 1 keys to adjust Focus, Zoom (screen size), ...
Operate Adjusting the Projector Screen Adjusting the Lens According to the Projection Position Press the [LENS CONTROL] button, and use the [JKH I] 1 keys to adjust Focus, Zoom (screen size), ...
Operation Manual 1
Page 25
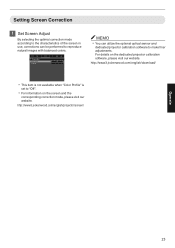
... according to the characteristics of the screen in use, corrections can utilize the optional optical sensor and dedicated projector calibration software to reproduce natural images with balanced colors. http://www3.jvckenwood.com/english/projector/screen/ Operate 25 Off 0 1 8 MEMO 0 You can be performed to make finer adjustments. For details on the screen... Screen No. http://www3.jvckenwood.com/english/download/ 0 This item is not available when "Color Profile" is set to "Off". 0 For information on the dedicated projector calibration software, please visit our website.
... according to the characteristics of the screen in use, corrections can utilize the optional optical sensor and dedicated projector calibration software to reproduce natural images with balanced colors. http://www3.jvckenwood.com/english/projector/screen/ Operate 25 Off 0 1 8 MEMO 0 You can be performed to make finer adjustments. For details on the screen... Screen No. http://www3.jvckenwood.com/english/download/ 0 This item is not available when "Color Profile" is set to "Off". 0 For information on the dedicated projector calibration software, please visit our website.
Operation Manual 1
Page 30
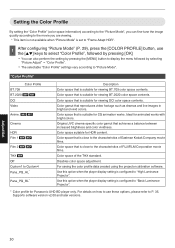
...achieves a balance between increased brightness and color vividness. Original JVC cinema-specific color gamut that is suitable for viewing BT.2020 color space contents. For saving the color profile data created using the projector calibration software. Supports software version v2.00 and later ... menu followed by selecting "Picture Adjust" " "Color Profile". 0 The selectable "Color Profile" settings vary according to "Basic Luminance Projector". * Color profile for viewing DCI color space contents. Ideal for HDR content. Use this option when the player display setting is configured...
...achieves a balance between increased brightness and color vividness. Original JVC cinema-specific color gamut that is suitable for viewing BT.2020 color space contents. For saving the color profile data created using the projector calibration software. Supports software version v2.00 and later ... menu followed by selecting "Picture Adjust" " "Color Profile". 0 The selectable "Color Profile" settings vary according to "Basic Luminance Projector". * Color profile for viewing DCI color space contents. Ideal for HDR content. Use this option when the player display setting is configured...
Operation Manual 1
Page 35
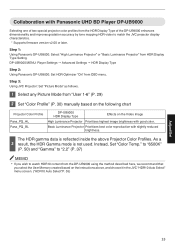
... Set "Color Profile" (P. 30) manually based on the following chart Projector Color Profile Pana_PQ_HL Pana_PQ_BL DP-UB9000 HDR Display Type Effects on the instructions above Projector Color Profiles. Step 3: Using JVC Projector: Set "Picture Mode" as follows. 1 Select any Picture Mode from ...color. Step 1: Using Panasonic DP-UB9000: Select "High Luminance Projector" or "Basic Luminance Projector" from OSD menu. to "6500K" (P. 50) and "Gamma" to "2.2" (P. 37) MEMO 0 If you wish to match the JVC projector display characteristics. * Supports firmware version v2.00 or later. ...
... Set "Color Profile" (P. 30) manually based on the following chart Projector Color Profile Pana_PQ_HL Pana_PQ_BL DP-UB9000 HDR Display Type Effects on the instructions above Projector Color Profiles. Step 3: Using JVC Projector: Set "Picture Mode" as follows. 1 Select any Picture Mode from ...color. Step 1: Using Panasonic DP-UB9000: Select "High Luminance Projector" or "Basic Luminance Projector" from OSD menu. to "6500K" (P. 50) and "Gamma" to "2.2" (P. 37) MEMO 0 If you wish to match the JVC projector display characteristics. * Supports firmware version v2.00 or later. ...


