
Operation Manual 1
Page 2
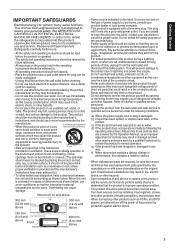
...installation place Do not install the projector in your local authorities or for Class B digital devices, pursuant to environmental considerations. Getting Started Safety Precautions IMPORTANT INFORMATION This product has a High Intensity Dis-charge (HID) lamp that may cause undesired operation. Disposal of the FCC Rules. only) CAUTION: Changes...technician for help. CAUTION: To reduce the risk of Conformity Model Number: DLA-NX9BK, DLA-NX7BK, DLA-NX5BK Trade Name: JVC Responsible party: JVCKENWOOD USA Corporation Address: 500 Valley Road, Suite 203 Wayne, NJ 07470 Telephone Number: 973...
...installation place Do not install the projector in your local authorities or for Class B digital devices, pursuant to environmental considerations. Getting Started Safety Precautions IMPORTANT INFORMATION This product has a High Intensity Dis-charge (HID) lamp that may cause undesired operation. Disposal of the FCC Rules. only) CAUTION: Changes...technician for help. CAUTION: To reduce the risk of Conformity Model Number: DLA-NX9BK, DLA-NX7BK, DLA-NX5BK Trade Name: JVC Responsible party: JVCKENWOOD USA Corporation Address: 500 Valley Road, Suite 203 Wayne, NJ 07470 Telephone Number: 973...
Operation Manual 1
Page 3
... should use a mount recommended by the product manufacturer as opening or removing covers may be read these Important Safeguards carefully before use an air-conditioner so that are not likely to dangerous voltages and other hazards. - Unplug this unit is operated. - d) If the product does not operate normally by following conditions: a) When the power supply cord or plug is used replacement parts specified by the Operation Manual...
... should use a mount recommended by the product manufacturer as opening or removing covers may be read these Important Safeguards carefully before use an air-conditioner so that are not likely to dangerous voltages and other hazards. - Unplug this unit is operated. - d) If the product does not operate normally by following conditions: a) When the power supply cord or plug is used replacement parts specified by the Operation Manual...
Operation Manual 1
Page 4
... and software for a long time can lead to the strong light can vary greatly depending on the device. * DO NOT allow any way. Do not look into the projection lens while the illumination lamp is on the projector, ensure that no problem with the playback of the projected image size. Not using the 3D feature, the video output may appear different from a broken light-source lamp...
... and software for a long time can lead to the strong light can vary greatly depending on the device. * DO NOT allow any way. Do not look into the projection lens while the illumination lamp is on the projector, ensure that no problem with the playback of the projected image size. Not using the 3D feature, the video output may appear different from a broken light-source lamp...

Operation Manual 1
Page 5
... hazard by our dealer to the main supply. Getting Started POWER CONNECTION For USA and Canada only Use only the following code: Green-and-yellow : Earth Blue : Neutral Brown : Live As these colors may not correspond with the letter E or the safety earth or colored green or green-and-yellow. AC240V. Power cord For United Kingdom For European continent countries WARNING: Do not cut off the main...
... hazard by our dealer to the main supply. Getting Started POWER CONNECTION For USA and Canada only Use only the following code: Green-and-yellow : Earth Blue : Neutral Brown : Live As these colors may not correspond with the letter E or the safety earth or colored green or green-and-yellow. AC240V. Power cord For United Kingdom For European continent countries WARNING: Do not cut off the main...

Operation Manual 1
Page 8
... Picture Adjust 49 Input Signal 54 Installation 56 Display Setup 63 Function 64 Information 66 Maintenance Replacing the Lamp 67 Lamp Replacement Procedure 67 Resetting the Lamp Time 69 Maintaining the Cabinet and Remote Control ........ 70 Cleaning and Replacing the Filter 70 Troubleshooting Troubleshooting 71 When the Following Messages Appear 75 Others External Control 76 RS-232C Specifications 76 TCP/IP Connection 76 Command Format 77 Remote Control Code 78 Communications Example 79 Specifications 80 Index 91 Symbols used in this manual...
... Picture Adjust 49 Input Signal 54 Installation 56 Display Setup 63 Function 64 Information 66 Maintenance Replacing the Lamp 67 Lamp Replacement Procedure 67 Resetting the Lamp Time 69 Maintaining the Cabinet and Remote Control ........ 70 Cleaning and Replacing the Filter 70 Troubleshooting Troubleshooting 71 When the Following Messages Appear 75 Others External Control 76 RS-232C Specifications 76 TCP/IP Connection 76 Command Format 77 Remote Control Code 78 Communications Example 79 Specifications 80 Index 91 Symbols used in this manual...
Operation Manual 1
Page 13
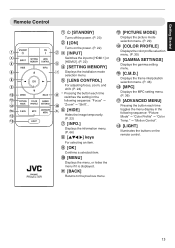
...HDMI 1] or D E [HDMI 2]. (P. 22) D [SETTING MEMORY] F G Displays the installation mode selection menu. L [PICTURE MODE] Displays the picture mode selection menu. (P. 29) M [COLOR PROFILE] Displays the color profile selection menu. (P. 30) N [GAMMA SETTINGS] Displays the gamma setting menu. R [LIGHT] Illuminates the buttons on the power. (P. 22) A B C [INPUT] C Switches the input to the previous menu. Getting Started Remote Control A B [STANDBY] Turns off the power. (P. 23) B C [ON] Turns on the remote control. 13 O Q F [HIDE] P Hides the image temporarily. J [MENU...
...HDMI 1] or D E [HDMI 2]. (P. 22) D [SETTING MEMORY] F G Displays the installation mode selection menu. L [PICTURE MODE] Displays the picture mode selection menu. (P. 29) M [COLOR PROFILE] Displays the color profile selection menu. (P. 30) N [GAMMA SETTINGS] Displays the gamma setting menu. R [LIGHT] Illuminates the buttons on the power. (P. 22) A B C [INPUT] C Switches the input to the previous menu. Getting Started Remote Control A B [STANDBY] Turns off the power. (P. 23) B C [ON] Turns on the remote control. 13 O Q F [HIDE] P Hides the image temporarily. J [MENU...

Operation Manual 1
Page 15
A Picture Adjust B Input Signal C Installation D Display Setup E Function F Information 15 Getting Started Menu AB CDEF Select the icon at the top of the menu to display its corresponding setting item as shown below.
A Picture Adjust B Input Signal C Installation D Display Setup E Function F Information 15 Getting Started Menu AB CDEF Select the icon at the top of the menu to display its corresponding setting item as shown below.

Operation Manual 1
Page 18
... also changes with the amount of vertical shift. 0 The values on the graph are intended as a guide. Lift the unit and adjust the four feet. 4 Locations Set up Extend Contract Feet Adjusting the position of the image By using the lens shift ...feature of this unit, you can shift the image upward/downward or to about 43% k and 34% l m of the projected image * Lens Shift Range (16:9) k 120 100 80 60 40 20 Amount of the unit (0 to 5 mm (0 to 0.2 in)) can be adjusted by turning the feet. Adjusting the Position Adjusting the elevation angle of the projector...
... also changes with the amount of vertical shift. 0 The values on the graph are intended as a guide. Lift the unit and adjust the four feet. 4 Locations Set up Extend Contract Feet Adjusting the position of the image By using the lens shift ...feature of this unit, you can shift the image upward/downward or to about 43% k and 34% l m of the projected image * Lens Shift Range (16:9) k 120 100 80 60 40 20 Amount of the unit (0 to 5 mm (0 to 0.2 in)) can be adjusted by turning the feet. Adjusting the Position Adjusting the elevation angle of the projector...
Operation Manual 1
Page 22
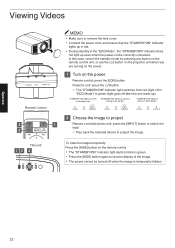
..." indicator light switches from red (light off when the image is correctly connected. Operate 22 "STANDBY/ON" lights up (red) In standby state "STANDBY/ON" lights up (green) During lamp startup "STANDBY/ON" light off When in "ECO Mode" WARNING LIGHT STANDBY/ON WARNING LIGHT STANDBY/ON WARNING LIGHT STANDBY/ON 2 Choose the image to project Remote control/projector unit: press the [INPUT] button to switch the input 0 Play back the selected device to resume display of the image. 0 The power cannot be turned off in "ECO Mode") to remove the lens cover. 0 Connect the power cord...
..." indicator light switches from red (light off when the image is correctly connected. Operate 22 "STANDBY/ON" lights up (red) In standby state "STANDBY/ON" lights up (green) During lamp startup "STANDBY/ON" light off When in "ECO Mode" WARNING LIGHT STANDBY/ON WARNING LIGHT STANDBY/ON WARNING LIGHT STANDBY/ON 2 Choose the image to project Remote control/projector unit: press the [INPUT] button to switch the input 0 Play back the selected device to resume display of the image. 0 The power cannot be turned off in "ECO Mode") to remove the lens cover. 0 Connect the power cord...
Operation Manual 1
Page 28
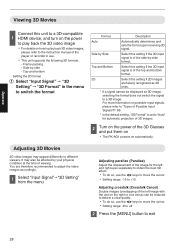
... of viewing. Operate Viewing 3D Movies Connect this unit to a 3D-compatible 1 HDMI device, and turn on the power to play back 3D video images, please refer to the instruction manual of the side-by -side - Side by Side Select this setting if 2D images are therefore recommended to adjust the video images accordingly. 1 Select "Input Signal"""3D Setting" from the menu Adjusting parallax (Parallax) Adjust the displacement of the image for automatic projection...
... of viewing. Operate Viewing 3D Movies Connect this unit to a 3D-compatible 1 HDMI device, and turn on the power to play back 3D video images, please refer to the instruction manual of the side-by -side - Side by Side Select this setting if 2D images are therefore recommended to adjust the video images accordingly. 1 Select "Input Signal"""3D Setting" from the menu Adjusting parallax (Parallax) Adjust the displacement of the image for automatic projection...
Operation Manual 1
Page 49
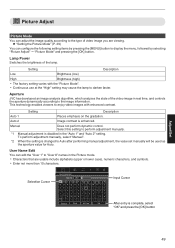
... of the video image in real time, and controls the aperture dynamically according to "User 6" names in the "Auto 1" and "Auto 2" setting. Lamp Power Switches the brightness of the lamp. This technology enables viewers to display the menu, followed by pressing the [MENU] button to enjoy video images with the "Picture Mode". 0 Continuous use at the "High" setting may cause the lamp to darken faster. Manual Does not perform dynamic control. Picture Adjust Picture Mode You can adjust the image quality according...
... of the video image in real time, and controls the aperture dynamically according to "User 6" names in the "Auto 1" and "Auto 2" setting. Lamp Power Switches the brightness of the lamp. This technology enables viewers to display the menu, followed by pressing the [MENU] button to enjoy video images with the "Picture Mode". 0 Continuous use at the "High" setting may cause the lamp to darken faster. Manual Does not perform dynamic control. Picture Adjust Picture Mode You can adjust the image quality according...
Operation Manual 1
Page 63
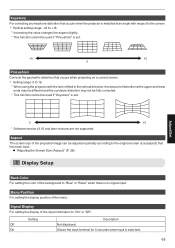
... value changes the aspect slightly. * This function cannot be used if "Pincushion" is set . Signal Display For setting the display of the menu. Menu Position For setting the display position of the input information to "On" or "Off". Keystone For correcting any keystone distortion that has been input. Æ "Adjusting the Screen Size (Aspect)" (P. 26) Display Setup Back Color For setting the color of the background to "Blue" or "Black" when there is no signal input.
... value changes the aspect slightly. * This function cannot be used if "Pincushion" is set . Signal Display For setting the display of the menu. Menu Position For setting the display position of the input information to "On" or "Off". Keystone For correcting any keystone distortion that has been input. Æ "Adjusting the Screen Size (Aspect)" (P. 26) Display Setup Back Color For setting the color of the background to "Blue" or "Black" when there is no signal input.
Operation Manual 1
Page 64
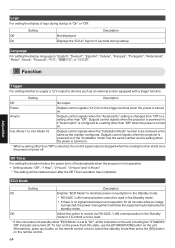
... operated. 0 Setting values: "Off", "1 Hour", "2 Hours", "3 Hours" and "4 Hours" * The setting will be used in the Standby mode or if Control4 is to "On", all the indicators on . Alternatively, press any button on the remote control once to a setting other than "Off" when the power is changed from "Off" to cancel the standby mode then press the [ON] button on the unit. Setting Off On Description Not displayed. Outputs control signals when the projector is powered...
... operated. 0 Setting values: "Off", "1 Hour", "2 Hours", "3 Hours" and "4 Hours" * The setting will be used in the Standby mode or if Control4 is to "On", all the indicators on . Alternatively, press any button on the remote control once to a setting other than "Off" when the power is changed from "Off" to cancel the standby mode then press the [ON] button on the unit. Setting Off On Description Not displayed. Outputs control signals when the projector is powered...
Operation Manual 1
Page 69
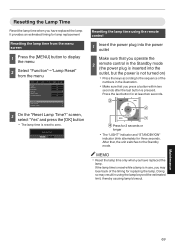
... "LIGHT" indicator and "STANDBY/ON" indicator blink alternately for at least two seconds. screen, select "Yes" and press the [OK] button 0 The lamp time is in the Standby mode (the power plug is inserted into the power outlet Make sure that you operate the 2 remote control in use, you may result in the illustration. 0 Make sure that , the unit switches to display the menu 2 Select "Function"""Lamp Reset" from the menu screen 1 Press the [MENU] button...
... "LIGHT" indicator and "STANDBY/ON" indicator blink alternately for at least two seconds. screen, select "Yes" and press the [OK] button 0 The lamp time is in the Standby mode (the power plug is inserted into the power outlet Make sure that you operate the 2 remote control in use, you may result in the illustration. 0 Make sure that , the unit switches to display the menu 2 Select "Function"""Lamp Reset" from the menu screen 1 Press the [MENU] button...
Operation Manual 1
Page 71
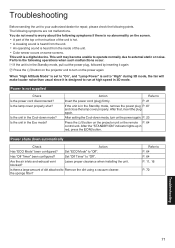
... the following operations when such malfunctions occur. Set "ECO Mode" to "Off". Troubleshooting Before sending the unit to your authorized dealer for repair, please check the following symptoms are not malfunctions. The following points. Is the lamp cover properly shut? Is the unit in 3D mode. After the "STANDBY/ON" indicator lights up in red, press the C [ON] button. Leave proper clearance when installing the unit...
... the following operations when such malfunctions occur. Set "ECO Mode" to "Off". Troubleshooting Before sending the unit to your authorized dealer for repair, please check the following symptoms are not malfunctions. The following points. Is the lamp cover properly shut? Is the unit in 3D mode. After the "STANDBY/ON" indicator lights up in red, press the C [ON] button. Leave proper clearance when installing the unit...

Operation Manual 1
Page 72
... Set "3D Format" to Is the correct external input selected? Check the model name of the AV device or PC turned on how to change the setting, please refer to the projector directly, and P. 19 divider, etc.) in use a certified Premium High Speed HDMI Cable (18 Gbps compatible) when inputting 4K video signals. cable? Is an intermediate device (AV amplifier, Connect the source device to the instruction manual of the source...
... Set "3D Format" to Is the correct external input selected? Check the model name of the AV device or PC turned on how to change the setting, please refer to the projector directly, and P. 19 divider, etc.) in use a certified Premium High Speed HDMI Cable (18 Gbps compatible) when inputting 4K video signals. cable? Is an intermediate device (AV amplifier, Connect the source device to the instruction manual of the source...
Operation Manual 1
Page 78
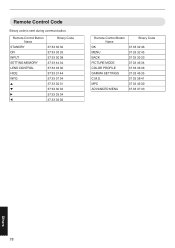
Remote Control Button Name STANDBY ON INPUT SETTING MEMORY LENS CONTROL HIDE INFO. J K I H Binary Code 37 33 30 36 37 33 30 35 37 33 30 38 37 33 44 34 37 33 33 30 37 33 31 44 37 33 37 34 37 33 30 31 37 33 30 32 37 33 33 34 37 33 33 36 Remote Control Button Name OK MENU BACK PICTURE MODE COLOR PROFILE GAMMA SETTINGS C.M.D. MPC ADVANCED MENU Binary Code 37 33 32 46 37 33 32 45 37 33 30 33 37 33 46 34 37 33 38 38 37 33 46 35 37 33 38 41 37 33 46 30 37 33 37 33 Others 78 Remote Control Code Binary code is sent during communication.
Remote Control Button Name STANDBY ON INPUT SETTING MEMORY LENS CONTROL HIDE INFO. J K I H Binary Code 37 33 30 36 37 33 30 35 37 33 30 38 37 33 44 34 37 33 33 30 37 33 31 44 37 33 37 34 37 33 30 31 37 33 30 32 37 33 33 34 37 33 33 36 Remote Control Button Name OK MENU BACK PICTURE MODE COLOR PROFILE GAMMA SETTINGS C.M.D. MPC ADVANCED MENU Binary Code 37 33 32 46 37 33 32 45 37 33 30 33 37 33 46 34 37 33 38 38 37 33 46 35 37 33 38 41 37 33 46 30 37 33 37 33 Others 78 Remote Control Code Binary code is sent during communication.
Operation Manual 1
Page 80
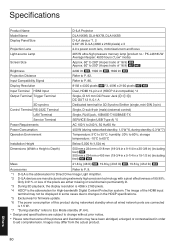
... (43.6 lb) l, 19.6 kg (43.2 lb) m Accessories Refer to P. 86. Specifications Product Name D-ILA Projector Model Name DLA-NX9B, DLA-NX7B, DLA-NX5B Display Panel/Size D-ILA device *1, 2 0.69" 4K D-ILA (4096 x 2160 pixels) x 3 Projection Lens 2.0 x power zoom lens, motorized zoom and focus Light-source Lamp Screen Size 265 W ultra-high pressure mercury lamp [product no.: PK-L2618UW Average lifespan: 4500 hours ("Low" mode) Approx. 60" to 280" (Aspect ratio of 16:9) k Approx. 60" to...
... (43.6 lb) l, 19.6 kg (43.2 lb) m Accessories Refer to P. 86. Specifications Product Name D-ILA Projector Model Name DLA-NX9B, DLA-NX7B, DLA-NX5B Display Panel/Size D-ILA device *1, 2 0.69" 4K D-ILA (4096 x 2160 pixels) x 3 Projection Lens 2.0 x power zoom lens, motorized zoom and focus Light-source Lamp Screen Size 265 W ultra-high pressure mercury lamp [product no.: PK-L2618UW Average lifespan: 4500 hours ("Low" mode) Approx. 60" to 280" (Aspect ratio of 16:9) k Approx. 60" to...
Operation Manual 1
Page 88
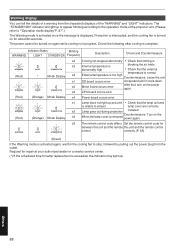
... is displayed. Projection is interrupted, and the cooling fan is unable to project lamp cover are correctly LIGHT STANDBY/ON x2 Lamp goes out during projection installed. Warning display You can tell the details of a warning from the outlet. The "STANDBY/ON" indicator will light up . The power cannot be turned on for the cooling fan to ""Operation mode display"P. 87".) The Warning mode is activated once the message is in progress. WARNING x3 The remote control code differs Set the remote control code...
... is displayed. Projection is interrupted, and the cooling fan is unable to project lamp cover are correctly LIGHT STANDBY/ON x2 Lamp goes out during projection installed. Warning display You can tell the details of a warning from the outlet. The "STANDBY/ON" indicator will light up . The power cannot be turned on for the cooling fan to ""Operation mode display"P. 87".) The Warning mode is activated once the message is in progress. WARNING x3 The remote control code differs Set the remote control code...
Operation Manual 1
Page 91
... 9 Original HDR Technology of JVC 33 P Partial Adjustment (Zone Adjust 58, 61 Picture Adjust Menu 49 Picture Mode 29, 49 Picture Tone 39 Pixel Adjust 58 Power Cord 9, 21 Precautions during Installation 16 Projection Distance 82 R Remote Code 65 Remote Control 13 Replacing the Lamp 67 S Screen Adjust 25 Screen Size and Projection Distance 82 Securing (Mounting) the Projector 17 Securing the Projector (Ceiling Mount 17 Shift 24 Signal Display 66 Soft Ver 66 Software Update 66 Specifications 80 Signal Display 63 T Tint 53 Trigger 64 Troubleshooting 71 91 Others
... 9 Original HDR Technology of JVC 33 P Partial Adjustment (Zone Adjust 58, 61 Picture Adjust Menu 49 Picture Mode 29, 49 Picture Tone 39 Pixel Adjust 58 Power Cord 9, 21 Precautions during Installation 16 Projection Distance 82 R Remote Code 65 Remote Control 13 Replacing the Lamp 67 S Screen Adjust 25 Screen Size and Projection Distance 82 Securing (Mounting) the Projector 17 Securing the Projector (Ceiling Mount 17 Shift 24 Signal Display 66 Soft Ver 66 Software Update 66 Specifications 80 Signal Display 63 T Tint 53 Trigger 64 Troubleshooting 71 91 Others


