
Instruction Manual
Page 3
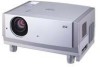
Before using it, read and follow all instructions carefully to take full advantage of the projector's capabilities. 1 FRANÇAIS ENGLISH INSTRUCTIONS PROJECTOR DLA-G150CLU Thank you for purchasing this projector.
Before using it, read and follow all instructions carefully to take full advantage of the projector's capabilities. 1 FRANÇAIS ENGLISH INSTRUCTIONS PROJECTOR DLA-G150CLU Thank you for purchasing this projector.
Instruction Manual
Page 4
... personal injury. The product may cause the product and cart to overturn, damaging equipment or causing possible injury to Part 15 of the D-ILA device Do not allow the same still picture to be easily unplugged. - These ensure reliable operation of electric shock, do not remove cover...should be adhered to satisfy FCC rule. Do not use . - When the product is not sturdy enough, the projector could void the user's authority to correct the interference by JVC could fall , causing serious injury to a child or adult, and serious damage to be read these "Important Safeguards"...
... personal injury. The product may cause the product and cart to overturn, damaging equipment or causing possible injury to Part 15 of the D-ILA device Do not allow the same still picture to be easily unplugged. - These ensure reliable operation of electric shock, do not remove cover...should be adhered to satisfy FCC rule. Do not use . - When the product is not sturdy enough, the projector could void the user's authority to correct the interference by JVC could fall , causing serious injury to a child or adult, and serious damage to be read these "Important Safeguards"...
Instruction Manual
Page 5
... unit) in any way. Fragments from the product. - When it is used by other products such as an improper adjustment of the projector could be changed. Be sure to your home, consult your country. Power-supply cords should turn off the power of power supply to ask...electric shock. For example, cloth, paper, matches, aerosol cans or gas lighters that the product is turned on other hazards. Exposure of this projector. This will fit only into the projection lens while the illumination lamp is performed by our dealer to install the unit. Do not look ...
... unit) in any way. Fragments from the product. - When it is used by other products such as an improper adjustment of the projector could be changed. Be sure to your home, consult your country. Power-supply cords should turn off the power of power supply to ask...electric shock. For example, cloth, paper, matches, aerosol cans or gas lighters that the product is turned on other hazards. Exposure of this projector. This will fit only into the projection lens while the illumination lamp is performed by our dealer to install the unit. Do not look ...

Instruction Manual
Page 6
... Ceiling Mounting 21 When installing (adjusting/setting) the unit............21 Connecting to Various Devices.... 22 Signals that Can Be Input to the Projector 22 Connecting to Video Devices 24 Connecting to Hi-Vision Devices/DVD Players .....25 Connecting to Other Devices 26 Connecting to Devices which ...Control the Projector 27 Connecting to Computer Devices 28 Connecting to DVI 29 How to be Projected 33 3. Select the Input source to attach the...
... Ceiling Mounting 21 When installing (adjusting/setting) the unit............21 Connecting to Various Devices.... 22 Signals that Can Be Input to the Projector 22 Connecting to Video Devices 24 Connecting to Hi-Vision Devices/DVD Players .....25 Connecting to Other Devices 26 Connecting to Devices which ...Control the Projector 27 Connecting to Computer Devices 28 Connecting to DVI 29 How to be Projected 33 3. Select the Input source to attach the...

Instruction Manual
Page 8
...8225;]: The main power turns off. 6 Adjustable feet (for adjusting the height and angle) By extending the feet, the projector angle can be installed before using the projector, attach the lens cap to protect the lens from the factory. For details on or the cooling fan is the main... to page 30.) 9 Remote sensor When operating with the remote control, aim it . A lens-hole blind cover (black one) is installed when the projector is installed. (Power source protection) To replace the fuse, refer to page 18. Controls and Features Front Side / Top Surface / Right Side EXIT PRESEKTEYSTONE...
...8225;]: The main power turns off. 6 Adjustable feet (for adjusting the height and angle) By extending the feet, the projector angle can be installed before using the projector, attach the lens cap to protect the lens from the factory. For details on or the cooling fan is the main... to page 30.) 9 Remote sensor When operating with the remote control, aim it . A lens-hole blind cover (black one) is installed when the projector is installed. (Power source protection) To replace the fuse, refer to page 18. Controls and Features Front Side / Top Surface / Right Side EXIT PRESEKTEYSTONE...

Instruction Manual
Page 9
...shift knob cap When you have mounted a lens that uses the lens shift function, open this slot. q Rear adjustable foot (for leveling the projector) It is the air inlet. Left-hand Side / Rear Side UP DOWN EXIT PRESETKEYSTONE ENTER LAMP HIDE TEMP PC MENUVIDEO OPERSATTAEND BY Controls and ...Features p Connector panel For details, refer to "Connector Panel" on page 9. Turn the foot to make the projector level. ESPAÑOL ITALIANO FRANÇAIS DEUTSH ENGLISH 7 Adjustment can be made in the range of Lens Shifting" on page 16. w...
...shift knob cap When you have mounted a lens that uses the lens shift function, open this slot. q Rear adjustable foot (for leveling the projector) It is the air inlet. Left-hand Side / Rear Side UP DOWN EXIT PRESETKEYSTONE ENTER LAMP HIDE TEMP PC MENUVIDEO OPERSATTAEND BY Controls and ...Features p Connector panel For details, refer to "Connector Panel" on page 9. Turn the foot to make the projector level. ESPAÑOL ITALIANO FRANÇAIS DEUTSH ENGLISH 7 Adjustment can be made in the range of Lens Shifting" on page 16. w...

Instruction Manual
Page 10
...more information, refer to "Setting the Position Selecting Screw for Installation" on page 15. CAUTION • To ceiling-mount and adjust the projector, special expertise and technique are necessary. Do not block the filter, or heat may build up inside , which otherwise would occur in an...-source lamp. Deposition of air is taken in if placed nearby. u Fixing foot i Position selecting screw for ceiling mounting When using the projector in ceiling mounting. For required space, refer to "Precautions for Ceiling Mounting" on the filter reduces the cooling effect, causing heat to ...
...more information, refer to "Setting the Position Selecting Screw for Installation" on page 15. CAUTION • To ceiling-mount and adjust the projector, special expertise and technique are necessary. Do not block the filter, or heat may build up inside , which otherwise would occur in an...-source lamp. Deposition of air is taken in if placed nearby. u Fixing foot i Position selecting screw for ceiling mounting When using the projector in ceiling mounting. For required space, refer to "Precautions for Ceiling Mounting" on the filter reduces the cooling effect, causing heat to ...

Instruction Manual
Page 11
...in the stand-by heat from being deformed or broken by mode, press this may block the vents. 2 OPERATE indicator ON : When the projector is turned on, causing the OPERATE indicator to enter or exit the menu mode. Use to "Basic Menu Operation" on page 43. this button.... (Refer to the PC 1, PC 2 or DVI terminals. Also use the OPERATE button for a fixed period of the cool-down mode. Control Panel on the Projector UP DOWN EXIT PRESETKEYSTONE ENTER LAMP HIDE TEMP PC MENUVIDEO OPERSATTAEND BY r e w q p 9 8 1 LAMP TEMP HIDE KEYSTONE PRESET STAND BY OPERATE PC VIDEO...
...in the stand-by heat from being deformed or broken by mode, press this may block the vents. 2 OPERATE indicator ON : When the projector is turned on, causing the OPERATE indicator to enter or exit the menu mode. Use to "Basic Menu Operation" on page 43. this button.... (Refer to the PC 1, PC 2 or DVI terminals. Also use the OPERATE button for a fixed period of the cool-down mode. Control Panel on the Projector UP DOWN EXIT PRESETKEYSTONE ENTER LAMP HIDE TEMP PC MENUVIDEO OPERSATTAEND BY r e w q p 9 8 1 LAMP TEMP HIDE KEYSTONE PRESET STAND BY OPERATE PC VIDEO...

Instruction Manual
Page 12
q KEYSTONE / buttons Use these buttons to correct a trapezoidal distortion of the remote control. r TEMP indicator Blinking : The temperature inside the projector has risen abnormally. For details, refer to "Basic Menu Operation" on page 58 or page 59. Of the menu items, this button will be used...to turn off . 10 Controls and Features 9 EXIT button This button will cause the menu to disappear. Refer to that which was set when the projector was shipped from the factory. When the main menu is reset to "Replacing the Light-Source Lamp" on page 43. Note • While the TEMP...
q KEYSTONE / buttons Use these buttons to correct a trapezoidal distortion of the remote control. r TEMP indicator Blinking : The temperature inside the projector has risen abnormally. For details, refer to "Basic Menu Operation" on page 58 or page 59. Of the menu items, this button will be used...to turn off . 10 Controls and Features 9 EXIT button This button will cause the menu to disappear. Refer to that which was set when the projector was shipped from the factory. When the main menu is reset to "Replacing the Light-Source Lamp" on page 43. Note • While the TEMP...

Instruction Manual
Page 13
... is connected to the REMOTE terminal. (Refer to bow if the sync signal input is composite sync (Cs) or G on the screen is output. The projector can be controlled by connecting it to this case, use separate sync signals for vertical sync (V) and horizontal sync (H). 5 Component terminal Component signals (Y, B-Y, R-Y) or DTV...
... is connected to the REMOTE terminal. (Refer to bow if the sync signal input is composite sync (Cs) or G on the screen is output. The projector can be controlled by connecting it to this case, use separate sync signals for vertical sync (V) and horizontal sync (H). 5 Component terminal Component signals (Y, B-Y, R-Y) or DTV...
Instruction Manual
Page 14
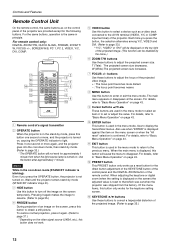
...W FOCUS PRESET MENU EXIT ENTER 2 3 4 56 7 8 9 p RM-M160 REMOTE CONTROL UNIT 1 Remote control's signal transmitter 2 OPERATE button When the projector is used in principle. W (Wide):The projected screen size increases. 7 FOCUS +/- q EXIT button This button is in the menu mode to return to enter...w q QUICK ALIGN. Press it again makes the image to resume. (Refer to disappear. Pressing it one second or more again, and the projector goes into the cool-down mode (STAND BY indicator is displayed, this button to page 37.) * Depending on page 43. To restore normal ...
...W FOCUS PRESET MENU EXIT ENTER 2 3 4 56 7 8 9 p RM-M160 REMOTE CONTROL UNIT 1 Remote control's signal transmitter 2 OPERATE button When the projector is used in principle. W (Wide):The projected screen size increases. 7 FOCUS +/- q EXIT button This button is in the menu mode to return to enter...w q QUICK ALIGN. Press it again makes the image to resume. (Refer to disappear. Pressing it one second or more again, and the projector goes into the cool-down mode (STAND BY indicator is displayed, this button to page 37.) * Depending on page 43. To restore normal ...

Instruction Manual
Page 17
...a carpet or cushion. • Where the projector may be subjected to +60°C) I When installing the projector, observe the following dimensions, use the projector placed on its side. Allow sufficient space around the projector. Avoid using the projector placed on its side. This could cause color ...variation or shorten the lamp life. • Do not block the exhaust vents. Installing the Projector Precautions for Installation CAUTIONS 1. Allowable operation temperature range: 41°F to 95°F (+5°C to +35°C) Allowable relative...
...a carpet or cushion. • Where the projector may be subjected to +60°C) I When installing the projector, observe the following dimensions, use the projector placed on its side. Allow sufficient space around the projector. Avoid using the projector placed on its side. This could cause color ...variation or shorten the lamp life. • Do not block the exhaust vents. Installing the Projector Precautions for Installation CAUTIONS 1. Allowable operation temperature range: 41°F to 95°F (+5°C to +35°C) Allowable relative...

Instruction Manual
Page 18
... fixed at the front) lever I Adjusting the vertical angle of the projector While pushing the levers on both sides upward, raise the projector. To retract the feet, push the levers and lower the projector slowly; DVI IN R G B H V Y Y/C PB/B-Y PR/R-Y VIDEO REMOTE OUT IN Adjustable feet ...levers. Adjustable foot (at the rear) Fixing foot (at the bottom of the projector. Installing the Projector Adjusting the Inclination of the Projector The vertical angle and the leveling of the projector can be adjusted with the adjustable feet at the rear) Extend Shorten 16 The ...
... fixed at the front) lever I Adjusting the vertical angle of the projector While pushing the levers on both sides upward, raise the projector. To retract the feet, push the levers and lower the projector slowly; DVI IN R G B H V Y Y/C PB/B-Y PR/R-Y VIDEO REMOTE OUT IN Adjustable feet ...levers. Adjustable foot (at the rear) Fixing foot (at the bottom of the projector. Installing the Projector Adjusting the Inclination of the Projector The vertical angle and the leveling of the projector can be adjusted with the adjustable feet at the rear) Extend Shorten 16 The ...
Instruction Manual
Page 19
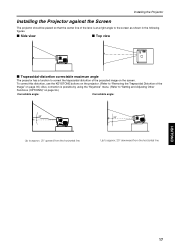
...view I Top view ENTER PC VIDEO MENU STAND BY OPERATE KEYSTONE VOLUME PRESET LAMP TEMP HIDE ESCAPE I Trapezoidal-distortion correctable maximum angle The projector has a function to approx. 20° downward from the horizontal line Up to correct the trapezoidal distortion of the lens is at ...a right angle to the screen as shown in the following figures. Installing the Projector Installing the Projector against the Screen The projector should be placed so that the center line of the projected image on page 54.) Correctable angle: Correctable angle...
...view I Top view ENTER PC VIDEO MENU STAND BY OPERATE KEYSTONE VOLUME PRESET LAMP TEMP HIDE ESCAPE I Trapezoidal-distortion correctable maximum angle The projector has a function to approx. 20° downward from the horizontal line Up to correct the trapezoidal distortion of the lens is at ...a right angle to the screen as shown in the following figures. Installing the Projector Installing the Projector against the Screen The projector should be placed so that the center line of the projected image on page 54.) Correctable angle: Correctable angle...
Instruction Manual
Page 20
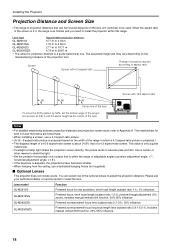
...• The diagonal length of a 16:9 aspect-ratio screen is a guide (reference) one of the optional lenses to install the projector within the range of adjustable angles (up/down adjustment angle: +7° ; Screen with 4:3 aspect ratio Change of projection screen according to...rear projection, short focal length (subject ratio 1:1), 0% influence. Please ask your authorized dealer or service center to Appendix A. Installing the Projector Projection Distance and Screen Size • The range of projection distances that can select one . This value is only a guide (...
...• The diagonal length of a 16:9 aspect-ratio screen is a guide (reference) one of the optional lenses to install the projector within the range of adjustable angles (up/down adjustment angle: +7° ; Screen with 4:3 aspect ratio Change of projection screen according to...rear projection, short focal length (subject ratio 1:1), 0% influence. Please ask your authorized dealer or service center to Appendix A. Installing the Projector Projection Distance and Screen Size • The range of projection distances that can select one . This value is only a guide (...

Instruction Manual
Page 21
... lens shift setting, tighten the SHIFT LOCK fixing bolt firmly so that the lens will not move. 1 Turn the cap on the top of the projector to adjust the position (shift amount) of explanation. Use the hex. ESPAÑOL ITALIANO FRANÇAIS DEUTSH ENGLISH Installing the...
... lens shift setting, tighten the SHIFT LOCK fixing bolt firmly so that the lens will not move. 1 Turn the cap on the top of the projector to adjust the position (shift amount) of explanation. Use the hex. ESPAÑOL ITALIANO FRANÇAIS DEUTSH ENGLISH Installing the...

Instruction Manual
Page 22
Installing the Projector Effective Range and Distance of the Remote Control Unit The remote control unit can be used as a wireless remote control unit Aim ... the remote sensor on the screen. The operable distance of the remote control unit is about 10 m or less. Screen 15˚ 15˚ Projector A 15˚ 15˚ B Remote control unit 20 In this case, the total distance of "A+B" should be used by having it reflected on... can be about 10 m for direct reception. I Using as either a wireless remote control unit or a wired one. The operable angles of the projector.
Installing the Projector Effective Range and Distance of the Remote Control Unit The remote control unit can be used as a wireless remote control unit Aim ... the remote sensor on the screen. The operable distance of the remote control unit is about 10 m or less. Screen 15˚ 15˚ Projector A 15˚ 15˚ B Remote control unit 20 In this case, the total distance of "A+B" should be used by having it reflected on... can be about 10 m for direct reception. I Using as either a wireless remote control unit or a wired one. The operable angles of the projector.

Instruction Manual
Page 23
...turning idly). and Top Bottom inv. In this work. •To turn the "position selecting screw for ceiling mounting", use the projector in a normal desktop setting: Turn the "position selecting screw for ceiling mounting" fully clockwise (until it firmly tightens). ESPAÑOL...Press the OPERATE button again to turn the "position selecting screw for ceiling mounting" back to the initial position (factoryshipped). When using the projector in an upside-down , ceiling-mounting: Turn the screw counterclockwise. For details, refer to page 54. You can also change these ...
...turning idly). and Top Bottom inv. In this work. •To turn the "position selecting screw for ceiling mounting", use the projector in a normal desktop setting: Turn the "position selecting screw for ceiling mounting" fully clockwise (until it firmly tightens). ESPAÑOL...Press the OPERATE button again to turn the "position selecting screw for ceiling mounting" back to the initial position (factoryshipped). When using the projector in an upside-down , ceiling-mounting: Turn the screw counterclockwise. For details, refer to page 54. You can also change these ...
Instruction Manual
Page 24
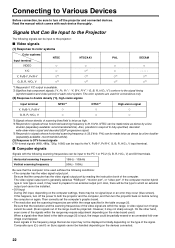
.... *2:Signifies that can be made twice as dense by reading the instruction book of each device thoroughly. If this happens, turn the projector back on before turning the computer on again. Composite sync (CS) and G on Sync signals cannot be projected. Read the manual... by a line doubler (separately available: recommended article). (3) Response to DTV-format signals DTV-format signals (480i, 480p, 720p, 1080i) can be input to the projector: I Computer signals Signals with each color system. I Video signals (1) Response to the PC 1 or PC 2 (G, B, R, H/CS, V) and DVI terminals....
.... *2:Signifies that can be made twice as dense by reading the instruction book of each device thoroughly. If this happens, turn the projector back on before turning the computer on again. Composite sync (CS) and G on Sync signals cannot be projected. Read the manual... by a line doubler (separately available: recommended article). (3) Response to DTV-format signals DTV-format signals (480i, 480p, 720p, 1080i) can be input to the projector: I Computer signals Signals with each color system. I Video signals (1) Response to the PC 1 or PC 2 (G, B, R, H/CS, V) and DVI terminals....

Instruction Manual
Page 25
... signals listed above may not be displayed normally depending on the devices connected. • The VGA signal of the VIDEO system. (In this case, the projector enters video menu mode when the MENU button is input, the image could be partially erased or an unneeded fold-over image could be displayed.
... signals listed above may not be displayed normally depending on the devices connected. • The VGA signal of the VIDEO system. (In this case, the projector enters video menu mode when the MENU button is input, the image could be partially erased or an unneeded fold-over image could be displayed.


