User Manual
Page 2
...or cable system. This appliance should never be blocked or covered. This plug will be sure the service technician has used replacement parts specified by the manufacturer that are covered by a qualified technician to restore the appliance to overturn. This is damaged or frayed.... manufacturer. Adjust only those controls that have the same characteristics as a bookcase unless proper ventilation is in installation such as the original part. Do not use a mounting kit approved by following conditions: a. Do not place this appliance from the wall outlet before cleaning. ...
...or cable system. This appliance should never be blocked or covered. This plug will be sure the service technician has used replacement parts specified by the manufacturer that are covered by a qualified technician to restore the appliance to overturn. This is damaged or frayed.... manufacturer. Adjust only those controls that have the same characteristics as a bookcase unless proper ventilation is in installation such as the original part. Do not use a mounting kit approved by following conditions: a. Do not place this appliance from the wall outlet before cleaning. ...
User Manual
Page 3
...This equipment generates, uses, and can be replaced by a JVC authorized service dealer only. CAUTION CHANGES OR MODIFICATIONS NOT APPROVED BY JVC COULD VOID USER'S AUTHORITY TO OPERATE THE EQUIPMENT. AUCUNE ... which can radiate radio frequency energy and, if not installed and used in the BR-DV6000U must be determined by one or more of the following measures: ● Reorient ...ANY INTERFERENCE RECEIVED, INCLUDING INTERFERENCE THAT MAY CAUSE UNDESIRED OPERATION. THIS DEVICE COMPLIES WITH PART 15 OF THE FCC RULES. REFER SERVICING TO QUALIFIED SERVICE PERSONNEL The lightning flash ...
...This equipment generates, uses, and can be replaced by a JVC authorized service dealer only. CAUTION CHANGES OR MODIFICATIONS NOT APPROVED BY JVC COULD VOID USER'S AUTHORITY TO OPERATE THE EQUIPMENT. AUCUNE ... which can radiate radio frequency energy and, if not installed and used in the BR-DV6000U must be determined by one or more of the following measures: ● Reorient ...ANY INTERFERENCE RECEIVED, INCLUDING INTERFERENCE THAT MAY CAUSE UNDESIRED OPERATION. THIS DEVICE COMPLIES WITH PART 15 OF THE FCC RULES. REFER SERVICING TO QUALIFIED SERVICE PERSONNEL The lightning flash ...
User Manual
Page 4
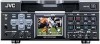
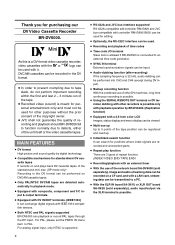
... recorded and unrecorded parts. ● Repeat play function There are 3 types of repeat function. (INDEX/ VIDEO END/ TAPE END) ● Recording/playback with an external timer ● With the use of the network board SA-DV6000 (sold separately), image and audio streaming data can be recorded ...NTSC and PAL signals supported BR-DV6000 can be used for purchasing our DV Video Cassette Recorder BR-DV6000. For analog signal input, only NTSC is supported. ● RS-422A and JVC bus interface supported RS-422A-compatible edit controller RM-G820 and JVC bus-compatible edit controller RM-...
... recorded and unrecorded parts. ● Repeat play function There are 3 types of repeat function. (INDEX/ VIDEO END/ TAPE END) ● Recording/playback with an external timer ● With the use of the network board SA-DV6000 (sold separately), image and audio streaming data can be recorded ...NTSC and PAL signals supported BR-DV6000 can be used for purchasing our DV Video Cassette Recorder BR-DV6000. For analog signal input, only NTSC is supported. ● RS-422A and JVC bus interface supported RS-422A-compatible edit controller RM-G820 and JVC bus-compatible edit controller RM-...
User Manual
Page 5
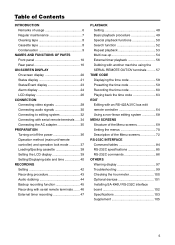
... Regular maintenance 7 Cleaning tape 8 Cassette tape 8 Condensation 9 NAMES AND FUNCTIONS OF PARTS Front panel 10 Rear panel 16 ON-SCREEN DISPLAY On-screen display 20 Status display 21...56 Dubbing with another machine using the SERIAL REMOTE OUT/DV terminals ......... 57 TIME CODE Displaying the time code 58 Presetting the time code 59 Recording the time code 60 Playing back the time code ...63 EDIT Editing with an RS-422A/JVC bus edit remote controller 64 Using a non-linear ...
... Regular maintenance 7 Cleaning tape 8 Cassette tape 8 Condensation 9 NAMES AND FUNCTIONS OF PARTS Front panel 10 Rear panel 16 ON-SCREEN DISPLAY On-screen display 20 Status display 21...56 Dubbing with another machine using the SERIAL REMOTE OUT/DV terminals ......... 57 TIME CODE Displaying the time code 58 Presetting the time code 59 Recording the time code 60 Playing back the time code ...63 EDIT Editing with an RS-422A/JVC bus edit remote controller 64 Using a non-linear ...
User Manual
Page 8
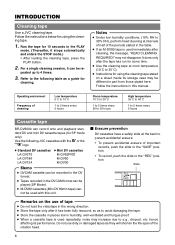
...the instructions in part from those stated here. peated up to 2 times every 5 hours Cassette tape BR-DV6000 can be different in this unit. Ⅵ Erasure prevention DV cassettes have a safety slide at room temperature (10˚C to e.g., dropout, etc. Refer to the following JVC cassettes with ...avoid damaging the tape. ● Store the cassette in places low in the PLAY mode. (Thereafter, it can record onto and playback standard DV and mini DV cassette tapes (for using the cleaning tape. 1. Follow the instructions below for using the cleaning tape stated on ...
...the instructions in part from those stated here. peated up to 2 times every 5 hours Cassette tape BR-DV6000 can be different in this unit. Ⅵ Erasure prevention DV cassettes have a safety slide at room temperature (10˚C to e.g., dropout, etc. Refer to the following JVC cassettes with ...avoid damaging the tape. ● Store the cassette in places low in the PLAY mode. (Thereafter, it can record onto and playback standard DV and mini DV cassette tapes (for using the cleaning tape. 1. Follow the instructions below for using the cleaning tape stated on ...
User Manual
Page 10
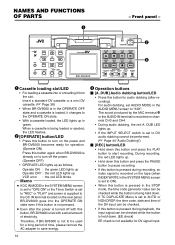
... Ⅵ [A. SET SEARCH+ MIC HOLD BLANK CUE UP PHONES REC LEVEL CH-1/3 CH-2/4 PROFESSIONAL BR-DV6000 OPERATE A.DUB REC PLAY PAUSE EJECT REW STOP FF AUDIO INPUT COUNTER MONITOR OUTPUT SELECT CTL L CH-1/2 DV TC MIX MIX LINE UB R CH-3/4 Y/C (CPN) REMOTE LOCAL 2 3 1 Cassette loading... is loaded, it from the slot. NAMES AND FUNCTIONS OF PARTS 1 - Insert a standard DV cassette or a mini DV cassette. (☞ Page 38) • When BR-DV6000 is in the OPERATE OFF state and a cassette is recorded on channels CH3 and CH4. • During audio dubbing, the...
... Ⅵ [A. SET SEARCH+ MIC HOLD BLANK CUE UP PHONES REC LEVEL CH-1/3 CH-2/4 PROFESSIONAL BR-DV6000 OPERATE A.DUB REC PLAY PAUSE EJECT REW STOP FF AUDIO INPUT COUNTER MONITOR OUTPUT SELECT CTL L CH-1/2 DV TC MIX MIX LINE UB R CH-3/4 Y/C (CPN) REMOTE LOCAL 2 3 1 Cassette loading... is loaded, it from the slot. NAMES AND FUNCTIONS OF PARTS 1 - Insert a standard DV cassette or a mini DV cassette. (☞ Page 38) • When BR-DV6000 is in the OPERATE OFF state and a cassette is recorded on channels CH3 and CH4. • During audio dubbing, the...

User Manual
Page 12
... JVC. 6 [AUDIO OUTPUT] switch Memo ● To control BR-DV6000 with the SERIAL REMOTE terminal or DV... OF PARTS - PIN REMOTE terminal. Use this switch setting can be done with REMOTE SEL SERIAL or REMOTE SEL DV in...recording. REMOTE : Use this setting if BR-DV6000 is used to the REMOTE 1 (9- can be operated. DV : For DV signals of tapes recorded in the 32k audio mode • In the EE mode for DV...CH-1/3 CH-2/4 PROFESSIONAL BR-DV6000 OPERATE A.DUB REC PLAY PAUSE EJECT REW STOP FF AUDIO INPUT COUNTER MONITOR OUTPUT SELECT CTL L CH-1/2 DV TC MIX ...
... JVC. 6 [AUDIO OUTPUT] switch Memo ● To control BR-DV6000 with the SERIAL REMOTE terminal or DV... OF PARTS - PIN REMOTE terminal. Use this switch setting can be done with REMOTE SEL SERIAL or REMOTE SEL DV in...recording. REMOTE : Use this setting if BR-DV6000 is used to the REMOTE 1 (9- can be operated. DV : For DV signals of tapes recorded in the 32k audio mode • In the EE mode for DV...CH-1/3 CH-2/4 PROFESSIONAL BR-DV6000 OPERATE A.DUB REC PLAY PAUSE EJECT REW STOP FF AUDIO INPUT COUNTER MONITOR OUTPUT SELECT CTL L CH-1/2 DV TC MIX ...

User Manual
Page 14
...-1/3 CH-2/4 PROFESSIONAL BR-DV6000 OPERATE A.DUB REC PLAY PAUSE EJECT REW STOP FF AUDIO INPUT COUNTER MONITOR OUTPUT SELECT CTL L CH-1/2 DV TC MIX MIX LINE UB R CH-3/4 Y/C (CPN) REMOTE LOCAL !@ 0 0 [REC LEVEL] Volume for audio recording level for ... this terminal is connected, sound for CH3 and CH4 can be input. During audio dubbing, the audio recording level for the AUDIO IN terminal located on the LCD. When the time code preset screen is displayed,... panel - (continued) # Mini MENU DISP RESET SEARCH- NAMES AND FUNCTIONS OF PARTS $% * ^ & -
...-1/3 CH-2/4 PROFESSIONAL BR-DV6000 OPERATE A.DUB REC PLAY PAUSE EJECT REW STOP FF AUDIO INPUT COUNTER MONITOR OUTPUT SELECT CTL L CH-1/2 DV TC MIX MIX LINE UB R CH-3/4 Y/C (CPN) REMOTE LOCAL !@ 0 0 [REC LEVEL] Volume for audio recording level for ... this terminal is connected, sound for CH3 and CH4 can be input. During audio dubbing, the audio recording level for the AUDIO IN terminal located on the LCD. When the time code preset screen is displayed,... panel - (continued) # Mini MENU DISP RESET SEARCH- NAMES AND FUNCTIONS OF PARTS $% * ^ & -

User Manual
Page 15
...button • During normal display, the function of this button to select the items or setting values. Ⅵ [BLANK/9] button • When BR-DV6000 is in the stop mode, press this button can be selected using ";,:" KEY FUNC in the SYSTEM (1/2) Menu screen. It searches the unrecorded... part of this button to enable/disable the LCD or select display style. This function is not effective during recording or recording pause. (☞ Page 52 "Index search") • When the setting screen is ...
...button • During normal display, the function of this button to select the items or setting values. Ⅵ [BLANK/9] button • When BR-DV6000 is in the stop mode, press this button can be selected using ";,:" KEY FUNC in the SYSTEM (1/2) Menu screen. It searches the unrecorded... part of this button to enable/disable the LCD or select display style. This function is not effective during recording or recording pause. (☞ Page 52 "Index search") • When the setting screen is ...

User Manual
Page 16
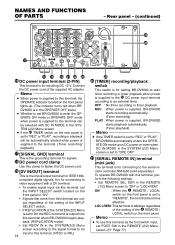
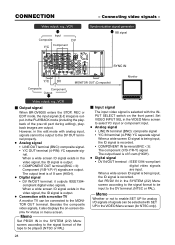
... [VIDEO Y/C OUT] terminal (4-PIN) This is the output terminal for Y/C separate video signals. • When tapes that have recorded wide-screen signals are played back, the wide-screen ID signal is output. #% 5 [VIDEO MONITOR OUT] terminal (BNC) This... Y/C COMPONENT IN R-Y B-Y Y OUT REMOTE2 IN OUT AUDIO CH 1/3 CH 2/4 IN MONITOR OUT SIGNAL GND DC12V IN SYNC IN DV IN/OUT OUT TIME CODE IN OUT OFF REC PLAY SERIAL REMOTE TIMER OUT MONITOR OUT REMOTE1 $ 5809 1 [VIDEO LINE IN] terminal...VIDEO Menu screen (for NTSC only). 16 NAMES AND FUNCTIONS OF PARTS 1 6 7 !@ -
... [VIDEO Y/C OUT] terminal (4-PIN) This is the output terminal for Y/C separate video signals. • When tapes that have recorded wide-screen signals are played back, the wide-screen ID signal is output. #% 5 [VIDEO MONITOR OUT] terminal (BNC) This... Y/C COMPONENT IN R-Y B-Y Y OUT REMOTE2 IN OUT AUDIO CH 1/3 CH 2/4 IN MONITOR OUT SIGNAL GND DC12V IN SYNC IN DV IN/OUT OUT TIME CODE IN OUT OFF REC PLAY SERIAL REMOTE TIMER OUT MONITOR OUT REMOTE1 $ 5809 1 [VIDEO LINE IN] terminal...VIDEO Menu screen (for NTSC only). 16 NAMES AND FUNCTIONS OF PARTS 1 6 7 !@ -
User Manual
Page 18
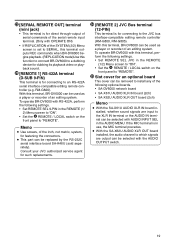
...DV". • Signals that come from this terminal when BR-DV6000 begins playback. (REPLICATION mode) • Set PB/DV... IN in the REMOTE (2/2) Menu screen. (☞ Page 77) mote controller RM-G30 (sold separately). Connect the DC power cord of the 4 REMOTE / LOCAL switch on even when DC IN MODE in the REMOTE (1/2) Menu screen to this terminal, per- OFF : No timer recording or timer playback. To operate BR...BR...recording...DV...BR-DV6000 to start timer recording or...BR-DV6000 starts recording automatically. (Timer recording) PLAY : When power is supplied, BR... SYNC IN DV IN/OUT OUT...
...DV". • Signals that come from this terminal when BR-DV6000 begins playback. (REPLICATION mode) • Set PB/DV... IN in the REMOTE (2/2) Menu screen. (☞ Page 77) mote controller RM-G30 (sold separately). Connect the DC power cord of the 4 REMOTE / LOCAL switch on even when DC IN MODE in the REMOTE (1/2) Menu screen to this terminal, per- OFF : No timer recording or timer playback. To operate BR...BR...recording...DV...BR-DV6000 to start timer recording or...BR-DV6000 starts recording automatically. (Timer recording) PLAY : When power is supplied, BR... SYNC IN DV IN/OUT OUT...
User Manual
Page 19
... to the XLR IN terminal or the AUDIO IN terminal can be used as a player or recorder of an editing system. Consult your JVC authorized service agent for such replacements. › [REMOTE 2] JVC Bus terminal (12-PIN) This terminal is for connecting to an RS-422A serial interface-compatible .... 19 RM-G820). With this terminal, BR-DV6000 can be replaced by the RS-232C serial interface board SA-K46U (sold separately). Memo ● Use screws, of the inch, not metric, system, for fastening the connectors. ● This part can be used as a player or recorder of an editing system.
... to the XLR IN terminal or the AUDIO IN terminal can be used as a player or recorder of an editing system. Consult your JVC authorized service agent for such replacements. › [REMOTE 2] JVC Bus terminal (12-PIN) This terminal is for connecting to an RS-422A serial interface-compatible .... 19 RM-G820). With this terminal, BR-DV6000 can be replaced by the RS-232C serial interface board SA-K46U (sold separately). Memo ● Use screws, of the inch, not metric, system, for fastening the connectors. ● This part can be used as a player or recorder of an editing system.

User Manual
Page 25
...Menu screen is set to perform audio dubbing during DV signal input. DUB INHIBIT (48 K) A. DUB INHIBIT (DV) A. The user attempted to PAL. The user attempted audio dubbing when PB/DV IN in the SYSTEM (2/2) Menu screen to insert-edit an unrecorded part of a blank tape. The user attempted to ... EDIT INHIBIT (LP) EDIT INHIBIT (BLANK) EDIT INHIBIT (NTSC/PAL) EDIT INHIBIT (DV CAM) EDIT INHIBIT (AUDIO) EDIT INHIBIT (DV TC INS) DV EE INHIBIT OPERATION LOCK Description The user attempted to edit a tape recorded in the LP mode. The user attempted to perform audio dubbing on a tape that ...
...Menu screen is set to perform audio dubbing during DV signal input. DUB INHIBIT (48 K) A. DUB INHIBIT (DV) A. The user attempted to PAL. The user attempted audio dubbing when PB/DV IN in the SYSTEM (2/2) Menu screen to insert-edit an unrecorded part of a blank tape. The user attempted to ... EDIT INHIBIT (LP) EDIT INHIBIT (BLANK) EDIT INHIBIT (NTSC/PAL) EDIT INHIBIT (DV CAM) EDIT INHIBIT (AUDIO) EDIT INHIBIT (DV TC INS) DV EE INHIBIT OPERATION LOCK Description The user attempted to edit a tape recorded in the LP mode. The user attempted to perform audio dubbing on a tape that ...
User Manual
Page 28
...REMOTE TIMER OUT MONITOR OUT REMOTE1 Y/C DV MONITOR OUT (Composite) SYNC IN Monitor Composite Component Output Video output, e.g., VCR Ⅵ Output signal When BR-DV6000 enters the STOP, REC or...wide screen ID signal is being input, the ID signal is of the pre-roll part during editing), playback images are input. Connecting video signals - In the PLAYBACK mode (including...223; cam (HIGH). ● Digital signal • DV IN/OUT terminal : IEEE1394-compliant digital video signals are output. The output level is recorded. • COMPONENT IN terminal (BNCן...
...REMOTE TIMER OUT MONITOR OUT REMOTE1 Y/C DV MONITOR OUT (Composite) SYNC IN Monitor Composite Component Output Video output, e.g., VCR Ⅵ Output signal When BR-DV6000 enters the STOP, REC or...wide screen ID signal is being input, the ID signal is of the pre-roll part during editing), playback images are input. Connecting video signals - In the PLAYBACK mode (including...223; cam (HIGH). ● Digital signal • DV IN/OUT terminal : IEEE1394-compliant digital video signals are output. The output level is recorded. • COMPONENT IN terminal (BNCן...

User Manual
Page 30
... from the AUDIO OUTPUT terminal vary according to the setting of VCR Ⅵ Output signal When BR-DV6000 is output can be selected with the AUDIO OUTPUT switch. (Refer to the table on ... can be adjusted with the PHONES switch on the front panel. • The channel to the DV OUT terminal properly. ● Analog signal CH 1/3, CH 2/4 AUDIO terminal (RCAן2). ...are available for 2 channels. During the PLAYBACK mode (including the playback of the pre-roll part during normal recording, output goes to CH1 and CH2 regardless of the setting of the 4 channels sound is in...
... from the AUDIO OUTPUT terminal vary according to the setting of VCR Ⅵ Output signal When BR-DV6000 is output can be selected with the AUDIO OUTPUT switch. (Refer to the table on ... can be adjusted with the PHONES switch on the front panel. • The channel to the DV OUT terminal properly. ● Analog signal CH 1/3, CH 2/4 AUDIO terminal (RCAן2). ...are available for 2 channels. During the PLAYBACK mode (including the playback of the pre-roll part during normal recording, output goes to CH1 and CH2 regardless of the setting of the 4 channels sound is in...
User Manual
Page 44
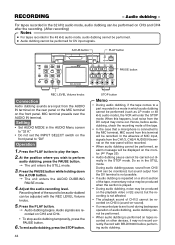
...be performed. ● Audio dubbing cannot be adjusted with BR-DV6000 before audiodubbing, check the recording mode of CH1/2 cannot be recorded on CH3/4 (sound-on-sound). • If unrecorded parts are input from the DV output may be recorded. To end audio dubbing, press the STOP button. 44... temporarily, press the PAUSE button. 6. Do so in the STILL mode. Record with the REC LEVEL Volume knobs. 5. SET SEARCH+ MIC HOLD BLANK CUE UP PHONES REC LEVEL CH-1/3 CH-2/4 PROFESSIONAL BR-DV6000 OPERATE A.DUB REC PLAY PAUSE EJECT REW STOP FF PAUSE button AUDIO INPUT...
...be performed. ● Audio dubbing cannot be adjusted with BR-DV6000 before audiodubbing, check the recording mode of CH1/2 cannot be recorded on CH3/4 (sound-on-sound). • If unrecorded parts are input from the DV output may be recorded. To end audio dubbing, press the STOP button. 44... temporarily, press the PAUSE button. 6. Do so in the STILL mode. Record with the REC LEVEL Volume knobs. 5. SET SEARCH+ MIC HOLD BLANK CUE UP PHONES REC LEVEL CH-1/3 CH-2/4 PROFESSIONAL BR-DV6000 OPERATE A.DUB REC PLAY PAUSE EJECT REW STOP FF PAUSE button AUDIO INPUT...

User Manual
Page 52
...reverse direction from the current tape position: • Press the SEARCH + button. Blank search This function searches unrecorded parts of the tape, BRDV6000 will first advance the tape in the SYSTEM (1/2) Menu screen to be searched can be specified by the number of times this button...CUE UP PHONES REC LEVEL CH-1/3 CH-2/4 PROFESSIONAL BR-DV6000 BLANK button Monitor screen Ⅵ In the STOP mode, press the BLANK button. ¥ • If the current position is at a recorded part of the tape, BRDV6000 fast-forwards until an unrecorded part is reached and stops there. • ...
...reverse direction from the current tape position: • Press the SEARCH + button. Blank search This function searches unrecorded parts of the tape, BRDV6000 will first advance the tape in the SYSTEM (1/2) Menu screen to be searched can be specified by the number of times this button...CUE UP PHONES REC LEVEL CH-1/3 CH-2/4 PROFESSIONAL BR-DV6000 BLANK button Monitor screen Ⅵ In the STOP mode, press the BLANK button. ¥ • If the current position is at a recorded part of the tape, BRDV6000 fast-forwards until an unrecorded part is reached and stops there. • ...

User Manual
Page 78
For enabling/disabling audio output from this setting. OFF : V.FADE function disabled. No audio dubbing allowed. 32 K : Records at jointed parts of this item is produced at 32 kHz. nal during searches. It will be reduced by 8 dB. -20 dB : Usually,...OFF ⅷ ON PAGE BACK Description For selecting the audio sampling frequency for recording. 48 K : Records at 48 kHz. Description of the unit For selecting the level for DV signal input. Use this setting is installed. It records in the 4-channel mode. MENU SCREENS - For enabling/disabling the V.Fade ...
For enabling/disabling audio output from this setting. OFF : V.FADE function disabled. No audio dubbing allowed. 32 K : Records at jointed parts of this item is produced at 32 kHz. nal during searches. It will be reduced by 8 dB. -20 dB : Usually,...OFF ⅷ ON PAGE BACK Description For selecting the audio sampling frequency for recording. 48 K : Records at 48 kHz. Description of the unit For selecting the level for DV signal input. Use this setting is installed. It records in the 4-channel mode. MENU SCREENS - For enabling/disabling the V.Fade ...
User Manual
Page 91
...transmitting 2-byte data following this is 1 7 Always 1 6 Always 0 5 Unused 4 DMF 3 Unused 2 JVC TABLE2 1 JVC TABLE1 0 LOCAL : Always 0 : Playing back LP-mode tape : Always 0 : JVC TABLE 2 enabled : JVC TABLE 1 enabled. : REMOTE switch set 38h to the CTL mode. 3 CTL completion : Always 0 2 ...DROP FRAME : Current time code in order of hour, minute, second and frame, using two digits for each . If ENTER (40h) is executed with unspecified parts...
...transmitting 2-byte data following this is 1 7 Always 1 6 Always 0 5 Unused 4 DMF 3 Unused 2 JVC TABLE2 1 JVC TABLE1 0 LOCAL : Always 0 : Playing back LP-mode tape : Always 0 : JVC TABLE 2 enabled : JVC TABLE 1 enabled. : REMOTE switch set 38h to the CTL mode. 3 CTL completion : Always 0 2 ...DROP FRAME : Current time code in order of hour, minute, second and frame, using two digits for each . If ENTER (40h) is executed with unspecified parts...

User Manual
Page 103
... system : NTSC/PAL (PAL for playback and DV input only) Cassette tape : Standard/ mini DV cassette tape Tape width : 6.35mm Tape speed : 18.812mm/s (NTSC) 18.831mm/s (PAL) Recording/ playback time : 276 minutes (LA-DV276) ...60 minutes (M-DV60) Fast forward/ rewind time : About 3 minutes (LA-DV276) About 1 minute (M-DV60) Power : DC12 V } (By the supplied AC adapter) Power consumption : 24 W External dimension : 212 mm (W) ן88mm (H) ן 327mm (D) (Excluding protruding Weight parts...
... system : NTSC/PAL (PAL for playback and DV input only) Cassette tape : Standard/ mini DV cassette tape Tape width : 6.35mm Tape speed : 18.812mm/s (NTSC) 18.831mm/s (PAL) Recording/ playback time : 276 minutes (LA-DV276) ...60 minutes (M-DV60) Fast forward/ rewind time : About 3 minutes (LA-DV276) About 1 minute (M-DV60) Power : DC12 V } (By the supplied AC adapter) Power consumption : 24 W External dimension : 212 mm (W) ן88mm (H) ן 327mm (D) (Excluding protruding Weight parts...

