PX4i User Guide - Intermec
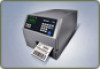
PX4i User Guide
Related Manual Pages
Similar Questions

Printer Not Working
I have a printer for work and tried to print a bill for a customer. The printer keeps flashin blue a...
I have a printer for work and tried to print a bill for a customer. The printer keeps flashin blue a...
(Posted by shawnkolker 8 years ago)