PX4i and PX6i High Performance Printer User's Manual
Page 19
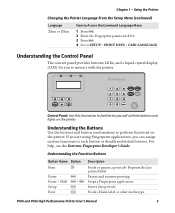
Enters Setup mode. If you are using Fingerprint applications, you to interact with the buttons and lights on the printer. For help, see the Intermec Fingerprint Developer's Guide. Chapter 1 - Understanding the Control Panel The control panel provides buttons, LEDs, and a liquid crystal display (LCD) for ... From the Setup Menu (continued) Language ZSim or DSim How to Access the Command Language Menu 1 Press T. 2 Enter the Fingerprint password: 8311. 3 Press E. 4 Go to familiarize yourself with the printer. PX4i and PX6i High Performance Printer User's Manual 5
Enters Setup mode. If you are using Fingerprint applications, you to interact with the buttons and lights on the printer. For help, see the Intermec Fingerprint Developer's Guide. Chapter 1 - Understanding the Control Panel The control panel provides buttons, LEDs, and a liquid crystal display (LCD) for ... From the Setup Menu (continued) Language ZSim or DSim How to Access the Command Language Menu 1 Press T. 2 Enter the Fingerprint password: 8311. 3 Press E. 4 Go to familiarize yourself with the printer. PX4i and PX6i High Performance Printer User's Manual 5
PX4i and PX6i High Performance Printer User's Manual
Page 73
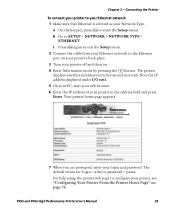
... to your Ethernet network 1 Make sure that Ethernet is selected as your login and password. Your printer home page appears. 7 When you are : login = admin, password = pass. The printer displays interface information in the address field and press Enter. PX4i and PX6i High Performance Printer User's Manual 59 Chapter 2 - a On the keypad, press...
... to your Ethernet network 1 Make sure that Ethernet is selected as your login and password. Your printer home page appears. 7 When you are : login = admin, password = pass. The printer displays interface information in the address field and press Enter. PX4i and PX6i High Performance Printer User's Manual 59 Chapter 2 - a On the keypad, press...
PX4i and PX6i High Performance Printer User's Manual
Page 78
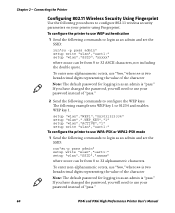
..."wlan","ACTIVE","1" setup write "wlan","uart1:" To configure the printer to use your password instead of "pass." 64 PX4i and PX6i High Performance Printer User's Manual If you have changed the password, you will need to 32 alphanumeric characters. The following commands to login as an ...0 to use WEP authentication 1 Send the following procedures to 01234 and enables WEP key 1. To configure the printer to use your password instead of "pass." 2 Send the following commands to 32 ASCII characters, not including the double quote. Connecting the Printer Configuring 802...
..."wlan","ACTIVE","1" setup write "wlan","uart1:" To configure the printer to use your password instead of "pass." 64 PX4i and PX6i High Performance Printer User's Manual If you have changed the password, you will need to 32 alphanumeric characters. The following commands to login as an ...0 to use WEP authentication 1 Send the following procedures to 01234 and enables WEP key 1. To configure the printer to use your password instead of "pass." 2 Send the following commands to 32 ASCII characters, not including the double quote. Connecting the Printer Configuring 802...
PX4i and PX6i High Performance Printer User's Manual
Page 79
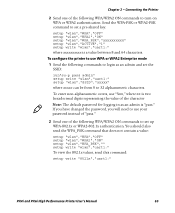
...an admin is "pass." Chapter 2 - Connecting the Printer 2 Send one of the character Note: The default password for logging in as an admin and set up WPA-802.1x or WPA2-802.1x authentication. To enter non-alphanumeric ... digits representing the value of the following WPA/WPA2 ON commands to 32 alphanumeric characters. If you have changed the password, you will need to use "%nn," where nn is a value between 8 and 64 characters. Send the WPA...wlan","uart1:" To view the 802.1x values, send this command: setup write "8021x","uart1:" PX4i and PX6i High Performance Printer User's Manual 65
...an admin is "pass." Chapter 2 - Connecting the Printer 2 Send one of the character Note: The default password for logging in as an admin and set up WPA-802.1x or WPA2-802.1x authentication. To enter non-alphanumeric ... digits representing the value of the following WPA/WPA2 ON commands to 32 alphanumeric characters. If you have changed the password, you will need to use "%nn," where nn is a value between 8 and 64 characters. Send the WPA...wlan","uart1:" To view the 802.1x values, send this command: setup write "8021x","uart1:" PX4i and PX6i High Performance Printer User's Manual 65

PX4i and PX6i High Performance Printer User's Manual
Page 80
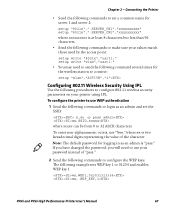
... set the TTLS outer name: setup "8021x","TTLS_USER","xxxx" where xxxx is the unique username and the unique password for this command to see if automatic PAC file provisioning is the passphrase. 66 PX4i and PX6i High Performance Printer User's Manual Connecting the Printer 3 Send these commands to use for validation, here...
... set the TTLS outer name: setup "8021x","TTLS_USER","xxxx" where xxxx is the unique username and the unique password for this command to see if automatic PAC file provisioning is the passphrase. 66 PX4i and PX6i High Performance Printer User's Manual Connecting the Printer 3 Send these commands to use for validation, here...
PX4i and PX6i High Performance Printer User's Manual
Page 81
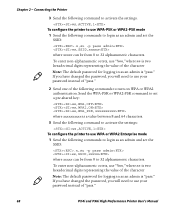
... -p pass admin ws,SSID,xxxxx where xxxxx can be from 0 to 01234 and enables WEP key 1. If you have changed the password, you will need to send the following command several times for server 1 and server 2: setup "8021x",".SERVER_CN1","xxxxxxxxxx" setup "8021x",".SERVER_CN2...","xxxxxxxxxx" where xxxxxxxxxx is "pass." The following procedures to configure the WEP keys. ws,WEP1,0x3031323334 ws,.WEP_KEY,1 PX4i and PX6i High Performance Printer User's Manual 67 To enter non-alphanumeric octets, use WEP authentication 1 Send the following commands to ...
... -p pass admin ws,SSID,xxxxx where xxxxx can be from 0 to 01234 and enables WEP key 1. If you have changed the password, you will need to send the following command several times for server 1 and server 2: setup "8021x",".SERVER_CN1","xxxxxxxxxx" setup "8021x",".SERVER_CN2...","xxxxxxxxxx" where xxxxxxxxxx is "pass." The following procedures to configure the WEP keys. ws,WEP1,0x3031323334 ws,.WEP_KEY,1 PX4i and PX6i High Performance Printer User's Manual 67 To enter non-alphanumeric octets, use WEP authentication 1 Send the following commands to ...
PX4i and PX6i High Performance Printer User's Manual
Page 82
... will need to use your password instead of the character Note: The default password for logging in as an admin is "pass." Chapter 2 - To enter non-alphanumeric octets, use "%nn," where nn is two hexadecimal digits representing the value of "pass." 68 PX4i and PX6i High Performance Printer User's Manual ...and set the SSID: .x,su -p pass admin ws,SSID,xxxxx where xxxxx can be from 0 to use your password instead of "pass." 2 Send one of the character Note: The default password for logging in as an admin and set the SSID: .x,su -p pass admin ws,SSID,xxxxx where xxxxx ...
... will need to use your password instead of the character Note: The default password for logging in as an admin is "pass." Chapter 2 - To enter non-alphanumeric octets, use "%nn," where nn is two hexadecimal digits representing the value of "pass." 68 PX4i and PX6i High Performance Printer User's Manual ...and set the SSID: .x,su -p pass admin ws,SSID,xxxxx where xxxxx can be from 0 to use your password instead of "pass." 2 Send one of the character Note: The default password for logging in as an admin and set the SSID: .x,su -p pass admin ws,SSID,xxxxx where xxxxx ...
PX4i and PX6i High Performance Printer User's Manual
Page 83
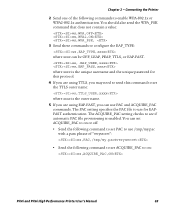
... • Send the following commands to set ACQUIRE_PAC to on : ws,ACQUIRE_PAC,ON PX4i and PX6i High Performance Printer User's Manual 69 ws,.EAP_USER,xxxx ws,EAP_PASS,xxxx where xxxx is the unique username and the unique password for EAPFAST authentication. The PAC setting specifies the PAC file to use /tmp/my...
... • Send the following commands to set ACQUIRE_PAC to on : ws,ACQUIRE_PAC,ON PX4i and PX6i High Performance Printer User's Manual 69 ws,.EAP_USER,xxxx ws,EAP_PASS,xxxx where xxxx is the unique username and the unique password for EAPFAST authentication. The PAC setting specifies the PAC file to use /tmp/my...
PX4i and PX6i High Performance Printer User's Manual
Page 90
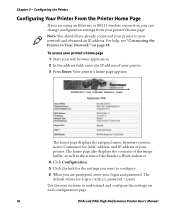
...Network" on each configuration page. 76 PX4i and PX6i High Performance Printer User's Manual Configuring the Printer Configuring Your Printer From the Printer Home Page If you are using an Ethernet or 802.11 wireless connection, you are : login = admin, password = pass. For help, see "Connecting... the Printer to understand and configure the settings on page 58. The default values are prompted, enter your login and password. To access your printer's home page 1 Start your web browser application. 2 In the address field, enter the IP address of your printer...
...Network" on each configuration page. 76 PX4i and PX6i High Performance Printer User's Manual Configuring the Printer Configuring Your Printer From the Printer Home Page If you are using an Ethernet or 802.11 wireless connection, you are : login = admin, password = pass. For help, see "Connecting... the Printer to understand and configure the settings on page 58. The default values are prompted, enter your login and password. To access your printer's home page 1 Start your web browser application. 2 In the address field, enter the IP address of your printer...
PX4i and PX6i High Performance Printer User's Manual
Page 95
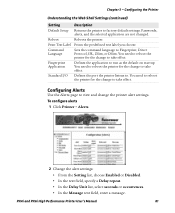
You need to reboot the printer for the change to take effect. Passwords, alerts, and the selected application are not changed. Reboot Reboots the printer. Fingerprint Application Defines the application to Fingerprint, Direct Protocol, IPL, ZSim,.... • In the Message text field, enter a message. Chapter 3 - Command Language Sets the command language to run as the default on startup. PX4i and PX6i High Performance Printer User's Manual 81 Standard I/O Defines the port the printer listens to factory default settings. Configuring the Printer Understanding the Web...
You need to reboot the printer for the change to take effect. Passwords, alerts, and the selected application are not changed. Reboot Reboots the printer. Fingerprint Application Defines the application to Fingerprint, Direct Protocol, IPL, ZSim,.... • In the Message text field, enter a message. Chapter 3 - Command Language Sets the command language to run as the default on startup. PX4i and PX6i High Performance Printer User's Manual 81 Standard I/O Defines the port the printer listens to factory default settings. Configuring the Printer Understanding the Web...
PX4i and PX6i High Performance Printer User's Manual
Page 97
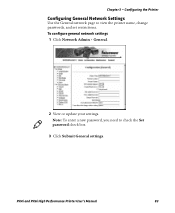
Note: To enter a new password, you need to view the printer name, change passwords, and set restrictions. PX4i and PX6i High Performance Printer User's Manual 83 To configure general network settings 1 Click Network Admin > General. 2 View or update your settings. Chapter 3 - Configuring the Printer Configuring General Network Settings Use the General network page to check the Set password check box. 3 Click Submit General settings.
Note: To enter a new password, you need to view the printer name, change passwords, and set restrictions. PX4i and PX6i High Performance Printer User's Manual 83 To configure general network settings 1 Click Network Admin > General. 2 View or update your settings. Chapter 3 - Configuring the Printer Configuring General Network Settings Use the General network page to check the Set password check box. 3 Click Submit General settings.
PX4i and PX6i High Performance Printer User's Manual
Page 98
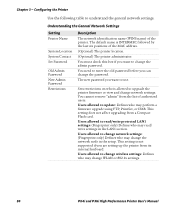
...INTERMEC followed by the last six positions of the printer. Sets restrictions on who is not supported if you want to change network settings: (Fingerprint only) Defines who may change the network node in the LAN1 section. Users allowed to upgrade the printer firmware or view and change the admin password... is allowed to change wireless settings: Defines who may change the password. Chapter 3 - Users allowed to use. You must check this box if you can change WLAN or 802.1x settings. 84 PX4i and PX6i High Performance Printer User's Manual This setting does not affect...
...INTERMEC followed by the last six positions of the printer. Sets restrictions on who is not supported if you want to change network settings: (Fingerprint only) Defines who may change the network node in the LAN1 section. Users allowed to upgrade the printer firmware or view and change the admin password... is allowed to change wireless settings: Defines who may change the password. Chapter 3 - Users allowed to use. You must check this box if you can change WLAN or 802.1x settings. 84 PX4i and PX6i High Performance Printer User's Manual This setting does not affect...
PX4i and PX6i High Performance Printer User's Manual
Page 106
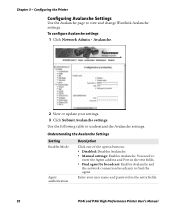
To configure Avalanche settings 1 Click Network Admin > Avalanche. 2 View or update your user name and password in the text fields. • Find agent by broadcast: Enables Avalanche and the network connection broadcasts to find the agent. Enter your settings. 3 Click Submit ... Avalanche Settings Use the Avalanche page to understand the Avalanche settings. You need to enter the Agent address and Port in the entry fields. 92 PX4i and PX6i High Performance Printer User's Manual
To configure Avalanche settings 1 Click Network Admin > Avalanche. 2 View or update your user name and password in the text fields. • Find agent by broadcast: Enables Avalanche and the network connection broadcasts to find the agent. Enter your settings. 3 Click Submit ... Avalanche Settings Use the Avalanche page to understand the Avalanche settings. You need to enter the Agent address and Port in the entry fields. 92 PX4i and PX6i High Performance Printer User's Manual
PX4i and PX6i High Performance Printer User's Manual
Page 189
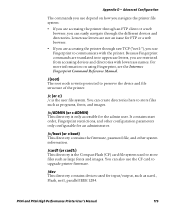
... images. /c/ADMIN (or c:ADMIN) This directory is the user file system. PX4i and PX6i High Performance Printer User's Manual 175 You can also use depend on using Fingerprint, see the Intermec Fingerprint Command Reference Manual. /(root) The root node is write protected to upgrade... printer firmware. /dev This directory contains devices used for an administrator. /c/boot (or c:boot) This directory contains the firmware, password file, and other configuration...
... images. /c/ADMIN (or c:ADMIN) This directory is the user file system. PX4i and PX6i High Performance Printer User's Manual 175 You can also use depend on using Fingerprint, see the Intermec Fingerprint Command Reference Manual. /(root) The root node is write protected to upgrade... printer firmware. /dev This directory contains devices used for an administrator. /c/boot (or c:boot) This directory contains the firmware, password file, and other configuration...
PX4i and PX6i High Performance Printer User's Manual
Page 190
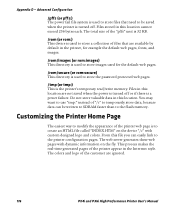
Files stored in this location. The colors and logo of files that need to store the password protected web pages. /tmp (or tmp:) This is a power failure. Files in the ...if there is the printer's temporary read/write memory. Do not store valuable data in the Intermec style. You may want to use "tmp:" instead of the printer web page is turned off . From ...this location are ignored. 176 PX4i and PX6i High Performance Printer User's Manual This process makes the real-time generated pages of the "pffs"...
Files stored in this location. The colors and logo of files that need to store the password protected web pages. /tmp (or tmp:) This is a power failure. Files in the ...if there is the printer's temporary read/write memory. Do not store valuable data in the Intermec style. You may want to use "tmp:" instead of the printer web page is turned off . From ...this location are ignored. 176 PX4i and PX6i High Performance Printer User's Manual This process makes the real-time generated pages of the "pffs"...

PX4i and PX6i High Performance Printer User's Manual
Page 197
See LEDs. H head lifted, error message 107 home page customizing printer 176 illustration 59 printer login and password 59 humidity specifications 138 HyperTerminal sending configuration commands 98 setting up communications 58, 59 exterior, cleaning 126 external ... 60 firmware upgrading using PrintSet 102 with CF card or USB mass storage device 102 with printer commands 103 with IPL 99 PX4i and PX6i High Performance Printer User's Manual 183 defsaeutlttincgosnf1i5g8u-ra1t6io3n (continued) viewing and changing with web page 80 DdeHviCcePt, rdeeefasturlutcsteuttrien1g7548,...
See LEDs. H head lifted, error message 107 home page customizing printer 176 illustration 59 printer login and password 59 humidity specifications 138 HyperTerminal sending configuration commands 98 setting up communications 58, 59 exterior, cleaning 126 external ... 60 firmware upgrading using PrintSet 102 with CF card or USB mass storage device 102 with printer commands 103 with IPL 99 PX4i and PX6i High Performance Printer User's Manual 183 defsaeutlttincgosnf1i5g8u-ra1t6io3n (continued) viewing and changing with web page 80 DdeHviCcePt, rdeeefasturlutcsteuttrien1g7548,...
PX4i and PX6i High Performance Printer User's Manual
Page 199
...in Setup mode 74 Net-Com, NET1 menu, Fingerprint 166 NeFtwinogrekrpmreinntu167, 168 IPL 171 network type choosing Ethernet or wireless 802.11 100 PX4i and PX6i High Performance Printer User's Manual Index choosing from the screen 101 choosing with printer commands 101 configuring from web page 91 network...25 paper fault, error message 110 paper out, error message 110 parallel port pins and descriptions 143 using to connect printer to PC 57 password changing with web page 83 home page 59 pause button, described 5 peel-off printing, loading media 15 performing a testprint 51 physical ...
...in Setup mode 74 Net-Com, NET1 menu, Fingerprint 166 NeFtwinogrekrpmreinntu167, 168 IPL 171 network type choosing Ethernet or wireless 802.11 100 PX4i and PX6i High Performance Printer User's Manual Index choosing from the screen 101 choosing with printer commands 101 configuring from web page 91 network...25 paper fault, error message 110 paper out, error message 110 parallel port pins and descriptions 143 using to connect printer to PC 57 password changing with web page 83 home page 59 pause button, described 5 peel-off printing, loading media 15 performing a testprint 51 physical ...
PX4i and PX6i High Performance Printer User's Manual
Page 200
...port 57 connecting to your network 58 directories, Fingerprint file system 174 file system, Fingerprint 174 front view 2 home page illustration 59 login name and password 59 problems connecting to, troubleshooting 114 using to configure printer 76 identifying parts 2 initial startup screen 4 learning about 2 maintaining 125 memory 138 modifying web... 106 printer crash, error message 109 printhead cleaning 128 pressure, adjusting 123 replacing 130 up wireless communications 62 using to 53 on 54 PX4i and PX6i High Performance Printer User's Manual See LEDs.
...port 57 connecting to your network 58 directories, Fingerprint file system 174 file system, Fingerprint 174 front view 2 home page illustration 59 login name and password 59 problems connecting to, troubleshooting 114 using to configure printer 76 identifying parts 2 initial startup screen 4 learning about 2 maintaining 125 memory 138 modifying web... 106 printer crash, error message 109 printhead cleaning 128 pressure, adjusting 123 replacing 130 up wireless communications 62 using to 53 on 54 PX4i and PX6i High Performance Printer User's Manual See LEDs.
Fingerprint Developer's Guide (old)
Page 44
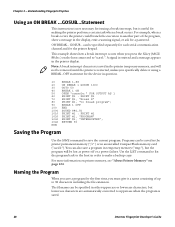
...A break interrupt character is saved in temporary memory ("tmp:"), but the program will not be removed until the printer is saved. 28 Intermec Fingerprint Developer's Guide You can be lost at power off or a power failure. The filename can be specified in either uppercase or..." on the host connected to uppercase when the program is restarted, unless you must give it using a BREAK...OFF statement for a password. Understanding Fingerprint Syntax Using an ON BREAK ...GOSUB...Statement This instruction is not necessary for issuing a break interrupt, but lowercase characters are...
...A break interrupt character is saved in temporary memory ("tmp:"), but the program will not be removed until the printer is saved. 28 Intermec Fingerprint Developer's Guide You can be lost at power off or a power failure. The filename can be specified in either uppercase or..." on the host connected to uppercase when the program is restarted, unless you must give it using a BREAK...OFF statement for a password. Understanding Fingerprint Syntax Using an ON BREAK ...GOSUB...Statement This instruction is not necessary for issuing a break interrupt, but lowercase characters are...
