Fingerprint Developer's Guide (old)
Page 91
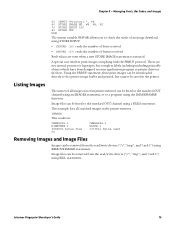
... buffer and printed, but complete labels including including printable objects which have been designed in some application program or printer driver in printer memory can be listed to the standard OUT channel using KILL statements. Chapter 5 - Using the PRBUF statement, these print...These are reset when a new STORE IMAGE statement is executed. This example lists all images stored in the host. IMAGES This results in the printer memory. Intermec Fingerprint Developer's Guide 75 Managing Fonts, Bar Codes, and Images 50 INPUT "Protocol:", P$ 60 STORE IMAGE N$, W%, H%, P$ 70 STORE...
... buffer and printed, but complete labels including including printable objects which have been designed in some application program or printer driver in printer memory can be listed to the standard OUT channel using KILL statements. Chapter 5 - Using the PRBUF statement, these print...These are reset when a new STORE IMAGE statement is executed. This example lists all images stored in the host. IMAGES This results in the printer memory. Intermec Fingerprint Developer's Guide 75 Managing Fonts, Bar Codes, and Images 50 INPUT "Protocol:", P$ 60 STORE IMAGE N$, W%, H%, P$ 70 STORE...
PB22 and PB32 Mobile Label and Receipt Printer User Guide
Page 42
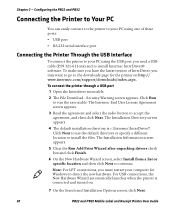
Security Warning screen appears. Click Run to continue. The Installation Information screen appears. 5 Clear the Run Add Print Wizard after unpacking drivers check box and click Finish. 6 On the New Hardware Wizard screen, select Install from a list or specific location and then click ..., you may want to go to detect the new hardware. Configuring the PB22 and PB32 Connecting the Printer to Your PC You can easily connect to the printer to your PC using one of InterDriver, you need a USB cable (P/N 321-611-xxx) and to install Intermec InterDriver® software. Chapter 2 -
Security Warning screen appears. Click Run to continue. The Installation Information screen appears. 5 Clear the Run Add Print Wizard after unpacking drivers check box and click Finish. 6 On the New Hardware Wizard screen, select Install from a list or specific location and then click ..., you may want to go to detect the new hardware. Configuring the PB22 and PB32 Connecting the Printer to Your PC You can easily connect to the printer to your PC using one of InterDriver, you need a USB cable (P/N 321-611-xxx) and to install Intermec InterDriver® software. Chapter 2 -
PB22 and PB32 Mobile Label and Receipt Printer User Guide
Page 85
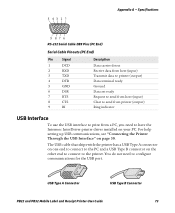
... USB port. The USB cable that ships with the printer has a USB Type A connector on one end to connect to the PC and a USB Type B connector on the other end to connect to have the Intermec InterDriver printer driver installed on page 30. For help setting up USB ...communications, see "Connecting the Printer Through the USB Interface" on your PC. 5 43 2 1 Appendix A - You do not need to the printer. USB Type A Connector USB Type B Connector PB22 and PB32 Mobile Label and Receipt Printer User Guide...
... USB port. The USB cable that ships with the printer has a USB Type A connector on one end to connect to the PC and a USB Type B connector on the other end to connect to have the Intermec InterDriver printer driver installed on page 30. For help setting up USB ...communications, see "Connecting the Printer Through the USB Interface" on your PC. 5 43 2 1 Appendix A - You do not need to the printer. USB Type A Connector USB Type B Connector PB22 and PB32 Mobile Label and Receipt Printer User Guide...
Media Core Installation Instructions
Page 1
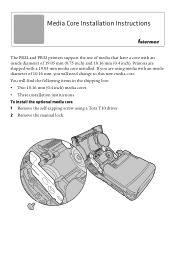
Media Core Installation Instructions The PB22 and PB32 printers support the use of media that have a core with an inside diameter of 19.05 mm (0.75 inch) and 10.16 mm (0.4 inch). If you ... media core 1 Remove the self-tapping screw using media with a 19.05 mm media core installed. You will need change to this new media core. Printers are using a Torx T10 driver. 2 Remove the manual lock.
Media Core Installation Instructions The PB22 and PB32 printers support the use of media that have a core with an inside diameter of 19.05 mm (0.75 inch) and 10.16 mm (0.4 inch). If you ... media core 1 Remove the self-tapping screw using media with a 19.05 mm media core installed. You will need change to this new media core. Printers are using a Torx T10 driver. 2 Remove the manual lock.


