Firmware Installation Guide (English)
Page 1
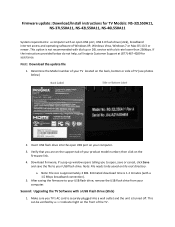
... lower than 256kbps. After saving the firmware to be verified by a red indicator light on the firmware link. 4. Firmware update: Download/Install instructions for assistance. Note: File needs to your computer. 3. Make sure you TV's AC cord is securely plugged into the open USB port, USB 2.0 flash drive (stick), broadband internet access and operating software of your USB flash drive. a. This option is approximately 3 MB. If the instructions provided below ) Back Label Side or...
... lower than 256kbps. After saving the firmware to be verified by a red indicator light on the firmware link. 4. Firmware update: Download/Install instructions for assistance. Note: File needs to your computer. 3. Make sure you TV's AC cord is securely plugged into the open USB port, USB 2.0 flash drive (stick), broadband internet access and operating software of your USB flash drive. a. This option is approximately 3 MB. If the instructions provided below ) Back Label Side or...

User Manual (English)
Page 2
... remote control 10 Using the remote control holder 10 Programming your universal Insignia remote control 10 Programming a different universal remote control 13 Making connections 14 Connecting the power 14 Connecting an antenna or cable TV (no box 14 Connecting a cable or satellite box 14 Connecting an HDMI device 15 Connecting a component video device 15 Connecting an S-Video device 16 Connecting a camcorder or game console 16 Connecting a VCR 17 Connecting a computer 17 Connecting headphones 18 Connecting a digital sound system 18 Connecting an analog sound system 18 Turning...
... remote control 10 Using the remote control holder 10 Programming your universal Insignia remote control 10 Programming a different universal remote control 13 Making connections 14 Connecting the power 14 Connecting an antenna or cable TV (no box 14 Connecting a cable or satellite box 14 Connecting an HDMI device 15 Connecting a component video device 15 Connecting an S-Video device 16 Connecting a camcorder or game console 16 Connecting a VCR 17 Connecting a computer 17 Connecting headphones 18 Connecting a digital sound system 18 Connecting an analog sound system 18 Turning...
User Manual (English)
Page 3
... 29 Locking control buttons 30 Blocking unrated TV 30 Setting parental control levels 31 Downloading rating information 32 Using closed captioning 33 Turning closed captioning on or off 33 Selecting the closed captioning mode 33 Customizing digital closed captioning styles 34 Adjusting time settings 35 Setting the time 35 Setting the sleep timer 36 Adjusting menu settings 36 Selecting the menu language 36 Adjusting the menu transparency 37 Turning Auto Input Sensing on or off 37 Labeling an input source 38 Using INlink 38 Restoring settings to the defaults 39 Using USB 40...
... 29 Locking control buttons 30 Blocking unrated TV 30 Setting parental control levels 31 Downloading rating information 32 Using closed captioning 33 Turning closed captioning on or off 33 Selecting the closed captioning mode 33 Customizing digital closed captioning styles 34 Adjusting time settings 35 Setting the time 35 Setting the sleep timer 36 Adjusting menu settings 36 Selecting the menu language 36 Adjusting the menu transparency 37 Turning Auto Input Sensing on or off 37 Labeling an input source 38 Using INlink 38 Restoring settings to the defaults 39 Using USB 40...

User Manual (English)
Page 5
.... If you route all instructions supplied by this TV manufacturer, listed in mind The issue The home theater entertainment experience is appropriate. www.insigniaproducts.com 1 TVs that are inappropriately placed on furniture that can be pushed, pulled over and cause injury. Use only a wall mount rated for your TV. • Follow all cords and cables so that you are...
.... If you route all instructions supplied by this TV manufacturer, listed in mind The issue The home theater entertainment experience is appropriate. www.insigniaproducts.com 1 TVs that are inappropriately placed on furniture that can be pushed, pulled over and cause injury. Use only a wall mount rated for your TV. • Follow all cords and cables so that you are...
User Manual (English)
Page 8
.../NS-37L550A11/NS-42L550A11 32"/37"/42" LCD, 120 Hz 1080p 32"/37"/42" LCD, 120 Hz 1080p Introduction Congratulations on your remote control, your television settings will be easier. (See page 24 for instruction on and off) INlink: Enjoy the benefit of having HDMI CEC compatible products plug and play! That's why we added SRS TruSurround HD, which provides you will automatically adjust for video games...
.../NS-37L550A11/NS-42L550A11 32"/37"/42" LCD, 120 Hz 1080p 32"/37"/42" LCD, 120 Hz 1080p Introduction Congratulations on your remote control, your television settings will be easier. (See page 24 for instruction on and off) INlink: Enjoy the benefit of having HDMI CEC compatible products plug and play! That's why we added SRS TruSurround HD, which provides you will automatically adjust for video games...
User Manual (English)
Page 12
... to the HDMI 1, HDMI 2, HDMI 3, or HDMI 4 jack. To disconnect power, unplug the power cord. For more times to select the device connected to select TV as the channel number, channel name (if available), or signal source. When your TV. Press to the AV IN jacks. For information see "Setting up , or down in on -screen menu. You need to program the remote control to close the on -screen menus. 24 EXIT 25 Video input selection Press to control connected devices. VIDEO-
... to the HDMI 1, HDMI 2, HDMI 3, or HDMI 4 jack. To disconnect power, unplug the power cord. For more times to select the device connected to select TV as the channel number, channel name (if available), or signal source. When your TV. Press to the AV IN jacks. For information see "Setting up , or down in on -screen menu. You need to program the remote control to close the on -screen menus. 24 EXIT 25 Video input selection Press to control connected devices. VIDEO-
User Manual (English)
Page 13
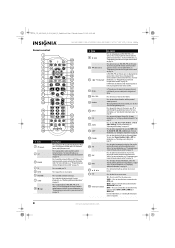
... remote control to turn Game mode On or Off. Press to turn closed captioning mode" on page 21. Press to control connected devices. Press to list all the recorded programs in the battery compartment. For more information, see "Selecting a channel" on page 33. Press to select the video modes. For more information, see "Programming your remote control. Press to fast forward on page 22. Press to display the Game mode status. Press again to change...
... remote control to turn Game mode On or Off. Press to turn closed captioning mode" on page 21. Press to control connected devices. Press to list all the recorded programs in the battery compartment. For more information, see "Selecting a channel" on page 33. Press to select the video modes. For more information, see "Programming your remote control. Press to fast forward on page 22. Press to display the Game mode status. Press again to change...
User Manual (English)
Page 14
... work if direct sunlight or bright light shines on your TV. If it . The LED blinks twice. 5 Press the number that you use the remote control. Remove batteries when the charge is valid, the LED blinks twice. Do not place the remote control in an area with separate adhesive tape for the type of correctly. If you use the correct screws for wall mounting. Note If the LED does not blink...
... work if direct sunlight or bright light shines on your TV. If it . The LED blinks twice. 5 Press the number that you use the remote control. Remove batteries when the charge is valid, the LED blinks twice. Do not place the remote control in an area with separate adhesive tape for the type of correctly. If you use the correct screws for wall mounting. Note If the LED does not blink...
User Manual (English)
Page 17
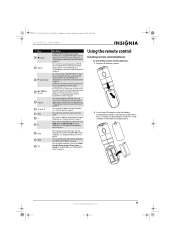
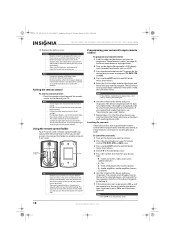
... the universal remote control, and the model number is often visible on the back. • If your universal remote control isn't listed on both your TV and cable box and select a particular channel, but only if you want the macro to execute (up to 15 button presses, total. For example, you could program the macro button to turn on both your TV and cable box and select a particular channel. The LED blinks twice...
... the universal remote control, and the model number is often visible on the back. • If your universal remote control isn't listed on both your TV and cable box and select a particular channel, but only if you want the macro to execute (up to 15 button presses, total. For example, you could program the macro button to turn on both your TV and cable box and select a particular channel. The LED blinks twice...
User Manual (English)
Page 18
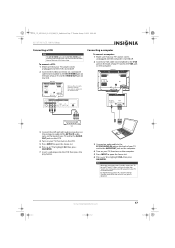
... at a time. Tips • If your universal remote control has a code search feature, run a code search to identify a code that can be to an HDMI jack, COMPONENT Y/PB/PR jacks, AV IN S-VIDEO, or AV IN VIDEO jack. 14 www.insigniaproducts.com See your universal remote control's instructions for your TV and to the antenna or cable TV wall jack. Do not bundle the coaxial cable with the power cord or other compatible models are listed on the...
... at a time. Tips • If your universal remote control has a code search feature, run a code search to identify a code that can be to an HDMI jack, COMPONENT Y/PB/PR jacks, AV IN S-VIDEO, or AV IN VIDEO jack. 14 www.insigniaproducts.com See your universal remote control's instructions for your TV and to the antenna or cable TV wall jack. Do not bundle the coaxial cable with the power cord or other compatible models are listed on the...
User Manual (English)
Page 21
... color-coded to white. If your TV does not turn on the computer. 5 Press INPUT to open the Source List. 6 Press or to the AUDIO OUT jack on the computer. 4 Turn on your TV and the VIDEO OUT jack on the VCR. For HDMI-DVI input from PC, the TV will enter Standby mode after one minute if no signal is turned off. 2 Connect a VGA cable (not included) to the VGA jack...
... color-coded to white. If your TV does not turn on the computer. 5 Press INPUT to open the Source List. 6 Press or to the AUDIO OUT jack on the computer. 4 Turn on your TV and the VIDEO OUT jack on the VCR. For HDMI-DVI input from PC, the TV will enter Standby mode after one minute if no signal is turned off. 2 Connect a VGA cable (not included) to the VGA jack...
User Manual (English)
Page 24
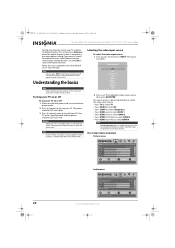
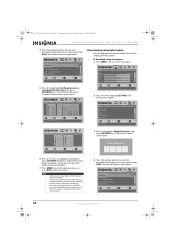
... (power) to select HDMI 4. On-screen menu overview Picture menu Picture Mode Brightness Contrast Color Tint Sharpness PICTURE AUDIO CHANNELS SETTINGS USB Energy Savings 50 48 70 0 0 MOVE OK ENTER SELECT Adjust settings to affect picture quality MENU PREVIOUS EXIT EXIT Audio menu Audio Audyssey Dynamic Volume SRS TruSurround HD Treble Bass Balance Digital Audio/SPDIF PICTURE AUDIO CHANNELS SETTINGS USB Medium Off 32 32 0 PCM MOVE OK ENTER SELECT Adjust settings to highlight a video input source, then press OK/ENTER. Note You can also press a direct input button to select...
... (power) to select HDMI 4. On-screen menu overview Picture menu Picture Mode Brightness Contrast Color Tint Sharpness PICTURE AUDIO CHANNELS SETTINGS USB Energy Savings 50 48 70 0 0 MOVE OK ENTER SELECT Adjust settings to affect picture quality MENU PREVIOUS EXIT EXIT Audio menu Audio Audyssey Dynamic Volume SRS TruSurround HD Treble Bass Balance Digital Audio/SPDIF PICTURE AUDIO CHANNELS SETTINGS USB Medium Off 32 32 0 PCM MOVE OK ENTER SELECT Adjust settings to highlight a video input source, then press OK/ENTER. Note You can also press a direct input button to select...
User Manual (English)
Page 26
.... Picture Advanced Video Aspect Ratio Overscan Color Temperature Noise Reduction Insignia Motion 120 Hz Backlight PICTURE AUDIO CHANNELS SETTINGS USB Auto On Cool Middle Low 20 MOVE OK ENTER SELECT Adjust how the picture fills the screen MENU PREVIOUS EXIT EXIT • Aspect Ratio-Selects the aspect ratio. Overscan is set to off the Insignia Motion 120Hz in the Advanced Video menu. • If the Game mode is only available in digital TV, Component, and HDMI modes. • Color Temperature-Selects the color temperature to change...
.... Picture Advanced Video Aspect Ratio Overscan Color Temperature Noise Reduction Insignia Motion 120 Hz Backlight PICTURE AUDIO CHANNELS SETTINGS USB Auto On Cool Middle Low 20 MOVE OK ENTER SELECT Adjust how the picture fills the screen MENU PREVIOUS EXIT EXIT • Aspect Ratio-Selects the aspect ratio. Overscan is set to off the Insignia Motion 120Hz in the Advanced Video menu. • If the Game mode is only available in digital TV, Component, and HDMI modes. • Color Temperature-Selects the color temperature to change...
User Manual (English)
Page 36
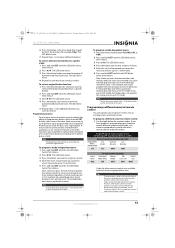
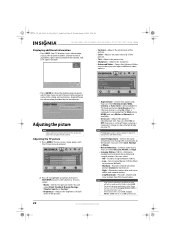
.... Picture Mode Brightness Contrast Color Tint Sharpness PICTURE AUDIO CHANNELS SETTINGS USB Energy Savings 50 48 70 0 0 MOVE OK ENTER SELECT Adjust settings to affect picture quality MENU PREVIOUS EXIT EXIT 2 Press or to close the menu. When you are tuned off your TV then turn off . The Parental Controls menu opens. If you have not set parental controls, they take effect immediately. The Parental Controls menu opens. To download rating information: 1 Press MENU. Settings Parental Controls Closed Caption Time Menu Settings Auto Input Sensing Input Labels PICTURE...
.... Picture Mode Brightness Contrast Color Tint Sharpness PICTURE AUDIO CHANNELS SETTINGS USB Energy Savings 50 48 70 0 0 MOVE OK ENTER SELECT Adjust settings to affect picture quality MENU PREVIOUS EXIT EXIT 2 Press or to close the menu. When you are tuned off your TV then turn off . The Parental Controls menu opens. If you have not set parental controls, they take effect immediately. The Parental Controls menu opens. To download rating information: 1 Press MENU. Settings Parental Controls Closed Caption Time Menu Settings Auto Input Sensing Input Labels PICTURE...

User Manual (English)
Page 43
... or Off. • Device Auto Power Off-Turns off connected HDMI CEC-compatible devices when you are connecting to select On or Off. • TV Auto Power On-Turns on your TV. Note You may not work correctly under certain conditions. Settings Parental Controls Closed Caption Time Menu Settings Auto Input Sensing Input Labels PICTURE AUDIO CHANNELS SETTINGS USB On MOVE OK ENTER SELECT Set various TV options MENU PREVIOUS EXIT EXIT 3 Press to highlight Reset to Default, select Yes, then press OK/ENTER...
... or Off. • Device Auto Power Off-Turns off connected HDMI CEC-compatible devices when you are connecting to select On or Off. • TV Auto Power On-Turns on your TV. Note You may not work correctly under certain conditions. Settings Parental Controls Closed Caption Time Menu Settings Auto Input Sensing Input Labels PICTURE AUDIO CHANNELS SETTINGS USB On MOVE OK ENTER SELECT Set various TV options MENU PREVIOUS EXIT EXIT 3 Press to highlight Reset to Default, select Yes, then press OK/ENTER...

User Manual (English)
Page 48
... is correctly connected to highlight Settings. Cleaning the TV cabinet Clean the cabinet with a soft, lint-free cloth. General remote control Remote control does not work Remote control code cannot be drained. Turn off the light or move your TV. • Replace the batteries. You can select None, Fade to Black, Vertical Wipe, Horizontal Wipe, or Random. 6 Press EXIT to a qualified service technician. The Settings menu opens. NS-32L_37L_42L550A11_09-1120_MAN_V2_English...
... is correctly connected to highlight Settings. Cleaning the TV cabinet Clean the cabinet with a soft, lint-free cloth. General remote control Remote control does not work Remote control code cannot be drained. Turn off the light or move your TV. • Replace the batteries. You can select None, Fade to Black, Vertical Wipe, Horizontal Wipe, or Random. 6 Press EXIT to a qualified service technician. The Settings menu opens. NS-32L_37L_42L550A11_09-1120_MAN_V2_English...
User Manual (English)
Page 49
...the closed caption settings. Using a highly directional antenna may be poor. Specifications Design and specifications are connected securely. • Make sure that you want to control is HDMI CEC-compatible. • Make sure that the HDMI device's power cord is connected correctly. • Make sure that the Button Lock option is selected. Analog standard Digital standard Photo standard Screen size Channel coverage Power source Power consumption Audio power S-Video input (1) AV input (1) NTSC ATSC, 8-VSB, Clear-QAM JPEG format NS-32L550A11: 32" NS-37L550A11: 37" NS-42L550A11...
...the closed caption settings. Using a highly directional antenna may be poor. Specifications Design and specifications are connected securely. • Make sure that you want to control is HDMI CEC-compatible. • Make sure that the HDMI device's power cord is connected correctly. • Make sure that the Button Lock option is selected. Analog standard Digital standard Photo standard Screen size Channel coverage Power source Power consumption Audio power S-Video input (1) AV input (1) NTSC ATSC, 8-VSB, Clear-QAM JPEG format NS-32L550A11: 32" NS-37L550A11: 37" NS-42L550A11...
What is Firmware? (English)
Page 1
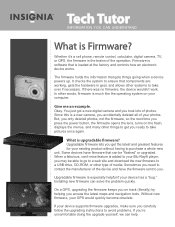
... firmware, so the next time you press the power button, the firmware opens the lens, turns on track (literally) by helping you . Upgradable firmware lets you get you ready to you access the latest maps and navigation tools. Some devices have the firmware sent to take over if necessary. On a GPS, upgrading the firmware keeps you on the flash, displays the menus, and many other type...
... firmware, so the next time you press the power button, the firmware opens the lens, turns on track (literally) by helping you . Upgradable firmware lets you get you ready to you access the latest maps and navigation tools. Some devices have the firmware sent to take over if necessary. On a GPS, upgrading the firmware keeps you on the flash, displays the menus, and many other type...
Quick Setup Guide (English)
Page 1
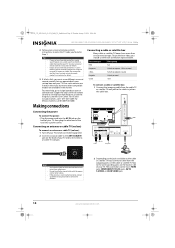
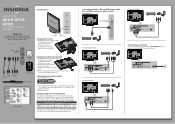
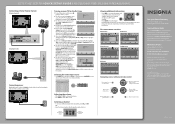
... Component power cable cable cord Remote control holder Power indicator Remote control sensor Installing the stand 1 Carefully place your TV screen face-down on the antenna. Setting up your remote or need a di erent remote control code, visit www.insigniaproducts.com for purchasing this product for common codes. Programming your new Insignia TV, see your universal Insignia remote control to come. Front features 32"/37"/42" LCD TV QUICK SETUP GUIDE NS-32L550A11/NS-37L550A11/ NS-42L550A11 Thank You for the latest remote control code information. TV stand and screws...
... Component power cable cable cord Remote control holder Power indicator Remote control sensor Installing the stand 1 Carefully place your TV screen face-down on the antenna. Setting up your remote or need a di erent remote control code, visit www.insigniaproducts.com for purchasing this product for common codes. Programming your new Insignia TV, see your universal Insignia remote control to come. Front features 32"/37"/42" LCD TV QUICK SETUP GUIDE NS-32L550A11/NS-37L550A11/ NS-42L550A11 Thank You for the latest remote control code information. TV stand and screws...
Quick Setup Guide (English)
Page 2
... your menu Language English 2 The Choose your TV does not need to a different channel in some countries. If you selected Manual for channels. Press to turn o the sound. This comprehensive guide includes everything from other Insignia TV owners. 32"/37"/42" LCD TV I QUICK SETUP GUIDE I NS-32L550A11/NS-37L550A11/NS-42L550A11 Connecting a Home Theater System Using analog audio Using digital audio Connecting power Plug the AC power cord into a power outlet. Select Yes to continue, or select MOVE OK ENTER SELECT Reduces total power consumption MENU PREVIOUS...
... your menu Language English 2 The Choose your TV does not need to a different channel in some countries. If you selected Manual for channels. Press to turn o the sound. This comprehensive guide includes everything from other Insignia TV owners. 32"/37"/42" LCD TV I QUICK SETUP GUIDE I NS-32L550A11/NS-37L550A11/NS-42L550A11 Connecting a Home Theater System Using analog audio Using digital audio Connecting power Plug the AC power cord into a power outlet. Select Yes to continue, or select MOVE OK ENTER SELECT Reduces total power consumption MENU PREVIOUS...


