User Manual (English)
Page 2
... remote control 9 Programming a universal remote control to work with your TV . . . . 9 Making connections 10 Connecting the power cord 10 Connecting an antenna, cable TV, or satellite TV 10 Connecting a standard video device 11 Connecting an S-Video device 11 Connecting a component video device 12 Connecting an HDMI device 12 Connecting a DVI device 13 Connecting a computer using VGA 13 Connecting a computer using HDMI or DVI 14 Turning on your TV for the first time 14 Understanding the basics 15 Turning your TV on and off 15 Selecting the video input mode...
... remote control 9 Programming a universal remote control to work with your TV . . . . 9 Making connections 10 Connecting the power cord 10 Connecting an antenna, cable TV, or satellite TV 10 Connecting a standard video device 11 Connecting an S-Video device 11 Connecting a component video device 12 Connecting an HDMI device 12 Connecting a DVI device 13 Connecting a computer using VGA 13 Connecting a computer using HDMI or DVI 14 Turning on your TV for the first time 14 Understanding the basics 15 Turning your TV on and off 15 Selecting the video input mode...
User Manual (English)
Page 3
... the digital channel strength 22 Using the electronic program guide 22 Setting parental controls 22 Turning parental controls on or off 22 Blocking a video input source 23 Blocking U.S. TV programs 23 Blocking movies 25 Blocking Canadian TV programs 26 Using downloaded rating information 27 Changing the password 27 Using closed captioning 28 Selecting the closed captioning mode 28 Setting closed captioning styles 28 Adjusting time settings 29 Manually setting the current date and time 30 Setting the sleep timer 30 Setting the wake timer 31 Adjusting menu settings 31 Selecting...
... the digital channel strength 22 Using the electronic program guide 22 Setting parental controls 22 Turning parental controls on or off 22 Blocking a video input source 23 Blocking U.S. TV programs 23 Blocking movies 25 Blocking Canadian TV programs 26 Using downloaded rating information 27 Changing the password 27 Using closed captioning 28 Selecting the closed captioning mode 28 Setting closed captioning styles 28 Adjusting time settings 29 Manually setting the current date and time 30 Setting the sleep timer 30 Setting the wake timer 31 Adjusting menu settings 31 Selecting...

User Manual (English)
Page 5
...install the TV where it cannot be heavy. Tune into safety • One size of TV stand does not fit all cords and cables so that they cannot be used as steps, such as suitable for your TV. • Follow all enclosed instructions for proper use your flat panel display... you use of this manual, or otherwise listed by the TV and wall mount manufacturers. • If you have any doubts about your ability to safely wall mount your TV, get help from a professional installer. • Make sure that the wall where you are required for safe wall mount installation. Wall mounting If ...
...install the TV where it cannot be heavy. Tune into safety • One size of TV stand does not fit all cords and cables so that they cannot be used as steps, such as suitable for your TV. • Follow all enclosed instructions for proper use your flat panel display... you use of this manual, or otherwise listed by the TV and wall mount manufacturers. • If you have any doubts about your ability to safely wall mount your TV, get help from a professional installer. • Make sure that the wall where you are required for safe wall mount installation. Wall mounting If ...
User Manual (English)
Page 6
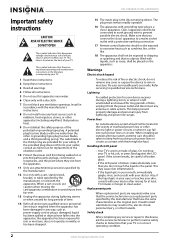
... earthing connection. 17 Remote control batteries should be connected to earth ground wire to prevent possible electric shock. No user-serviceable parts are required, make absolutely sure that have fallen into your safety. This helps prevent property damage and personal injury from the power outlet and disconnect any antenna or cable system. Class I apparatus to a mains socket outlet with a cart, stand, tripod, bracket...
... earthing connection. 17 Remote control batteries should be connected to earth ground wire to prevent possible electric shock. No user-serviceable parts are required, make absolutely sure that have fallen into your safety. This helps prevent property damage and personal injury from the power outlet and disconnect any antenna or cable system. Class I apparatus to a mains socket outlet with a cart, stand, tripod, bracket...

User Manual (English)
Page 7
... If an outside antenna or cable system is brought from an air conditioner. Condensation Moisture will often require extensive work by following conditions: • When the power supply cord or plug is grounded to its new surroundings for about an hour before switching it states that can be connected to the grounding system of the building as close to the...
... If an outside antenna or cable system is brought from an air conditioner. Condensation Moisture will often require extensive work by following conditions: • When the power supply cord or plug is grounded to its new surroundings for about an hour before switching it states that can be connected to the grounding system of the building as close to the...

User Manual (English)
Page 11
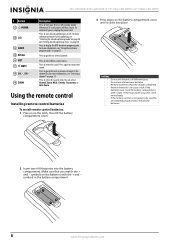
... connecting a computer using HDMI or DVI" on page 13. To disconnect power, unplug the power cord. 11 # Button 1 INPUT 2 TV 3 MTS/SAP 4 FAVORITE 5 INFO 6 7 OK/ENTER 8 MENU 9 VOL +/VOL- 10 Numbers 11 (decimal) 19 Description Press to enter channel numbers and the parental control password. Press to select the video input mode. 19" 720p LED HDTV/ 22" 1080p LED HDTV Back Remote Control 1 2 12 13 3 14 4 5 15 6 1 7 5 8 16 2 17 6 9 18 7 3 4 8 10 9 # Jack 1 (headphone) COMPONENT INPUT 2 (Y, CB/PB, CR/PR, and L/R AUDIO) 3 VGA INPUT 4 VGA AUDIO INPUT 5 ANT/CABLE...
... connecting a computer using HDMI or DVI" on page 13. To disconnect power, unplug the power cord. 11 # Button 1 INPUT 2 TV 3 MTS/SAP 4 FAVORITE 5 INFO 6 7 OK/ENTER 8 MENU 9 VOL +/VOL- 10 Numbers 11 (decimal) 19 Description Press to enter channel numbers and the parental control password. Press to select the video input mode. 19" 720p LED HDTV/ 22" 1080p LED HDTV Back Remote Control 1 2 12 13 3 14 4 5 15 6 1 7 5 8 16 2 17 6 9 18 7 3 4 8 10 9 # Jack 1 (headphone) COMPONENT INPUT 2 (Y, CB/PB, CR/PR, and L/R AUDIO) 3 VGA INPUT 4 VGA AUDIO INPUT 5 ANT/CABLE...
User Manual (English)
Page 12
... select the aspect ratio. Press to restore the sound. Cautions • Do not mix batteries of time, remove the batteries. 2 Insert two AAA batteries into place. Make sure that you match the + and - NS-19E430A10/NS-22E430A10 19" 720p LED HDTV/ 22" 1080p LED HDTV # Button 12 POWER 13 CCD 14 GUIDE 15 RECALL 16 EXIT 17 MUTE 18 CH /CH 19 ZOOM Description Press to turn closed captioning...
... select the aspect ratio. Press to restore the sound. Cautions • Do not mix batteries of time, remove the batteries. 2 Insert two AAA batteries into place. Make sure that you match the + and - NS-19E430A10/NS-22E430A10 19" 720p LED HDTV/ 22" 1080p LED HDTV # Button 12 POWER 13 CCD 14 GUIDE 15 RECALL 16 EXIT 17 MUTE 18 CH /CH 19 ZOOM Description Press to turn closed captioning...
User Manual (English)
Page 14
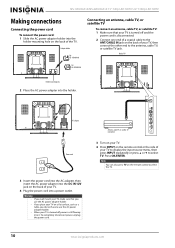
... select TV. Note You can also press TV on the remote control or the side of your TV. 4 Press INPUT on the remote control to the antenna, cable TV, or satellite TV jack. Press OK/ENTER. Antenna, cable TV, or satellite TV connection 3 Turn on your TV. 4 Plug the power cord into the holder. NS-19E430A10/NS-22E430A10 19" 720p LED HDTV/ 22" 1080p LED HDTV Making connections Connecting the power cord To connect the power cord: 1 Slide the AC power...
... select TV. Note You can also press TV on the remote control or the side of your TV. 4 Press INPUT on the remote control to the antenna, cable TV, or satellite TV jack. Press OK/ENTER. Antenna, cable TV, or satellite TV connection 3 Turn on your TV. 4 Plug the power cord into the holder. NS-19E430A10/NS-22E430A10 19" 720p LED HDTV/ 22" 1080p LED HDTV Making connections Connecting the power cord To connect the power cord: 1 Slide the AC power...
User Manual (English)
Page 18
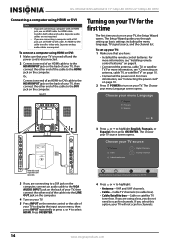
... you have: • Installed the remote control batteries. To set up basic settings including the menu language, TV signal source, and the channel list. For more information, see "Connecting the power cord" on page 10. 2 Press POWER to turn on your TV. 5 Press INPUT on the computer. Choose your TV source Antenna Cable Cable/Satellite box 0 Digital Channels 0 Analog Channels O Audio cable is disconnected. 2 Connect one end of an HDMI-to-DVI cable to the HDMI INPUT jack on the back of...
... you have: • Installed the remote control batteries. To set up basic settings including the menu language, TV signal source, and the channel list. For more information, see "Connecting the power cord" on page 10. 2 Press POWER to turn on your TV. 5 Press INPUT on the computer. Choose your TV source Antenna Cable Cable/Satellite box 0 Digital Channels 0 Analog Channels O Audio cable is disconnected. 2 Connect one end of an HDMI-to-DVI cable to the HDMI INPUT jack on the back of...

User Manual (English)
Page 19
... When your TV, press POWER again. The power indicator turns blue and your TV turns on using an antenna for channels Digital Channels Analog Channels Move OK Select ENTER MENU Previous EXIT Exit Select Antenna if using the remote control. To disconnect power, unplug the power cord. to increase or decrease the volume. • Press MUTE to the next or previous channel in the channel list. Choose your TV source Antenna 0 Cable 0 Cable/Satellite box Scan for standard or HD...
... When your TV, press POWER again. The power indicator turns blue and your TV turns on using an antenna for channels Digital Channels Analog Channels Move OK Select ENTER MENU Previous EXIT Exit Select Antenna if using the remote control. To disconnect power, unplug the power cord. to increase or decrease the volume. • Press MUTE to the next or previous channel in the channel list. Choose your TV source Antenna 0 Cable 0 Cable/Satellite box Scan for standard or HD...

User Manual (English)
Page 20
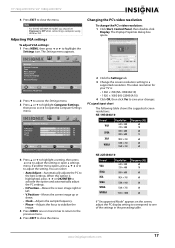
... Auto. EXIT Exit VGA mode Picture Picture Mode Brightness Contrast Color Tint Sharpness Advanced Video Picture Audio Channel Settings Standard 50 50 50 50 50 Move OK Select ENTER MENU Previous Adjust settings to open the Advanced Video menu. NS-19E430A10/NS-22E430A10 19" 720p LED HDTV/ 22" 1080p LED HDTV Adjusting the picture Adjusting the picture To adjust the picture: 1 Press MENU, then press or to the previous menu. 16 www.insigniaproducts.com One of the following menus opens: Picture • Advanced Video Aspect Ratio Color Temperature...
... Auto. EXIT Exit VGA mode Picture Picture Mode Brightness Contrast Color Tint Sharpness Advanced Video Picture Audio Channel Settings Standard 50 50 50 50 50 Move OK Select ENTER MENU Previous Adjust settings to open the Advanced Video menu. NS-19E430A10/NS-22E430A10 19" 720p LED HDTV/ 22" 1080p LED HDTV Adjusting the picture Adjusting the picture To adjust the picture: 1 Press MENU, then press or to the previous menu. 16 www.insigniaproducts.com One of the following menus opens: Picture • Advanced Video Aspect Ratio Color Temperature...
User Manual (English)
Page 21
... Computer Settings, then press or to open a settings menu. If another menu opens, press or to highlight the Settings icon. Settings Parental Controls Time Menu Settings Input Labels Computer Settings Closed Caption Reset to the best settings. You can select: • Auto Adjust-Automatically adjusts the PC to Factory Picture Audio Channel Settings Move OK Select ENTER Set various TV options. 19" 720p LED HDTV/ 22" 1080p LED HDTV 4 Press EXIT to close the menu. 2 Click the Settings tab. 3 Change the screen resolution setting to a supported resolution.
... Computer Settings, then press or to open a settings menu. If another menu opens, press or to highlight the Settings icon. Settings Parental Controls Time Menu Settings Input Labels Computer Settings Closed Caption Reset to the best settings. You can select: • Auto Adjust-Automatically adjusts the PC to Factory Picture Audio Channel Settings Move OK Select ENTER Set various TV options. 19" 720p LED HDTV/ 22" 1080p LED HDTV 4 Press EXIT to close the menu. 2 Click the Settings tab. 3 Change the screen resolution setting to a supported resolution.
User Manual (English)
Page 22
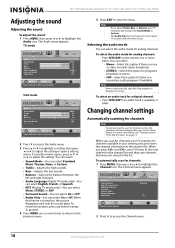
... channel list. EXIT Exit VGA mode Audio Sound Mode Treble Bass Balance Audio Language Surround Sound Audio Only Picture Audio Channel Settings Music 70 75 50 English Off Off Move OK Select ENTER MENU Previous Adjust settings to highlight the Audio icon. Note Mono is automatically selected if the program is available, it plays. Changing channel settings Automatically scanning for channels Note You do not need to a secondary audio program, if available. NS-19E430A10/NS-22E430A10 19" 720p LED HDTV/ 22" 1080p LED HDTV Adjusting the sound Adjusting the sound To adjust the sound...
... channel list. EXIT Exit VGA mode Audio Sound Mode Treble Bass Balance Audio Language Surround Sound Audio Only Picture Audio Channel Settings Music 70 75 50 English Off Off Move OK Select ENTER MENU Previous Adjust settings to highlight the Audio icon. Note Mono is automatically selected if the program is available, it plays. Changing channel settings Automatically scanning for channels Note You do not need to a secondary audio program, if available. NS-19E430A10/NS-22E430A10 19" 720p LED HDTV/ 22" 1080p LED HDTV Adjusting the sound Adjusting the sound To adjust the sound...

User Manual (English)
Page 26
... program guide (EPG) that supplies information such as program lists and program times. Settings Parental Controls Time Menu Settings Input Labels Computer Settings Closed Caption Reset to highlight the Settings icon. Default is 0000. NS-19E430A10/NS-22E430A10 19" 720p LED HDTV/ 22" 1080p LED HDTV Checking the digital channel strength To check the digital channel strength: 1 Press MENU, then press or to enter the password. EXIT Exit 4 Press the number buttons to highlight the Channel icon. The channel strength indicator appears. MENU Previous EXIT Exit 2 Press to access...
... program guide (EPG) that supplies information such as program lists and program times. Settings Parental Controls Time Menu Settings Input Labels Computer Settings Closed Caption Reset to highlight the Settings icon. Default is 0000. NS-19E430A10/NS-22E430A10 19" 720p LED HDTV/ 22" 1080p LED HDTV Checking the digital channel strength To check the digital channel strength: 1 Press MENU, then press or to enter the password. EXIT Exit 4 Press the number buttons to highlight the Channel icon. The channel strength indicator appears. MENU Previous EXIT Exit 2 Press to access...

User Manual (English)
Page 27
..." 1080p LED HDTV 6 Press MENU one or more times to return to the previous menu. 7 Press EXIT to close the menu. The Parental Controls menu opens. A lock icon appears next to Factory Picture Audio Channel Settings Move OK Select ENTER Set various TV options. Settings Parental Controls Time Menu Settings Input Labels Computer Settings Closed Caption Reset to the video input source. Picture Audio Settings • Parental Controls • Input Block Change Password System Lock Input Block US Ratings Canadian Ratings RRT Settings Reset RRT TV AV S-Video Component HDMI VGA...
..." 1080p LED HDTV 6 Press MENU one or more times to return to the previous menu. 7 Press EXIT to close the menu. The Parental Controls menu opens. A lock icon appears next to Factory Picture Audio Channel Settings Move OK Select ENTER Set various TV options. Settings Parental Controls Time Menu Settings Input Labels Computer Settings Closed Caption Reset to the video input source. Picture Audio Settings • Parental Controls • Input Block Change Password System Lock Input Block US Ratings Canadian Ratings RRT Settings Reset RRT TV AV S-Video Component HDMI VGA...

User Manual (English)
Page 28
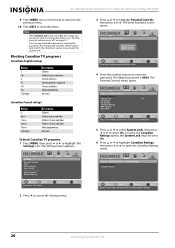
TV programs: 1 Press MENU, then press or to Factory Picture Audio Channel Settings Move OK Select ENTER Set various TV options. The Settings menu appears. A lock icons appears next to the rating you want to block, then press OK/ENTER. Note If the System Lock is 0000. You can view blocked programs by US Ratings. Settings Parental Controls Time Menu Settings Input Labels Computer Settings Closed Caption Reset to highlight the Settings icon. Note To unblock a rating, select the...
TV programs: 1 Press MENU, then press or to Factory Picture Audio Channel Settings Move OK Select ENTER Set various TV options. The Settings menu appears. A lock icons appears next to the rating you want to block, then press OK/ENTER. Note If the System Lock is 0000. You can view blocked programs by US Ratings. Settings Parental Controls Time Menu Settings Input Labels Computer Settings Closed Caption Reset to highlight the Settings icon. Note To unblock a rating, select the...
User Manual (English)
Page 30
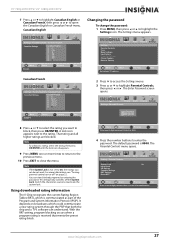
... highlight Parental Controls, then press or . Picture Settings • Parental Controls Audio Channel Settings Enter Password Move OK Select ENTER MENU Previous Enter your 4-digit password. The Parental Controls menu opens. Settings Parental Controls Time Menu Settings Input Labels Computer Settings Closed Caption Reset to On, the ratings you set to Factory Picture Audio Channel Settings Move OK Select ENTER Set various TV options. Default is 0000. Note If the System Lock is not set do not work. Picture Audio Channel Settings Settings • Parental Controls...
... highlight Parental Controls, then press or . Picture Settings • Parental Controls Audio Channel Settings Enter Password Move OK Select ENTER MENU Previous Enter your 4-digit password. The Parental Controls menu opens. Settings Parental Controls Time Menu Settings Input Labels Computer Settings Closed Caption Reset to On, the ratings you set to Factory Picture Audio Channel Settings Move OK Select ENTER Set various TV options. Default is 0000. Note If the System Lock is not set do not work. Picture Audio Channel Settings Settings • Parental Controls...
User Manual (English)
Page 31
... your 4-digit password. Settings Parental Controls Time Menu Settings Input Labels Computer Settings Closed Caption Reset to block, then press OK/ENTER. Note If the System Lock is not set do not work. A lock icon appears next to On, the ratings you want to Factory Picture Audio Channel Settings Move OK Select ENTER Set various TV options. This temporarily switches off " on broadcasts which is received that both the chip and a TV's software can view blocked programs by...
... your 4-digit password. Settings Parental Controls Time Menu Settings Input Labels Computer Settings Closed Caption Reset to block, then press OK/ENTER. Note If the System Lock is not set do not work. A lock icon appears next to On, the ratings you want to Factory Picture Audio Channel Settings Move OK Select ENTER Set various TV options. This temporarily switches off " on broadcasts which is received that both the chip and a TV's software can view blocked programs by...
User Manual (English)
Page 34
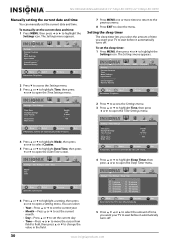
... Parental Controls Time Menu Settings Input Labels Computer Settings Closed Caption Reset to open the Time Settings menu. Picture Settings • Time Settings • Sleep Timer Audio Channel Off 5 minutes 10 minutes 15 minutes 30 minutes 45 minutes 60 minutes 90 minutes 120 minutes 180 minutes 240 minutes Settings 6 Press or to highlight a setting, then press or to Factory Picture Audio Channel Settings Move OK Select ENTER Set various TV options. The Settings menu appears. Settings • Time Settings Mode Time Zone Daylight Savings Time Format Date / Time Sleep...
... Parental Controls Time Menu Settings Input Labels Computer Settings Closed Caption Reset to open the Time Settings menu. Picture Settings • Time Settings • Sleep Timer Audio Channel Off 5 minutes 10 minutes 15 minutes 30 minutes 45 minutes 60 minutes 90 minutes 120 minutes 180 minutes 240 minutes Settings 6 Press or to highlight a setting, then press or to Factory Picture Audio Channel Settings Move OK Select ENTER Set various TV options. The Settings menu appears. Settings • Time Settings Mode Time Zone Daylight Savings Time Format Date / Time Sleep...
User Manual (English)
Page 36
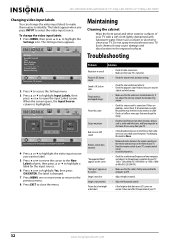
... clear • Adjust the phase control. Troubleshooting Problem Solution No picture or sound • Check all connections are tight, the problem may be a black and white movie. If all cable connections. • Make sure that your TV is turned on the front of your TV. Try changing the mode to Factory Picture Audio Channel Settings Move OK Select ENTER Set various TV options. Image is changed. 7 Press MENU one or more times to return to...
... clear • Adjust the phase control. Troubleshooting Problem Solution No picture or sound • Check all connections are tight, the problem may be a black and white movie. If all cable connections. • Make sure that your TV is turned on the front of your TV. Try changing the mode to Factory Picture Audio Channel Settings Move OK Select ENTER Set various TV options. Image is changed. 7 Press MENU one or more times to return to...


